background image

3

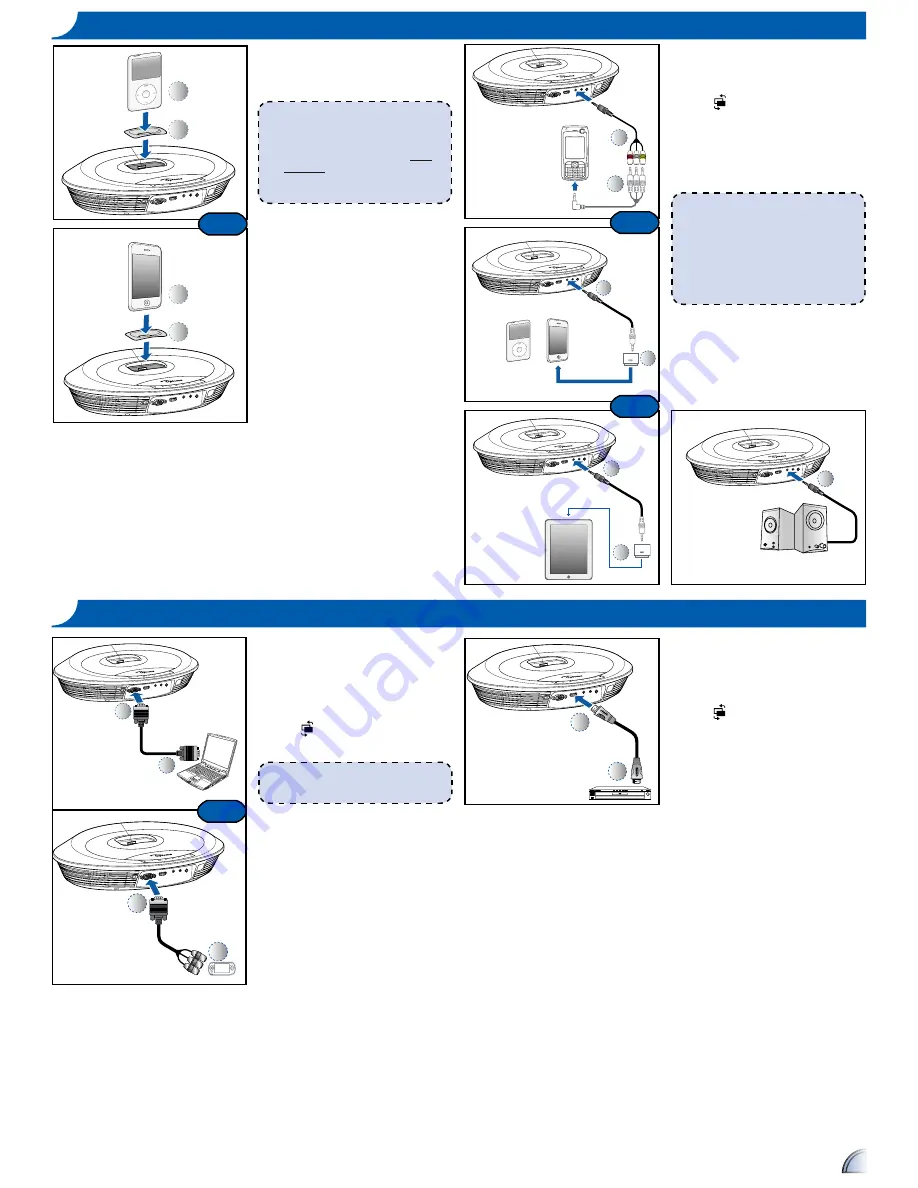
1. Insert the iPod/iPhone universal 

dock adapter into the docking 

station. (

)

2. Turn on your projector. 

3. Plug your iPod/iPhone into the 

docking station. (

)

• 

iPod/iPhone will take priority and 

override all other input signals 

when other sources are being 

displayed.

• 

iPod/iPhone will charge when 

docked and power is connected to 

projector.

4.  Use the controls of the iPod/iPhone 

to select content for playback.  Use 

the remote control or keypad to 

control playback.

C

ONNECT

 I

NPUT


S

OURCE

 - 

i

P

OD

/

i

P

HONE

1

2

3

C

ONNECT

 I

NPUT


S

OURCE

 - V

IDEO


IN

1

2

1

2

or

or

or

1.  Connect the AV input source. 

(

~

)

2.  After powering on the projector, 

press   "Source Button" to switch 

source.

3.  Connect earphones or amplifi ed 

external speakers to the audio out 

connector of the projector. (

)

<Note>

1. All other brand and product names are 

trademarks or registered trademarks of 

their respective companies. 

2. The AV cable for connecting your video 

output device is not supplied as standard. 

Please contact your Optoma reseller 

or the relevant manufacturer's service 

center.

C

ONNECT

 I

NPUT


S

OURCE

 - VGA/C

OMPONENT


IN

VGA

1

2

1

2

or

CONNECT INPUT SOURCE

1.  Connect the VGA/Component 

source device with its respective 

connector.

2.  After powering on the projector, 

press   "Source Button" to switch 

source.

1

2

<Note>

VGA cable, Component cable and HDMI 

cable are optional accessories.

1

2

1

2

or

C

ONNECT

 I

NPUT


S

OURCE

 - HDMI

CONNECT HDMI SOURCE

1.  Connect the HDMI source device to 

the HDMI connector. (

~

)

2.  After powering on the projector, 

press   "Source Button" to switch 

source.

<Note>

1. Several dock adapters are included to 

help ensure the best fi t of your iPod/

iPhone.  Adapters supplied with your 

iPod/iPhone or purchased from www.

apple.com may also be used.  

2. To remove adapter, gently pull up after 

removing iPod/iPhone.

Содержание GT200

Страница 1: ...r a Class B digital device pursuant to Part 15 of the FCC rules These limits are designed to provide reasonable protection against harmful interference in a residential installation This device generates uses and can radiate radio frequency energy and if not installed and used in accordance with the instructions may cause harmful interference to radio communications However there is no guarantee t...

Страница 2: ...essories may vary in each region due to different applications 8 5 6 7b 7a 1 2 1 Connect the power cord to the power adapter 2 Plug the power cord into an electrical outlet 3 Connect the power adapter to the DC Input of the projector 4 During standby mode the projector can be powered on by pressing the power button on the projector or the remote control Connecting an iPod iPhone to the dock will a...

Страница 3: ...oduct names are trademarks or registered trademarks of their respective companies 2 The AV cable for connecting your video output device is not supplied as standard Please contact your Optoma reseller or the relevant manufacturer s service center CONNECT INPUT SOURCE VGA COMPONENT IN VGA 1 2 1 2 or CONNECT INPUT SOURCE 1 Connect the VGA Component source device with its respective connector 2 After...

Страница 4: ...N Button Keypad Remote Control Source Source Switch source Rewind Short press Previous Long press Backward Rewind Fast Forward Short press Next Long press Forward Play Pause Play Pause MP3 or Video MP3 Video Playback Play Pause Enter Enter Enter Enter Down OSD menu on Down OSD menu off Volume down Up OSD menu on Up OSD menu off Volume up Menu Menu Display hide the OSD menu Power Power on off Mute ...

Страница 5: ...ndard Extended Brightness Set the brightness level Contrast Set the contrast level Aspect Ratio Select aspect ratio 4 3 16 9 Auto Music Menu EQ Select equalizer mode Standard Deep Bass Treble Movie Mute Toggle mute option to on off System Menu Languages Set the OSD language Projection Select projection mode Front Desktop Rear Desktop Signal Select signal mode H Position V Position Clock Phase Sign...

Страница 6: ... direction Audio Problems No sound Press the Volume button See page 5 TROUBLESHOOTING COMPATIBILITY MODE HOW TO USE THE MENU SOURCE iPOD iPHONE Timing Table Mode Resolution V Sync Hz VGA 640x480 60 800x600 60 1024x768 60 1280x720 60 1280x800 60 Composite Component HDMI 480i 480P 60 576i 576P 50 720P 50 60 1080i 50 60 Display OSD menu Picture Menu Music Menu System Menu Music Menu EQ Select equaliz...

Отзывы: