background image

18

Adjusting the Accompaniment 
Volume

The MD-1150 lets you adjust the volume
of your accompaniment separately from
the overall volume of the keyboard.

1. Press 

ACCOMP VOLUME

. The cur-

rent accompaniment volume setting
appears on the display next to

Acomp


Vol

.

2. Within 5 seconds, enter a number

from 0 (no sound) to 9 (loudest) on
the keypad. The number appears on
the display as you press the key.

Or, press 

 or 

+

 to select the next

lowest or highest accompaniment
volume setting.

To reset the accompaniment volume to
its default value of 7, press 

 and 

+

 at

the same time.

Note: You can adjust the accompani-
ment volume separately for your key-
board play and prerecorded tune
playback.

Concert Chord

The concert chord method lets begin-
ning keyboard players easily select and
play a chord.

The number of accompaniment keys
you press determines the type of chord
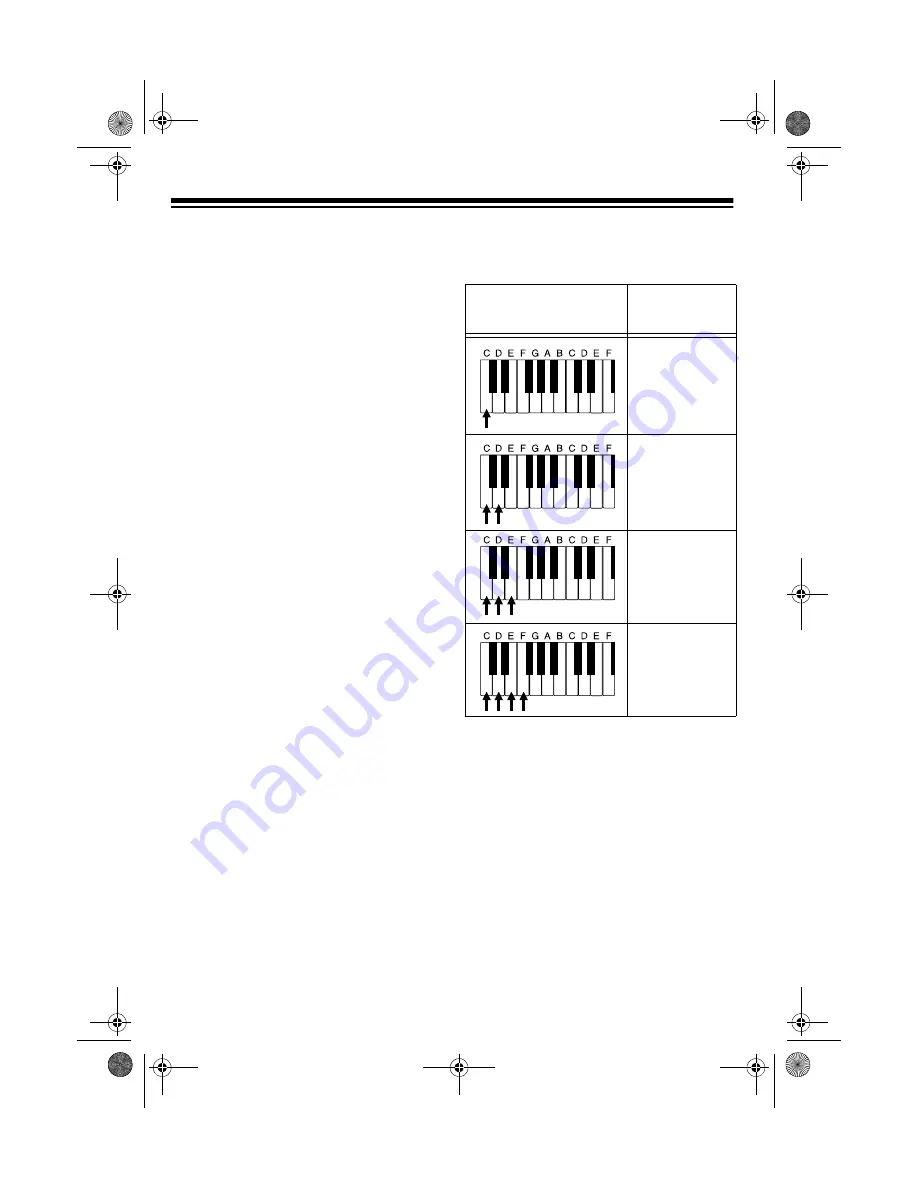
that plays. This chart shows the chord
type that plays when you press one,

two, three, or four accompaniment keys
at the same time.

The lowest note you play determines the
key of the chord. For example, if the low-
est note is C, the keyboard plays a C
chord.

Note: You can press any labeled note(s)
to the right of the lowest note in the
chord to produce a minor, a dominant
seventh, or minor seventh chord.

Number of Keys 

Pressed 

Chord Type

Major

Minor (m)

Dominant 
Seventh (7)

Minor Seventh 
(m7)

42-4039.fm  Page 18  Friday, March 3, 2000  8:55 AM

Содержание 42-4039

Страница 1: ...Cat No 42 4039 OWNER S MANUAL Please read before using this equipment Electronic Keyboard MD 1150 A 42 4039 fm Page 1 Friday March 3 2000 8 55 AM ...

Страница 2: ...nsult your local RadioShack store if the problem still exists You must use shielded interface cables with this equipment WARNING To reduce the risk of fire or shock hazard do not expose this product to rain or moisture CAUTION RISK OF ELEC TRIC SHOCK DO NOT OPEN CAUTION TO REDUCE THE RISK OF ELECTRIC SHOCK DO NOT REMOVE COVER OR BACK NO USER SERVICEABLE PARTS INSIDE REFER SERVICING TO QUAL IFIED P...

Страница 3: ... like an acoustic piano or or gan so you can add emotion to your music Backlit Liquid Crystal Display shows the notes and chords as you play them along with the current tone rhythm and tempo The built in back light makes it easy to read the display even in darkness 16 Note Polyphonic Sound lets you play and hear up to 16 notes at the same time so you can play or create al most any type of music 10...

Страница 4: ...s easily learn the chord s name Two Built In Speakers provide ex cellent sound to help make your music come alive Power Options let you power the keyboard from internal batteries not supplied or standard AC power with an optional adapter so you can make mu sic almost anywhere Notes If the keyboard is left in one place for a very long time its feet could mar your furniture s finish We rec ommend yo...

Страница 5: ...ause Off On 13 Consecutively Playing Back the Tunes 13 Using the Preset Tones 13 Selecting Playing a Preset Tone 14 Keyboard Split Tones 14 Percussion Sounds 15 Layered Tones 15 Using the Preset Auto Rhythms 15 Selecting Playing an Auto Rhythm 16 Using SYNCHRO 17 Using FILL IN 17 Using Auto Accompaniment 17 Adjusting the Accompaniment Volume 18 Concert Chord 18 Standard Fingering 20 Using the Chor...

Страница 6: ...I Data 26 Changing MIDI Settings 27 Notes About the MIDI Implementation Chart 28 Troubleshooting 29 Standard Fingering Chord Charts 31 Note Table 34 MIDI Implementation Chart 35 Care and Maintenance 37 Specifications 38 42 4039 fm Page 6 Friday March 3 2000 8 55 AM ...

Страница 7: ...tteries of the required size and recommended type If you do not plan to use the MD 1150 with batteries for a week or more or if you will be using only AC power remove the batteries Do not mix old and new batteries different types of batteries stan dard alkaline or rechargeable or rechargeable batteries of different capacities 1 Press the tabs on the battery com partment cover then pull up to remov...

Страница 8: ...AC power 1 Insert the adapter s barrel plug into the DC 9V jack on the back of the MD 1150 2 Plug the adapter into a standard AC outlet CONNECTING HEADPHONES To listen to your MD 1150 without dis turbing others you can connect a pair of 1 4 inch 6 35 mm plug stereo head phones not supplied Your local Ra dioShack store sells a wide selection of headphones To connect a pair of headphones insert the ...

Страница 9: ... inch 6 35 mm plug To connect an external amplifier to your keyboard insert the cable s 1 4 inch 6 35 mm plug into the PHONES OUT PUT jack on the back of the keyboard and connect the cable s other end to the amplifier s input jack s such as AUX IN or TAPE IN Your local RadioShack store sells a full line of amplifiers speakers and connec tion cables USING THE MUSIC STAND To easily view sheet music ...

Страница 10: ...wer on To select a different tone see Selecting Playing a Preset Tone on Page 14 To select an auto rhythm see Using the Preset Auto Rhythms on Page 15 To play auto accompaniment see Using Auto Accompaniment on Page 17 3 Repeatedly press MAIN VOLUME or to increase or decrease the volume The current setting appears Notes The keyboard s volume ranges from 0 no sound to 9 maxi mum Each time you turn o...

Страница 11: ...00 SONGS list and enter its two digit number on the keypad Or you can press or to move to the next higher or lower numbered tune Notes Precede a single digit number with a 0 For example to select 08 Killing Me Softly with His Song press 0 8 If you enter an incorrect first digit press SONG to clear your entry then enter the correct digit 3 Press PLAY PAUSE to start playing the tune You can change t...

Страница 12: ...section you want release REW or FF to resume play Hint You can find the scores for most of the prerecorded tunes in the Sheet Music and Play Guide for the Prerecorded Tunes supplied with your MD 1150 Refer to this sheet to count the number of measures to skip To change the tempo press TEMPO or The current tempo setting appears Notes To quickly slow down or speed up the tempo hold down TEMPO or To ...

Страница 13: ...ys contin uously until you press STOP To temporarily stop the tune press PLAY PAUSE again To stop the tune completely press STOP Turning Applause Off On When you turn off either the melody or the accompaniment and then play a tune applause automatically sounds at the end of the tune To turn off the ap plause hold down STOP and press ei ther ON OFF LEFT or ON OFF RIGHT Apls Off appears To turn the ...

Страница 14: ... time you turn the key board on it automatically selects the tone PIANO 1 No 00 2 To play a different tone choose a preset tone from the 100 TONES list and enter its two digit number on the keypad As you press the keys the selected digits appear Or you can use or to move to the next higher or lower numbered tone Notes Precede a single digit number with a 0 For example to select ELEC PIANO 1 No 04 ...

Страница 15: ...to rhythms that provide a steady beat for your music The name and two digit number of each preset auto rhythm is listed on the keyboard s top panel You can play a preset auto rhythm on the keyboard in any of the following ways select and play a rhythm see Selecting Playing an Auto Rhythm synchronize the start of a rhythm with your music see Using SYN CHRO on Page 17 briefly vary the pattern of a r...

Страница 16: ...rst digit of the rhythm press RHYTHM to clear the entry and return to the last selected auto rhythm 3 Press START STOP to start the selected auto rhythm 4 Adjust MAIN VOLUME and ACCOMP VOLUME to the desired level see Adjusting the Accompaniment Vol ume on Page 18 5 To change the auto rhythm speed press TEMPO or The current tempo setting appears Notes You can adjust the tempo to play an auto rhythm...

Страница 17: ...he original rhythm automatically resumes at the end of the current measure USING AUTO ACCOMPANIMENT The 18 keys with note labels above them on the left side of the keyboard are called accompaniment keys You can set the keyboard to play two dif ferent types of auto accompaniment us ing the accompaniment keys Concert Chord lets you play chords on the accompaniment keys using chord formations of from...

Страница 18: ...mpani ment volume separately for your key board play and prerecorded tune playback Concert Chord The concert chord method lets begin ning keyboard players easily select and play a chord The number of accompaniment keys you press determines the type of chord that plays This chart shows the chord type that plays when you press one two three or four accompaniment keys at the same time The lowest note...

Страница 19: ...LL IN 4 Begin the accompaniment at the desired interval by pressing the desired accompaniment key s To play a melody along with the accompaniment press any key s to the right of the accompaniment keys 5 Adjust the tempo MAIN VOLUME and ACCOMP VOLUME to the desired levels 6 To change chords without interrupt ing the rhythm simply press the auto accompaniment key s required to form the new chord 7 T...

Страница 20: ...ceding chart to produce a 7 m7 M7 mM7 9 or m9 chord This chart shows only one possible fingering position for each chord It is possi ble to play a chord using several different positions For example the following three fingering positions produce the same C chord Major M Minor m Augmented aug Suspended 4th sus4 Dominant 7th 7 Minor 7th m7 Major 7th M7 Minor Half Diminished m7 5 Major Half Diminish...

Страница 21: ...desired levels 6 To change chords without interrupt ing the rhythm simply press the auto accompaniment keys required to form the new chord 7 To stop auto accompaniment and the auto rhythm press START STOP USING THE CHORD BOOK You can use your keyboard s chord book display feature to see which keys to press and which fingers to use to form a chord You can also display the name of a chord you play F...

Страница 22: ...dash appears on the display Since the keyboard automatically changes some chords so you can play them on the accompaniment keyboard the keyboard might dis play some chords in inverted form 6 Using the center hands as a guide play the displayed chord on the key board 7 When you have finished press CHORD BOOK to turn off chord book To display the name of the chord you play press CHORD BOOK then play...

Страница 23: ... or to lower or raise the key Each time you press or the number on the display decreases or increases by 1 semitone As you raise the key 1 is C 2 is D and so on As you lower the key 1 is B 2 is A 3 is A and so on Notes You can also use the number key pad to quickly raise the key Simply press the semitone change value 1 to 5 The keyboard automatically resets the key to the default value of 0 middle...

Страница 24: ...the default value of 00 cents each time you turn off the keyboard or play the pre recorded tunes USING TOUCH RESPONSE The MD 1150 has a touch response fea ture that lets you adjust the volume of your music s tone based on how hard you strike the key s so you can add emotion to your music If you want to turn off this feature press TOUCH RESPONSE so its indicator dis appears To turn on touch respons...

Страница 25: ... MIDI data sent by the other MIDI instrument s MIDI THRU lets you connect network additional MIDI instruments and sends along to other MIDI devices a copy of all data it receives through its MIDI IN ter minal Your MD 1150 has MIDI OUT and MIDI IN terminals The cable that connects MIDI devices does not actually carry sound between them like a speaker wire carries sound from a receiver to a speaker ...

Страница 26: ... the MIDI function see the MIDI Imple mentation Chart on Page 34 Note On Off specifies which keys are pressed Note On or released Note Off Also includes how loud a note is played as a value from 0 to 127 Notes The pitch of a note depends on the tone that is being used as shown in the Note Table on Page 33 If the keyboard receives a request to play notes outside of its range higher or lower it auto...

Страница 27: ...il Keybd Ch appears 2 Within 5 seconds press or to select the channel you want Tone Map sets the range of program change values received recognized by this keyboard 1 Repeatedly press TRANSPOSE TUNE MIDI until TonMap N appears 2 Within 5 seconds press or to select the setting you want N Normal Tone Map This setting allows receipt of 0 to 99 program changes Each program change corresponds to one of...

Страница 28: ...dle C and the highest is three octaves above mid dle C your keyboard can send note numbers between 36 and 96 and re ceive note numbers from 0 through 127 The keyboard automatically assigns any key outside its range to a key within its key range Velocity This number shows how fast the key was pressed or how loud the note should sound Pianissimo 1 is the lowest velocity Fortissimo 127 is the loudest...

Страница 29: ...nt keys while POWER MODE is set to FINGERED Set POWER MODE to NORMAL or CONCERT CHORD Press 3 or 4 keys to form a chord while POWER MODE is set to FINGERED No sound when connected to an external amplifier Volume is turned down Repeatedly press MAIN VOLUME to increase the volume Defective connection cord Replace the connection cord The key or tuning does not match when playing along with another MI...

Страница 30: ...MIDI device by the keyboard do not sound correct The other device s MIDI THRU function is turned on Turn off the MIDI THRU function on the other device Trouble Possible Cause Remedy 42 4039 fm Page 30 Friday March 3 2000 8 55 AM ...

Страница 31: ...31 STANDARD FINGERING CHORD CHARTS These tables show the left hand fingering for the chords you play most often 42 4039 fm Page 31 Friday March 3 2000 8 55 AM ...

Страница 32: ... asterisk in the fingered mode on this keyboard This illustration shows which fingers on your left hand match the numbers on the chord charts The illustra tion also appears on your keyboard s display 42 4039 fm Page 32 Friday March 3 2000 8 55 AM ...

Страница 33: ...33 NOTE TABLE Legend 1 Tone number 2 Maximum polyphony 3 Range type see Note Table on Page 33 4 Corresponding general MIDI number see MIDI Data on Page 26 42 4039 fm Page 33 Friday March 3 2000 8 55 AM ...

Страница 34: ...X O X X X Modulation Data entry Volume Pan Expression Hold1 RPN LSB MSB All sound off Reset all controller Program Change True O 0 99 O 0 127 3 3 Depends on GM Tone Map setting When set to N only the 100 normal list tones from 0 to 99 are received When set to G tone numbers 0 to 127 are received Those that most closely match the 100 prerecorded tones of this keyboard are mapped to the applicable t...

Страница 35: ...35 Mode 1 OMNI ON POLY Mode 3 OMNI OFF POLY O Yes Mode 2 OMNI ON MONO Mode 4 OMNI OFF MONO X No 42 4039 fm Page 35 Friday March 3 2000 8 55 AM ...

Страница 36: ... and dirt which can cause prema ture wear of parts Handle the keyboard gently and carefully Dropping it can damage cir cuit boards and cases and can cause the keyboard to work improperly Use only fresh batteries of the required size and recommended type Batteries can leak chemicals that damage your keyboard s electronic parts Wipe the keyboard with a damp cloth occasionally to keep it looking new ...

Страница 37: ...ly DC 9V Jack PHONES OUTPUT Jack Output Impedance 50 Ohms Output Voltage 3 5V RMS MAX MIDI IN OUT SUSTAIN 1 4 Inch Standard Jack Power Sources DC 6 D batteries AC 120V 60Hz with AC adapter Power Consumption 7 7 W Dimensions HWD 53 8 377 8 1413 16 Inches 143 961 376 mm Weight Without Batteries 12 lb 7 oz 5 7 kg Included Accessories Sheet Music Stand Sheet Music and Play Guide for the Prerecorded Tu...

Страница 38: ...38 NOTES 42 4039 fm Page 38 Friday March 3 2000 8 55 AM ...

Страница 39: ...39 42 4039 fm Page 39 Friday March 3 2000 8 55 AM ...

Страница 40: ...efect during the warranty period take the product and the RadioShack sales receipt as proof of purchase date to any RadioShack store RadioShack will at its option un less otherwise provided by law a correct the defect by product repair without charge for parts and labor b replace the product with one of the same or similar design or c refund the purchase price All replaced parts and products and p...

Отзывы: