


6
21
22
24
23
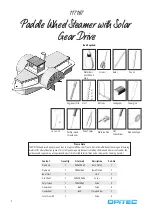
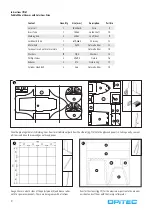
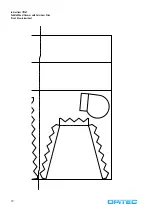
Instructions 117.167
Paddle Wheel Steamer with Solar Gear Drive
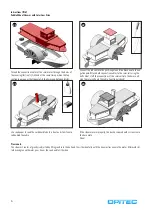
Thread the connection cables of the solar motor through the bores of
the covering lids/roofs (C+D) and at the same time position the top
section in a manner that the axle fits the 5mm gap between B1+B2.
Connect the red cable to the positive pole and the black one to the ne-
gative pole. Attach both connection cables to the solar cell using the
bolts. Next, stuff the connections of the solar cell into the bores and
glue the solar cell onto the cabin. Functional check!
Use sandpaper to sand the cardboard tube to a slant and stick it cente-
red behind the cabin
If the steamer works properly, the deck is screwed with 2 screws onto
the base plate.
Done!
Please note:
The steamer’s center of gravity is adjusted by filling sand into the hull and trim it horizontally until the steamer lies even in the water. Afterwards, di-
lute wood glue with water, pour it over the sand and let it harden.
Содержание 117167
Страница 7: ...7 E3 E1 E4 E2 Trennlinie Instructions 117 167 Paddle Wheel Steamer with Solar Gear Drive Plan 1 Base 1...
Страница 8: ...8...
Страница 10: ...10...
Страница 11: ...11 Instructions 117 167 Paddle Wheel Steamer with Solar Gear Drive Plan 3 Base 1 D3 D4 A Trennlinie...
Страница 12: ...12...
Страница 13: ...13 6 5 1 2 Instructions 117 167 Paddle Wheel Steamer with Solar Gear Drive Plan 1 Base 2 D1 B1 C D...
Страница 14: ...14...
Страница 15: ...15 5 1 2 2 2 Instructions 117 167 Paddle Wheel Steamer with Solar Gear Drive Plan 2 Base 2 B2 D2 C3 C4 C2 C1...
Страница 16: ...16...
Страница 17: ...17 Instructions 117 167 Paddle Wheel Steamer with Solar Gear Drive Plan 1 Aluminiumsheet...
Страница 18: ...18...
Страница 19: ...19 Instructions 117 167 Paddle Wheel Steamer with Solar Gear Drive Plan 2 Aluminiumsheet...


