OpenEye CM-610 Скачать руководство пользователя страница 6

Configuration B Instructions


Caution:

 Running the installation disc will overwrite all settings on 

your OpenEye recorder. If you have already changed settings on your 
recorder and want to save your existing configuration, you need to 
use the 

CONFIGURE C

 section of this document.

To configure a new OpenEye recorder and camera kit with additional connections.
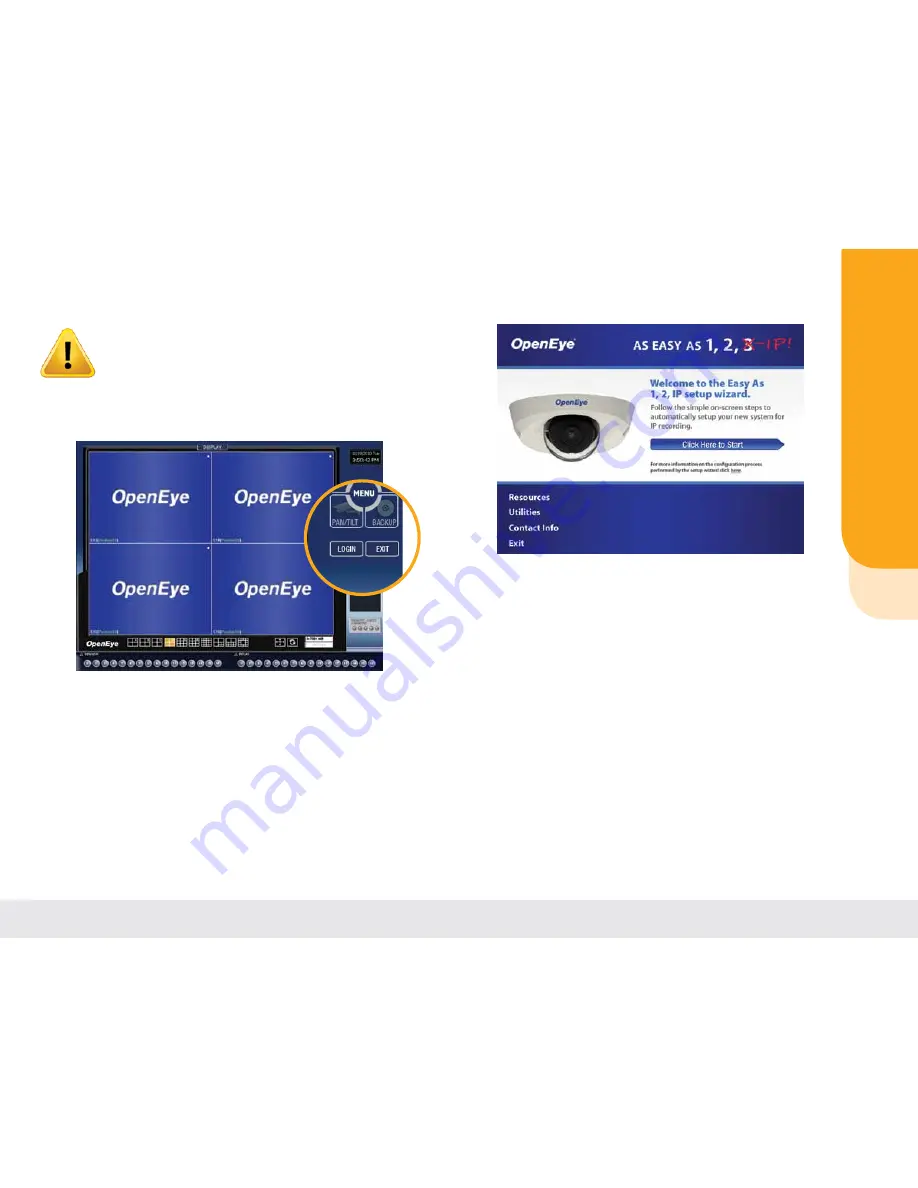
 

1. 

On the main screen of your OpenEye recorder, click 

Exit

2. 

Select 

Restart in Windows Mode

 to go to the Microsoft

®

 Windows

® 

desktop. 
 

Note:

 If you have not already done so, log in as an authorized user.

3. 

 Insert the software disc included with the IP camera kit. The disc should auto-
run. If it does not, open Windows Explorer, browse to the CD Drive and then 
double-click 

OpenEye.exe

4. 

Click 

Click Here to Start

 on the CD menu to start the setup 

process

5. 

 Follow the on-screen instructions to select your camera kit and 
install the cameras on your recorder. When the setup wizard 
asks 

Select your Installation Type

, select 

Type B

 then 

click 

Next


Note:

 You will be prompted to enter your custom network 

settings. If you do not know what settings should be entered, 
refer to the 

Determine Network Settings

 section. 

Determine Network Settings

In order to connect to the OpenEye cameras, you must configure a static IP 
address, subnet, and gateway on your OpenEye recorder. This means that the 
network addresses you enter must be permanent and must not dynamically 
change over time. This section will help you identify what network addresses you 
should use to configure your recorder. Because other devices on the network will 
determine what static addresses you can or cannot use, it is necessary to identify 
this information.

There are several ways to determine your network settings. 

• 

Consult your network administrator.

• 

Consult your Internet Service Provider.

• 

Consult the manufacturer of your router.

• 

Follow the steps outlined in the next few pages.

Need help? Contact our Virtual Support Hotline

 Phone: 

888-542-1103

Email: 

[email protected] 

FAQ: 

faq.openeye.net

 • 

Web: 

www.openeye.net/12ip

page 10

Need help? Contact our Virtual Support Hotline

 Phone: 

888-542-1103

Email: 

[email protected] 

FAQ: 

faq.openeye.net

 • 

Web: 

www.openeye.net/12ip

page 11

CONFIGURE 

page 10

b

Содержание CM-610

Страница 1: ...1 2 3 QUICK START GUIDE AS EASY AS FREE VIRTUAL INSTALLATION SERVICE...

Страница 2: ...new to IP video it may all seem like a bit too much to handle but don t be alarmed OpenEye is here to make it easy for you OpenEye has developed a series of IP camera kits that walk you through the i...

Страница 3: ...ra kit and a new OpenEye HVR or NVR If this installation type applies to you then follow the steps in the CONNECT section on page 6 and the CONFIGURE A section on page 8 Installation B New OpenEye rec...

Страница 4: ...t on the included switch Connect recorder to port 1 4 camera kit or port 25 8 camera kit on the included switch If using Installation B or C connect switch to network using any available port 6 24 dep...

Страница 5: ...open Windows Explorer browse to the CD Drive and then double click OpenEye exe 4 Click Click Here to Start on the CD menu to start the setup process 5 Follow the on screen instructions to select your...

Страница 6: ...e You will be prompted to enter your custom network settings If you do not know what settings should be entered refer to the Determine Network Settings section Determine Network Settings In order to c...

Страница 7: ...ete the network configuration on your OpenEye recorder IP Address With the information obtained in the previous step IP address Subnet Mask Gateway you now need to choose an IP address that uses the s...

Страница 8: ...use and then click Apply Note Enter the Gateway last The Gateway must match the scheme of the IP address and subnet mask 9 After approximately one minute click Device Search again and your camera will...

Страница 9: ...on port on the camera you also need to change the Port here as well The camera s default login is User Admin Password 1234 Device Setup 1 Click the Channel Setup tab and then click Drag and Drop Camer...

Страница 10: ...al integrity cable style used for computer networks and is also used to carry other signals such as telephony and video C at5e Category 5e cable or Category 5 Enhanced is network cable made of four pa...

Страница 11: ...tware portals through which all network communication must travel There are 65 535 ports which ensure that any number of devices requiring unique ports should be able to work together on the same netw...

Страница 12: ...support openeye net FAQ faq openeye net Web www openeye net 12ip page 23 Need help Contact our Virtual Support Hotline Phone 888 542 1103 Email support openeye net FAQ faq openeye net Web www openeye...

Страница 13: ...ined in this document is subject to change without prior notice OpenEye does its best to provide accurate information but cannot be held responsible for typos or mistakes A12931 23221 E Knox Ave Liber...

Отзывы: