background image

M e d   P C  

M e d P C - 5 5 0 0


20 


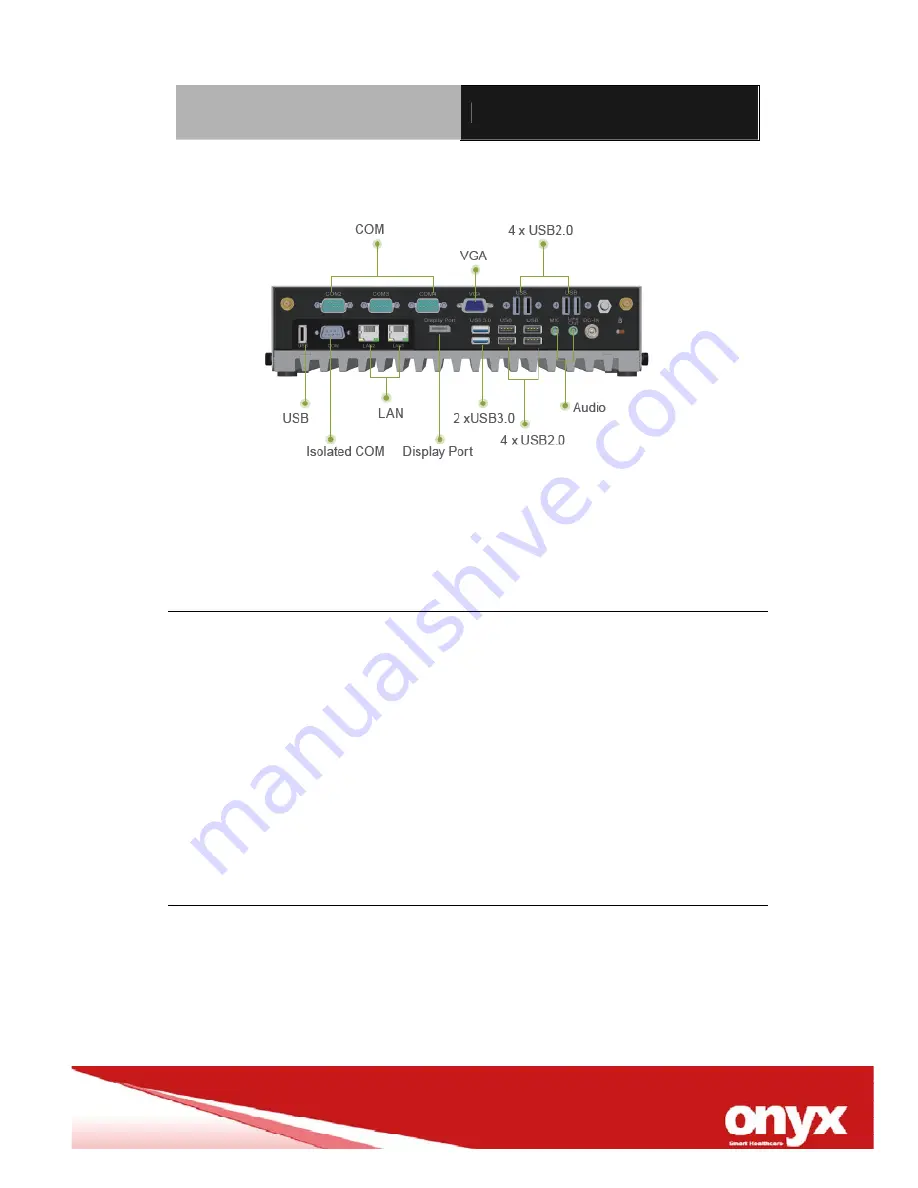
When you turn the 5500 around and look at its rear side, as shown 

in Picture 2-2.   


Picture 2.2: Rear view of the Zeus Series


2.3 Turn On and Boot up into Windows OS       

This section is for Windows operating system only. If you are 
installing a different operating system, please contact your vendor 
for installation details. 
 
Your 5500 will begin loading Windows OS once you push the power 
button to turn power on. After less than one minute, Windows 
desktop screen will appear. 
 
You can select the programs from the start menu in the left-down 
corner of the desktop screen. 

2.4 Turn off 

Turning off ZEUS properly is important for system reliability. There 
are two ways to turn off the system. 
 
1.  On the start menu, click “shut down” and select “OK” 
2.  Push the power button and then the system will shut down 

Содержание MedPC-5500

Страница 1: ... 0 0 1 MedPC 5500 Intel dual core i7 Processor Multiple display output support System chassis of easy clean design no airhole Isolated I O interface COM USB LAN CE FCC Class B Passed 18 IEC 60601 1 1 1 2005 EN60601 1 1 206 ...

Страница 2: ... this manual is intended to be accurate and reliable However the original manufacturer assumes no responsibility for its use nor for any infringements upon the rights of third parties which may result from its use The material in this document is for product information only and is subject to change without notice While reasonable efforts have been made in the preparation of this document to assur...

Страница 3: ...emark of Microsoft Corporation RTL is a trademark of Realtek Semi Conductor Co Ltd C T is a trademark of Chips and Technologies Inc UMC is a trademark of United Microelectronics Corporation ITE is a trademark of Integrated Technology Express Inc SiS is a trademark of Silicon Integrated Systems Corp VIA is a trademark of VIA Technology Inc All other product names or trademarks are properties of the...

Страница 4: ...sert the MedPC 5500 CD ROM into external CD ROM drive which Contains User s Manual in PDF format Drivers and Utilities If any of these items are missing or damaged you should contact your distributor or sales representative immediately Headquarters Onyx Healthcare Inc 2F No 135 Lane 235 Pao Chiao Rd Hsin Tien City Taipei 231 Taiwan R O C TEL 886 2 8919 2188 FAX 886 2 8919 1699 E mail sales onyx he...

Страница 5: ...96 1811 Email usasales onyx healthcare com Onyx Healthcare EUROPE B V Ekkersrijt 4002 5692 DA Son The Netherlands Tel 31 0 499 462020 Fax 31 0 499 462010 Email eusales onyx healthcare com Onyx Healthcare Technology GmbH An der Trift65d 63303 Dreieich Germany TEL 49 0 61033 7479 00 Fax 49 0 61033 7479 49 Email eusales onyx healthcare com ...

Страница 6: ...o 5 Xing Han Street Suzhou Industrial Park Jiang Su Province China Tel 86 512 67625700 Fax 86 512 67617337 Email cnsales onyx healthcare com Onyx Healthcare Singapore PTE LTD 57 Genting Lane 07 00 Singapore 349564 Tel 65 67498749 Fax 65 67461595 Email sgsales onyx healthcare com ...

Страница 7: ...ping it or letting it fall could cause damage 7 The openings on the enclosure are for air convection Protect the equipment from overheating DO NOT COVER THE OPENINGS 8 Make sure the voltage of the power source is correct before connecting the equipment to the power outlet 9 WARNING To avoid risk of electric shock this equipment must only be connected to a supply mains with protective earth 10 Posi...

Страница 8: ...quipment c The equipment has been exposed to moisture d The equipment does not work well or you cannot get it to work according to the users manual e The equipment has been dropped and damaged f The equipment has obvious signs of breakage 17 DO NOT LEAVE THIS EQUIPMENT IN AN UNCONTROLLED ENVIRONMENT WHERE THE STORAGE TEMPERATURE IS BELOW 20 C 4 F OR ABOVE 60 C 140 F IT MAY DAMAGE THE EQUIPMENT 18 ...

Страница 9: ...ecommended by the manufacturer Classification 1 Degree of production against electric shock not classified 2 Degree of protection against the ingress of water IPX0 3 Mode of operation Continuous 4 Type of protection against electric shock Class I equipment 5 No Applied Part No AP APG FCC This device complies with Part 18 FCC Rules Operation is subject to the following two conditions 1 this device ...

Страница 10: ...Safety Symbol Description The following safety symbols are the further explanations for your reference Medical equipment with respect to electric shock fire and mechanical hazards only in accordance with ANSI AAMI ES 60601 1 2005 AND CAN CSA C22 2 No 60601 1 08 Attention consult ACCOMPANYING DOCUMENTS Ground wire Protective Ground wire ...

Страница 11: ...cautions 19 2 2 A Quick Tour of the MEDPC 5500 19 2 3 Turn On and Boot up into Windows 20 2 4 Turn off 20 2 5 1 Overview 21 2 5 2 Memory Configurations 21 2 5 3 Installing a SO DIMM 22 2 5 4 Removing a SO DIMM 24 2 6 Mini PCI Express 24 2 7 Clear CMOS9CLTRC1 25 2 8 Rear Panel Connectors 27 2 9 Mount kit 29 Chapter 3 BIOS Setup 3 1 BIOS Setup Program 31 3 2 Legend Box 32 3 3 List Box 33 ...

Страница 12: ...Med PC M e d P C 5 5 0 0 12 3 4 Sub menu 33 Chapter 4 Driver Installation 4 1 Installation 36 Appendix A Miscellanea A 1 General Cleaning Tips 39 A 2 Cleaning Tools 40 A 3 Scrap Computer Recycling 42 ...

Страница 13: ...Med PC M e d P C 5 5 0 0 13 General Information Chapter ...

Страница 14: ...wo DDRIII SODIMM up to 8GB The fanless solution integrated multimedia functions and extensive expansion options make them the perfect platform upon which to build comprehensive lifestyle computing applications The MedPC 5500 includes all the features of a powerful computer into a slim and attractive chassis Combining the MEDPC 5500 into your system can achieve both cost saving and efficient improv...

Страница 15: ...05 EN60601 1 1 2006 1 3 Specification Hardware Specifications CPU Onboard Intel CoreTM i7 2655LE 2 2H Processor System memory DDR3 1333 4GB Disk Drive Space 2 5 SATA SSD driver bay x 1 optional Function Key Power On Chipest Intel HD Graphics 3000 Video VGA x 1 Display Port 1 Audio Mic in x 1 Line out x 1 phone jacks Serial Port Isolated RS 232 422 485 x1 RS 232 x 13 Ethernet Isolated GbE LAN x 2 b...

Страница 16: ...0V AC 2 0 1 0A 50 60 Hz Output Voltage 24V 4 6A 110W max MTBF 100 000 hrs operation at 25 C Environmental Specifications Operating Temperature 0 C to 30 C 32 F 86 F 10 C 40 C 32 F 104 F Storage Temperature 20 C to 60 C 4 F 140 F Storage Humidity 5 95 40 C Non Condensing Pressure 850 1000hPa Operating 700 1060hPa Transport Storage EMI Safety CE FCC Class B Passed 18 醫療類 cULus Mark UL VTC Report RMF...

Страница 17: ...Med PC M e d P C 5 5 0 0 17 1 4 Dimension ...

Страница 18: ...Med PC M e d P C 5 5 0 0 18 Hardware Introduction Chapter ...

Страница 19: ... sensitive to static electric charges Use a grounding wrist strap at all times Place all electronic components on a static dissipative surface or in a static shielded bag when they are not in the chassis 2 2 A Quick Tour of the MEDPC 5500 Before you start to set up the MEDPC 5500 take a moment to become familiar with the locations and purposes of the controls drives connections and ports which are...

Страница 20: ...your vendor for installation details Your 5500 will begin loading Windows OS once you push the power button to turn power on After less than one minute Windows desktop screen will appear You can select the programs from the start menu in the left down corner of the desktop screen 2 4 Turn off Turning off ZEUS properly is important for system reliability There are two ways to turn off the system 1 ...

Страница 21: ...oard comes with four 204 pin Double Data Rate 3 DDR3 SO Dual Inline Memory Modules DIMM sockets DDR3 SODIMMs are notched differently to prevent installation on a DDR2 SODIMM socket The following figure illustrates the location of the sockets 204 Pin DDR3 SODIMM sockets ...

Страница 22: ...ect less than 3GB of total memory because of address space allocation for other critical functions This limitation applies to Windows XP 32 bit version operating system since it does not support PAE Physical Address Extension mode IF you install Windows XP 32 bit version operating system we recommend that you install less than 3GB of total memory 2 5 3 Installing a SO DIMM 1 Unlock a DIMM socket b...

Страница 23: ...M matches the break on the socket simulative sample 3 Firmly insert the SO DIMM into the socket until the retaining clips snap back in place and the SO DIMM is properly seated simulative sample The DDR3 SO DIMM sockets do not support DDR SO DIMMs DO NOT install DDR2 SO DIMMs to the DDR3 SO DIMM ...

Страница 24: ...ause severe damage to both the motherboard and the components 2 5 4 Removing a SO DIMM 1 Simultaneously press the retaining clips downward to unlock the DIMM 2 Remove the DIMM from the socket simulative sample 2 6 Mini PCI Express This motherboard supports two MINI PCI Express The following figure shows a Decode card installed on the MINI PCI Express slot ...

Страница 25: ...asswords To erase the RTC RAM 1 Turn OFF the computer and unplug the power cord 2 Remove the onboard battery 3 Move the jumper cap from pins 2 3 default to pins 1 2 Keep the cap on pins 1 2 for about 5 10 seconds then move the cap back to pins 2 3 4 Re install the battery 5 Plug the power cord and turn ON the computer 6 Hold down the Del key during the boot process and enter BIOS setup to re enter...

Страница 26: ... the RTC when the system hangs due to overclocking For system failure due to overclocking use the C P R CPU Parameter Recall feature Shut down and reboot the system so the BIOS can automatically reset parameter settings to default values Clear Normal Def ...

Страница 27: ...al connectors on desktops notebooks graphics cards monitors 5 USB 2 0 ports These 4 pin Universal Serial Bus USB ports are available for connecting USB 2 0 devices 6 USB 3 0 ports These 9 Universal Serial Bus USB ports are available for connecting USB 3 0 devices 6 LAN RJ 45 port These port allows Gigabit connection to a Local Area Network LAN through a network hub Refer to the table below for the...

Страница 28: ...ts a tape CD DVD player or other audio sources 10 Line Out port lime This port connects a headphone or a speaker In 4 channel 6 channel and 8 channel configuration the function of this port becomes Front Speaker Out 11 Microphone port pink This port connects a microphone ...

Страница 29: ...Med PC M e d P C 5 5 0 0 29 2 9 Mount kit The mount kit screw hole and screw type as below ...

Страница 30: ...Med PC M e d P C 5 5 0 0 30 BIOS Setup Chapter ...

Страница 31: ...puter in the future For example you can enable the security password feature or change the power management settings This requires you to reconfigure your system using the BIOS Setup program so that the computer can recognize these changes and record them in the CMOS RAM of the firmware hub The firmware hub on the motherboard stores the Setup utility When you start up the computer the system provi...

Страница 32: ...S settings for this motherboard apply for most conditions to ensure optimum performance If the system becomes unstable after changing any BIOS settings load the default settings to ensure system compatibility and stability Select the Load Optimized Defaults from the BIOS menu screen The BIOS setup screens shown in this section are for reference purposes only and may not exactly match what you see ...

Страница 33: ... items in the menu you selected 3 4 Sub menu Note that a right pointer symbol appears to the left of certain fields This pointer indicates that you can display a sub menu from this field A sub menu contains additional options for a field parameter To display a sub menu move the highlight to the field and press Enter The sub menu appears Use the legend keys to enter values and move from field to fi...

Страница 34: ...Med PC M e d P C 5 5 0 0 34 Driver Installation Chapter ...

Страница 35: ...erating Systems Please follow the sequence below to install the drivers Step 1 Install INF Driver Step 2 Install VGA Driver Step 3 Install LAN Driver Step 4 Install Audio Driver Step 5 USB 3 0 Driver Step6 ME Driver Step 7 Serial Port Driver optional Please read instructions below for further detailed installations ...

Страница 36: ... The system will help you install the driver automatically Step 3 Install Intel LAN Driver 1 Click on the LAN driver folder and select the Winx32 folder and double click on exe for x86 32bit OS if the OS is Windows 64bit OS please select the Winx64 folder and double click on exe file 2 Follow the instructions that the window shows 3 The system will help you install the driver automatically Step 4 ...

Страница 37: ...d select the Intel_Management_Engine_Interface_v7 0 0 1144 folder and double click on the setup exe 2 Follow the instructions that the window shows 3 The system will help you install the driver automatically Step 7 Install Serial Port Driver 1 Click on the Serial Port Driver folder and and select the WIN7_32 WIN7_64 WINXP_32 folder and double click on the setup exe 2 Follow the instructions that t...

Страница 38: ...Med PC M e d P C 5 5 0 0 38 Miscellanea Appendix ...

Страница 39: ...ner to absorb the dirt on the floor 3 Turn the system off before you start to clean up the component or computer 4 Never drop the components inside the computer or get circuit board damp or wet 5 Be cautious of all kinds of cleaning solvents or chemicals when you use it for the sake of cleaning Some individuals may be allergic to the ingredients 6 Try not to put any food drink or cigarette around ...

Страница 40: ...eaned using a product designed for cleaning that component if this is the case it will be mentioned in the cleaning tips Cloth A piece of cloth is the best tool to use when rubbing up a component Although paper towels or tissues can be used on most hardware as well we still recommend you to rub it with a piece of cloth Water or rubbing alcohol You may moisten a piece of cloth a bit with some water...

Страница 41: ... to reach areas in your keyboard mouse and other locations Foam swabs Whenever possible it is better to use lint free swabs such as foam swabs Please follow the steps below 1 Close all application programs 2 Close operating software 3 Turn off power switch 4 Remove all device 5 Pull out power cable Note We strongly recommended that you should shut down the system before you start to clean any sing...

Страница 42: ...ended that you should inform us as soon as possible for the suitable solution For the computers that are no longer useful or work well please contact with worldwide distributors for recycling The worldwide distributors show on the following website http www onyx healthcare com tw Contact php Note Follow the national requirement to dispose unit ...

Отзывы: