InTemp CX Temperature Logger (CX40x) Manual
1-800-LOGGERS 3
www.onsetcomp.com
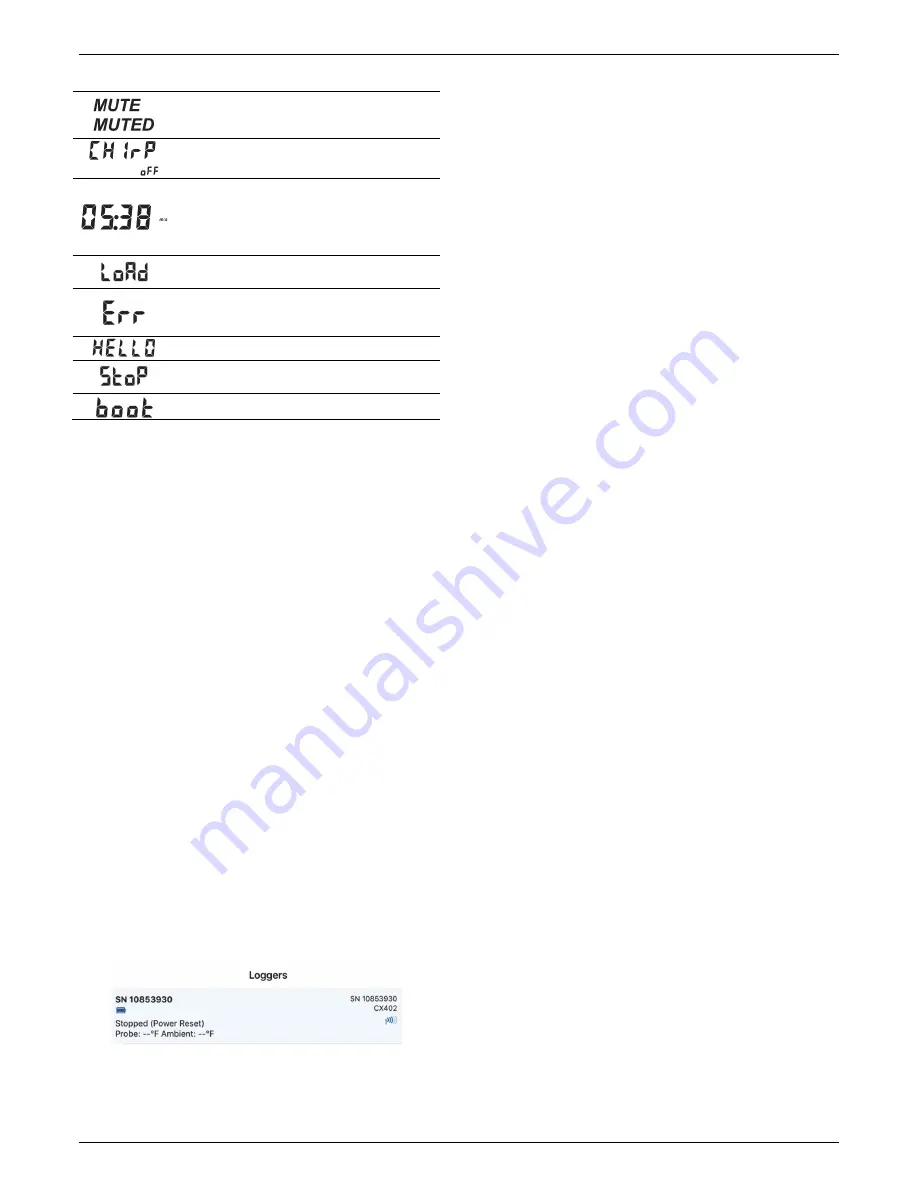
LCD Symbol
Description
or
MUTE indicates an alarm is beeping. Turn off the
beeping alarm by pressing the Mute button. The
LCD then changes to MUTED.
The audible alarm has been muted.
The logger has been configured to start logging on
a delay. The display will count down in days,
hours, minutes, and seconds until logging begins.
In this example, 5 minutes and 38 seconds remain
until logging will begin.
The configuration settings are being loaded onto
the logger from the app.
An error occurred while loading the configuration
settings onto the logger from the app. Try
reconfiguring the logger.
The logger was paged from the app.
The logger has been downloaded and stopped
with the app or because the memory is full.
The logger is being updated with new firmware.
Note:
If the logger has stopped logging because the memory is
full, the LCD screen will remain on with “STOP” displayed until
the logger is downloaded to your mobile device. Once the
logger has been downloaded, the LCD will turn off
automatically after 2 hours. The LCD will turn back on the next
time the logger connects with your device.
Getting Started
Install the InTemp app to connect to and work with the logger.
1.
Install the batteries and battery door.
Insert two AAA
batteries in the logger, observing polarity. Insert the battery
door in the back of the logger making sure it is flush with
the rest of the logger case. Use the included screw and a
Phillips-head screwdriver to screw the battery door into
place.
2.
Insert the external probe (if applicable).
3.
Download InTemp.
Go to the App Store® or Google Play™
and download the InTemp app to your phone or tablet.
4.
Open the InTemp app.
Enable Bluetooth in your device
settings if prompted.
5.
Set up a user account.
Enter your email address, first and
last name, and a password. You can also enter a company
name, add notes and select a profile photo. Tap Save when
done entering your user settings and log in to the account
when prompted.
6.
Connect to the logger
. In the Loggers screen, find the logger
in the list (if more than one is in range of your device), and
tap the logger to connect to it.
If you are having trouble connecting:
•
Make sure the logger is within range of your mobile
device. The range for successful wireless communication
is approximately 30.5 m (100 ft) with full line-of-sight.
•
If your device can connect to the logger intermittently or
loses its connection, move closer to the logger, within
sight if possible.
•
If the logger appears in the list, but you cannot connect
to it, close the app, power down the mobile device, and
then turn it back on. This forces the previous Bluetooth
connection to close.
7.
Configure the logger
. Once connected, tap Configure. Swipe
left and right to select one of the preset logger
configurations (Ambient Storage, Clinical Refrigerator,
Freezer, or Refrigerator). Type a name for this logger
deployment and tap Start to load the selected configuration
to the logger and start logging.
Note:
You can also create
your own custom configuration under Settings. See
Configuring the Logger
for details.
Once logging begins, the logger will display the current
temperature reading and the minimum and maximum readings
within the current 24-hour period (midnight from one day to
midnight the next day). These values are also available in the
logger reports (see
Downloading the Logger and Generating
Reports
).
For CX402 models, you can click Next to switch between
external probe and ambient temperature readings. Minimum
and maximum readings are only available for the external
probe.
Configuring the Logger
There are four preset configurations associated with this logger
when monitoring conditions in the following applications:
ambient storage, clinical refrigerator, freezer, and refrigerator.
You can view the settings associated with each configuration by
tapping the Settings icon in the InTemp app and then tapping
Logger Configurations. These preset configurations cannot be
changed, but you can disable them or create your own custom
configurations to suit other monitoring applications. To create a
new configuration:
1.
Tap the Settings icon and tap Logger Configurations.
2.
Tap the plus icon in the upper right corner.
3.
Type a configuration name.
4.
Tap Logging Interval. Select a logging interval and tap Save.
5.
Tap Start and select one of the following start options:
•
Immediately. The logger will begin logging immediately.
•
On next even interval. The logger will begin logging on
the next even interval (such as 11:00 or 11:05).
•
On date/time. The logger will begin logging on a date and
time you specify. The specific date and time is not
selected now. You will select the date and time when you
configure the logger.
•
After a fixed delay. The logger will begin logging after a
certain period of time, such as five minutes or 3 hours.


