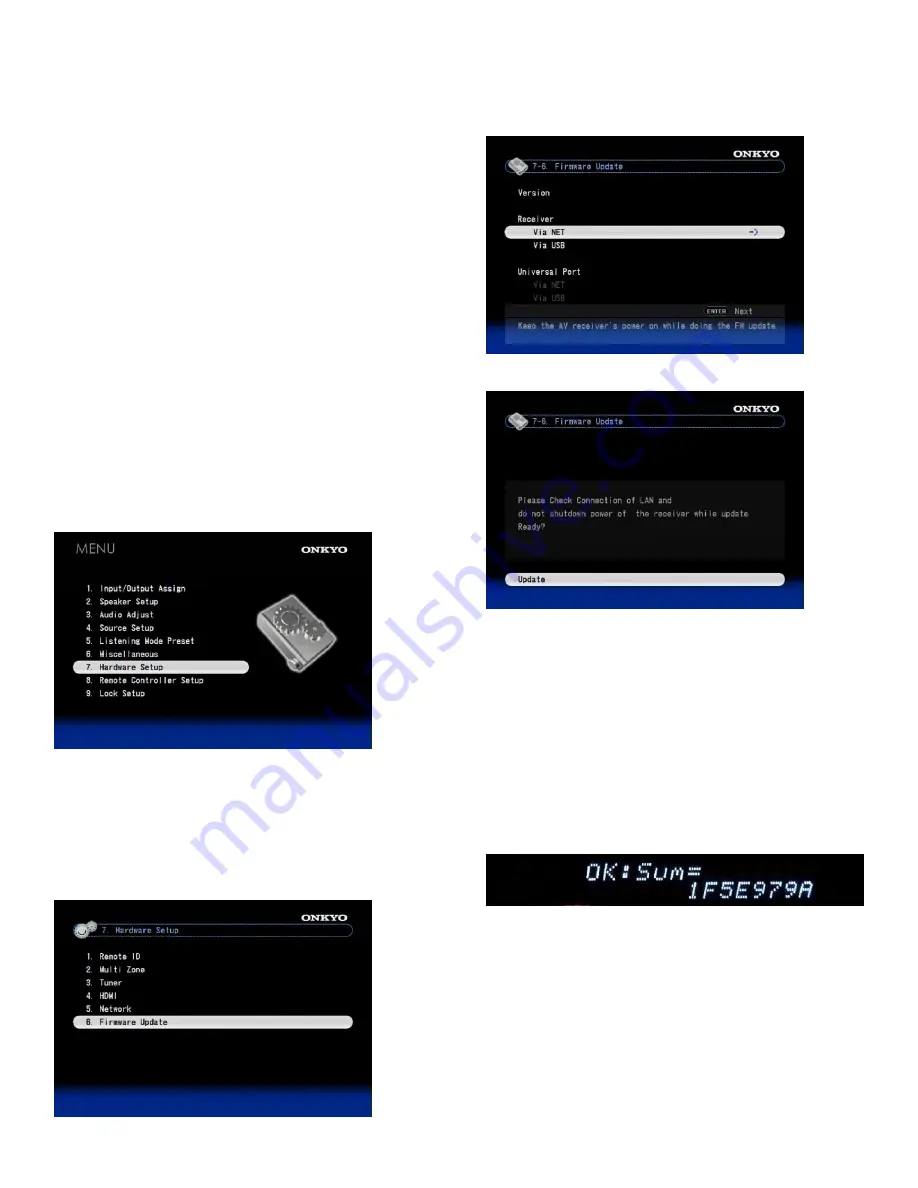
Updating the Firmware via Network
TX-NR1007/3007/5007 allow you to update firmware
using Network connection on rear panel.
*
In this procedure, on-screen display may vary depending on the
model.
Note:
1. Make sure your AV receiver/controller and TV are
turned on and Ethernet cable is connected to rear panel of the
AV receiver/controller.
2. Never unplug or turn off the AV receiver/controller
during updating process.
3. To update the firmware, it will take 15 to 25 minutes
for TX-NR1007 and 30 to 40 minutes for TX-NR3007/5007.
4. The AV receiver/controller will retain all your
settings after update is finished.
Step 1:
Push [RECEIVER] followed by [SETUP] on the remote
controller.
Main menu will be displayed on TV screen. Procedures
thereafter can also be performed on the AV
receiver/controller by using its SETUP, arrow, and
ENTER buttons.
Step 2:
Go to “7. Hardware Setup” menu.
Step 3:
Go to “7-6. Firmware Update” menu.
Note that the Firmware Update option will be grayed
out for 30 seconds after AV receiver/controller is
turned on.
Please wait.
Step 4:
Select “Via NET” and push [ENTER].
Step 5:
Select “Update” and push [ENTER].
Updating will begin.
As the updating progresses, the TV screen may
disappear depending on the program updated. In this
case, you can see the update progress on the front
display of the AV receiver/controller. The TV screen
will reappear when you finish the update and turn on the
AV receiver/controller.
Step 6:
Message “OK:Sum = ********” appears on the front
display of the AV receiver/controller, indicating that the
update has been completed. (Alpha-numeric characters
on the front display are denoted by asterisks.)
Step 7:
Using the [ON/STANDBY] button on the front panel,
turn off and on the AV receiver/controller.
Do not use the [ON] or [STANDBY] button on the
remote controller.
Congratulations!! Now you have the latest firmware on
your Onkyo AV receiver/controller.
(Go to the next page for troubleshooting.)


