background image

7

System connections

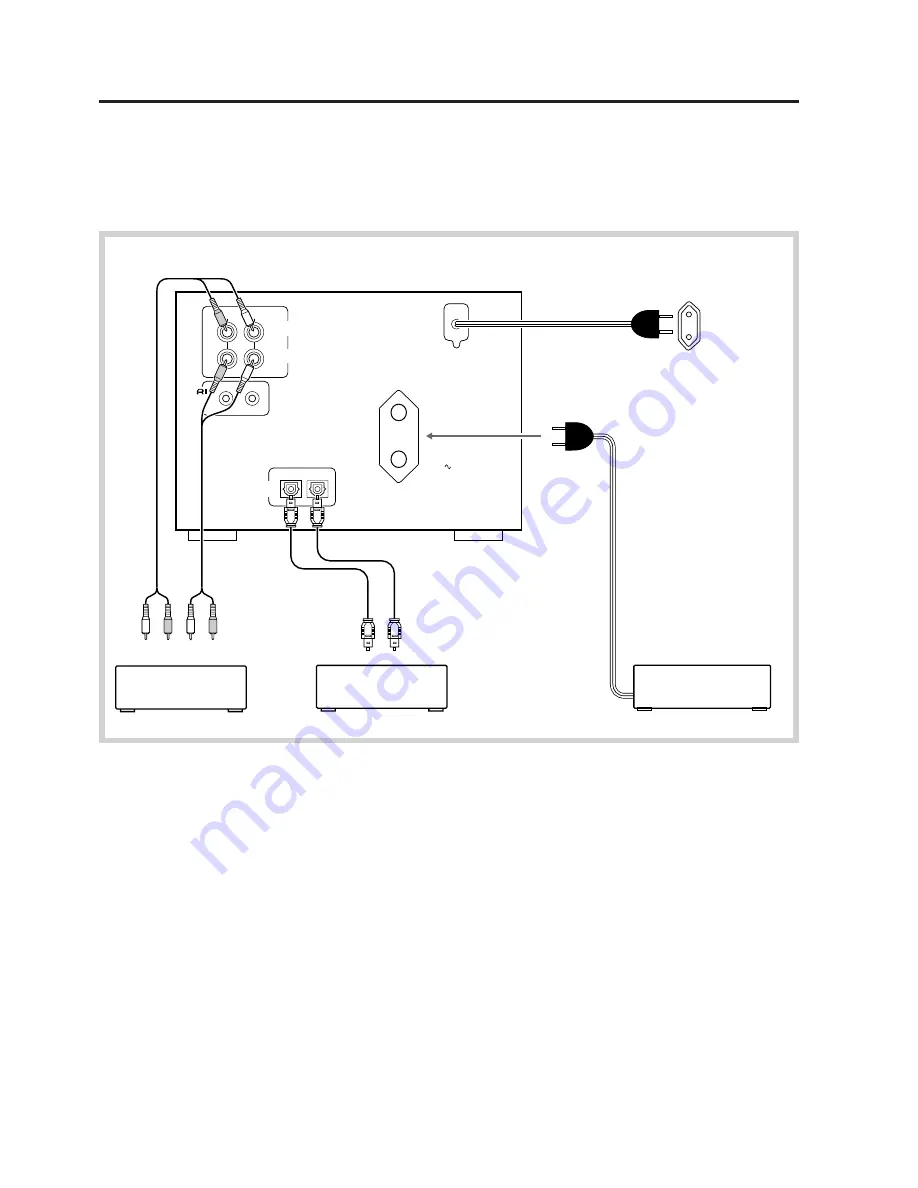
Connecting other components

• Do not plug in the AC power cord until all other connections have been made.
• On each pair of input or output jacks, the jack (marked R) corresponds to the right channel, and the jack (marked L) to the left

channel. Refer to the amplifier's instruction manual for further information on connections.

• Do not place the MD recorder on the amplifier or receiver.
• Do not fold optical cables into a short length or wind them up into a coil with a small radius.
• Avoid bundling the audio connection cables with the power cord or speaker cables. Doing so may cause degraded sound reproduction.

1

1

1

1

1

Connection with the Amplifier

Connect the MD-185X to the MD (or
TAPE) jacks of your amplifier.

2

2

2

2

2

Connection via the Digital Input
Terminal (DIGITAL IN)

You can perform digital recording on the
MD-185X if a CD (Compact Disc) player
or DAT (Digital Audio Tapedeck) equipped
with a digital (OPTICAL) output terminal
is available. For digital recording, you need
to connect the equipment to either DIGI-
TAL IN 1 or 2 terminal using the supplied
optical cable. These terminals can also be
used for connecting an amplifier which is
equipped with a digital output terminal.

Note:

• If the DIGITAL IN 2 is used for

connecting the amplifier, you cannot
use the full capability of the MD-185X.

•  If you attempt to perform digital

recording using a digital input terminal
which is not connected, “D.In Unlock”
will appear.

• Terminal protection caps are attached to

the DIGITAL IN terminals. Remove the
cap for the terminal you wish to use
when connecting the MD-185X to
digital equipment. Replace the caps if
you are not using the DIGITAL IN
terminals.

3

3

3

3

3

AC outlet (UNSWITCHED)

The power cord of another component may
be plugged into this outlet. Its maximum
capacity is 100 watts.
The outlet type and capacity may vary
according to the area where purchased.

4

4

4

4

4

Connecting the AC power cord
and switching power on

1. Insert the AC power cord into a wall

outlet.

2. Press the STAND-BY/ON button.

The STAND-BY indicator will light.

Note:
To insert the AC power cord into an AC
outlet on the rear panel of another compo-
nents, use the UNSWITCHED outlet.

L

R

L

R

(PLAY)

(REC)

OUT

MD-185X

(ANALOG IN)

(ANALOG OUT)

(DIGITAL IN)

1

4

2

3

R

L

LINE IN

(REC)

LINE OUT

(PLAY)

R

L

DIGITAL

INPUT

OPTICAL

1

2

Analog amplifier

Digital equipment

such as CD and DAT

European model’s

rear panel shown.

REMOTE

CONTROL

AC OUTLET

UNSWITCHED

100W MAX.

AC230V

50Hz

(

)

Содержание MD-185X

Страница 1: ... Naming a track or disc 28 Message list 30 System limitations 30 Preset titles for easy titling 30 Rules for digital recording 31 Precautions for handling the MiniDisc MD 32 Troubleshooting guide 33 Specifications 34 MD 185X MiniDisc Recorder Instruction Manual MINIDISC RECORDER CD DUBBING MD 185X REC DISPLAY INPUT REC LEVEL 20bit PROCESSING AMCS PUSH ENTER STAND BY ON STAND BY PLAY MODE REPEAT ED...

Страница 2: ...zation of the plug The lightning flash with arrowhead symbol within an equilateral triangle is intended to alert the user to the presence of uninsulated dangerous voltage within the product s enclosure that may be of sufficient magni tude to constitute a risk of electric shock to persons The exclamation point within an equilateral triangle is intended to alert the user to the presence of important...

Страница 3: ...r TV sets If placed next to a TV or tuner it may cause reception interference resulting in some noise in the TV or tuner output 6 Care From time to time you should wipe off the front and rear panels and the cabinet with a soft cloth For heavier dirt dampen a soft cloth in a weak solution of mild detergent and water wring it out and wipe away the dirt Following this dry immediately with a clean clo...

Страница 4: ...However this product is classified as a Laser Product by CDRH Center for Devices and Radiological Health which is a department of the Food and Drug Administration According to their regulations 21 CFR section 1002 30 all manufactures who sell Laser Products must maintain records of written communications between the manufacturer dealers and customers concerning radiation safety If you have any com...

Страница 5: ...nputs One Touch CD to MD Synchro Recording Disc Track Titling Extensive Editing Capabilities AMCS Automatic Music Control System 25 Track Programming Dot Matrix Display Random Play Compatible Full Function Remote Control Signal recording linked with various sources ...

Страница 6: ...n the MD 185X is connected with the CR 185X CHR 185X CD player pressing the CD DUBBING button on the MD recorder immediately starts recording from the CD onto the MD CD synchro Recording When this function is enabled you can immediately start recording to the MD by pressing the PLAY button on the CD player CD dubbing with track specified You can record only one track at a time being played from CD...

Страница 7: ...d for connecting an amplifier which is equipped with a digital output terminal Note If the DIGITAL IN 2 is used for connecting the amplifier you cannot use the full capability of the MD 185X If you attempt to perform digital recording using a digital input terminal which is not connected D In Unlock will appear Terminal protection caps are attached to the DIGITAL IN terminals Remove the cap for th...

Страница 8: ...indicator l l l l l REC indicator m m m m m Play indicator Front panel 1 Play mode button PLAY MODE 13 15 2 Repeat button REPEAT 14 3 Display button DISPLAY 11 28 4 Input button INPUT 16 18 23 5 Rec level control knob REC LEVEL 21 6 Edit No button EDIT NO 22 24 29 7 Yes button YES 22 24 29 8 AMCS knob AMCS 12 15 24 28 9 Play Pause button ø ø ø ø ø 10 13 15 19 21 22 10 Stop button ß ß ß ß ß 10 29 1...

Страница 9: ...unit remote control may cause interference Control positions and names Inserting the remote control batteries Remove the battery compartment cover by opening it as shown in the illustration Load two R6 UM 3 AA size batteries into the remote control with the plus and minus terminals positioned as indicated by the diagram inside the battery compartment and close the cover Remove dead batteries immed...

Страница 10: ...OTE CONTROL RC 339MD CONTINUE PLAY MODE RANDOM MEMORY REPEAT 25 M SCAN CLEAR ENTER NAME SCROLL DISPLAY 1 A 2 3 4 5 6 7 8 9 10 11 12 13 14 15 16 17 18 19 20 21 22 23 24 25 B C D E F G H I J K L M N O P Q R S T U V W X Y Z REC A B A SPACE RC 339MD 1 3 3 SCROLL 1 STAND BY ON STAND BY 1 2 3 4 5 6 7 8 9 10 11 12 13 14 15 DIGITAL IN 0 10 2 20 40 R 6 L 15 1 POWER Remote control TRACK 1 2 3 4 5 6 7 8 9 10...

Страница 11: ... time at pause high speed search When playing is temporarily stopped paused keep pressing the π or π button and release it when the playing time of the part you want to hear is displayed Press the ø button or the button on the remote control to start playing from that part Note Over in the display indicates that the end of the last track is reached DISPLAY DISPLAY DISPLAY DISPLAY DISPLAY DISPLAY P...

Страница 12: ...ck to play using the number buttons Press the number button on the remote control to select the track you want to play Note To play a track numbered 26 or more Press the 25 button first Set a value for the 10th place and then the 1st place using the number buttons in this order 0 can be entered by pressing the 10 button Ex To select the 30th track 25 3 10 To select the 100th track 25 25 1 10 10 Nu...

Страница 13: ...he RANDOM button 2 Press the ø button or the button on the remote control To exit the random mode When the MD recorder is stopped press the PLAY MODE button several times until RANDOM disappears from the display Or press the CONTINUE button on the remote control PLAY MODE RANDOM RANDOM Remote control TRACK 1 2 3 4 5 6 7 8 9 10 11 12 13 14 15 DIGITAL IN RANDOM 0 10 2 20 40 R 6 L 15 1 Remote control...

Страница 14: ...rder If the REPEAT button is pressed during random play The contents of the entire MD will be played again repeatedly with the playing order changed each time a random play begins To repeat the playing of the track currently playing press the REPEAT button on the remote control twice Note In Memory Play or Random Play you cannot repeat the currently playing track REPEAT 1 To stop the repeat play P...

Страница 15: ... the remote control Clearing the last track stored Press the ß or CLEAR button on the remote control The last track programmed in memory is cleared You can program up to 25 tracks If the total playing time of the programmed tracks exceeds 256 minutes m s will be displayed PLAY MODE MEMORY MEMORY Remote control REPEAT 25 M SCAN 1 2 3 4 5 6 7 8 9 10 11 12 13 14 15 16 17 18 19 20 21 22 23 24 25 F G H...

Страница 16: ...igured into a system with Onkyo Separate Collection series components CR 185X CHR 185X recording from the CD onto the MD can be started by simply pressing the CD DUBBING button on the MD 185X To perform CD dubbing your CD player must be connected through an optical cable to the DIGITAL IN 1 terminal located on the rear panel of the MD recorder For details see the section System connections of the ...

Страница 17: ...tops recording and enters the recording standby mode To stop CD synchro recording Press the ß button on the CD player The MD recorder then enters the recording standby mode Note For analog recording set the input selector of the CR 185X CHR 185X to the CD position and keep it placed in that position during recording Changing the input selector setting causes the MD recorder to stop and then enter ...

Страница 18: ...efers to recording where an optical digital cable is used for inputting signals from the recording source When Protected is shown in the display it indicates that the record protect tab of the MD is open Before starting the recording procedure close the tab See page 23 This MD recorder contains a digital input signal sampling frequency rate converter which converts the sampling frequency of digita...

Страница 19: ... ø ø ø ø ø button or the ƒ ƒ ƒ ƒ ƒ button on the remote controller To resume record ing press the ø ø ø ø ø button again or press the button on the remote controller To stop recording Press the ß button To eject the MD Press the ß button and then the å button Note If TOC is flashing when you press the å å å å å button or the STAND BY ON button it means the MD recorder is writing the recorded conte...

Страница 20: ...isplay The analog input source is now selected Note Make sure that the Input and Rec selectors on the amplifier are set to the Recording Source position 4 Press the REC button When your MD 185X is configured with CR 185X CHR 185X start playing the CD player before pressing the REC button in step 4 3 Recording to an MD 4 STAND BY ON STAND BY 1 2 3 4 5 6 7 8 9 10 11 12 13 14 15 0 10 2 20 40 R 6 L 15...

Страница 21: ...4 seconds or less an interval may lead to a failure in marking track numbers 7 Press the ø button to start record ing and then start playing the recording source immediately The TOC indicator appears as soon as the recording starts The MD recorder will automatically stop when recordable time of the disc being recorded runs out To stop recording temporarily Press the ø ø ø ø ø button or the ƒ ƒ ƒ ƒ...

Страница 22: ...ding and enters the recording standby mode again To stop MD synchro recording Press the ß button on the MD recorder The cassette tape deck then enters the recording standby mode Recording to an MD AUTO SPACE REC PAUSE K 185X 1 2 Signal Synchro recording Even if your recording source is not Onkyo compatible you can perform synchro nized recording 1 Press the INPUT button until Digital In1 Digital I...

Страница 23: ...r the button on the remote controller to start playback Storage Period of Backup Data The recorded contents will be backed up inside the MD 185X even if the MD recorder s power cord is accidentally unplugged or if a power failure occurs before they are stored to the disc when TOC is lit or when they are being stored to the disc when TOC is flashing You can restore the data which was backed up duri...

Страница 24: ...ile the TOC indicator is lit or flashing do not move or unplug the MD recorder To erase all tracks of an MD 1 Press the ß button 2 Press the EDIT NO button several times until All Erase appears in the display To cancel press the EDIT NO button or press the ß button 3 Press the YES button All Erase is displayed for confirmation On the display the track number flashes 4 Press the YES button again Wh...

Страница 25: ...ks following that divided track are moved backward each given a new number which is larger by one track than the previous track number For example if you divide track 2 into two parts the latter part will now be renumbered as track 3 the track 3 will now be renum bered as track 4 the track 4 will now be renumbered as track 5 and so on To erase parts of a track first divide the track in parts and t...

Страница 26: ...sal and Track Ok alternately shown on the display 5 Press the YES button to combine the tracks you have selected When the combining is completed Complete appears in the display When tracks are combined the tracks following those tracks are advanced each given a new number which is smaller by one track than the previous track number For example if you combine track 3 with track 2 track 4 will now b...

Страница 27: ...rack is moved the track numbers are renumbered based on the track number of the moved track so that they are consecutive For example if you move track 3 to track 1 track 1 will now be renumbered as track 2 track 2 will now be renumbered as track 3 and so on Note While the TOC indicator is lit or flashing do not move or unplug the MD recorder MINIDISC RECORDER CD DUBBING MD 185X REC DISPLAY INPUT R...

Страница 28: ...hose indicated below the buttons by directly operating the buttons 2 3 4 5 To name a disc To name a disc The MD recorder must be stopped To name a track The MD recorder may be stopped paused playing or recording You can enter up to 100 characters for each track name The characters being entered are canceled if the track which is playing or being recorded changes AMCS PUSH ENTER To name a track DIS...

Страница 29: ...the character blinks and then press the EDIT NO button or CLEAR button on the remote controller RC 339MD To make one space Turn AMCS knob to display and press the knob to set 6 Press the YES button Complete appears in the display Or with the remote control press the NAME button Note While the TOC indicator is lit or flashing do not move or unplug the MD recorder Erasing the disc name and all track...

Страница 30: ...e been used System limitations Message list The following table explains the various messages that appear in the display Message Meaning Blank Disc A new recordable MD or a recordable MD without disc or track names is inserted Cannot Copy An attempt was made to make a second copy from a digitally dubbed MD see Rules for Digital Recording on pages 31 32 Cannot Edit An attempt was made to edit the d...

Страница 31: ...MD via digital input terminals on the MD recorder to create a second generation digital copy Note however that with some BS tuners second generation digital copying may not be possible CD player DAT deck MD recorder MD recorder MD recorder MD recorder Digital output terminal Digital input terminal Recording Playing Recording MD A recordable MD recorded through the digital input terminal Line analo...

Страница 32: ...pied to another recordable MD through the digital output terminal However you cannot make subsequent copies from the record able MD to other recordable MDs through the digital output terminal Subsequent copies can only be made through analog output terminal When MD recorders are connected using analog terminals the number of dubbings is not limited Rules for digital recording Precautionsforhan dli...

Страница 33: ...tected appears Remedy Close the record protect slot See page 23 Cause The unit is not connected properly to the sound source Remedy Make connections properly to the sound source Cause The analog recording level is too low Remedy Turn the REC LEVEL control knob to adjust the recording level properly Cause A premastered disc is inserted Remedy Replace it with a recordable disc Cause There is not eno...

Страница 34: ...ror correction system Advanced Cross Interleave Reed solomon code Sampling frequency 44 1 kHz Number of channels 2 stereo Frequency response 10 Hz 20 kHz Signal to noise ratio 98 dB or more when playing Output level 1 3 volts r m s Power supply rating AC 230 V 50 Hz AC 120 V 60 Hz Power consumption 12W AC230V 50Hz 14W AC120V 60Hz Dimensions W H D 185 131 298 mm 7 5 16 5 3 16 11 3 4 Weight 2 9 kg 6...

Страница 35: ...35 ...

Страница 36: ...NICS GmbH Industriestrasse 20 82110 Germering GERMANY Tel 089 84 93 20 Fax 089 84 93 226 E mail info onkyo de ONKYO EUROPE FRANCE BRANCH Domaine Technologique de Saclay 4 Rue René Razel SACLAY 91892 ORSAY CEDEX FRANCE Tel 1 69 33 14 00 Fax 1 69 41 35 84 ONKYO CHINA LIMITED Units 1111 1112 Metroplaza Tower II 223 Hing Fong Road Kwai Chung N T HONG KONG Tel 852 2429 3118 Fax 852 2428 9039 E http www...

Отзывы: