background image

6

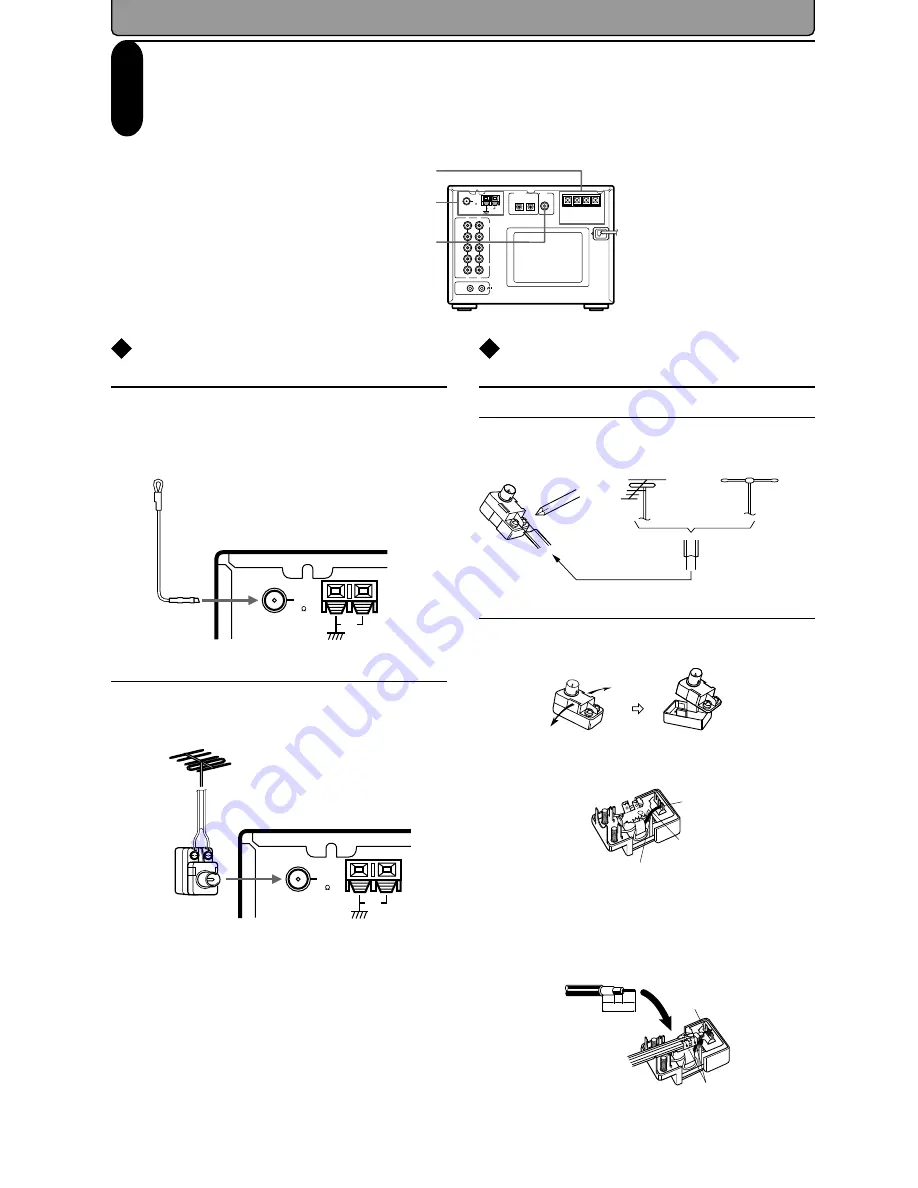
Connecting the FM antenna cable
to the 75/300 ohm antenna adapter

Connecting the 300 ohm ribbon wire

Loosen the screws and wrap the wire around the
screws. Then tighten the screws with a screwdriver.

Connecting the coaxial cable

1. With your fingernail or a small screwdriver, press

the stoppers outward and remove the cover.

2. Remove the transformer wire A from slot B and

insert it into slot C.

3. Prepare the coaxial cable as shown in the diagram.

Connect the 75/300 ohm antenna adapter to the
coaxial cable.

1

Insert the end of the cable.

2

Use pliers to clamp it in place.

4. Re-install the cover.

Connecting

Antenna (aerial) and speakers

Do not connect the AC power cord (main lead) when you connect the antenna or speakers. You will connect
the AC power cord on page 10.

Connecting the supplied indoor FM
antenna (aerial)

While listening to the radio on page 20, move the
antenna (aerial) in various directions until the clearest
signal is received. Then secure the antenna (aerial)
with push pins in the position with the least distortion.

To connect the outdoor FM antenna (aerial)

If signals received via the indoor FM antenna (aerial)
are not clear enough, connect an outdoor FM
antenna (aerial).

• To avoid the risk of lightning and electrical shock,

grounding is necessary. Follow item 19 of the
“Important Safeguards” on page 3 when you install
the outdoor antenna.

WARNING

Do not install the antenna (aerial) near power lines. This
could result in electrical shock.

Note

Keep the antenna (aerial) away from noise sources, such
as neon signs and busy roads.

1

2

✦ ✦

✦ ✦

6

mm

3

mm

6

mm

15mm

Outdoor FM
antenna

Indoor FM
antenna

300 ohms
ribbon wire

Slot B

Wire A

Slot C

SPEAKERS

+

+

FM

75

OUT

IN

REMOTE

CONTROL

PRE OUT

ANTENNA

OPTICAL

OUT

(REC)

IN

(PLAY)

OUT

(REC)

IN

(PLAY)

L

R

AM

TAPE

L

R

L

R

CDR

DIGITAL

SUB  

WOOFER

LINE

CAUTION : SPEAKER IMPEDANCE

                   4 OHMS MIN. / SPEAKER

Speaker connectors

Antenna (aerial) connector

Subwoofer connector

FM

75

ANTENNA

AM

FM

75

ANTENNA

AM

75/300 ohm

antenna adapter

(included)

Содержание FR-V77

Страница 1: ... making connections and turning on the power Following the instructions in this manual will enable you to obtain optimum performance and listening enjoyment from your new CD MD TUNER AMPLIFIER Please retain this manual for future reference Contents Connecting Preparations Basic Operation Advanced Operation Additional Operation Others Before Using ...

Страница 2: ...se or cabinet that may impede the flow of air through the ventilation openings there should be free space of at least 20 cm 8 in and an opening behind the appliance 9 Heat The appliance should be situated away from heat sources such as radiators heat registers stoves or other appliances including amplifiers that produce heat 10 Power Sources The appliance should be connected to a power supply only...

Страница 3: ...owing this dry immediately with a clean cloth Do not use rough material thinners alcohol or other chemical solvents or cloths since these could damage the finish or remove the panel lettering 8 Points to remember If this unit is brought from a cold environment to a warm one or is in a cold room that is quickly heated condensation may form on the pickup preventing proper operation In this case remo...

Страница 4: ...door FM antenna aerial 1 75 300 ohm antenna adapter 1 Main features Supports MDLP long duration recording mode that extends recording playback time twice or four times The DLA Link Digital Rec Level Adjustment function automatically adjusts the digital recording level Various CD to MD dubbing functions including double speed recording Digital output for CD R Various external IN OUT connectors thre...

Страница 5: ...g CD to MD at double speed 26 Recording CD to MD Synchro recording 28 Recording an FM AM broadcast program to an MD 30 Recording data from a connected external device to an MD 32 Synchro Recording operation with an Onkyo stereo cassette tape deck 33 Advanced Operation Various ways to play CDs and MDs 34 Naming a CD an MD and its tracks and preset channels 37 Moving dividing combining and erasing M...

Страница 6: ... in various directions until the clearest signal is received Then secure the antenna aerial with push pins in the position with the least distortion To connect the outdoor FM antenna aerial If signals received via the indoor FM antenna aerial are not clear enough connect an outdoor FM antenna aerial To avoid the risk of lightning and electrical shock grounding is necessary Follow item 19 of the Im...

Страница 7: ...nna will be more effective if it is stretched horizontally above or outside a window Do not remove the AM loop antenna To avoid the risk of lightning and electrical shock grounding is necessary Follow item 19 of the Important Safeguards on page 3 when you install the outdoor antenna Directional Iinkage Do not use the same antenna for both FM and TV or VCR reception since these signals may interfer...

Страница 8: ...bwoofer a subwoofer that contains an amplifier or connect an amplifier to the FR V77 then connect a non active subwoofer to the amplifier Antenna aerial and speakers continued NO 1 1 2 2 3 SPEAKERS L R 15mm Push down the lever Insert the tip of the speaker cable Right speaker Left speaker Return the lever to the original position Make sure that the core wire is slightly exposed Peel the insulation...

Страница 9: ...R REC PLAY INPUT OUTPUT REMOTE CONTROL REMOTE CONTROL OUT REC IN PLAY OUT REC IN PLAY TAPE L R L R CDR LINE Onkyo stereo cassette tape deck rear panel Audio connection cable Audio connection cable white red cable supplied with the Onkyo stereo cassette tape deck FR V77 s rear panel Signal flow OUT IN OPTICAL DIGITAL OUT REC IN PLAY OUT REC TAPE L R LINE Audio connection cable Optical fiber audio c...

Страница 10: ...shows how to connect an optional Onkyo compact disc recorder to the FR V77 Connect its CDR OUT REC jacks and IN PLAY jacks to the disc recorder s INPUT REC jacks and OUTPUT PLAY jacks respectively The jack connection enables you to use the following functions You can control a connected Onkyo compact disc recorder from the FR V77 s remote controller When the connected Onkyo compact disc recorder p...

Страница 11: ...er operation of the remote controller Using another remote controller of the same type in the same room or using the unit near equipment which uses infrared rays may cause operational interference Do not put any object such as a book on the remote controller The buttons of the remote controller may accidentally be pressed and drain the batteries Make sure the audio rack doors do not have colored g...

Страница 12: ...tor flashes in the display when you select DIGITAL but no digital equipment is connected or when the connected digital component is not turned on The FR V77 has the following three power modes Standby mode In this mode the LCD indicates the current time If the time is not set appears See page 10 Power On mode The FR V77 enters this mode when you press the STANDBY ON button on the unit or remote co...

Страница 13: ... DIGITAL CHAIN REPEAT DISC TRACK ELAPSED REMAIN TITLE RDS MONO AUTO STEREO TUNED 1 TR MEMORY RANDOM LEVEL SYNC MD DUB TOC SLEEP SOURCE CD TIMER MD MD CH CD CD ONCE W DAY W END REC L R S BASS 40 20 10 0 OVER 6 2 MUTING DIGITAL CHAIN REPEAT DISC TRACK ELAPSED REMAIN TITLE RDS MONO AUTO STEREO TUNED 1 TR MEMORY RANDOM LEVEL SYNC MD DUB TOC PUSH TO ENTER MULTI JOG PUSH TO ENTER MULTI JOG SLEEP SOURCE ...

Страница 14: ...SOURCE CD TIMER MD MD CH CD CD ONCE W DAY W END REC L R S BASS 40 20 10 0 OVER 6 2 MUTING DIGITAL CHAIN REPEAT DISC TRACK ELAPSED REMAIN TITLE RDS MONO AUTO STEREO TUNED 1 TR MEMORY RANDOM LEVEL SYNC MD DUB TOC Before presetting You can preset up to 30 channels including both FM and AM stations If any radio stations are preset in the channels before you start auto presetting all the preset channel...

Страница 15: ...ion Press REPEAT YES To cancel presetting Press EDIT CLEAR NO If Memory Full appears The FM AM stations have already been programmed into all 30 channels Delete unnecessary stations page 50 and try again 7 Repeat steps 2 to 6 to preset the next channel SLEEP SOURCE CD TIMER MD MD CH CD CD ONCE W DAY W END REC L R S BASS 40 20 10 0 OVER 6 2 MUTING DIGITAL CHAIN REPEAT DISC TRACK ELAPSED REMAIN TITL...

Страница 16: ...hen you press CD Source name Total playing time Playing track number The elapsed playing time SLEEP SOURCE CD TIMER MD MD CH CD CD ONCE W DAY W END REC L R S BASS 40 20 10 0 OVER 6 2 MUTING DIGITAL CHAIN REPEAT DISC TRACK ELAPSED REMAIN TITLE RDS MONO AUTO STEREO TUNED 1 TR MEMORY RANDOM LEVEL SYNC MD DUB TOC SLEEP SOURCE CD TIMER MD MD CH CD CD ONCE W DAY W END REC L R S BASS 40 20 10 0 OVER 6 2 ...

Страница 17: ...PSEDREMAINTITLE RDS MONO AUTO STEREO TUNED 1TRMEMORY RANDOM LEVEL SYNC MD DUB TOC SLEEP SOURCE CD TIMER MD MD CH CD CD ONCE W DAY W END REC L R S BASS 40 20 10 0 OVER 6 2 MUTING DIGITAL CHAIN REPEAT DISCTRACK ELAPSEDREMAINTITLE RDS MONO AUTO STEREO TUNED 1TRMEMORY RANDOM LEVEL SYNC MD DUB TOC SLEEP SOURCE CD TIMER MD MD CH CD CD ONCE W DAY W END REC L R S BASS 40 20 10 0 OVER 6 2 MUTING DIGITAL CH...

Страница 18: ...JOG clockwise If you select a track while the MD is stopped press MULTI JOG to start playback The MD track can also be selected and played back by pressing MULTI JOG while the MD is playing or stopped Each press skips one track ahead Locating a particular point in a track Press and hold to fast forward and to fast reverse during playback or pause until you locate the desired point Note If you oper...

Страница 19: ...rded MD BlankDisc appears 4 If the MD has a disc name but does not contain any recordings MD No Track appears If the disc or song title is long You can scroll long names across the display by pressing SCROLL on the remote controller See below Total number of tracks Disc name 2 3 4 During playback or pause The name of the playing track 2 The elapsed time of the playing track The remaining time of t...

Страница 20: ...elect a higher channel number Adjusting the volume level Turn the volume control to adjust the level SLEEP SOURCE CD TIMER MD MD CH CD CD ONCE W DAY W END REC L R S BASS 40 20 10 0 OVER 6 2 MUTING DIGITAL CHAIN REPEAT DISC TRACK ELAPSED REMAIN TITLE RDS MONO AUTO STEREO TUNED 1 TR MEMORY RANDOM LEVEL SYNC MD DUB TOC SLEEP SOURCE CD TIMER MD MD CH CD CD ONCE W DAY W END REC L R S BASS 40 20 10 0 OV...

Страница 21: ...ACK ELAPSED REMAIN TITLE RDS MONO AUTO STEREO TUNED 1 TR MEMORY RANDOM LEVEL SYNC MD DUB TOC SLEEP SOURCE CD TIMER MD MD CH CD CD ONCE W DAY W END REC L R S BASS 40 20 10 0 OVER 6 2 MUTING DIGITAL CHAIN REPEAT DISCTRACK ELAPSEDREMAINTITLE RDS MONO AUTO TUNED 1TRMEMORY RANDOM LEVEL SYNC MD DUB TOC SLEEP SOURCE CD TIMER MD MD CH CD CD ONCE W DAY W END REC L R S BASS 40 20 10 0 OVER 6 2 MUTING DIGITA...

Страница 22: ...ller the sound will be restored If you turn the unit off and then on again the sound will be restored Listening through the headphones Decrease the volume then connect the stereo headphones mini plug to the PHONES jack You can adjust the volume and mute the sound as described above The speakers will reproduce no sound while the headphones are connected SLEEP SOURCE CD TIMER MD MD CD CD ONCE W DAY ...

Страница 23: ...Y repeatedly 3 Press CD MD to select MD 4 Select a recording mode Use the REC MODE switch to select the desired recording mode MONO Monaural recording mode The available recording time is twice as much as that for SP SP Normal stereo recording mode The recording time is the same as the time length indicated on the CD LP2 Normal stereo recording time is compressed to half The available recording ti...

Страница 24: ...new MD CD Dub Fail appears on the display The MD mechanism is still operating Wait a while then press CD DUBBING The CD is in RANDOM mode Press MODE AUTO MONO to cancel RANDOM mode CD Dub Mode Fade Album Album Mode SLEEP SOURCE CD TIMER MD MD CH CD CD ONCE W DAY W END REC L R S BASS 40 20 10 0 OVER 6 2 MUTING DIGITAL CHAIN REPEAT DISCTRACK ELAPSEDREMAINTITLE RDS MONO AUTO STEREO TUNED 1TRMEMORY RA...

Страница 25: ...ining playback time on the CD Elapsed time of the current song Available recording time on the disc Title of the song being recorded Tip Recorded songs are automatically numbered during double speed CD to MD dubbing Notes on CD dubbing You cannot change the input source The play pause and eject are disabled The TOC indicator flashes TOC indicator Information such as track numbers is written into t...

Страница 26: ...ond interval scrolls on the display 5 When recording is complete press MD eject Refer to Step 5 on page 25 CD MD 2 Dubbing Switching the display during double speed CD dubbing Refer to Step 4 Switching the display information during dubbing on page 24 Tip The quality of data recorded via double speed CD dubbing may be adversely affected by a dirty disc If skipping or noise occurs dub at normal spe...

Страница 27: ...s from the top of the song and dubbing starts When dubbing of the song is complete the MD stops The CD continues playing Dubbing a CD in a different playback mode to an MD 1 Insert a CD and an MD select CD as the input source then select a different playback mode Be sure to insert a recordable MD with the write protection off Set up MEMORY playback see page 34 1TR playback see page 35 or REPEAT pl...

Страница 28: ...ress REPEAT YES The FR V77 displays the current setting Dig Ana or Ana Dig 3 If you do not wish to change the current setting press EDIT CLEAR NO If you wish to change the setting press REPEAT YES When you press REPEAT YES after the FR V77 displays Dig Ana it starts analog recording When you press REPEAT YES after the FR V77 displays Ana Dig it starts digital recording The FR V77 displays Complete...

Страница 29: ...cording is complete press MD stop then eject Press MD to stop recording The CD continues playback The TOC indicator flashes and the FR V77 writes the TOC then ejects the MD MD L R 40 20 10 0 OVER 6 2 DIGITAL LEVEL SYNC L R 40 20 10 0 6 2 Numbering the desired song s Press REC during recording of the desired song If you do not hold down REC long enough about four seconds or less the song may not be...

Страница 30: ...40 20 10 0 OVER 6 2 MUTING DIGITAL CHAIN REPEAT DISC TRACK ELAPSED REMAIN TITLE RDS MONO AUTO STEREO TUNED 1 TR MEMORY RANDOM LEVEL SYNC MD DUB TOC SLEEP SOURCE CD TIMER MD MD CH CD CD ONCE W DAY W END REC L R S BASS 40 20 10 0 OVER 6 2 MUTING DIGITAL CHAIN REPEAT DISC TRACK ELAPSED REMAIN TITLE RDS MONO AUTO STEREO TUNED 1 TR MEMORY RANDOM LEVEL SYNC MD DUB TOC Recording input source Recording tr...

Страница 31: ... songs during recording The songs may not be numbered if the gap silence between songs is too short To number the songs turn off the Level Sync function and follow Step 7 Numbering the desired song s on page 30 When the LEVEL SYNC indicator is lit the Level Sync function is turned on When you turn off the function this indicator disappears To turn the Level Sync function on or off follow the steps...

Страница 32: ...ce is not connected or the connected external device is not turned on the DIGITAL indicator flashes Note If a digital source is not connected or the connected external device is not turned on the DIGITAL indicator flashes If the FR V77 does not enter recording standby mode See Can t dub on page 24 Turning Level Sync on or off See Numbering the songs Level Sync on page 31 Numbering the desired song...

Страница 33: ...casts do not include this signal and in such a cases track numbers are not marked automatically The following types of recording are possible when you connect an Onkyo stereo cassette tape deck see page 9 Synchro Recording from the unit CD to the stereo cassette tape deck Synchro Recording from the unit MD to the stereo cassette tape deck Synchro Recording from the stereo cassette tape deck to the...

Страница 34: ...back mode and the CD MD is stopped press EDIT CLEAR NO Each press erases the last track number stored in memory If you change the playback mode all data stored in MEMORY playback will be erased Operating with the remote controller To select a track number in memory Press repeatedly during MEMORY playback To check the track numbers in memory Press while the CD MD is stopped To erase a track number ...

Страница 35: ...L R S BASS 40 20 10 0 OVER 6 2 MUTING DIGITAL CHAIN REPEAT DISC TRACK ELAPSED REMAIN TITLE RDS MONO AUTO STEREO TUNED 1 TR MEMORY RANDOM LEVEL SYNC MD DUB TOC The RANDOM indicator lights SLEEP SOURCE CD TIMER MD MD CH CD CD ONCE W DAY W END REC L R S BASS 40 20 10 0 OVER 6 2 MUTING DIGITAL CHAIN REPEAT DISC TRACK ELAPSED REMAIN TITLE RDS MONO AUTO STEREO TUNED 1 TR MEMORY RANDOM LEVEL SYNC MD DUB ...

Страница 36: ... SOURCE CD TIMER MD MD CH CD CD ONCE W DAY W END REC L R S BASS 40 20 10 0 OVER 6 2 MUTING DIGITAL CHAIN REPEAT DISC TRACK ELAPSED REMAIN TITLE RDS MONO AUTO STEREO TUNED 1 TR MEMORY RANDOM LEVEL SYNC MD DUB TOC The REPEAT or CHAIN REPEAT indicator lights Cancelling the playback mode Cancelling 1TR MEMORY and RANDOM mode 1 Press on the selected source to stop playback 2 Press MODE AUTO MONO repeat...

Страница 37: ... turn off the unit or stop recording Therefore do not disconnect the AC power cord mains lead or vibrate the unit when the TOC indicator is lit or flashing See page 25 Naming a preset channel After you select the preset channel to name execute Entering a name as described in the right column You can enter up to 8 characters per name Entering a name 1 Press EDIT CLEAR NO repeatedly until Name In ap...

Страница 38: ...EREO TUNED 1 TR MEMORY RANDOM LEVEL SYNC MD DUB TOC SLEEP SOURCE CD TIMER MD MD CH CD CD ONCE W DAY W END REC L R S BASS 40 20 10 0 OVER 6 2 MUTING DIGITAL CHAIN REPEAT DISC TRACK ELAPSED REMAIN TITLE RDS MONO AUTO STEREO TUNED 1 TR MEMORY RANDOM LEVEL SYNC MD DUB TOC BALLAD BLUES CLASSIC DANCE FUSION JAZZ African American Asian British Euro German Japanese Heavy Hit Songs Omnibus Selection Specia...

Страница 39: ...MD turn off the unit or stop recording Therefore do not disconnect the AC power cord mains lead or vibrate the unit when the TOC indicator lit or flashing See page 25 If the MEMORY RANDOM or 1TR indicator is lit in the display you cannot edit or erase any tracks In such cases cancel the MEMORY RANDOM and 1TR playback mode see page 36 before starting the operation Erasing all tracks on an MD All Er...

Страница 40: ...MD MD CH CD CD ONCE W DAY W END REC L R S BASS 40 20 10 0 OVER 6 2 MUTING DIGITAL CHAIN REPEAT DISC TRACK ELAPSED REMAIN TITLE RDS MONO AUTO STEREO TUNED 1 TR MEMORY RANDOM LEVEL SYNC MD DUB TOC SLEEP SOURCE CD TIMER MD MD CH CD CD ONCE W DAY W END REC L R S BASS 40 20 10 0 OVER 6 2 MUTING DIGITAL CHAIN REPEAT DISC TRACK ELAPSED REMAIN TITLE RDS MONO AUTO STEREO TUNED 1 TR MEMORY RANDOM LEVEL SYNC...

Страница 41: ... LEVEL SYNC MD DUB TOC SLEEP SOURCE CD TIMER MD MD CH CD CD ONCE W DAY W END REC L R S BASS 40 20 10 0 OVER 6 2 MUTING DIGITAL CHAIN REPEAT DISC TRACK ELAPSED REMAIN TITLE RDS MONO AUTO STEREO TUNED 1 TR MEMORY RANDOM LEVEL SYNC MD DUB TOC 1 2 3 5 4 1 3 5 4 2 1 2 5 3 4 Continued on the next page Destination track number SLEEP SOURCE CD TIMER MD MD CH CD CD ONCE W DAY W END REC L R S BASS 40 20 10 ...

Страница 42: ...d track is divided and all the tracks are renumbered from the top SLEEP SOURCE CD TIMER MD MD CH CD CD ONCE W DAY W END REC L R S BASS 40 20 10 0 OVER 6 2 MUTING DIGITAL CHAIN REPEAT DISC TRACK ELAPSED REMAIN TITLE RDS MONO AUTO STEREO TUNED 1 TR MEMORY RANDOM LEVEL SYNC MD DUB TOC The dividing point Approximately four seconds rehearsal play SLEEP SOURCE CD TIMER MD MD CH CD CD ONCE W DAY W END RE...

Страница 43: ...tracks Renumbering the tracks SLEEP SOURCE CD TIMER MD MD CH CD CD ONCE W DAY W END REC L R S BASS 40 20 10 0 OVER 6 2 MUTING DIGITAL CHAIN REPEAT DISC TRACK ELAPSED REMAIN TITLE RDS MONO AUTO STEREO TUNED 1 TR MEMORY RANDOM LEVEL SYNC MD DUB TOC The selected track Approximately eight seconds rehearsal play The selected track The combining point The preceding track The preceding track SLEEP SOURCE...

Страница 44: ...ime is reached Rec timer operates only once Tips While Rec timer is operating the sound is muted To check the sound during timer recording press MUTING or VOLUME on the remote controller to turn off the muting function Using the Sleep timer The Sleep timer can be set between 90 and 10 minutes in intervals of 10 minutes Press SLEEP while you are listening to music or a radio program Sleep 90 appear...

Страница 45: ...3 2 Press MULTI JOG then turn it to select the source When setting Once Weekday and Weekend timers The following playing sources appear in turn CD MD FM AM CD R DIGITAL LINE TAPE When setting Rec timer The following playing sources to be recorded appear in turn FM AM LINE DIGITAL If you changed the name the new name appears see page 49 Connect the timer equipped source SLEEP SOURCE CD TIMER MD MD ...

Страница 46: ...the source for playback e g insert a CD Even if MEMORY mode or RANDOM mode is selected for playback an MD will play in normal mode when the timer is triggered Adjust the volume before proceeding to the next step When the timer turns on the unit the volume will match the volume when you switched off the unit When setting Rec timer Insert an MD with the record protect window closed into the unit Adj...

Страница 47: ...E 2 MD TAPE 2 Continued on the next page Sunday Monday Tuesday Wednesday Thursday Friday Saturday SLEEP SOURCE CD TIMER MD MD CH CD CD ONCE W DAY W END REC L R S BASS 40 20 10 0 OVER 6 2 MUTING DIGITAL CHAIN REPEAT DISC TRACK ELAPSED REMAIN TITLE RDS MONO AUTO STEREO TUNED 1 TR MEMORY RANDOM LEVEL SYNC MD DUB TOC SLEEP SOURCE CD TIMER MD MD CH CD CD ONCE W DAY W END REC L R S BASS 40 20 10 0 OVER ...

Страница 48: ...DIGITAL CHAIN REPEAT DISC TRACK ELAPSED REMAIN TITLE RDS MONO AUTO STEREO TUNED 1 TR MEMORY RANDOM LEVEL SYNC MD DUB TOC SLEEP SOURCE CD TIMER MD MD CH CD CD ONCE W DAY W END REC L R S BASS 40 20 10 0 OVER 6 2 MUTING DIGITAL CHAIN REPEAT DISC TRACK ELAPSED REMAIN TITLE RDS MONO AUTO STEREO TUNED 1 TR MEMORY RANDOM LEVEL SYNC MD DUB TOC If the start or end time of one timer overlaps another If the ...

Страница 49: ... DSR DR DAT DT DIGITAL DG DVD DV LINE LI MD2 M2 PC PC TAPE TA TV TV VCR VC VIDEO DISC VD 1 Press OTHER INPUTS until the source whose name you wish to change appears in the display The source names appear in the following order TAPE LINE DIGITAL CD R 2 Press EDIT CLEAR NO repeatedly until Name Select appears in the display 3 Press REPEAT YES 4 Turn MULTI JOG to select a new name for the source Depe...

Страница 50: ...LEEP SOURCE CD TIMER MD MD CH CD CD ONCE W DAY W END REC L R S BASS 40 20 10 0 OVER 6 2 MUTING DIGITAL CHAIN REPEAT DISC TRACK ELAPSED REMAIN TITLE RDS MONO AUTO STEREO TUNED 1 TR MEMORY RANDOM LEVEL SYNC MD DUB TOC SLEEP SOURCE CD TIMER MD MD CH CD CD ONCE W DAY W END REC L R S BASS 40 20 10 0 OVER 6 2 MUTING DIGITAL CHAIN REPEAT DISC TRACK ELAPSED REMAIN TITLE RDS MONO AUTO STEREO TUNED 1 TR MEM...

Страница 51: ...RCE CD TIMER MD MD CH CD CD ONCE W DAY W END REC L R S BASS 40 20 10 0 OVER 6 2 MUTING DIGITAL CHAIN REPEAT DISC TRACK ELAPSED REMAIN TITLE RDS MONO AUTO STEREO TUNED 1 TR MEMORY RANDOM LEVEL SYNC MD DUB TOC SLEEP SOURCE CD TIMER MD MD CH CD CD ONCE W DAY W END REC L R S BASS 40 20 10 0 OVER 6 2 MUTING DIGITAL CHAIN REPEAT DISC TRACK ELAPSED REMAIN TITLE RDS MONO AUTO STEREO TUNED 1 TR MEMORY RAND...

Страница 52: ...ted disc is record protected Recording You tried to switch to another source while recording or perform a CD or tuner operation that is disabled during recording Retry Error The recording attempt failed due to consecutive disturbances from scratches on the MD or from applied vibration Sorry You tried to a combine tracks that cannot be combined b divide a track at its beginning or c edit a disc usi...

Страница 53: ...nnection MD recorder Playing back Playing back Recording Recording Guide to the serial copy management system Since your MD unit uses the Serial Copy Management System SCMS MDs recorded through the digital input terminal cannot be used to make subsequent copies to other MDs through the digital output terminal The following diagram shows a system for making copies through the digital or analog term...

Страница 54: ...nment or recording of track numbers may result 1 when CD tracks are divided into several smaller tracks during digital recording or 2 when certain CDs are recorded with the Level Sync On for automatic track marking MD Reading appears for a long time If the inserted recordable disc is brand new MD Reading appears on the display longer than those that have been used Rule 3 A recordable MD with mater...

Страница 55: ...about dust and fingerprints Even so a dirty or warped cartridge may malfunction Always remember the following precautions so you can enjoy high quality sound for a long time Do not touch the disc in the cartridge directly with your fingers Do not open the shutter by hand Doing so may damage the disc Storage location Avoid storing MDs in a place subject to direct sunlight high temperature or high h...

Страница 56: ... the AC power cord mains lead plug to the wall outlet the mains securely Check the speaker connections Adjust the volume level Press MUTING on the remote control to restore the sound Turn down the volume level first then disconnect the headphones Check the connections and insert the audio connection cable plugs firmly Turn off any television or similar devices or move them away from the unit Place...

Страница 57: ...far from the unit s remote control sensor or outside the sensor s detection angle There is some obstruction between the remote control and the unit The cable is not connected Remedy Switch the frequency receiving mode to MONO Adjust the position height and direction of the antenna aerial Connect an outdoor FM antenna aerial Try to use an antenna aerial having more elements For installation of the ...

Страница 58: ...on 16 H CD button 16 29 36 I CD button 16 27 29 34 35 J DISPLAY button 13 17 19 21 23 25 37 K EDIT CLEAR NO button 13 15 24 28 29 31 34 37 43 49 51 L REPEAT YES button 14 15 24 28 29 31 36 43 49 51 M MULTI JOG dial 13 15 16 18 20 29 30 34 35 37 38 40 43 45 47 49 51 N TIMER button 13 45 48 O buttons 16 18 34 48 TUNING buttons 15 21 P MODE button 34 36 AUTO MONO button 21 CD MD TUNER AMPLIFIER FR V ...

Страница 59: ... 3 TIMER indicator 45 4 MD indicator 26 5 MD CD setting indicators 24 6 Multi purpose display 7 CH channel indicator 14 15 20 8 When lit the indicators show what the mulit purpose display 6 above them is currently displaying 17 19 24 9 Indicators for radio frequency information 14 21 0 TOC indicator 25 A MD operation indicators 18 24 25 B DUB indicator 24 25 C CD operation indicators 20 24 25 D Pl...

Страница 60: ...tor 25 at 8 Ω Sensitivity and impedance LINE TAPE 150 mV 50 kΩ CDR 150 mV 50 kΩ Frequency response 10 to 50 000 Hz 0 3 dB Tone Control S BASS1 4 dB at 40 Hz S BASS2 8 dB at 50 Hz S BASS3 4 dB at 10 kHz 8 dB at 50 Hz Signal to noise ratio LINE CDR TAPE 100dB IHF A Muting 50 dB CD player Signal readout system Optical non contact Frequency response 10 Hz to 20 kHz 3 dB Wow and flutter Below threshold...

Отзывы: