background image

41

Listening to the Radio

When tuned into a station, the Tuned 

 indicator 

appears. When tuned into a stereo FM station, the FM ST 
indicator appears as well.

Tuning into weak stereo FM stations

If the signal from a stereo FM station is weak, it may be
impossible to get good reception. In this case, switch to 
Manual Tuning mode and listen to the station in mono.

Adjusting the Antennas

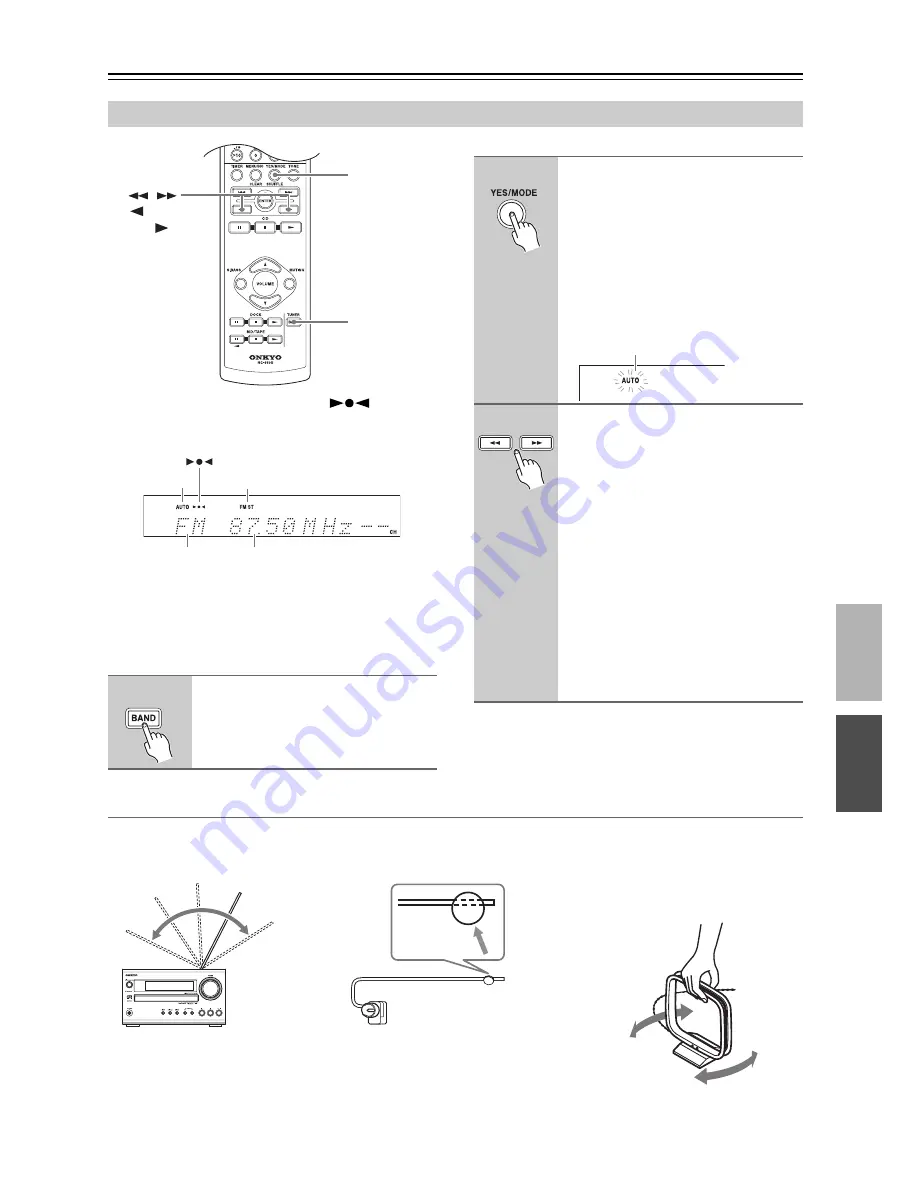
Tuning into AM/FM Radio Stations

1

Press the [BAND] button repeat-
edly to select “AM” or “FM”.

YES/MODE

BAND

(     TUN/
TUN     )

    /      

AUTO

FM ST

Band

Frequency

2

Press the [YES/MODE] button 
repeatedly to select “Auto” or 
“Manual”.

• Auto Tuning Mode

The AUTO indicator appears and ste-
reo radio reception is possible.

• Manual Tuning Mode

The AUTO indicator is not displayed 
and radio reception will be in mono.

3

Use the Rewind and Fast Forward 
[

5

]/[

4

] buttons to tune into a 

station.

In Auto tuning mode,

 once a station is 

found, tuning stops automatically.
Radio Frequency can be changed in 0.05 
MHz steps for FM and 9 kHz or 10 kHz 
steps for AM.

In Manual Tuning mode,

 the frequency 

stops changing when you release the but-
ton. Press the button repeatedly to 
change the frequency one step at a time.

Note:

On the CD receiver, you can also tune into 
a station by pressing its PRESET 
[

t

]/[

1

] button for a few seconds.

AUTO indicator

1

2

Change the direction of the 
antenna to achieve the best 
reception.

Affix the antenna with a thumbtack. (Do not 
push the thumbtack 

through

 the antenna.)

Caution: 

Be careful not to prick your finger!

Adjusting the AM antenna

Adjust the location and position of the AM 
antenna while listening to an AM station to 
achieve the best reception.

Adjusting and installing the FM antenna

Choose a location for the FM antenna while listening to an FM station.

Содержание CR-325UKD

Страница 1: ...you to obtain optimum performance and listening enjoyment from your new CD receiver Please retain this manual for future reference Contents Getting Started 2 Connections 17 Basic Operations 25 Playin...

Страница 2: ...ratus does not operate normally by following the operating instructions Adjust only those controls that are covered by the oper ating instructions as an improper adjustment of other controls may resul...

Страница 3: ...inished using this unit remove all discs and turn off the power 7 Installing this Unit Install this unit in a well ventilated location Ensure that there s adequate ventilation all around this unit esp...

Страница 4: ...in accordance with the following code As the colours of the wires in the mains lead of this appa ratus may not correspond with the coloured markings identifying the terminals in your plug proceed as...

Страница 5: ...nterface for Sticks and Portable Audio Player WMA 3 MP3 Aluminium Volume Knob Gold Plated Banana Plug Compatible Transparency Speaker Posts Supplied Accessories Make sure you have the following access...

Страница 6: ...her remote controller of the same type is used in the same room or the CD receiver is installed close to equipment that uses infrared rays the remote controller may not work reliably Don t put anythin...

Страница 7: ...26 Muting the Sound 26 Changing the Input Display 27 Playing a Disc Playing CDs 28 Using the Remote Controller 29 Displaying CD Information 29 Selecting Playing MP3 Files 30 Displaying MP3 Information...

Страница 8: ...8 Getting to Know the CD receiver Front Panel 1 2 3 5 4 6 7 bn bo bp 9 8 bk bl bm CR 525UKD 1 2 3 5 4 6 bn bo bp 9 8 bk bl bm CR 425UKD CR 325UKD...

Страница 9: ...drive or MP3 music player containing music files MP3 WMA can be plugged in here and the music selected and played through the CD receiver h Disc tray 28 The CD is loaded here i INPUT button 25 27 46...

Страница 10: ...mmed 1 2 3 4 Light up when a timer has been programmed Lights up when a timer has been programmed for recording k Tuning indicators AUTO Lights up when Auto Tuning is selected and disap pears when Man...

Страница 11: ...ote controller can then be used to control that component To use u you must make an analog audio connection RCA between the CD receiver and the other component f DAB antenna 18 This jack is for connec...

Страница 12: ...Know the CD receiver Continued Remote Controller bm bq bo bs bt cl ck br cm cn 2 1 3 5 bl 4 bn 6 7 bp bq bo bs bt cl ck br cm cn bp 8 9 bk bm 2 1 3 5 bl 4 bn 6 7 8 bk RC 721S CR 525UKD RC 660S CR 425...

Страница 13: ...26 Sets the Super Bass function l Onkyo RI Dock control buttons m Onkyo MD recorder and cassette deck control buttons For twin cassette decks only Deck B can be con trolled n CLOCK CALL button 53 Cal...

Страница 14: ...to the MD TAPE jack of the CD receiver and the input source is set to TAPE it works as a DOLBY NR button Refer to the instruction manual for each connected component for details For column items with...

Страница 15: ...2 Audio Layer 3 format with a sampling rate of between 8 kHz and 48 kHz and a bit rate of between 8 kbps and 320 kbps 128 kbps recommended Incompatible files cannot be played Constant bit rate MP3 fi...

Страница 16: ...rside of a disc Always hold discs by the edge as shown Never attach adhesive tape or sticky labels to discs Cleaning Discs For best results keep your discs clean Fingerprints and dust can affect the s...

Страница 17: ...dy for use you ll need to tune into an FM radio station and adjust the position of the FM antenna to achieve the best possible reception 2 Use thumbtacks or something similar to fix the FM antenna int...

Страница 18: ...use the same antenna for both FM and TV reception as this can cause interference problems If cir cumstances demand it use a TV FM antenna splitter as shown Connecting an Outdoor AM Antenna If good rec...

Страница 19: ...rs with an impedance of between 4 and 16 ohms Connecting a speaker with a lower impedance may damage the speaker Be careful not to short the positive and negative wires Doing so may damage the CD rece...

Страница 20: ...inputs and out puts typically labeled L Push plugs in all the way to make good connections loose connec tions can cause noise or malfunc tions To prevent interference keep audio cables away from powe...

Страница 21: ...s is the default setting unless you ve changed it it can be left as it is see page 27 Some u capable components have two u jacks They re both the same so you can use either one The extra jack is for c...

Страница 22: ...APE jacks must be set to MD see page 27 Some u capable components have two u jacks They re both the same so you can use either one The extra jack is for connecting additional u capable components Note...

Страница 23: ...DOCK See the RI Dock s instruction manual for details Connecting the Power Cord Notes Before connecting the power cord connect all of your speakers and AV components Turning on the CD receiver may ca...

Страница 24: ...nction automatically updates the clock daily at 2 A M 3 A M and 2 P M If for some reason the clock cannot be set automatically see Setting AccuClock to Use a Specific Station on page 52 and Setting th...

Страница 25: ...ler s VOLUME q w buttons You can select CD DAB AM FM or a connected com ponent TAPE DOCK USB as the input source To select the input source press the remote controller s INPUT t 1 buttons repeatedly O...

Страница 26: ...l indicator flashes too To unmute the CD receiver press the MUTING button again Tips While the CD receiver is muted Turning the VOLUME control on the CD receiver or pressing the VOLUME q w buttons on...

Страница 27: ...etter abbreviation as per the following table Changing the Input Display 1 Use the INPUT t 1 buttons to select TAPE 2 Press and hold the MENU NO button until Name Select appears on the display and the...

Страница 28: ...n the CD receiver and open the disc tray 2 Place the CD on the tray with the label side facing up Place 8 cm CDs in the center of the tray 3 To start playback press the Play Pause 1 3 button The disc...

Страница 29: ...page 30 Press to adjust the volume Press the VOLUME Up q button to turn up the volume Press the VOL UME Down w button to turn it down Press to start playback Pressing this button while the CD receive...

Страница 30: ...selected press the YES MODE button to cancel it before pro ceeding Selecting Playing MP3 Files File 11 File 1 File 10 Folder 3 File 12 Root Folder 1 Folder 2 File 13 Folder 4 File 14 File 18 FOLDER M...

Страница 31: ...y in progress press ENTER to play the first MP3 file in the specified folder 3 Use the number buttons to enter the file number Playback starts If a folder contains more than 99 MP3 files double digit...

Страница 32: ...MP3 file Notes You can also use the CD receiver s DISPLAY button to display this information To display the disc name press the DISPLAY button while playback is stopped If a file or folder name contai...

Страница 33: ...ess the Open Close 0 button to open the disc tray or turn off the CD receiver Memory Playback 1 Press the YES MODE button repeatedly until the MEMORY indi cator appears 2 Use the Previous and Next 7 6...

Страница 34: ...e disc in random order repeatedly With an MP3 CD you can combine repeat playback with 1 folder playback to play all of the tracks in a specified folder repeatedly Repeat 1 playback can t be combined w...

Страница 35: ...this preference doesn t need to be changed SVD Supplementary Volume Descriptor supports long file and folder names and characters other than letters and numbers Some CD burning software refers to the...

Страница 36: ...y This preference determines how the FOLDER button works File folder name Hide Number Option Disable Enable 01 Pops 01 Pops Pops 10 Rock 10 Rock Rock 16_Jazz 16_Jazz Jazz 21th Century 21th Century 21t...

Страница 37: ...orage device has been partitioned only music files in the first partition can be played Each folder may contain up to 500 music files and folders may be nested up to eight levels deep USB hubs and USB...

Страница 38: ...me 4 Use the Previous 7 and Next 6 buttons to select a file Notes Do not connect the CD receiver s USB port to a USB port on your computer Music on your computer cannot be played through the CD receiv...

Страница 39: ...rs Random playback is cancelled when the USB mass storage device is removed or the CD receiver is set to Standby Select the type of Repeat Playback When playing back USB mass storage device music file...

Страница 40: ...resent Album name Name of the album if ID3 tag present While an MP3 file is playing MP3 will appear While a WMA file is playing WMA will appear Notes You can also use the CD receiver s DISPLAY button...

Страница 41: ...o 3 Use the Rewind and Fast Forward 5 4 buttons to tune into a station In Auto tuning mode once a station is found tuning stops automatically Radio Frequency can be changed in 0 05 MHz steps for FM an...

Страница 42: ...RDS data The RDS indicator appears on the display when the CD receiver is tuned to an FM station that supports RDS Notes If the signal from an RDS station is weak RDS data may be displayed intermitten...

Страница 43: ...new area you can run the Auto Tuning function again 1 Press the MENU NO button 2 Use the Previous and Next 7 6 buttons to select Auto Tuning and then press ENTER The number of stations found and the...

Страница 44: ...and audio mode ste reo mono or joint stereo 4 Signal Quality Displays the signal quality 0 59 Poor reception 60 79 Good reception 80 100 Excellent reception 5 Multiplex Name Displays the name of the...

Страница 45: ...and Next 7 6 buttons to select the following options and then press ENTER Tuning Aid With the Tuning Aid you can adjust the position and direction of the DAB antenna while monitoring the sig nal stre...

Страница 46: ...t them see page 48 Name them for easy identification see page 49 Copy them see page 50 Erase them see page 51 Presetting FM Stations Automatically Auto Preset 1 Press the BAND or INPUT t 1 buttons rep...

Страница 47: ...preset 1 will store an AM station when the AM band is selected and an FM station when the FM band is selected Stations can be stored to presets in any order For example you could store preset 5 first...

Страница 48: ...ting Preset Stations 1 Use the BAND or INPUT t 1 buttons to select AM FM or DAB The preset you selected the last time you listened to the radio will still be selected 2 Use the Previous and Next 7 6 b...

Страница 49: ...ce Note Not all of the symbols can be entered by using the number buttons Use the Previous and Next 7 or 6 buttons to select from the full range of symbols When you ve selected the charac ter you want...

Страница 50: ...lect Pre setCopy 3 Press ENTER The number of the preset to be copied flashes 4 Use the Previous and Next 7 6 buttons to select the destination preset The number of the destination preset flashes MENU...

Страница 51: ...reset s name is erased and Com plete appears on the display MENU NO YES MODE Erasing Presets 1 Select the preset you want to erase see page 48 2 Press the MENU NO button and then use the Previous and...

Страница 52: ...he display 4 Use the Rewind and Fast Forward 5 4 buttons to tune into the FM station Tip If you press the YES MODE button instead of using the Rewind and Fast For ward 5 4 buttons the CD receiver will...

Страница 53: ...ote that having the time displayed in Standby mode will consume a little more power Setting the Clock Manually 1 Press the TIMER button repeat edly until Clock appears 2 Press ENTER 3 Use the Previous...

Страница 54: ...Set The timer will work on the specified range of days With this setting you could set up a morning alarm for Mon day to Friday Timer Examples The following examples highlight some of the ways in whi...

Страница 55: ...ssette deck or MD recorder is properly connected to the MD TAPE jacks see pages 21 and 22 and the Input Display is set accordingly see page 27 TIMER STANDBY ON ENTER Number buttons or 3 Use the Previo...

Страница 56: ...time slightly ahead of the program s start time about 1 minute SUN TUE MON Days Set Everyday WED THU SAT FRI 11 Use the Previous and Next 7 6 buttons to specify the Off time and then press ENTER 12 If...

Страница 57: ...buttons to select Timer On or Timer Off After a few moments the previous dis play reappears TIMER ENTER MENU NO or Checking Timer Settings 1 Press the TIMER button repeat edly to select timer 1 2 3 or...

Страница 58: ...sing the Sleep Timer Press the SLEEP button repeat edly to select the required sleep time With the SLEEP button you can set the sleep time from 90 to 10 minutes in 10 minute increments Use the Previou...

Страница 59: ...ct polarity see page 19 Make sure all audio connecting plugs are pushed in all the way see page 20 The sound quality can be affected by strong magnetic fields such as that from a TV Try moving any suc...

Страница 60: ...see page 41 Move the CD receiver away from a nearby TV or computer Cars or airplanes can cause noisy interference The radio signal will be weakened if it has to pass through a concrete wall before re...

Страница 61: ...in all the way see page 20 No sound is heard from your turntable Make sure the turntable has a built in phono equalizer If the turntable doesn t have a phono equalizer built in you must provide one Ti...

Страница 62: ...W Damping Factor 25 Front 1 kHz 8 Input Sensitivity and Impedance 150 mV 50 k DOCK IN MD TAPE IN Output Level and Impedance 150 mV 2 2 MD TAPE OUT Frequency Response 10 Hz 100 kHz 3 dB DOCK MD TAPE To...

Страница 63: ...63 Memo...

Страница 64: ...Fax 201 785 2650 http www us onkyo com ONKYO EUROPE ELECTRONICS GmbH Liegnitzerstrasse 6 82194 Groebenzell GERMANY Tel 49 8142 4401 0 Fax 49 8142 4401 555 http www eu onkyo com ONKYO EUROPE UK Office...

Отзывы: