background image

14

Enjoying Audio Sources

• Before connecting the power cord, connect all your 

speakers and audio components.

• Turning on the A-9355/A-9155 may cause a momen-

tary power surge, which might interfere with other 
electrical equipment on the same circuit. If this is a 
problem, plug the A-9355/A-9155 into a different 
branch circuit.

For home electric appliances which require a measure-
ble amount of power, do not use the same wall outlet in 
which the A-9355/A-9155 is plugged so that the 
A-9355/A-9155 may operate under optimum condi-
tions. Allocate them another wall outlet.

Notes:

• To shut down the A-9355/A-9155 completely, set the 

[POWER] switch to the OFF position (

).

• For the sake of speaker protection, the A-9355/A-9155 

waits for approximately 10 seconds after powered on 
before the system becomes stable to start delivering 
sound.

Powering on the whole system

This operation is available when you have Onkyo products 
with STANDBY/ON function connected through 

.


Press first the ON button on the remote controller to turn 
the A-9355/A-9155 on. Press once again the ON button on 
the remote controller to power on every Onkyo component 
that is connected to the A-9355/A-9155 via 

.


Powering on the all the components at a time 


that are 

 connected to the A-9355/A-9155


With the A-9355/A-9155 powered on, press and hold the 
ON button on the remote controller for more than 16 sec-
onds.The system goes Standby. Now you can power on all 
the components connected to the A-9355/A-9155 at a time 
by pressing the ON button on the remote controller.
• To restore the setting, use the same procedure mentioned 

above.

You can select which set of speakers outputs sound, or 
you can use both sets at the same time. 

To output sound from the speakers connected to the 
SPEAKERS A terminals, press the SPEAKERS [A] 
button. The indicator above that button will light up.
To output sound from the speakers connected to the 
SPEAKERS B terminals, press the SPEAKERS [B] 
button. The indicator above that button will light up. 
To output sound from all connected speakers, press the 
SPEAKERS [A] and SPEAKERS [B] button so that 
both indicators are on.


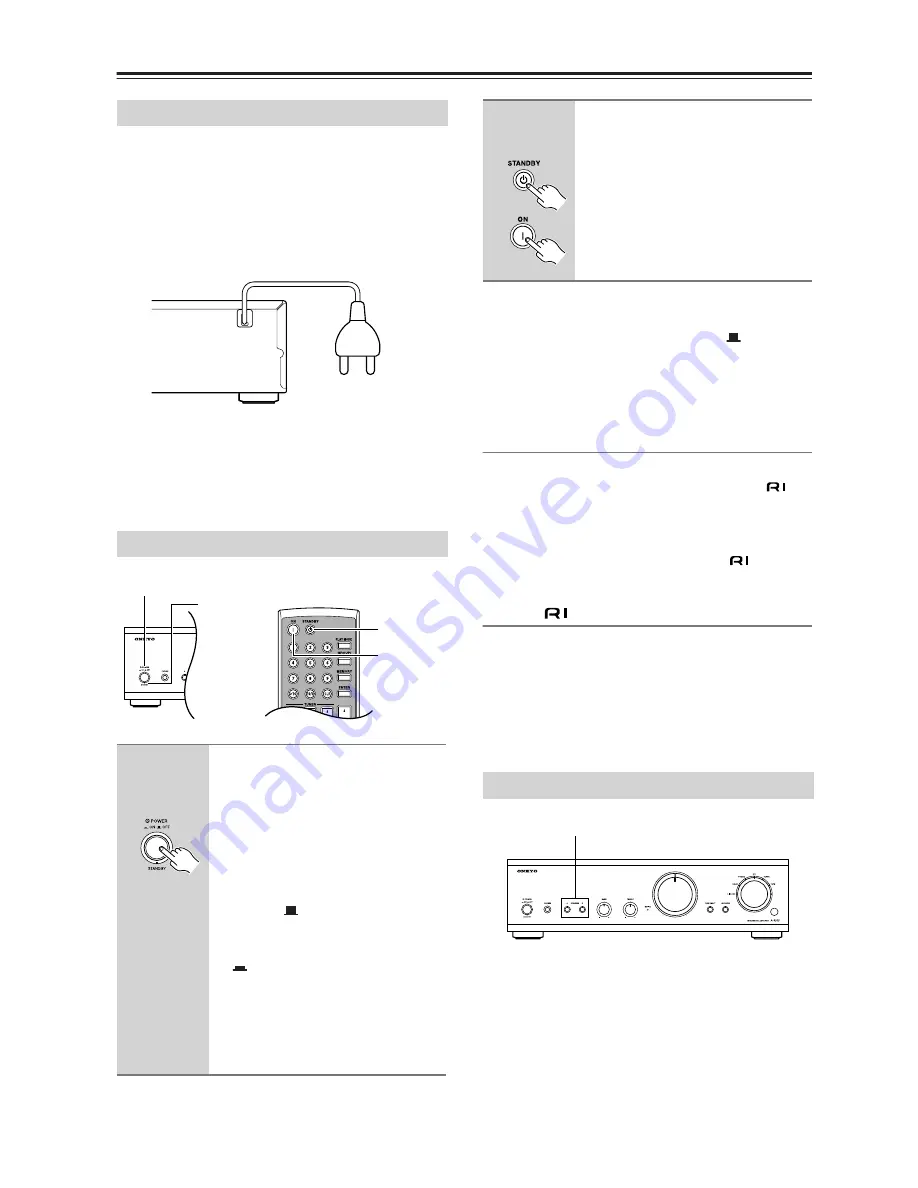
Connecting the Power Cord

Turning On the A-9355/A-9155


1


Press the [POWER] switch.


The A-9355/A-9155 retains the power 
mode (on/standby) in which the ampli-
fier was the last time you turned off the 
system.


Notes:


• The A-9355/A-9155 is shipped with 

the [POWER] switch in the OFF 
position (

). When the power cord 

is connected for the very first time or 
the [POWER] switch is set to ON 
(

) position, the A-9355/A-9155 

will turn on.

• When it’s turned on, the 

A-9355/A-9155 outputs no sound 
for about five seconds. This allows 
the circuits to stabilize.

To wall outlet

POWER

ON

STANDBY

STANDBY
indicator

A-9355/

A-9155


2


To turn the A-9355/A-9155 on, 
press the [ON] button on the 
remote controller.


The STANDBY indicator goes off.


To set the A-9355/A-9155 to 
Standby, press the [STANDBY] 
button on the remote controller.


The STANDBY indicator lights up.


Selecting Speaker Set A or B

Remote

controller

SPEAKER selector

Содержание A-9155

Страница 1: ... before making connections and plugging in the unit Following the instructions in this manual will enable you to obtain optimum performance and listening enjoyment from your new Integrated Amplifier Please retain this manual for future reference Contents Introduction 2 Connections 10 Enjoying Audio Sources 14 Troubleshooting 17 Specifications 19 ...

Страница 2: ...paratus does not operate normally by following the operating instructions Adjust only those controls that are covered by the operating instructions as an improper adjustment of other controls may result in damage and will often require extensive work by a qualified technician to restore the apparatus to its normal operation E If the apparatus has been dropped or damaged in any way and F When the a...

Страница 3: ...Handling Notes If you need to transport this unit use the original packaging to pack it how it was when you origi nally bought it Do not leave rubber or plastic items on this unit for a long time because they may leave marks on the case This unit s top and rear panels may get warm after prolonged use This is normal If you do not use this unit for a long time it may not work properly the next time ...

Страница 4: ...Remote Control Important Safety Instructions 2 Precautions 3 Table of Contents 4 Features 4 Supplied Accessories 5 Using the Remote Controller 5 Installing the Remote Controller s Batteries 5 Front Rear Panels 6 Front Panel 6 Rear Panel 7 Remote Controller 8 Remote Controller Buttons to control the A 9355 A 9155 8 Remote Controller Buttons to control Onkyo products other than A 9355 A 9155 8 Intro...

Страница 5: ...ng the batteries The remote controller may not work reliably if the A 9355 A 9155 is installed in a rack behind colored glass doors Keep this in mind when installing The remote controller will not work if there s an obstacle between it and the A 9355 A 9155 s remote control sensor Notes If the remote controller doesn t work reliably try replacing the batteries Don t mix new and old batteries or di...

Страница 6: ...of treble sounds G MUTING indicator 15 The indicator lights up while muting function is activated H Volume control 15 This control is used to adjust the volume of the A 9355 A 9155 I A 9355 PURE DIRECT button and indicator 16 This button turns the PURE DIRECT function on and off The indicator lights up when the PURE DIRECT function is on A 9155 DIRECT button and indicator 16 This button turns the ...

Страница 7: ... input and output are for connect ing a cassette deck with an analog audio output and input J A 9355 LINE MD IN OUT A 9155 LINE DOCK IN OUT This analog audio input and output are for connect ing a component s with an analog audio output and input MD recorder TV RI Dock etc K DOCK IN A 9355 only This analog audio input is for connecting a compo nent s analog audio output RI Dock etc L REMOTE CONTRO...

Страница 8: ...ed to the A 9355 A 9155 via you can control them by using the corresponding buttons for each component listed in the following table Example For 6 Random button When the A 9355 has a MD player connected to the LINE MD terminal or a CD player to the CD termi nal the button functions as RANDOM control When the A 9355 has a RI dock connected to the DOCK terminal or the A 9155 has a RI dock con nected...

Страница 9: ...ontrolled Connecting Terminal LINE MD A 9355 DOCK A 9355 LINE DOCK A 9155 CD TUNER TAPE Component and Input Name Button on Remote Controller MD Recorder MD RI Dock DOCK CD Player CD Tuner TUNER CassetteTape Deck TAPE 1 1 9 1 9 1 9 10 0 10 0 10 0 10 10 10 2 BAND BAND FM MODE FM MODE PRESET PRESET TUNING TUNING 3 DIMMER DIMMER 4 5 6 RANDOM RANDOM SHUFFLE RANDOM DOLBY NR 7 REPEAT REPEAT REPEAT REPEAT...

Страница 10: ...rds connect positive terminals only to positive terminals and negative terminals only to nega tive terminals If you get them the wrong way around the sound will be out of phase and will sound unnatural Unnecessarily long or very thin speaker cables may affect the sound quality and should be avoided Be careful not to short the positive and negative wires Make sure also the wires do not touch the re...

Страница 11: ...d connect the phono preamp s output to the A 9355 A 9155 s PHONO L R jacks Connecting a CD Player Use an analog audio cable to connect the A 9355 A 9155 s CD L R jacks to the analog audio out put jacks on the CD player as shown Always refer to the instructions that came with the component that you are connecting Do not plug in the power cord until all connec tions have been properly made Do not bi...

Страница 12: ...e MD recorder s analog audio input jacks as shown Connecting a Remote Interactive Dock RI Dock Use an analog audio cable to connect the A 9355 s DOCK Jack or A 9155 s LINE DOCK IN jack to the RI Dock s analog audio output jacks and use an cable to connect the A 9355 A 9155 s jack to the RI Dock s jack as shown See page 13 to connect multiple audio components using jacks Note If you use the Onkyo R...

Страница 13: ...ing all the components using the daisy chain method Use only dedicated cables for connections no cables are supplied with the A 9355 A 9155 The A 9355 has two jacks They re all the same so you can use either of them jacks should be connected only to Onkyo compo nents Connecting them to another manufacturer s component may cause the A 9355 A 9155 to mal function Some components may not support all ...

Страница 14: ...dby Now you can power on all the components connected to the A 9355 A 9155 at a time by pressing the ON button on the remote controller To restore the setting use the same procedure mentioned above You can select which set of speakers outputs sound or you can use both sets at the same time To output sound from the speakers connected to the SPEAKERS A terminals press the SPEAKERS A button The indic...

Страница 15: ...cted to the DOCK jacks LINE DOCK A 9155 Select to lis ten to the component connected to the LINE DOCK jacks PHONO Select to listen to the turnta ble connected to the PHONO jacks CD Select to listen to the component connected to the CD jacks TUNER Select to listen to the compo nent connected to the TUNER jacks TAPE Select to hear the component connected to the TAPE IN jacks When selecting with the ...

Страница 16: ...s turned down low Use this button according to the music source and according to the listening area Its purpose is to enrich the natural sound effects of both the treble and bass The indicator lights up when the LOUDNESS function is on When the PURE DIRECT or DIRECT function is on turn the function off to use the LOUDNESS effect Notes A 9355 You can record on a recorder that s con nected to the LI...

Страница 17: ...ected no sound will be output from any of the speakers page 14 Noise can be heard Using cable ties to bundle audio cables with power cords speaker cables and so on may degrade the audio perfor mance so don t bundle them together An audio cable may be picking up interference Try repositioning your cables The tone controls have no effect A 9355 If the PURE DIRECT indicator lights up the PURE DIRECT ...

Страница 18: ...all outlet wait at least ten seconds and then plug it back in again Onkyo is not responsible for damages such as CD rental fees due to unsuccessful recordings caused by the unit s malfunction Before you record important data make sure that the material will be recorded correctly How to reset Begin by turning the POWER switch off Next with the SPEAKERS A and B buttons pressed at the same time turn ...

Страница 19: ...60 Hz AC 220 230 V 50 60 Hz Power consumption European 46 W Asian 45 W 120 V 51 W 220V Stand by power consumption 0 2 W Dimensions W H D 435 124 344 mm 17 1 8 4 7 8 13 9 16 Weight 7 3 kg 16 1 lbs Analog inputs PHONO CD TUNER TAPE LINE MD DOCK Analog outputs LINE MD TAPE Speaker outputs 2 A B Phones 1 Specifications and features are subject to change without notice A 9155 Integrated Amplifier 2ch 6...

Страница 20: ...Tel 201 785 2600 Fax 201 785 2650 http www us onkyo com ONKYO EUROPE ELECTRONICS GmbH Liegnitzerstrasse 6 82194 Groebenzell GERMANY Tel 49 8142 4401 0 Fax 49 8142 4401 555 http www eu onkyo com ONKYO EUROPE UK Office Suite 1 Gregories Court Gregories Road Beaconsfield Buckinghamshire HP9 1HQ UNITED KINGDOM Tel 44 0 1494 681515 Fax 44 0 1494 680452 ONKYO CHINA LIMITED Unit 1 12 9 F Ever Gain PlazaT...

Отзывы: