background image

SKU 97439 

For technical questions, please call 1-800-444-3353. 

Page 4

asseMblY instructions

read the entire iMportant 

saFetY inForMation section 

at the beginning of this manual 

including all text under 

subheadings therein before set 

up or use of this product.

note:

  For additional information regarding 

the parts listed in the following pages, 

refer to the Assembly Diagram near 

the end of this manual.

note:

  The Greenhouse is heavy and 

unwieldy when fully assembled.  It 

should be assembled near the area 

where it will be anchored.  The area 

should be firm, level, and provide 

shelter from the wind.  

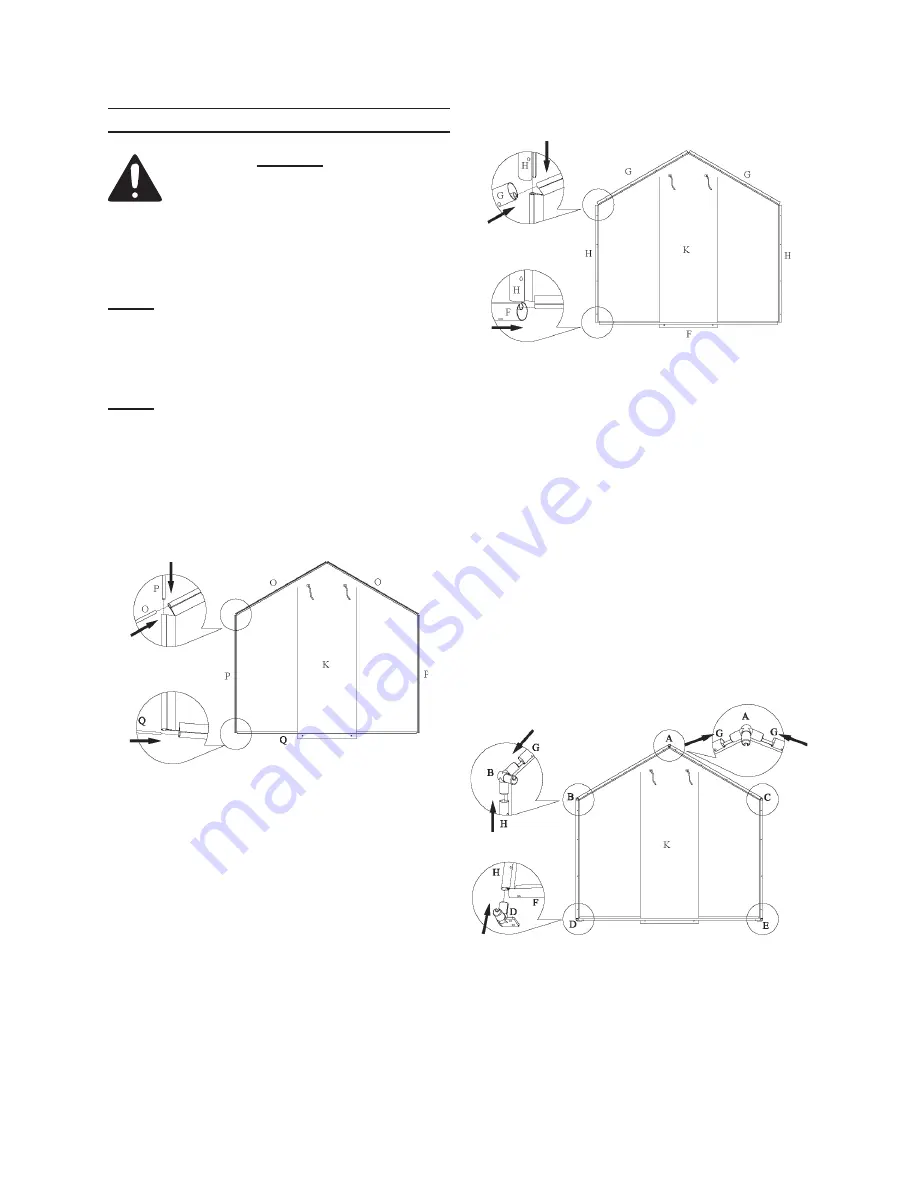
Figure for slat assembly (steps 1-3)

1.  Slide two Rafter Slats (O) into the 

sleeves on the top of the Front Panel 

(K).
Slide two Side Slats (P) into the 

2. 

sleeves on the sides of the Front 

Panel.
Slide Bottom Slat (Q) into the sleeve 

3. 

on the bottom of the Front Panel.

Figure for pole assembly (steps 4-6)

4.  Fit the covered Rafter Slats into the 

grooves in the Rafter Poles (G) and 

slide into place, with the holes on the 

Rafter Poles facing toward you (see 

insets above).
Fit the covered Side Slats into the 

5. 

grooves in the Side Poles (H) and 

slide into place, with the holes on the 

Side Poles facing toward you.
Fit the covered Bottom Slat into the 

6. 

groove in the Bottom Pole (F) and 

slide into place, with the holes on the 

Bottom Pole facing toward you.

Figure for connector ass’y (steps 7-8)

7.  Secure the Rafter Poles together at 

the peak of the roof using Connector 

A.  Make sure the unconnected point 

on the Connector faces towards you.

Содержание 97439

Страница 1: ...ed No portion of this manual or any artwork contained herein may be reproduced in any shape or form without the express written consent of Harbor Freight Tools Diagrams within this manual may not be d...

Страница 2: ...ld result in death or serious injury CAUTION used with the safety alert symbol indicates a hazardous situation which if not avoided could result in minor or moderate injury NOTICE is used to address p...

Страница 3: ...or near this item Use for intended purpose s only 7 Inspect before use do not use if parts 8 loose or damaged Maintain product labels and name 9 plates These carry important safety information If unre...

Страница 4: ...into the sleeves on the top of the Front Panel K Slide two Side Slats P into the 2 sleeves on the sides of the Front Panel Slide Bottom Slat Q into the sleeve 3 on the bottom of the Front Panel Figure...

Страница 5: ...0 of the Panel with Connector E Use the Hex Wrench T to fasten a Hex Screw S into the hole on the bottom of the Bottom Pole Repeat the above steps to assemble 11 the Rear Panel L Figure for Panel Asse...

Страница 6: ...es N and could result in property damage or personal injury In case of severe weather take the Greenhouse apart Examine the area where the Green 18 house is to be placed Make sure there are no utility...

Страница 7: ...stributor expressly states that all repairs and parts replacements should be undertaken by certified and licensed technicians and not by the buyer The buyer assumes all risk and liability arising out...

Страница 8: ...e 8 ASSEMBLY DIAGRAM Record Product s Serial Number Here Note If product has no serial number record month and year of purchase instead Note Some parts are listed and shown for illustration purposes o...

Отзывы: