background image

27

NOTE: Gradual deterioration in performance because the battery has been left in a 

discharged state, left in cold conditions for an extended period of time, or worn out 

through heavy use is not covered by the warranty. 

17.5 Service Checks and Warranty Service

This warranty is extended only to the original purchaser. Your original receipt will be 

necessary as proof of purchase before any warranty performances are rendered. 

This warranty only covers failures due to defects in materials or workmanship which 

occur during normal use and does not cover damage that occurs in shipment or 

failures which are caused by products not supplied by 

One Rehab

 or failures resulting 

from accident, misuse, abuse, neglect, mishandling, misapplication, alteration, 

modification, commercial use or by anyone other than an authorized dealer, or 

damage that is attributable to the acts of God.

The manufacturer reserves the right to alter without notice, any weights, 

measurements or other technical data shown in this manual. All figures, 

measurements and capacities shown in this manual are approximate and do not 

constitute specifications.  

Important

This warranty is void if the original scooter serial number tag is removed or altered.  

To validate the warranty this form must be filled online (where applicable) or 

posted to One Rehab (Unit 1, Fernwood Estate, Shillinglee Road, Chiddingfold, GU8 

4SX within 14 days of purchasing the scooter.

17.6 Notices to Consumer

There are no other express warranties. To the extent permitted by law, any implied 

warranty (including a warranty of merchantability or fitness for a particular purpose) is 

limited to:

1.  One (1) year from the day of original delivery

2.  Repair or replacement of the defective part only.

Manufacture: One Rehab Ltd

Содержание QFold

Страница 1: ...QFold Mobility Scooter User Manual...

Страница 2: ...use improves your mobility and quality of life This owner s manual includes operation instructions for every aspect of the scooter Contents 1 0 Safety Guidelines 3 4 2 0 Pre Ride Safety Check 4 3 0 S...

Страница 3: ...election and purchasing decision regarding the type of scooter to be used is the responsibility of the scooter user who is capable of making such a decision and his her health care professional i e me...

Страница 4: ...you discover a problem contact your authorized Provider for assistance Please refer to the Contact Information insert in your Owner s Package WARNING Never exceed the maximum permissible load see 3 0...

Страница 5: ...ees Turning Radius Min 1150 mm 45 in Ground Clearance Max Mid Frame 105 mm 4 in Seat Type Folding with removable seat covers Seat Width 430 mm 17 in Seat Height 370 mm 18 in Front Tyre 150 mm 6 in Sol...

Страница 6: ...10 LED Light 4 Battery Box 11 Control Panel 5 Rear mud guard 12 Anti Tip Wheel 6 Rear Wheel 13 Freewheel Lever 7 Storage basket Your scooter is equipped with a number of elements and parts You should...

Страница 7: ...ail represents the slowest speed setting The image of the hare represents the fastest speed setting 5 3 Key Switch 3 This turns the power on and off your scooter Insert the key into the key switch Tur...

Страница 8: ...hand tiller handle To move forward Use your right thumb to push the right side of the control lever forward the scooter will then start to go forwards To move backward Use your left thumb to push the...

Страница 9: ...t sit the scooter with all wheels on the ground as shown Fig 6 0 1 Loosen off the tiller adjuster knob Fig 6 0 2 and lift the tiller into drive position 6 0 3 Re tighten tiller adjuster knob making su...

Страница 10: ...as clicked into position as shown Fig6 2 2 The fold knob is positioned on the left hand side of the scooter Fig 6 2 1 Fig 6 2 2 WARNING Sitting on the seat without the lock knob correctly in position...

Страница 11: ...pull the scooter on its rear tip wheels as shown in 6 4 Storage and travel Fig 6 3 3 Fig 6 2 1 Fig 6 2 2 6 4 Storage and Travel With the tiller tightened in the folded position you can now lift the sc...

Страница 12: ...movable padded covers These are easy to fit or remove The three items are shown below Fig 7 1 1 Fig 7 1 1 7 2 Padded Seat Bar To fit the padded back bar cover simply undo the Velcro and fold around th...

Страница 13: ...at and insert into place 7 4 2 Fig 7 4 1 Fig 7 4 2 7 3 Back Seat Cover To fit the seat back cover make sure the back support section is positioned as shown Fig 7 2 1 then simply pull down the back cov...

Страница 14: ...rds against the sprung connectors and then lift up to release the box Fig 8 2 0 Note See 10 0 Batteries and Charging on page 16 for how to charge your batteries 9 0 Operation Freewheel Lever The Freew...

Страница 15: ...on any incline WARNING When your scooter is in freewheel mode the braking system is disengaged WARNING Disengage the drive motors only on a level surface WARNING Ensure the key is removed from the ke...

Страница 16: ...state of charge without regularly recharging it fully Do not charge your battery under extreme temperatures High temperatures above 30 C are not recommended for charging as well as low temperatures b...

Страница 17: ...e same time Do not sit in the scooter while charging the batteries WARNING Chargers are selected precisely for particular applications and are especially matched to the type size and chemical formulat...

Страница 18: ...of the charger outlet point either positioned on the front of the battery box Fig 10 3 1 Put the charger plug into the outlet point Do not switch on the battery charger until all the plugs are in pos...

Страница 19: ...ntact is made WARNING Never sit on the scooter when it is in freewheel mode WARNING Never exceed the maximum permissible load see 3 0 Specifications and never use the scooter to transport more than on...

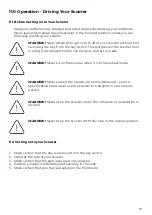
Страница 20: ...o stop release the throttle control lever to allow your scooter to stop gradually The electronic brakes will automatically engage when your scooter comes to a stop 11 4 Steering Place both hands on th...

Страница 21: ...raight down an incline ramp slope etc Never drive across traverse an incline ramp etc in any direction Driving across an incline ramp etc could result in turning the scooter over resulting in serious...

Страница 22: ...nt or brake release can cause an accident or injury The FDA has determined that each make and model of scooter can resist EMI RFI to a certain level The higher the lever of resistance the greater the...

Страница 23: ...ough for your trip Horn Button Does the horn work Seat Is the seat locking pin locating properly 13 1 Regular Checking Record To make sure your scooter is in good condition go to your scooter dealer r...

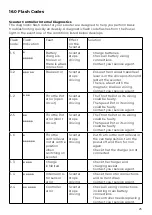
Страница 24: ...wer low 6 Scooter shuts down to conserve battery 7 Controller error 1 Turn key switch to ON 2 Reset circuit breaker 3 Place lever in Drive Mode 4 Disconnect charger 5 Recharge battery 6 Turn key switc...

Страница 25: ...n circuit Scooter stops driving The Throttle Pot or its wiring could be faulty The Speed Pot or its wiring could be faulty Contact your service agent 2 5 Throttle Pot error short circuit Scooter stops...

Страница 26: ...cessive strain on the scooter 17 3 Batteries Batteries are covered by a six 6 month warranty from the original manufacture and a further six 6 month warranty at the discretion of One Rehab Note Gradua...

Страница 27: ...use or by anyone other than an authorized dealer or damage that is attributable to the acts of God The manufacturer reserves the right to alter without notice any weights measurements or other technic...

Страница 28: ...QFold Mobility Scooter User Manual...
Отзывы: