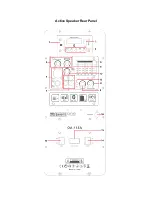
Rear Panel Guide
1. SD:
Entry for SD Memory Cards up to 16GB
2. USB:
Entry for USB Memory Cards up to 16GB
3. Play, Pause and Skip Functions
4. MIC 1 and 2 Input:
6.35 Jack input for Microphone
5. Microphone Controls:
Separate Volume Control for the inputs for Microphone MIC1 and
MIC2
6. Equalizer Panel:
5 Band Equalizer with range from -12 to +12 Db
7. L/R RCA Input/Output
8. MP3/Line Toggle:
Mode selection button to switch between Line and MP3
9. MP3/Line Volume:
Control for the USB/SD/AUX/Bluetooth or Line modes
10. MIC Echo Control:
Control for the intensity of the echo effect on the microphone inputs
11. Master Volume Control:
Adjusts the intensity or level of the volume
12. AUX IN:
3.5mm auxiliary jack input
13. LED Light Switch:
Switch for the built in LED lights on the front of the speaker
14. Power Switch:
Switch to turn the speaker on or off
15. Power Socket:
Location for the power cord for wired and charging modes
16. Speaker Antenna
Getting Set Up
Speaker Pole/Tri-pod Mounting
The OA115 speaker set also includes a pole mount option. The pole mount socket located on
the bottom of the speaker may be used to secure the speaker to the included tri-pod. Always
be sure to follow the guidelines listed below when pole mounting your speaker;
• Always be sure the stand is designed to support the weight of the speaker
• In outdoor situations that are prone to strong windy conditions, be sure to use sandbags to
weigh down the tri-pod support, this will greatly reduce the risk of tipping
• Do not stack speakers on top of each other when mounting on a tri-pod. Only one speaker
should be mounted to a tri-pod at one time.
• Always position the tri-pod legs away from foot traffic
• Extend the tri-pod legs to their fully extended position to avoid accidental tipping
• Observe and follow all safety guidelines and regulations specified by the tri-pod’s
manufacturer
• Be sure the tri-pod is situated on a flat, level, and stable surface and always tighten all locks.


