

INSTRUCTION / INSTALLATION SHEET
ev
ō
Q™ 7000 In-Ceiling and In-Wall
Speakers
IS-0261 Rev. D
301 Fulling Mill Road, Suite G
Middletown, PA 17057
Phone (800) 321-2343 / Fax (717) 702-2546
www.onqlegrand.com
©Copyright 2007 by On-Q/Legrand All Rights Reserved.
Page 3 of 3
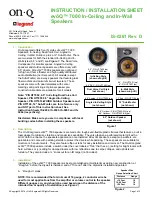
B. “Trim-out”
steps:
1. After drywall and/or painting is complete, push the speaker wire
through hole, center template over hole, mark with a pencil and
cut out with a dry-wall knife.
2.
Hold the speaker with one hand, (if speaker grill is off, pay
careful attention
not
to push on the woofer’s cone, this can
cause permanent contortion of the voice coil, thus producing a
mechanical rubbing sound or speaker failure), push in the
speaker terminal connectors and insert wires; remove speaker
grill. Be sure to have the positive wire in the RED terminal and
the negative wire in the BLACK terminal.
NOTE: Wiring both speakers identically as the above
instruction states will yield speakers that are “in phase”. If
one speaker is wired opposite of the other, the speakers will
be “out of phase” with one another. If the speakers are “out
of phase” the sound might appear smeared (canned) and a
significant loss of bass might be noticeable due to phase
cancellation. Make sure every installed speaker is correctly
phased.
3 Use one hand to push the speaker into the cut out (again,
pay careful attention
not
to push on the woofer’s cone, this
can cause permanent contortion of the voice coil, thus
producing mechanical rubbing sound or speaker failure) and
the other to turn the screws that engage the installation tabs
(see
Figure 5
). Tighten the tabs in a cross or X-pattern until
“snug”. Be careful not to over tighten the tabs or damage
could result. The speaker should appear flush to the surface.
NOTE: If using a cordless drill/screwdriver, it is suggested
that the screws be turned until almost tight, then finish
tightening via a hand screwdriver.
NOTE: A strip of grill adhesive is provided to more securely
attach the speaker grills on final installation. Simply insert
several short strips evenly around the grill slot prior to
installing the grill cover.
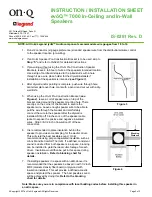
6.5" Speaker (0.7 CuFt)
Blocking Distance
16" on Center, 2x4
24.00"
16" on Center, 2x6
15.25"
16" on Center, 2x8
11.50"
16" on Center, 2x10
9.00"
16" on Center, 2x12
7.50"
24" on Center, 2x4
15.50"
24" on Center, 2x6
10.00"
8" Speaker (2.1 CuFt)
Blocking Distance
16" on Center, 2x4
71.50"
16" on Center, 2x6
45.50"
16" on Center, 2x8
34.50"
16" on Center, 2x10
27.00"
16" on Center, 2x12
22.25"
24" on Center, 2x4
46.00"
24" on Center, 2x6
29.50"
ev
ō
Q™ Speaker Blocking
Chart
Figure 5
HT7650
HT7651 HT7652 HT7653-WH/BK HT7655
HT7800
HT7801 HT7124
Size/Type
6.5" In-Ceiling
6.5" In-Wall
6.5" DVC
In-Ceiling
6.5” Outdoor
6.5" Angled
In-Ceiling
8" In-Ceiling
8" In-Wall
12” Sub
Efficiency 89dB
89dB 89dB
89dB
89dB
89dB
89dB powered
Power
(RMS/Peak)
100W/200W 100W/200W 100W/200W 100W/200W 100W/200W 125W/250W 125W/250W 200W
RMS
Freq. Resp.
55-20K
55-20K
55-20K
55-20K 55-20K
45-20K
45-20K
30-200Hz
Woofer
Glass Fiber
Glass Fiber
Glass Fiber
Glass Fiber
Glass Fiber
Glass Fiber
Glass Fiber
Glass Fiber
Tweeter
Alum. Adj.
Alum. Adj.
Alum. Adj.
Alum. Adj.
Alum. Adj.
Alum. Adj.
Alum. Adj
N/A
Drywall
Hole Size
7.75” dia.
7.5” x 10.75”
7.75” dia.
N/A
9.5” dia.
9.5” dia.
8.75” x
12.75”
N/A
Speaker Specifications