background image

DUKE EASY S.T.01/3AW Rev.0 01/2017 

12 


Outside each box there is a flag that indicates the order confirmation numbera and the model. 
Note: the packaging of an eventual seat O.M.S. is separated. 


ASSEMBLY  

1.


Remove the equipment from its packaging; 

2.


Place the chair on the previously made settings using the installation plan and adjust any “play” by 
tightening or unscrewing the adjustment feet as necessary, secure the chair to the floor using the 
two supplied dowels; 

3. If an operating mounting lamp and electrical connection; 

4. verify (and possibly perform) ground cables to the screw marked with the ground symbol; 

5. to connect the vacuum pump (see the wiring diagram) in the same manner as described in the next 
bullet for power cables (securing leads and traction). 
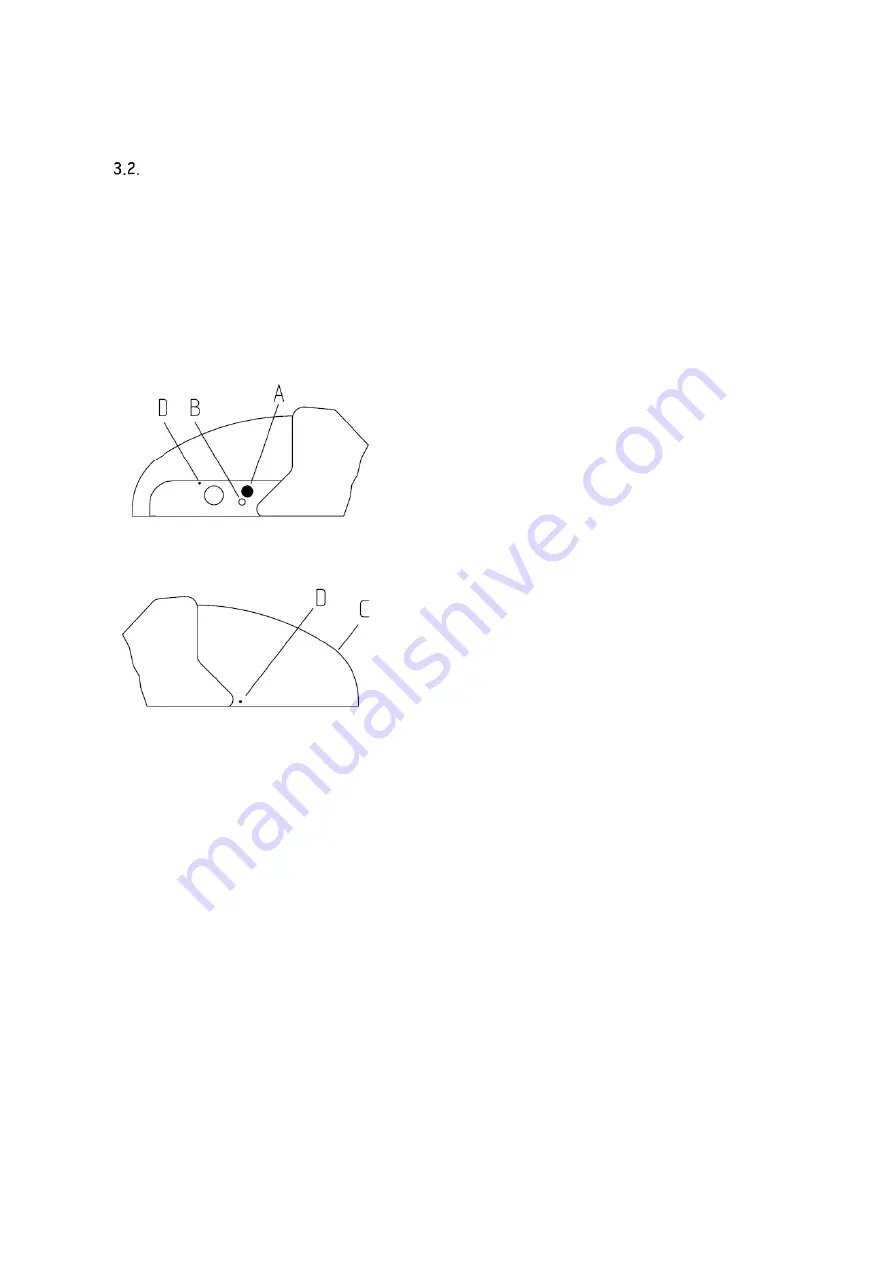
6. remove the cover at the base of the dental chair, unscrewing the screws D 

 to maintain water and air connections (see section 

developed), aspiration, exhaust and finally the power grid (Terminal); the power cables on the terminal 
board must be general, with nylon ties, insulating specially drilled and placed under the Terminal, in 
particular it must be ensured that, in the event of failure of the fasteners (clamps), the protective 
conductor is not subject to traction as long as network cables are still connected to terminal 
3.


Fit the accessories (instruments), if any, on the instrument and dental assistant tables. 

 
N.B.: Refer to the wiring and installation diagrams provided for all electrical connections.  
 

Содержание DUKE EASY

Страница 1: ...DUKE EASY S T 01 3AW Rev 0 01 2017 Instruction handbook Dental Unit DUKE EASY ...

Страница 2: ...DUKE EASY S T 01 3AW Rev 0 01 2017 2 ...

Страница 3: ...ON 13 4 CONTROLS ADJUSTMENTS INDICATORS 15 SAFETY SYSTEMS 15 INSTRUMENT TABLE 16 FOOT CONTROL 19 GROUND BOX 20 5 HIGH SPEED ASPIRATION 22 6 CHAIR 23 DOUBLE JOINT HEADREST 24 HEADREST WITH 3D MOVEMENT 25 ARMRESTS 26 7 SERVICE AND MAINTENANCE 27 CLEANING AND DISINFECTION 27 ADJUSTMENTS 29 SCHEDULED MAINTENANCE 32 EXTRAORDINARY MAINTENANCE 34 8 FORM TO REPORT ACCIDENTS TO PERSONS 42 WARNING Before us...

Страница 4: ...DUKE EASY S T 01 3AW Rev 0 01 2017 4 ...

Страница 5: ...on of the table around the patient allowing use at right and left handed operators at the same time with a single device Ability to install a table tray on a double pantografic arm High speed suction tubes and their connections are easily removable for disinfection treatment The filter easily and hygienically clean Duke Easy is combinable with the Directive 93 42 Moon dental chair CE and O M S s m...

Страница 6: ...orn If this is the case call in authorized O M S technical personnel WARNING Have defective or worn parts replaced with original warranted O M S spare parts only DANGER Do not operate the equipment on patients with pacemakers DANGER Device not suitable for use in rooms where use is made of a flammable anaesthetic mixture with air or with oxygen or with nitrous oxide WARNING Do not use the device w...

Страница 7: ... surgery WARNING Never sit on the tip or foot of the chair WARNING During instrument table movement patients and personnel in the surgery could be injured by sharp instrument tips WARNING before putting equipment into operation after periods of disuse accurately disinfect the air and water supply lines clean and drain the lines and then proceed with disinfection WARNING In the event of prolonged d...

Страница 8: ...The guarantee applies to the purchaser and to the product specified in the installation and testing report and covers all mechanical and electrical interventions relating to the product concerned The guarantee will be valid after the ordering party will be compiled and sent to O M S spa of installation and testing Essential condition to access the warranty is return to O M S spa of installation an...

Страница 9: ... to 400 kPa from 2 to 4 bar consumption of water equalling approx 2 litres minute Max temperature 30 C OPERATING PERIODS Chair intermittent 1 on 10 off Syringe 6F hot water intermittent 5 on 10 off Polymerization lamp intermittent 20 on 3 off Tooth scaler with water intermittent 3 on 5 off Micromotor intermittent 3 on 3 off Operating lamp continuous Syringe 3F cold water continuous EDI OPERATING L...

Страница 10: ...d Colour temperature 4200 6000 K Focal distance 700 mm Operating field at 700 mm 70x140 mm Luminous intensity 15000 30000 Lux MISCELLANEOUS Weight circa 165 Kg Maximum load allowed on chair 135 Kg Length of foot control cable 2 5 m Minimum space recommended for device installation approximately 3 20x3 00x3 00 m LxHxD ...

Страница 11: ...f installation additions re calibration modifications or changes are not performed by O M S authorised technicians following the instructions and using the components supplied by O M S exclusively if the electric system installed in the workplace does not comply with IEC standards and or if the equipment is not used according to the operating instructions NAMEPLATE DATA An identification plate is ...

Страница 12: ...vacuum pump see the wiring diagram in the same manner as described in the next bullet for power cables securing leads and traction 6 remove the cover at the base of the dental chair unscrewing the screws D to maintain water and air connections see section developed aspiration exhaust and finally the power grid Terminal the power cables on the terminal board must be general with nylon ties insulati...

Страница 13: ...mpurities from the tubes TESTING AND PUTTING INTO OPERATION IMPORTANT WARNING During testing check the mechanical stability of the equipment after placing all the mobile elements and accessories table lamp etc in the most unsuitable position possible 1 Ensure that the instrument table is perfectly level if an unusual tilting is identified adjust the table using the screw detail A in Figure located...

Страница 14: ...a general water tap During use the tap should be open At the end of the work day the tap should be closed or alternatively close the unit s general supply tap in the surgery DANGER Before performing any operations in the equipment always make sure that the power switch is off ...

Страница 15: ...l B Turn the screwdriver clockwise to reduce the sensor sensitivity and anticlockwise to increase it Control the pantographic arm or chair back to move downwards and touch the back of the dental chair to engage the safety sensor detail A in order to check its sensitivity Repeat the operations from the previous item until the ideal sensor sensitivity is found When the back safety sensor is engaged ...

Страница 16: ...liability eliminating crevices and the disinfection of the surface The key functions are Reversing command of the micromotor with warning led with led off the direction of rotation is normal command of spray preselection and fiber optics press button for 3 seconds with preselected led fibre optic lighting and with preselected spray active led The other buttons are inactive TURBINE MODULE Turbine o...

Страница 17: ... instructions ELECTRIC MICROMOTOR MODULE The function of the micromotor is achieved by lifting the instrument from its place moving it to the surgical field and then pressing the foot pedal see operation section MICROMOTOR Lifting the instrument from the table are inhibited all other dynamic tools and all the movements of the dental chair The micromotor allows you to work with a variable speed fro...

Страница 18: ...w to the spray until its complete exclusion the opposite rotating in the opposite direction It is recommended not to intervene in other regulations placed at the side of the spray faucet If the instrument is equipped with optical fibres lighting system these are switched on by pressing the command placed on the command pad of the table when the function is on it affects all instruments The activat...

Страница 19: ...tions so that the spray function can be operated without having to press the lever MICROMOTOR OPERATIONS Extract the instrument from its housing this operation is shown on the display Then pressing the lever A of the foot control in the rest position will enable the chip blower move the lever A to the right to operate the instrument The spray is pre selected in the instrument table by engaging the...

Страница 20: ...ion the dental chair using foot controls moving the lever B up will raise the seat moving the lever B down will lower the seat moving the lever C up will lower the backrest moving the lever C down will raise the backrest OTHER ACCESSORIES For accessories not previously described buy indicated in the product description see the specific user manuals supplied with the equipment GROUND BOX In the box...

Страница 21: ...te discharge CONDENSATE DRAIN section WATER PRESSURE REGULATOR The water pressure regulator maintains a constant pressure in the instruments table The adjustment made at the time of testing in the O M S may be changed only for technical reasons This must be done by an authorized technician The regulator is equipped with a filter that must be periodically checked and possibly replaced as described ...

Страница 22: ...unit The aspiration system consists of the following parts see Figure 16CT A a drain located on the column B a filter C a drain plug D 2 aspiration tubes approx 1 5 m in length and 11 and 16 mm in diameter E aspiration end pieces 11 and 16 mm in diameter If the dental unit is connected to a centralized aspiration system the main unit shall feature a shutter solenoid valve to select the work statio...

Страница 23: ...the rear It allows you to move easely the headboard on two axes of rotation Bringing the headboard cushion to an angle of approximately 90 to the joint mechanism it can be rotated 180 on himself It can also lower the swivel mechanism in a position that gives the most comfort for patients of modest stature headboard Caution once you have placed the headboard in the working position replace the latc...

Страница 24: ...ar It allows you to easily move the headboard on two axes of rotation Bringing the headboard cushion to an angle of approximately 90 to the joint mechanism it can be rotated 180 on himself It can also lower the swivel mechanism in a position that gives the most comfort for patients of modest stature headboard Caution once you have placed the headboard in the working position replace the latch in p...

Страница 25: ... with a range of about 23 cm and has articulation on rear joint which allows the lateral movement using the lever at the rear It allows you to easily move the hearest on three axes of rotation Caution once you have placed the headrest in the working position replace the latch in position to block the movement ...

Страница 26: ...ures a button at its base which when pressed enables to lower the armrest frontally or backwardly for easier patient s passage Once the armrest has been swung back it can also be removed by simply pulling it in the direction of its axis of rotation turning it slightly to the left and right to help it release Repeat the procedure in reverse to refit the armrest making sure it is inserted all the wa...

Страница 27: ...being exposed at length to spots of corrosive substances clean the equipment frequently Furthermore for the sake of hygiene and cleaning and to avoid the risk of damage O M S recommend you use products that contain Quaternary ammonium Phenolic compounds Iodophors that do not contain Alcohol Hypochlorite Soda Organic solvents O M S recommends these factory tested products Always refer to the manufa...

Страница 28: ...for several seconds Clean and sterilise 130 C terminals nozzles High speed aspirator system and terminals Daily Trained operator Clean with specific product for several minutes Lubricate drain mouth Painted cases Daily Trained operator You are strongly advised not to use denatured alcohol or cleaners containing soda or organic solvents as they could damage the paintwork and upholstery INSTRUMENTS ...

Страница 29: ...evious operation with the other cannula Aspirate using one cannula at a time so that the other cannula can be used for air suction thus preventing the aspiration system from getting blocked due to an excessive aspiration of liquid 3 Unscrew the drain plug and clean the filter inside the drain in the column Replace it if necessary Periodically grease the drain and plug mouthpiece with vaseline beca...

Страница 30: ...ely for technical reasons This operation must be performed by an authorised technician The regulator collects any condensate present in the compressed air For condensate draining refer to paragraph CONDENSATE DRAINAGE CLUTCH ADJUSTMENT the arm movement have regulations that allow to obtain the desired friction level for each of them arm movement tilting toolbar tray SWIVEL ARM SPRING The strength ...

Страница 31: ...in the table constant The regulator is calibrated during the testing phase at O M S and calibration can be changed exclusively for technical reasons This operation must be performed by an authorised technician The regulator has a filter that must be checked periodically and replaced if necessary as described in paragraph MAIN UNIT WATER FILTERS ...

Страница 32: ...ube replacement Annually Authorised technician Disinfect separate distilled water container for instrument supply Monthly Trained operator Replace the main unit water filter Annually Authorised technician Check the instrument water filter Every 2 years Authorised technician Replace amalgam tank When indicated by separator Trained operator According to the instrument manufacturer s instructions Rep...

Страница 33: ...erformed by an authorised technician If foam generating substances are used e g hydrogen peroxide etc the system may temporarily stop If this malfunctioning occurs use antifoam agent tablets These tablets a sample of which is included in the aspiration accessory kit must be placed in the drain filter and usually last a few days of operation All the parts of the aspiration cannulas are easy to disa...

Страница 34: ...e standard for medical electrical device controls manufactured in accordance with IEC 60601 1 Periodic checks and tests include visual inspection grounding connection measures and dispersed currents the results and values measured must be recorded in a specific form and kept to demonstrate device compliance in time complete with accessories and to monitor device safety levels Technical safety chec...

Страница 35: ... touched up with the bottle of paint provided in the accessories box for this very purpose Shake the bottle before use and mix the paint well plunging the brush up and down several times inside the bottle containing the enamel Touch up by dabbing the damaged area with small drops of paint ...

Страница 36: ...e B external replaceable with a screwdriver before the replacement make sure that the main switch A is switched off Fuse replacement should occur only after you remove the cause that caused the intervention If the problem persists after replacing the fuse you must request the assistance of a OMS qualified technician The fuses are also present on the electronic cards The replacement of fuses placed...

Страница 37: ...Suction 5AT 230Vac C unit 2 5AT 230Vac D operating Lamp 5AT 17 Vac 14 3 Vac E not used F not used G spittoon 4AT 24 Vac H General tab 6 3AT 24Vac Spare fuses supplied by O M S are packed in the accessory box Fuses should only be replaced by an authorised O M S technician ...

Страница 38: ...tandard WARNING Interference can instead occur with electrical equipment with a level of emissions or immunity that do not meet IEC standard EN 60601 1 2 In such cases this equipment must not be used at the same time as O M S equipment Should the device freeze due to said interference switching it off and back on again may be sufficient to resume normal operation In the event of brownouts the micr...

Страница 39: ... 1 kV The mains voltage quality must be that typical of a retail or hospital environment Surge IEC 61000 4 5 1 kV between phases 2 kV between phase and grounding 1 kV 2 kV The mains voltage quality must be that typical of a retail or hospital environment Brownouts short blackouts and voltage variations on input power lines IEC 61000 4 11 5 UT 95 brownout in UT for 0 5 cycles 40 UT 60 brownout in U...

Страница 40: ... noted additional measures such as a different device orientation or position may be necessary b Field intensity in the frequency interval from 150 kHz to 80 MHz should be under 3V m Recommended separation distance between portable and mobile radio communication devices and the device The device is intended to work in the electromagnetic environment in which radiated RF disturbances are under cont...

Страница 41: ...s operating life Consequently at the end of the equipment s life the user is required to take it to a suitable separate collection facility handling electronic and electrical waste or return it to the dealer on purchasing a new piece of equivalent equipment on a one for one basis Suitable separate collection with a view to the subsequent recycling treatment and environmentally friendly disposal of...

Страница 42: ...____ SERIOUSNESS OF THE DAMAGE ________________________________________________ __________________________________________________________________________ OPERATIVE DECISIONS PROPOSED _____________________________________________ __________________________________________________________________________ Date ___________________________ Signature________________________ AREA RESERVED TO THE COMPANY...

Страница 43: ...DUKE EASY S T 01 3AW Rev 0 01 2017 43 ...

Отзывы: