background image

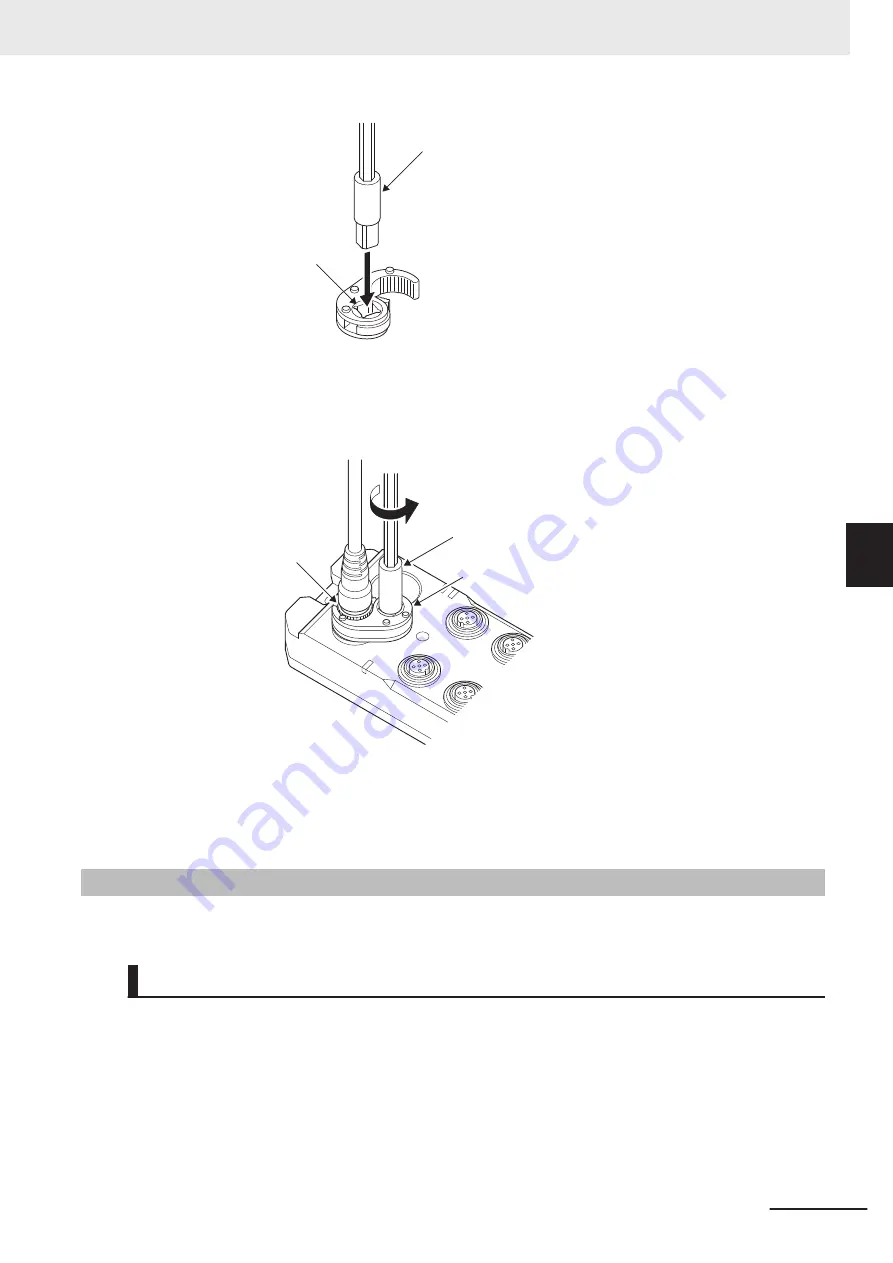
M12 torque handle

Hole of the M12 attachment

2

Mount the M12 attachment on the M12 screw connector of the IO-Link cable. After you mount
the M12 attachment, rotate the M12 torque handle in the direction shown in the following figure
to loosen the M12 screw connector.

M12 screw connector

M12 torque handle

M12 attachment

3

Rotate the M12 screw connector of the IO-Link cable in the direction opposite to the connection
direction.

5-2-4

Connecting I/O Cables

This section describes procedures for connecting and disconnecting I/O cables.

Procedure for Connecting an I/O Cable

Use the following procedures to connect an I/O cable. Turn OFF the Unit/input power supply and out-
put power supply to the IO-Link Master Unit before you connect the I/O cable.

1

Push the M12 plug (male) of the I/O cable into the I/O connector (female) of the IO-Link I/O
Hub. At this time, be careful of the orientation of the I/O connector.

5 Installation and Wiring

5-7

NXR-series IO-Link I/O Hub User’s Manual (W620)

5-2 W

iring IO-Link Cable and I/O Cables

5

5-2-4

 Connecting I/O Cables

Содержание NXR Series

Страница 1: ...Environment resistive Remote Terminal NXR series IO Link I O Hub IO Link I O Hub User s Manual W620 E1 02 NXR ID166C IL2 NXR CD166C IL2 ...

Страница 2: ... contained in this publication Sysmac and SYSMAC are trademarks or registered trademarks of OMRON Corporation in Japan and other countries for OMRON factory automation products Microsoft Windows Windows Vista Excel and Visual Basic are either registered trademarks or trademarks of Microsoft Corporation in the United States and other countries EtherCAT is registered trademark and patented technolog...

Страница 3: ...ng personnel who must also have knowledge of electrical sys tems an electrical engineer or the equivalent Personnel in charge of introducing FA systems Personnel in charge of designing FA systems Personnel in charge of installing and maintaining FA systems Personnel in charge of managing FA systems and facilities For programming this manual is intended for personnel who understand the programming ...

Страница 4: ...as shown below until they click into place Precautions for Correct Use Precautions for Correct Use 4 3 1 Connecting Controller Components Connector Hook Hook holes Slider Lock Release Move the sliders toward the back until they lock into place Level 1 heading Level 2 heading Level 3 heading Level 2 heading A step in a procedure Manual name Special information Level 3 heading Page tab Gives the cur...

Страница 5: ...operation easier Version Information Information on differences in specifications and functionality for IO Link Master Units and CX Configu ratorFDT with different unit versions is given Precaution on Terminology In this manual Store to device refers to transferring data from the Support Software to a physical device and Load from device refers to transferring data from a physical device to the Su...

Страница 6: ...Manual Structure 4 NXR series IO Link I O Hub User s Manual W620 ...

Страница 7: ...Data Functions of IO Link I O Hubs Troubleshooting Appendices A Index I 2 I 3 Designing the Power Supply System Part Names and Functions Inspection and Maintenance Features and System Configuration Specifications and Application Procedures Sections in this Manual 5 NXR series IO Link I O Hub User s Manual W620 ...

Страница 8: ...cautions for Correct Use 17 Regulations and Standards 18 Conformance to EU Directives 18 Conformance to UL and CSA Standards 19 Conformance to Shipbuilding Standards 19 Conformance to KC Certification 19 Software Licenses and Copyrights 19 Unit Versions 20 Unit Versions 20 Unit Versions and Support Software Versions 20 Related Manuals 21 Terminology 22 Revision History 23 Section 1 Features and Sy...

Страница 9: ...Conditions for the Power Supply System 4 4 4 2 3 Calculating the Total Current Consumption 4 5 4 2 4 Calculating the Voltage Drop 4 7 4 3 Selecting the External Power Supply and Protective Devices 4 10 Section 5 Installation and Wiring 5 1 Installing Hubs 5 2 5 1 1 Installation Precautions 5 2 5 1 2 Installation Orientations 5 2 5 1 3 Installation Method 5 2 5 2 Wiring IO Link Cable and I O Cables...

Страница 10: ... for Errors 8 4 8 3 Checking for Errors and Troubleshooting with the Indicators 8 6 8 3 1 Status Indicators 8 6 8 3 2 I O Indicators 8 7 8 4 Checking for Errors and Troubleshooting with the Device Events 8 9 8 4 1 Device Events 8 9 8 4 2 Reading and Clearing Device Events 8 9 8 4 3 List of Device Events and Troubleshooting 8 11 8 5 Resetting Errors 8 12 Section 9 Inspection and Maintenance 9 1 Cle...

Страница 11: ...e non complying Product or iii repay or credit Buyer an amount equal to the purchase price of the non complying Product provided that in no event shall Omron be re sponsible for warranty repair indemnity or any other claims or expenses regarding the Products unless Omron s analysis confirms that the Products were properly handled stored installed and maintained and not subject to contamination abu...

Страница 12: ... PRODUCT FOR AN APPLICATION INVOLVING SERIOUS RISK TO LIFE OR PROPERTY OR IN LARGE QUANTITIES WITHOUT ENSURING THAT THE SYSTEM AS A WHOLE HAS BEEN DESIGNED TO ADDRESS THE RISKS AND THAT THE OMRON PRODUCT S IS PROPERLY RATED AND INSTALLED FOR THE INTENDED USE WITHIN THE OVERALL EQUIP MENT OR SYSTEM Programmable Products Omron Companies shall not be responsible for the user s programming of a progra...

Страница 13: ... s representative at any time to confirm actual specifications of purchased Product Errors and Omissions Information presented by Omron Companies has been checked and is believed to be accurate how ever no responsibility is assumed for clerical typographical or proofreading errors or omissions Terms and Conditions Agreement 11 NXR series IO Link I O Hub User s Manual W620 ...

Страница 14: ...y or property damage Symbols The circle and slash symbol indicates operations that you must not do The specific operation is shown in the circle and explained in text This example indicates prohibiting disassembly The triangle symbol indicates precautions including warnings The specific operation is shown in the triangle and explained in text This example indicates a precaution for electric shock ...

Страница 15: ...easure for such problems external safety measures must be provided to ensure safe operation of the system The CPU Unit will turn OFF all outputs from Basic Output Units in the following cases The remote I O slaves will operate according to the settings in the slaves If a power supply error occurs If the power supply connection becomes faulty If a CPU watchdog timer error or CPU reset occurs If a C...

Страница 16: ... system be sure to keep a clearance of at least 5 mm between cables to prevent unstable operation due to interference Do not bundle the cables together Observe the following precautions when wiring the communications cable Keep the communications cables away from power lines and high voltage lines Use cables connectors and waterproof covers that are specified in this manual Use the recommended com...

Страница 17: ...k I O Hubs before attempting any of the fol lowing Assembling Units including the connected devices Connecting or wiring cables Attaching or removing connectors Operation Confirm that the controlled system will not be adversely affected before you perform any of the fol lowing operations Changing the operating mode of the CPU Unit including changing the setting of the Operating Mode at Startup Cha...

Страница 18: ...er when cleaning Use commercially available alcohol Do not use high pressure cleaning Disposal Dispose of the product according to local ordinances as they apply Precautions for Safe Use 16 NXR series IO Link I O Hub User s Manual W620 ...

Страница 19: ...e to acid oil or chemicals Locations subject to shock or vibration Locations close to power lines Take appropriate and sufficient countermeasures during installation in the following locations Locations subject to static electricity or other forms of noise Locations subject to strong electromagnetic fields Locations subject to possible exposure to radioactivity Locations close to power supply line...

Страница 20: ... and 75 to 1 500 VDC meet the required safety standards The applicable directive is EN 61010 2 201 Conformance to EU Directives The NXR series products comply with EU Directives To ensure that the machine or device in which the NXR series products are used complies with EU Directives the following precautions must be observed You must use SELV power supply for the DC power supplies that are connec...

Страница 21: ...does not comply with the UL and CSA standards Conformance to Shipbuilding Standards This product does not comply with any shipbuilding standards Conformance to KC Certification When you use this product in South Korea observe the following precautions This product meets the electromagnetic compatibility requirements for business use There is a risk of radio interference when this product is used i...

Страница 22: ...The following information is printed on the side of the product Name Function Model number Gives the model of the Hub Unit version Gives the unit version of the Hub Lot number Gives the lot number of the Hub DDMYY Lot number M gives the month 1 to 9 January to September X October Y November Z December Unit Versions and Support Software Versions The functions that are supported depend on the unit v...

Страница 23: ...k I O Hub The hardware setup methods and functions of the NXR series IO Link I O Hub which is an IO Link device are described NXR series IO Link Master Unit for EtherNet IP User s Manual W619 NXR ILM08C EIT Learning how to use an NXR ser ies IO Link Master Unit for EtherNet IP The hardware setup methods and functions of the NXR series IO Link Master Unit for EtherNet IP are de scribed Related Manu...

Страница 24: ... to files containing IO Link device definitions SIO DI Mode One of the communications mode settings for an IO Link Master Unit A com munications mode to input digital signals ON OFF signals from the connect ed input devices SIO DO Mode One of the communications mode settings for an IO Link Master Unit A com munications mode to output digital signals ON OFF signals to the connected output devices c...

Страница 25: ...o the catalog number on the front and back covers of the manual W620 E1 02 Cat No Revision code Revision code Date Revised content 01 April 2020 Original production 02 July 2020 Corrected mistakes Revision History 23 NXR series IO Link I O Hub User s Manual W620 ...

Страница 26: ...Revision History 24 NXR series IO Link I O Hub User s Manual W620 ...

Страница 27: ...s the features and system configuration of NXR series IO Link I O Hubs 1 1 Types and Features of IO Link I O Hubs 1 2 1 1 1 Types 1 3 1 1 2 Features 1 3 1 2 System Configuration 1 5 1 3 List of Functions 1 7 1 1 NXR series IO Link I O Hub User s Manual W620 1 ...

Страница 28: ...s and send the data that are input from a connected external device to the IO Link Master Unit through IO Link communications NXR series IO Link I O Hubs can be connected to an NXR series IO Link Master Unit for EtherNet IP IO Link Master Unit Example NXR series IO Link Master Unit for EtherNet IP NXR series IO Link I O Hub Network communications Controller IO Link communications Non IO Link conne...

Страница 29: ...d the number of inputs to up to 136 points per EtherNet IP node 1 1 You can use up to 136 points when you use the eight digital inputs for pin 2 of your IO Link Master Unit If you do not use digital inputs for pin 2 you can use up to 128 points Detecting Errors That Occur between the Digital Input Hub and a Connect ed External Device The Digital Input Hub detects short circuit and disconnection th...

Страница 30: ...Hub and a connected external device Refer to 7 1 2 I O Cable Disconnection Detection on page 7 3 and 7 1 3 I O Cable Short circuit Detection on page 7 6 Full Use of I Os The Digital I O Variable Hub allows you to set each of the 16 points for input or output This ena bles you to make full use of the I Os Refer to 7 1 1 I O Function on page 7 2 1 Features and System Configuration 1 4 NXR series IO ...

Страница 31: ... F IO Link cable I IODD files G I O cable Let ter Item Description A Controller This is an OMRON CPU Unit or a controller from another company connected to the IO Link Master Unit through an EtherNet IP adapter It exchanges I O data with the IO Link Master Unit and executes a user program through EtherNet IP B EtherNet IP scan ner The EtherNet IP scanner monitors the status of the connections with...

Страница 32: ...vice A sensor actuator or other device that handles ON OFF signals F IO Link cable A cable that connects an IO Link Master Unit to an IO Link I O Hub The cable is called an IO Link cable in the user s manual for an IO Link I O Hub and called an I O cable in the user s manual for the OMRON IO Link Master Unit G I O cable A cable that connects an IO Link I O Hub to a non IO Link connected external d...

Страница 33: ... I O Hub and detects voltage drop when the voltage decreases below the monitored voltage All mod els 7 1 5 Voltage Drop De tection for Unit Input Power Supply on page 7 9 Voltage drop detection for output power supply This function monitors the output power supply volt age fed to the Digital I O Variable Hub and detects voltage drop when the voltage decreases below the monitored voltage I O Varia ...

Страница 34: ...1 Features and System Configuration 1 8 NXR series IO Link I O Hub User s Manual W620 ...

Страница 35: ...fications dimensions and application procedures for the NXR series IO Link I O Hubs 2 1 Specifications 2 2 2 1 1 General Specifications 2 2 2 1 2 Individual Specifications 2 2 2 2 Dimensions 2 7 2 3 Application Procedures 2 8 2 1 NXR series IO Link I O Hub User s Manual W620 2 ...

Страница 36: ...ms to IEC 61010 2 201 EMC immunity level Zone B Vibration resistance 10 to 60 Hz with amplitude of 0 35 mm 60 to 150 Hz and 50 m s2 80 min each in X Y and Z directions Shock resistance 150 m s2 3 times each in 6 directions along X Y and Z axes Applicable standards 1 EU EN 61131 2 RCM KC KC Registration IO Link conformance 1 Refer to the OMRON website www ia omron com or ask your OMRON representati...

Страница 37: ...I O Connector 1 I O Connector 8 V I0 G I1 V I14 G I15 Non isolated power supply circuits U IN P C Q OUT P U IN P OUT P IO Link connector NXR CD166C IL2 I O circuits IO Link circuits Internal circuits I O Connector 1 I O Connector 8 V IO0 G IO1 V IO14 G IO15 Non isolated power supply circuits U IN P C Q OUT P U IN P OUT P IO Link connector IO Link spec ifica tions Commu nications protocol IO Link p...

Страница 38: ...OMRON Corporation OMRON Corporation Device ID1 05 hex 05 hex Device ID2 00 hex 00 hex Device ID3 01 hex 02 hex Product Name NXR ID166C IL2 NXR CD166C IL2 Product ID NXR ID166C IL2 NXR CD166C IL2 Product Text IO Link I O Hub IO Link I O Hub Moun ting spec ifica tions Mounting method Mounting with M5 screws Mounting strength 100 N Connec tor strength 30 N Applicable to all connectors Connec tor type...

Страница 39: ...ge OFF current 5 VDC max 1 mA max between each input terminal and G Input cur rent 4 0 mA for 24 VDC Sensor power supply current 100 mA max port ON re sponse time 0 1 ms max OFF re sponse time 0 2 ms max Input fil ter 0 ms 0 5 ms 1 ms default 2 ms 4 ms 8 ms 16 ms 32 ms 64 ms 128 ms Short cir cuit pro tection Provided 1 Short cir cuit de tection Provided 1 Line dis connec tion de tection Provided 2...

Страница 40: ...4 1 Detects a short circuit that occurred between the power supply V and power supply G of the I O con nectors to protect the IO Link I O Hubs 2 Detects a disconnection of the power supply V of the I O connectors 3 Detects a short circuit that occurred between pin 4 and the power supply G and between pin 2 and the power supply G to protect the IO Link I O Hubs 4 Detects a disconnection of pin 4 an...

Страница 41: ... O Hub Digital I O Hub 14 2 Installation dimensions 62 174 16 5 32 8 68 8 93 8 118 8 143 8 14 5 47 5 161 0 2 24 2 37 8 19 2 26 8 Two M5 or 5 3 dia holes 5 5 6 5 2 Specifications and Application Procedures 2 7 NXR series IO Link I O Hub User s Manual W620 2 2 Dimensions 2 ...

Страница 42: ...rn ON the output power supply to the IO Link Master Unit and then turn ON this digital output to supply the output power through the IO Link Master Unit to the Digi tal I O Variable Hub To use only inputs of the Digital Input Hub or the Digital I O Variable Hub set the pin to SIO DI Mode 5 Setting the Param eters of the IO Link I O Hub Configure the functions of the IO Link I O Hub from CX Configu...

Страница 43: ...ctions of the parts of the NXR series IO Link I O Hubs 3 1 Parts and Names 3 2 3 2 Indicators 3 4 3 2 1 Status Indicators 3 4 3 2 2 I O Indicators 3 5 3 3 Connectors 3 7 3 3 1 IO Link Connector 3 7 3 3 2 I O Connectors 3 7 3 1 NXR series IO Link I O Hub User s Manual W620 3 ...

Страница 44: ...3 1 Parts and Names This section gives the names of the parts of the IO Link I O Hubs Digital I O Hub A E E C D B B C 3 Part Names and Functions 3 2 NXR series IO Link I O Hub User s Manual W620 ...

Страница 45: ...e connected external devices The connectors are called ports M12 connectors A coding female Connect I O cables C Status indicators The indicators that show the current operating status of the Digital I O Hub D I O indicators The indicators that show the I O status of pin 4 pin 1 and pin 2 for each port E Hub mounting hole The holes for mounting the Digital I O Hub They are provided in two location...

Страница 46: ... shows the status of IO Link communications with the IO Link Master Unit Color Status Description Green Flashing The Hub is operating normally Red Lit One of the following error was detected Hardware Error Service Data Error Flashing IO Link communications are not operating normally Not lit The IO Link cable is not connected IO Link communications are stopped The Unit input power is not supplied U...

Страница 47: ...in 1 for each port For each port the contact numbers for digital input or digital output are given De tails are given below P1 0 P2 2 P3 4 P4 6 P5 8 P6 10 P7 12 P8 14 B Pin 2 status indi cator This indicator shows the status of pin 2 for each port For each port the contact numbers for digital input or digital output are given De tails are given below P1 1 P2 3 P3 5 P4 7 P5 9 P6 11 P7 13 P8 15 The ...

Страница 48: ...ut is OFF 1 The setting is only available with the Digital I O Variable Hub Pin 2 Status Indicator The indicator shows the digital I O status of pin 2 and an error occurring to pin 2 Color Status Description Yellow Lit If pin 2 serves as an input The input is ON If pin 2 serves as an output 1 The output is ON Red Flashing If pin 2 serves as an output 1 One of the following errors occurred External...

Страница 49: ...igital Input Hub Not used Digital I O Variable Hub Output power supply 3 Digital Input Hub U IN P Digital I O Variable Hub U IN P and OUT P Digital Input Hub Unit input power supply Digital I O Variable Hub Unit input power supply and output power supply 4 C Q IO Link data 3 3 2 I O Connectors The I O connectors are used for connecting the Hub to the connected external devices Digital I O Hub 1 4 ...

Страница 50: ...Hub Input Digital I O Variable Hub Input or output depending on the setting 3 Pin 3 G Power supply 4 Pin 4 Digital Input Hub I0 I2 to I14 Digital I O Variable Hub IO0 IO2 to IO14 Digital Input Hub Input Digital I O Variable Hub Input or output depending on the setting 5 NC Not used 3 Part Names and Functions 3 8 NXR series IO Link I O Hub User s Manual W620 ...

Страница 51: ... Applications 4 2 4 1 2 Power Supply System 4 2 4 2 Designing the Power Supply System 4 4 4 2 1 Procedure for Designing the Power Supply System 4 4 4 2 2 Design Conditions for the Power Supply System 4 4 4 2 3 Calculating the Total Current Consumption 4 5 4 2 4 Calculating the Voltage Drop 4 7 4 3 Selecting the External Power Supply and Protective Devices 4 10 4 1 NXR series IO Link I O Hub User s...

Страница 52: ...tions of the power supplies are given below Power supply type Description Unit input power supply Operation of the internal circuits and input circuits of an IO Link I O Hub Power supply to input devices connected to an IO Link I O Hub Input current from input devices connected to an IO Link I O Hub Output power supply Drive of the output circuits of an IO Link I O Hub Operation of the output devi...

Страница 53: ... the connected external device IO Link cable IO Link connector Digital I O Variable Hub Set pin 2 of the port of the IO Link Master Unit to SIO DO Mode and turn on the output of pin 2 See following figure A IO Link Master Unit Unit input power supply 24 VDC Output power supply 24 VDC Power supply connector input PWR IN I O connectors P1 to P8 Power supply connector output PWR OUT Power supply cabl...

Страница 54: ...2 Design Conditions for the Power Supply System The design conditions for the power supply system for an IO Link I O Hub are given below Design condition Reference for confirmation method a The total current consumption from the Unit input power supply must not exceed the maximum current of the IO Link I O Hub 1 4 2 3 Calculating the Total Current Consumption on page 4 5 b The total current consum...

Страница 55: ...nds to the Input current of Digital input specified in 2 1 2 Individual Specifications on page 2 2 Total Current Consumption from Output Power Supply Current consumption from output power supply Current consumed between the Digital I O Hub and output devices The items of the formula are described below Current consumption item Description Current consumption from output power supply Current consum...

Страница 56: ... Number of inputs used 30 mA 10 points 4 mA 10 points 0 34 A Output power supply Current consumption from output power supply 40 mA according to the specifications of the Digital I O Variable Hub Current consumed between the Digital I O Variable Hub and output devices Load current Number of outputs used 0 3 A 6 points 1 8 A The results above give the total current consumption from Unit input power...

Страница 57: ... power supply cable connected to the IO Link Mas ter Unit and in the IO Link Master Unit Refer to the NXR series IO Link Master Unit for EtherNet IP User s Manual Cat No W619 for details Residual voltage at the digital outputs for pin 2 of the IO Link Master Unit This is a residual voltage at the digital outputs for pin 2 of the IO Link Master Unit Refer to the NXR series IO Link Master Unit for E...

Страница 58: ...es Use the conditions specified in Calculation Example for the Total Current Consumption on page 4 5 in 4 2 3 Calculating the Total Cur rent Consumption on page 4 5 The conditions lead to the total current consumption from Unit input power supply and the total current consumption from output power supply below Total current consumption from Unit input power supply 0 38 A Total current consumption ...

Страница 59: ...and the IO Link Master Unit Voltage drop in the IO Link cable 26 4 V 0 51 V 0 60 V 25 29 V b Input voltage to input devices Voltage of the external power supply connected to the IO Link Master Unit Voltage drop in the power supply cable and the IO Link Master Unit Voltage drop in the IO Link cable 26 4 V 0 51 V 0 60 V 25 29 V c Input voltage to output devices Voltage of the external power supply c...

Страница 60: ...ter Unit supplies power to the IO Link I O Hubs Refer to the NXR series IO Link Master Unit for EtherNet IP User s Manual Cat No W619 and select the external power supply and protective devices 4 Designing the Power Supply System 4 10 NXR series IO Link I O Hub User s Manual W620 ...

Страница 61: ... Link Cable and I O Cables 5 4 5 2 1 Installation Precautions 5 4 5 2 2 Preparing for Wiring 5 4 5 2 3 Connecting IO Link Cable 5 5 5 2 4 Connecting I O Cables 5 7 5 2 5 Tightening Torque 5 10 5 2 6 Waterproof Covers 5 10 5 3 Wiring Example for I O Connectors 5 11 5 4 Connected Devices 5 16 5 4 1 IO Link Connector Cable 5 16 5 4 2 I O Cables 5 16 5 4 3 Waterproof Cover for Connectors 5 17 5 1 NXR ...

Страница 62: ...s subject to shock or vibration Locations close to power lines Take appropriate and sufficient countermeasures during installation in the following locations Locations subject to static electricity or other forms of noise Locations subject to strong electromagnetic fields Locations subject to possible exposure to radioactivity Locations close to power supply lines 5 1 2 Installation Orientations T...

Страница 63: ...on if it is not installed properly which may cause failure Do not allow oil to adhere to the screws Oil adhesion may damage the screws Tighten the screws with an appropriate screwdriver Tightening a screw with an inappropriate screwdriver may damage the screw 5 Installation and Wiring 5 3 NXR series IO Link I O Hub User s Manual W620 5 1 Installing Hubs 5 5 1 3 Installation Method ...

Страница 64: ... Do not lay the cables in locations subject to excessive dust oil mist or other contaminants There are limitations on the bending radius of the cables Check the specifications of the cables for their bending radius 5 2 2 Preparing for Wiring Preparing IO Link Cable For the IO Link cable use the IO Link connector cable shown in 5 4 Connected Devices on page 5 16 Refer to 5 4 1 IO Link Connector Cab...

Страница 65: ...nector 2 Rotate the M12 screw connector of the IO Link cable in the direction shown in the following fig ure to tighten it Tighten the connector before tightening it to the specified torque M12 screw connector 3 Set the M12 torque handle to the specified torque Then insert the torque handle into the tight ening hole of the M12 attachment When you tighten the connector place the M12 attachment in t...

Страница 66: ...2 screw connector Procedure for Disconnecting an IO Link Cable Use the following procedures to disconnect an I O Link cable Turn OFF the Unit input power supply and output power supply to the IO Link Master Unit before you remove the IO Link cable 1 Insert the M12 torque handle into the tightening hole of the M12 attachment When you remove the connector place the M12 attachment upside down that is...

Страница 67: ...n 5 2 4 Connecting I O Cables This section describes procedures for connecting and disconnecting I O cables Procedure for Connecting an I O Cable Use the following procedures to connect an I O cable Turn OFF the Unit input power supply and out put power supply to the IO Link Master Unit before you connect the I O cable 1 Push the M12 plug male of the I O cable into the I O connector female of the ...

Страница 68: ...specified torque Then insert the torque handle into the tight ening hole of the M12 attachment When you tighten the connector place the M12 attachment in the orientation shown in the following figure and insert the torque handle Refer to 5 2 5 Tightening Torque on page 5 10 for information on the specified torque M12 torque handle Hole of the M12 attachment 5 Installation and Wiring 5 8 NXR series...

Страница 69: ...IO Link Master Unit before you remove an I O cable 1 Insert the M12 torque handle into the tightening hole of the M12 attachment When you remove the connector place the M12 attachment upside down that is in the opposite orientation to that for tightening M12 torque handle Hole of the M12 attachment 2 Mount the M12 attachment on the M12 screw connector of the I O cable After you mount the M12 attac...

Страница 70: ... IO Link connector M12 0 5 to 0 6 N m I O connectors 5 2 6 Waterproof Covers Install waterproof covers for I O connectors on any unused I O connectors Refer to 5 4 3 Waterproof Cover for Connectors on page 5 17 for details on the waterproof covers for I O connectors Tighten the waterproof covers to the following torque You can maintain the IP67 protective structure when the waterproof covers are t...

Страница 71: ...al devices to the I O connectors on the Digital I O Hub are given below Two wire sensor Three wire sensor Output device Wring examples with a branch connector are also shown 5 Installation and Wiring 5 11 NXR series IO Link I O Hub User s Manual W620 5 3 Wiring Example for I O Connectors 5 ...

Страница 72: ...nnected external device V brown V brown IO white IO white L Internal circuits Protective diode 2 1 3 4 Connected external device L Internal circuits Protective diode I O connector IO Link Master Unit IO Link connector U IN P OUT P C Q U IN P OUT P I O connector I O connector Built in reverse current prevention diode External reverse current prevention diode Pin 4 Input Pin 2 Output Pin 4 Output Pi...

Страница 73: ...Wiring Example for Two wire Sensors A wiring example for a 2 wire sensor to an input of the Digital I O Hub is given below In this example pin 4 of port 1 serves as an input Two wire sensor Digital I O Hub with an input I O connector V I0 or IO0 2 1 3 4 The power V to pin 1 is supplied from the IO Link Master Unit through the IO Link cable to the Digi tal I O Hub Wiring Example for Three wire Sens...

Страница 74: ...cautions for Correct Use If you use a inductive load solenoid valve etc use a device with built in diodes for absorbing counter electromotive force or externally install the diodes Refer to A 3 Wiring Precautions for External Output Signal Lines on page A 5 for details Wiring Examples with a Branch Connector Wiring examples of using a branch connector to connect two or more external devices to a p...

Страница 75: ...n input and an output I O connector V G IO0 IO1 2 1 3 4 L The power V to pin 1 is supplied from the IO Link Master Unit through the IO Link cable to the Digital I O Hub The output power that provides load current is supplied from the IO Link Master Unit through the IO Link cable to the Digital I O Hub Precautions for Correct Use If you use a inductive load solenoid valve etc use a device with buil...

Страница 76: ...2W D421 G81 F 10 m XS2W D421 J81 F 5 4 2 I O Cables Conversion Cable The following cable converts connections with an IO Link I O Hub and an M8 plug of a connected external device Name and appearance Manu facturer Specification Number of cable conduc tors Available connectors Cable connec tion direc tion Cable length Model XS3W Connector with Cable M8 socket M12 plug OMRON Corpora tion M8 socket A...

Страница 77: ...gth Model XS5R Y Joint Plug Socket Con nector OMRON Corpora tion M12 Smartclick connector 1 XS5R D426 1 1 I O connectors for the IO Link I O Hubs are not Smartclick connectors Use I O cable tightening tools to install this ca ble The Smartclick connector of the branch connector also serves as a screw connector The wiring diagram is shown below CN2 4 3 2 1 CN1 4 3 2 1 CN0 4 3 2 1 5 4 3 Waterproof C...

Страница 78: ...appear ance Manufacturer Specification Available connec tors Model M12 Waterproof Cover OMRON Corpora tion M12 Screw connector XS2Z 22 5 Installation and Wiring 5 18 NXR series IO Link I O Hub User s Manual W620 ...

Страница 79: ...ibes process data and service data of the NXR series IO Link I O Hubs 6 1 Process Data 6 2 6 1 1 Digital Input Hub 6 2 6 1 2 Digital I O Variable Hub 6 4 6 2 Service Data 6 9 6 2 1 Digital I O Hub 6 9 6 1 NXR series IO Link I O Hub User s Manual W620 6 ...

Страница 80: ...1 0 PD0 Input Data PD1 PD2 Smart Status PD3 PD4 Port1 Status PD5 PD6 Port2 Status PD7 PD8 Port3 Status PD9 PD10 Port4 Status PD11 PD12 Port5 Status PD13 PD14 Port6 Status PD15 PD16 Port7 Status PD17 PD18 Port8 Status PD19 The following describes each data in detail The value 1 indicates TRUE and 0 indicates FALSE Input Data The data indicate the input status of each port 6 Process Data and Service...

Страница 81: ...ut power supply voltage is equal to or higher than the monitored voltage 1 Unit Input Power Supply Voltage Drop Detection Hold Bit 1 The status of the Unit input power supply voltage drop detection is retained 0 The status of the Unit input power supply voltage drop detection was reset 2 to 7 Reserved Not available They are fixed to 0 PD3 0 Port1 Status Summary Bit 1 Of Port Status any bit except ...

Страница 82: ...supply short circuit detection is retained 0 The status of sensor power supply short circuit detection was reset 4 to 7 Reserved Not available They are fixed to 0 1 The number following PD is 2 port number 2 For port 2 for example the number is 2 2 2 6 or PD6 PD5 PD7 PD9 PD11 PD13 PD15 PD17 and PD19 are reserved They are not available They are fixed to 0 6 1 2 Digital I O Variable Hub The Digital ...

Страница 83: ... Pin2 In put Bit 4 Port3 Pin4 In put Bit 5 Port3 Pin2 In put Bit 6 Port4 Pin4 In put Bit 7 Port4 Pin2 In put Bit PD1 0 Port5 Pin4 In put Bit 1 The relevant input is ON 0 The relevant input is OFF A contact that was set to output through the I O function configuration is always 0 1 Port5 Pin2 In put Bit 2 Port6 Pin4 In put Bit 3 Port6 Pin2 In put Bit 4 Port7 Pin4 In put Bit 5 Port7 Pin2 In put Bit ...

Страница 84: ...Drop Detection Hold Bit 1 The status of the output power supply voltage drop detection is retained 0 The status of the output power supply voltage drop detection was reset 4 to 7 Reserved Not available They are fixed to 0 PD3 0 Port1 Status Summary Bit 1 Of Port Status any bit except the hold bits is ON 0 Of Port Status all bits except the hold bits are OFF refers to port numbers 1 to 8 Refer to P...

Страница 85: ...4 external load disconnection detection is retained 0 The status of pin 4 external load detection was reset 3 Port Pin4 External Load Short Circuit Detection Hold Bit 1 The status of pin 4 external load short circuit detection is re tained 0 The status of pin 4 external load short circuit was reset 4 Port Pin2 External Load Dis connection Detection Bit 1 A pin 2 external load disconnection was det...

Страница 86: ...utput Bit 4 Port3 Pin4 Output Bit 5 Port3 Pin2 Output Bit 6 Port4 Pin4 Output Bit 7 Port4 Pin2 Output Bit PD1 0 Port5 Pin4 Output Bit 1 The relevant output is ON 0 The relevant output is OFF If a contact is set to input through the I O function configuration setting the con tact to 1 does not turn ON the output 1 Port5 Pin2 Output Bit 2 Port6 Pin4 Output Bit 3 Port6 Pin2 Output Bit 4 Port7 Pin4 Ou...

Страница 87: ...t Name String R 20 2 Each product model 19 0 Product ID String R 20 2 Each product model 20 0 Product Text String R 20 IO Link I O Hub 21 0 Serial Number String R 16 22 0 Hardware Ver sion String R 4 23 0 Firmware Ver sion String R 4 24 0 Application Specific Tag String R W 32 32 aster isks 37 0 Detailed Device Status Record R 30 40 0 Process Data Input PD In R 20 Only for IO Link I O Hub with an ...

Страница 88: ...ex Disable 01 hex Enable For Digital I O Variable Hub only 71 Port Pin2 External Load Disconnection De tection Enable Disable Record R W 1 00 hex 00 hex Disable 01 hex Enable For Digital I O Variable Hub only 72 Port Sensor Discon nection Detection Ena ble Disable Record R W 1 00 hex 00 hex Disable 01 hex Enable 73 Port Pin4 External Load Disconnection De tection Hold Reset Record W 1 01 hex 01 he...

Страница 89: ...1 hex Reset 80 0 All Detection Hold Bits Reset UIn teger W 1 01 hex 01 hex Reset 81 0 Operating Hours Record R 4 0 Unit h 1 refers to port numbers 1 to 8 2 The indicates that the data is backed up The indicates that the data is not backed up 3 For details of the setting range of input filter values refer to 7 1 7 Digital Input Filter on page 7 12 6 Process Data and Service Data 6 11 NXR series IO ...

Страница 90: ...6 Process Data and Service Data 6 12 NXR series IO Link I O Hub User s Manual W620 ...

Страница 91: ...nnection Detection 7 3 7 1 3 I O Cable Short circuit Detection 7 6 7 1 4 All Hold Bits Reset 7 8 7 1 5 Voltage Drop Detection for Unit Input Power Supply 7 9 7 1 6 Voltage Drop Detection for Output Power Supply 7 11 7 1 7 Digital Input Filter 7 12 7 1 8 Communications Error Output Setting 7 14 7 1 9 Monitoring Total Power ON Time 7 15 7 1 NXR series IO Link I O Hub User s Manual W620 7 ...

Страница 92: ... hex Output Immediately 1 refers to port numbers 1 to 8 You can configure the function by one of the following two procedures Configure the function from CX ConfiguratorFDT Configure the function through message communications from the Controller to the IO Link device Refer to the NXR series IO Link Master Unit for EtherNet IP User s Manual Cat No W619 for details on how to configure the function ...

Страница 93: ...r settings are stored in the Digital I O Variable Hub 7 1 2 I O Cable Disconnection Detection This section describes the I O cable disconnection detection Overview and Applications This function detects disconnection of I O cables from the Digital I O Hub You can enable or disable the disconnection detection Applicable Hubs Sensor disconnection detection All models of the Digital I O Hub External ...

Страница 94: ... the Digi tal I O Variable Hub This setting enables or disables the dis connection detection for the external load connected to pin 4 of port 2 00 hex 00 hex Disable 01 hex Enable Immedi ately Port Pin2 External Load Disconnection Detection Enable Disable This setting is applicable only to the Digi tal I O Variable Hub This setting enables or disables the dis connection detection for the external ...

Страница 95: ... operates according to the status of each relevant disconnection detection bit The disconnection detection hold bits are irrelevant to in dicator display Refer to 8 4 Checking for Errors and Troubleshooting with the Device Events on page 8 9 for de tails on the device events Refer to 3 2 Indicators on page 3 4 for information on the indicator display Turning OFF the Disconnection Detection Hold Bi...

Страница 96: ... External Load Disconnection Detection Enable Disable Sensor Disconnection Detection Enable Disable 4 From the drop down list of Value of the following expanded items select Enable of Disable Port Pin4 External Load Disconnection Detection Enable Disable Port Pin2 External Load Disconnection Detection Enable Disable Port Sensor Disconnection Detection Enable Disable 5 Right click the device DTM fo...

Страница 97: ...rs in the Pin 4 Pin 1 sta tus indicator or Pin 2 status indicator Refer to Process Input Data of each Hub in 6 1 Process Data on page 6 2 for details on the proc ess input data Short circuit type Bit which turns ON 1 Pin 4 external load short circuit Smart Status Port Status Summary Bit Port Status Pin4 External Load Short Circuit Detection Bit Port Status Pin4 External Load Short Circuit Detectio...

Страница 98: ... the short circuit detection hold bits Service data 1 Index Dec Subindex Dec 1 Port Pin4 External Load Short Circuit Detection Hold Reset 74 Port Pin2 External Load Short Circuit Detection Hold Reset 76 Port Sensor Short Circuit Detection Hold Reset 78 1 refers to port numbers 1 to 8 b Execute all hold bits reset Refer to 7 1 4 All Hold Bits Reset on page 7 8 for information on executing all hold ...

Страница 99: ...t Operation Works If the cause of the error is removed executing reset turns OFF the error detection hold bits Resetting the Bits Write 01 hex reset in the following service data through message communications from the Con troller to the IO Link device Doing so turns OFF All Detection Hold Bits Reset Turning OFF All Detection Hold Bits Reset turns OFF all error detection hold bits Service data Ind...

Страница 100: ...supply voltage drop is removed On the other hand the Unit Input Power Supply Voltage Drop Detection Hold Bit remains ON after the cause of the power supply voltage drop is removed Refer to Turning OFF the Power Supply Voltage Drop Detection Hold Bit on page 7 10 for how to turn off the bits Refer to 8 4 Checking for Errors and Troubleshooting with the Device Events on page 8 9 for de tails on the ...

Страница 101: ...t power supply You cannot configure the monitored voltage How the Power Supply Voltage Drop Detection Works If the function detects power supply voltage drop the following bits of process input data turn ON and the Output Power Supply Voltage Drop 8CB0 hex device event occurs Refer to Process Input Data of the Digital I O Variable Hub in 6 1 Process Data on page 6 2 for details on the process inpu...

Страница 102: ...for details on how to access the service data through message communications Refer to 6 2 Service Data on page 6 9 for details on the service data a Execute Power Supply Voltage Drop Detection Hold Reset Write 01 hex reset in the following service data This turns OFF the Power Supply Voltage Drop Detection Hold Bit Service data Index Dec Subindex Dec Power Supply Voltage Drop Detection Hold Reset ...

Страница 103: ...lay time The ON delay time is represented by input response time time required to read input input filter time 1 1 For the input response time use the values of ON response time and OFF response time specified in 2 1 2 Individual Specifications on page 2 2 The settings for the digital input filter are as follows Setting 1 Description Default value Setting range Unit Update timing Port Pin4 Input F...

Страница 104: ... Setting and Pin2 Input Filter Setting From the drop down list of Value of Port Pin4 Input Filter Setting and Port Pin2 Input Filter Setting select a filter value 4 Right click the device DTM for the Digital I O Hub where to store parameters and select Go online The relevant device goes online Devices in the Network View are displayed in bold while you are online 5 Right click the device DTM again...

Страница 105: ... for how to create a network configuration and how to go online 1 Create a network configuration and then register the Digital I O Variable Hub 2 Double click or right click the device DTM for the Digital I O Variable Hub to configure and then select Configuration The Configuration tab page is displayed In the Configuration tab page Menu is displayed with Parameter selected Refer to A 4 Configurat...

Страница 106: ... from CX ConfiguratorFDT Check through message communications from the Controller to the IO Link device Checking from CX ConfiguratorFDT The following describes how to check from CX ConfiguratorFDT Refer to Setting IO Link Devices with the CX ConfiguratorFDT in the NXR series IO Link Master Unit for EtherNet IP User s Manual Cat No W619 for how to create a network configuration and how to go onlin...

Страница 107: ...t IP User s Manual Cat No W619 for how to read through message communications Refer to 6 2 Service Data on page 6 9 for details on the service data Service data Index Dec Subindex Dec Operating Hours 81 0 7 Functions of IO Link I O Hubs 7 17 NXR series IO Link I O Hub User s Manual W620 7 1 Functions of Digital I O Hubs 7 7 1 9 Monitoring Total Power ON Time ...

Страница 108: ...7 Functions of IO Link I O Hubs 7 18 NXR series IO Link I O Hub User s Manual W620 ...

Страница 109: ...Errors and Troubleshooting with the Indicators 8 6 8 3 1 Status Indicators 8 6 8 3 2 I O Indicators 8 7 8 4 Checking for Errors and Troubleshooting with the Device Events 8 9 8 4 1 Device Events 8 9 8 4 2 Reading and Clearing Device Events 8 9 8 4 3 List of Device Events and Troubleshooting 8 11 8 5 Resetting Errors 8 12 8 1 NXR series IO Link I O Hub User s Manual W620 8 ...

Страница 110: ...Unit for EtherNet IP NXR series IO Link I O Hub Connected external device Indicators Process input data of I O Hub Smart Status Port Status Device event occurs Error notifi cation type Overview Notification method Indicators Indicators of the IO Link I O Hub Process in put data Input data of the IO Link I O Hub The data contain I O Hub status information as well as input information from connected...

Страница 111: ... IO Link Master Unit The sent information is reflected in the following I O data of the IO Link Master Unit I O Port Error Status The IO Link Master Unit sends the status through network communi cations to the Controller In this example the IO Link Master Unit cyclically sends the data to the Controller through tag data link of EtherNet IP communications 8 Troubleshooting 8 3 NXR series IO Link I ...

Страница 112: ... the indicators Notification through IO Link communications to IO Link Master Unit Notification through tag data link to controller Checking method What you can check Checking the indi cators You can check the status of the IO Link I O Hub and whether an error occurred Checking the I O data of the IO Link Master Unit a Status information The IO Link input data of the IO Link Master Unit sent to th...

Страница 113: ...X ConfiguratorFDT can read device events Also you can read Detailed Device Status of the service data with the message communi cations instruction from the Controller 8 Troubleshooting 8 5 NXR series IO Link I O Hub User s Manual W620 8 2 Checking for Errors 8 ...

Страница 114: ...lowing error is detected Hardware Error Service Data Error Non vola tile memo ry failure Cycle the Unit input power sup ply If cycling the Unit input pow er supply does not clear the er ror replace the Hub Not lit Not lit Not lit The Unit input power is not supplied Check if the Unit input power is supplied If it is supplied check if the power supply voltage is not below the specification Not lit ...

Страница 115: ...uit in the I O cable Check the wiring for short circuit of sensor power supply Not lit Not lit Pin 4 input is OFF Lit Pin 2 input is ON Not lit Pin 2 input is OFF Note The of the indicator status indicates that the status is unstable Digital I O Variable Hub Pin 4 Pin 1 sta tus Pin 2 status Hub status Cause Correction Yel low Red Yel low Red Lit When pin 4 is set to input Pin 4 input is ON When pi...

Страница 116: ...ircuit of the connected ex ternal device Sensor power supply short cir cuit error occur red to pin 1 Check the wiring for short circuit of sensor power supply Not lit Not lit When pin 4 is set to input Pin 4 input is OFF When pin 4 is set to output Pin 4 output is OFF Lit When pin 2 is set to input Pin 2 input is ON When pin 2 is set to output Pin 2 output is ON Flash ing When pin 2 is set to outp...

Страница 117: ...and clear device events 8 4 2 Reading and Clearing Device Events This section describes how to read and clear device events Reading Device Events There are two ways to read device events as below Using CX ConfiguratorFDT Using message communications from the Controller to the IO Link device Precautions for Correct Use Device events are registered in a volatile memory and therefore cleared from the...

Страница 118: ...ations can read the device event type and event code The following shows the format of device event Refer to the NXR series IO Link Master Unit for EtherNet IP User s Manual Cat No W619 for details on how to read data through message communications Item Data size byte Description Device event type 1 Contains a level corresponding to the type of IO Link event code Error 0xF4 Warning 0xE4 IO Link ev...

Страница 119: ...ower supply to the IO Link I O Hub or communications with CX Con figuratorFDT during download 7701 hex I O Cable Disconnec tion Error Appeared Wire break of sub ordinate device 1 Error The I O cable is bro ken Check the wiring of the I O cable 7710 hex I O Cable Short circuit Error Appeared Short circuit Error There is a short circuit in the I O cable Check the wiring of the I O cable 8CB0 hex Out...

Страница 120: ...tting parameters for the IO Link I O Hub again Unit Input Power Supply Voltage Drop After the cause of the error is removed reset the relevant error detection hold bit or cycle the Unit input power supply to clear the error Only removing the error cause does not clear the error For how to reset the error detection hold bit refer to the information on how to turn off the hold bit of each error dete...

Страница 121: ...the NXR series IO Link I O Hubs 9 1 Cleaning and Inspection 9 2 9 1 1 Cleaning 9 2 9 1 2 Inspection Procedure 9 2 9 2 Maintenance Procedure 9 4 9 2 1 Handling an IO Link I O Hub to Replace 9 4 9 2 2 Replacing an IO Link I O Hub 9 4 9 1 NXR series IO Link I O Hub User s Manual W620 9 ...

Страница 122: ...ts such as paint thinner benzene or chemical wipes They may dete riorate the coating of the Hubs 9 1 2 Inspection Procedure Be sure to perform periodic inspections to ensure the device is maintained in the optimal operating condition Inspections should be performed every six month to every year When you operate the device in a location subject to extremely high temperatures and high humidity or du...

Страница 123: ...y Installation condi tion Check that the IO Link I O Hub is securely fixed No looseness Phillips screw driver Check that the waterproof covers of the cables are tightened to an appropriate torque on the connectors of the IO Link I O Hub The covers are tight ened to the specified torque Torque handle Check for damaged connecting cables No visible damage Inspect visually 9 Inspection and Maintenance...

Страница 124: ...ers for the IO Link I O Hub are already backed up to the IO Link Master Unit The conditions for the IO Link Master Unit to automatically perform restoration when IO Link com munications start are already met Refer to the NXR series IO Link Master Unit for EtherNet IP User s Manual Cat No W619 for details on how to back up or restore the IO Link device settings to the IO Link Master Unit The replac...

Страница 125: ...I O Hubs and considerations for connecting two wire DC sensors A 1 Version Information A 2 A 2 Considerations for Connecting a Two wire DC Sensor A 3 A 3 Wiring Precautions for External Output Signal Lines A 5 A 4 Configuration Tab Page A 6 A 1 NXR series IO Link I O Hub User s Manual W620 A ...

Страница 126: ... same or that are later or higher than the corresponding versions given in the following table you can use all of the functions that are sup ported by that unit version of the IO Link I O Hub IO Link I O Hub NXR series IO Link Master Unit for EtherNet IP Support Software Model Unit version Unit version of NXR ILM08C EIT CX ConfiguratorFDT version NXR ID166C IL2 Ver 1 0 Ver 1 0 Ver 2 54 NXR CD166C ...

Страница 127: ...ensor s output residual voltage Relation between ON Current of the IO Link I O Hubs and Sensor Control Output The IO Link I O Hubs cannot detect sensor output ON without the following conditions met IOUT min ION IOUT max IOUT Sensor control output load current ION Input current to the IO Link I O Hub When ION is smaller than IOUT min connect a bleeder resistor R The bleeder resistor constant can b...

Страница 128: ...he IO Link I O Hub Ileak Sensor leakage current When Ileak is greater than IOFF connect a bleeder resistor R The bleeder resistor constant can be calculated as follows Select an appropriate bleeder resistor R so that both equations can be satisfied R VOFF IOFF VOFF Ileak VOFF IOFF VOFF Rated power W of bleeder resistor VCC VR 2 R 4 allowable margin VOFF OFF voltage at the input of the IO Link I O ...

Страница 129: ...absorb counter electromotive force when an inductive load is connected to an output signal con nect a diode near the inductive load Example When pin 4 is used for output Inductive load Diode I O connector 2 1 3 4 Appendices A 5 NXR series IO Link I O Hub User s Manual W620 A 3 Wiring Precautions for Ex ternal Output Signal Lines A ...

Страница 130: ...om Menu select Parameter to display the IO Link I O Hub Configuration tab page b The IO Link I O Hub settings To configure a setting expand it c The values of the settings To configure a setting expand it and select a value from the drop down list d The default values of the settings Appendices A 6 NXR series IO Link I O Hub User s Manual W620 ...

Страница 131: ...I Index I 1 NXR series IO Link I O Hub User s Manual W620 I ...

Страница 132: ...device 22 IO Link event code 8 10 IO Link I O Hub 22 IO Link interface standards 6 9 IO Link master 22 IODD 22 IODD files 1 6 M M12 attachment 5 4 M12 torque handle 5 4 N non IO Link connected external device 1 6 Non volatile Memory Write Error 8 11 O ON delay time 7 13 OUT P 3 7 OUT P 3 7 Output data 6 8 output power supply 4 2 Output Power Supply Voltage Drop 8 11 P pin 1 3 8 pin 2 3 8 pin 3 3 8...

Страница 133: ......

Страница 134: ... 60169 U S A Tel 1 847 843 7900 Fax 1 847 843 7787 Regional Headquarters OMRON EUROPE B V Wegalaan 67 69 2132 JD Hoofddorp The Netherlands Tel 31 2356 81 300 Fax 31 2356 81 388 Contact www ia omron com Kyoto JAPAN OMRON ASIA PACIFIC PTE LTD No 438A Alexandra Road 05 05 08 Lobby 2 Alexandra Technopark Singapore 119967 Tel 65 6835 3011 Fax 65 6835 2711 OMRON CHINA CO LTD Room 2211 Bank of China Towe...

Отзывы: