


G
F
H
PhysICAl INsTAllATION
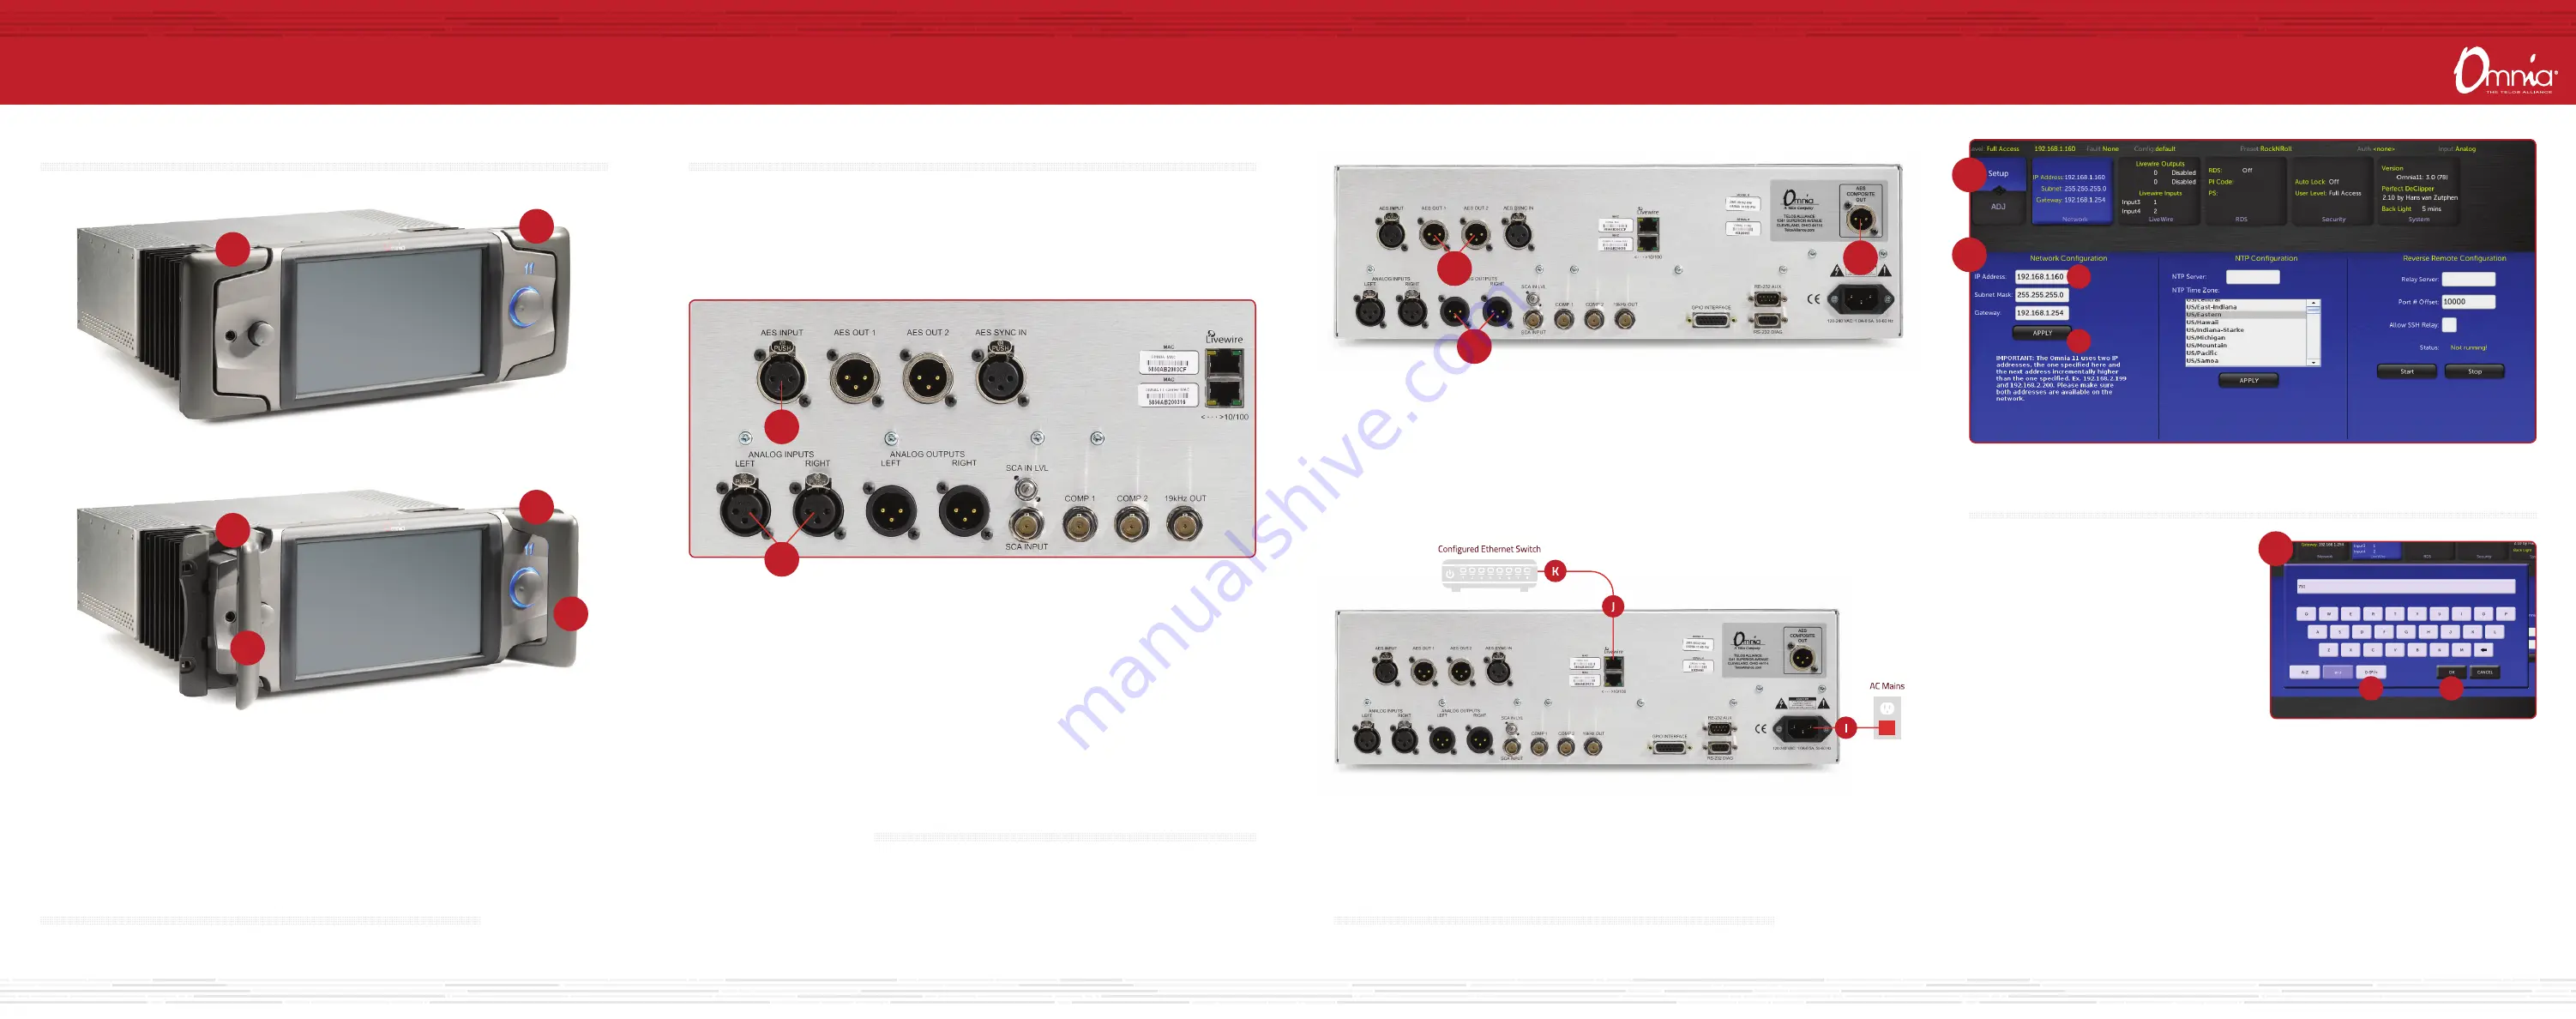
1. Locate the release pin (A) on the inside top of each handle on the Omnia.11.
2. Slide and hold the release pins (A) outwards and then pull the handles (B) towards you until you hear a click.
Make sure each handle is securely locked into the forward position.
3. Using the handles (B), lift and slide the Omnia.11 into the equipment rack and secure with all 4 rack screws.
4. Once installed into the rack, locate the release pin (A) on the inside top of each handle, slide the pin toward
you and fold the handles (B) back to their normal position.
AUdIO CONFIGURATION
AUdIO CONNECTIONs
1. Determine the inputs and outputs that are appropriate for your installation and follow the
appropriate instructions.
AUDIO INPUT - Both analog and digital input sources may be connected simultaneously,
however, only the input source that has been selected in the Input menu will be active.
Input source selection will be covered later in this guide.
a. For Analog audio, connect XLR audio cables to the left and right ANALOG INPUTS (C) jacks.
b. For Digital audio, connect XLR audio cables to the AES INPUT (D) jack.
c. For an existing Livewire system, the single Livewire Ethernet connection is all that is needed for audio I/O
(except for the composite MPX outputs). IMPORTANT: Do not connect an Ethernet cable at this time.
CONTINUE TO NETWORK CONFIGURATION
Your audio connections are complete. Continue to the ”Network Configuration” instructions.
CONTINUE TO AUdIO CONFIGURATION
Your physical installation is complete. Continue to the ”Audio Configuration” instructions.
AUDIO OUTPUT - All outputs are active simultaneously.
a. For Analog audio, connect XLR audio cables to the left and right ANALOG OUTPUTS jacks (F).
b. For Digital audio, connect XLR audio cables to the AES OUT 1/2 jacks (G).
c. For a direct composite MPX connection, connect an XLR cable to the AES COMPOSITE OUT jack (H).
Note: If you will be using conventional AES/EBU L/R digital audio to feed your STL or FM exciter, be sure
any pre-emphasis and limiters (if present) are fully defeated in the exciter. The Omnia must be the only
device providing the pre-emphasis so its own de-emphasis on the AES/EBU output being used must
also be “Off”. Also note that if the STL uses a codec (is not linear), the Omnia must be located at the
transmitter site for best performance and sound quality.
d. For an existing Livewire system, the single Livewire Ethernet connection is all that is needed for audio I/O
(except for the composite MPX outputs). IMPORTANT: Do not connect an Ethernet cable at this time.
NETWORK CONFIGURATION
INsTAllATION hElP
For more details about the Omnia.11, or to download the full manual
please visit https://www.telosalliance.com/Omnia/Omnia11
If you have more questions, call the Telos Alliance 24/7 Support Team at
+1 (216) 622-0247, or email us at [email protected], we’d be
happy to help you out.
1. Touch the “Setup” button (L). The Network
configuration screen will be displayed (M).
2. Touch the white field (N) to the right of IP Address
label to enter a static IP address. Note: The Omnia.11
requires 2 free static IP addresses on your network
(DHCP is not supported), the one that you enter
and the one directly above the one that you enter.
For example, if you enter 192.168.0.125 as the IP
Address, both it and 192.168.0.126 need to be open
on the network.
3. The on-screen keyboard will pop up (O). Touch the
“0-9*/=” button to shift the keyboard to number
entry mode.
4. Touch the backspace key to delete the current
information digit by digit, then enter your desired IP
address from the keyboard.
5. Touch OK (Q) and the keyboard will no longer display.
6. If your network requires changes to Subnet Mask or
Gateway values, touch the white fields to the right
of those labels to change the values via the pop-up
keyboard.
7. Once your values have been entered, touch the
“APPLY” button (R). The system will display an
option to either "Reboot Now" or Reboot Later".
Touch “Reboot Now” to reboot the system and apply
the new parameters.
NETWORK PARAmETER sETUP
2. Make sure that no cables are plugged into either Ethernet port.
3. Connect the Omnia.11 to AC Mains (I).
4. Once the system has booted up completely, connect one end of the Ethernet cable to the top Livewire/100BT
port (J) on the back of the Omnia.11. Connect the other end of the Ethernet cable to a configured Ethernet
switch (K) to allow access to the network.
RACK mOUNTING
AUdIO CONFIGURATION
(CONT.)
A
A
A
A
B
B
D
C
L
M
N
R
O
P
Q