7
Any form of reproduction of the entire contents of this document or parts thereof beyond the private use is strictly prohibited.
Subject to alterations and errors. All texts, illustrations and symbols are the property of nimax GmbH.
Procedure:
A)
Adjustment with laser pointer
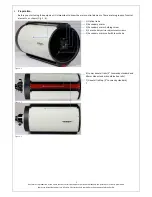
The baffle, that carries the main mirror, connects the eyepiece holder of the RC with the main mirror. We
will now adjust the eyepiece holder in such a way, that it points “straight” to the secondary mirror. Take
the front lid off the telescope and look on the main mirror under an oblique angle. Apart from the main
mirror and the baffle, you can also see the reflection of the secondary mirror with its holder in the main
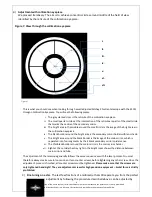
mirror. You see a small circle in the middle of the secondary mirror. This is the centre marking of the
secondary mirror. Now insert the 4577 Omegon laser pointer into the eyepiece holder and switch it on.
Under ideal conditions you will now see the laser reflex in the centre marking of the secondary mirror,
and the laser point will also be visible in the sight glass of the laser pointer. The laser point will not
perform a considerable movement when turning the focuser forth or back or when turning the laser. And
now step by step.
1)
Checking the adjustment of the laser.
Just like any other piece of optical equipment, the laser pointer will also get de-adjusted. This is generally
no problem, one simply readjusts the laser. However, it would be fatal to use a deadjusted laser to adjust
a telescope. This is why the laser is always checked first. Insert the laser into the eyepiece holder to do so.
For the following procedure make sure that the laser sits level on the eyepiece holder without any tipping
movement. Now rotate the laser – if the laser is correctly adjusted, the reflected laser in the sight glass
will not move. If it moves, adjust the laser as described in the operating instructions for the laser.
2)
Adjusting the eyepiece holder using the laser.
Make sure that the pressing screw of the eyepiece holder is slightly tightened, so that the eyepiece holder
moves neatly without skewing or slipping. Now move the eyepiece holder to approx. the middle of its
adjustment range (25 on the scale). Insert the laser and then focus forward and back. Watch the laser
reflex on the secondary mirror by looking into the telescope from the front. The laser reflex should not
move and be exactly in the middle of the secondary mirror mark. Should the reflex on the secondary
mirror move, you must enhance the adjustment of the eyepiece holder, to make sure that the laser point
will stay in place when focusing. Now adjust the unit consisting of eyepiece holder and main mirror to the
secondary mirror, so that the laser points exactly into the centre mark of the secondary mirror. On the 6”
and 8” Ritchey-Chretien the associated adjustment screws are located directly on the bottom of the
eyepiece holder and are slightly difficult to reach. On the 10” model the adjustment screws are located on
the outside of the tube and are very easy to reach. The procedure is the same for all models: Turn the
small grub screws to press the mirror slightly forward, then turn then round head socket head cap screws
to fix this setting. Now move the laser beam into the middle of the secondary mirror centre marking.
3)
Adjusting the secondary mirror.
Now use the socket head cap screws on the secondary mirror holder to guide the laser beam back into
the sight glass of the laser pointer. Here are no pairs of adjusting and counter screws – each screw is
countered by the two other screws. If you want to slight tighten one screw, you must first slightly loosen
the other two screw. Do not loosen the central Philips head screw in the holder! At the end of the
adjustment process the reflected laser should be in the middle of the secondary mirror centre marking, as
well as in the middle of the sight glass of the laser pointer and should not excessively move when
focusing. The coarse adjustment is thus finished – fine tuning can now take place on a star, but is normally
not required.


