
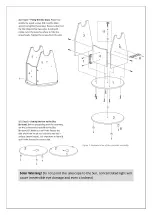


2.5. Step 5 – Fixing the Disc (bottom) #2 to the pre-assembled wood parts. Please proceed as shown. The handknob
allows adjusting pressure to the Teflon© pads increasing/decreasing friction.
Did you know? The Hand knob
adjusts the friction of the azimuth
movement. If you feel that the
movement on this axis is too
smooth, just give a quarter of turn
and tighten the central hand knob.
This will visibly increase the friction
making the movement stiffer. If on
the contrary the movement is too
stiff release the hand knob for a
smoother movement.
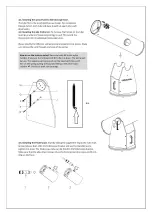
2.6. Step 6 – Setting the Handle #7 and
eyepiece rack #6. Use the supplied screws to
fix both the Handle and eyepiece rack as
shown in figure 1 and figure 2.
The one time assembly of the telescope base
is now completed. It can be easily carried with one hand using the handle. The
eyepiece rack can be used to store eyepieces and Barlow (not included) during
observations.
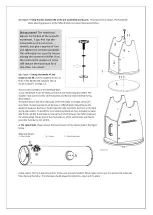
The optical tube is the other main part of this telescope. It already comes pre-
assembled. Its side bearings sit on the base’s Teflon© pads. Depending on the
weight of eyepiece, Barlow or finderscope the tube may tilt to the front or the back
during observation. To avoid this inconvenient problem we have included a unique
side friction kit #12 that allows increasing the friction between the Teflon pads and
the side bearings. Please look at the main features of the optical tube and how to
assemble the side friction kit #12.
3. The optical tube. Please look at the main features of the optical tube in the figure
below.
Optical tube features
A – Side bearing
B – Focuser
C – Finderscope base
A dust cap for the front aperture and for the focuser are also included. Please make sure to use it to protect the telescope
from dust and humidity. The telescope should always be stored in a clean and dry place.
Figure 2.


