


6
Installation
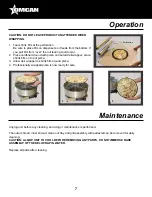
Operation
•
Remove cardboard from bottom of unit and heating element.
(CAUTION: DO NOT PLUG UNIT IN WITH CARDBOARD HEATING ELEMENT SUPPORT IN PLACE).
•
Screw threaded rod into disc.
•
Thread wing nut on the opposite end of rod so the wings of the nut face jam nut.
•
Thread disc and rod assembly into grill assembly until the height is approx. 4-1/2” to 5”.
•
Lock wing nut against grill assembly. (The 4-1/2” to 5” dimension given is only a starting place. Due to the
differences in wrapping mediums, you may have to adjust your pedestal height to attain best wrapping
results.)
•
Place grill with pedestal assembly on the brackets riveted to the inner shroud.
•
Clean out tray can then be put in place. Clean out tray should be centered between shroud support
brackets and resting on the base of the unit.
You are now ready to operate the unit.
CAUTION: THE CARDBOARD SUPPORT MUST BE REMOVED FROM THE HEATING ELEMENT BEFORE
ENERGIzING UNIT.
Plug unit in and turn the thermostat switch between the medium and high position. Pre-heat the machine for
approximately 3 minutes.
Place the product being wrapped on the center of the pedestal, immediately tear off a sheet of shrink wrap
material from the dispenser and place over product paying special attention to the symmetry. Best results will
be achieved if the wrapping material is evenly laid over the product.
In approximately 10 to 20 seconds your product will be enveloped and sealed. Remove from the pedestal and
allow to cool.
Содержание SE-US-0630
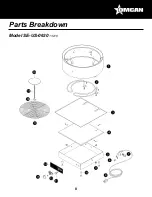
Страница 8: ...8 Model SE US 0630 13216 Parts Breakdown...
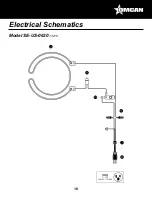
Страница 10: ...10 Model SE US 0630 13216 Electrical Schematics...


