background image

EN

 3

Quick Start 

Guide

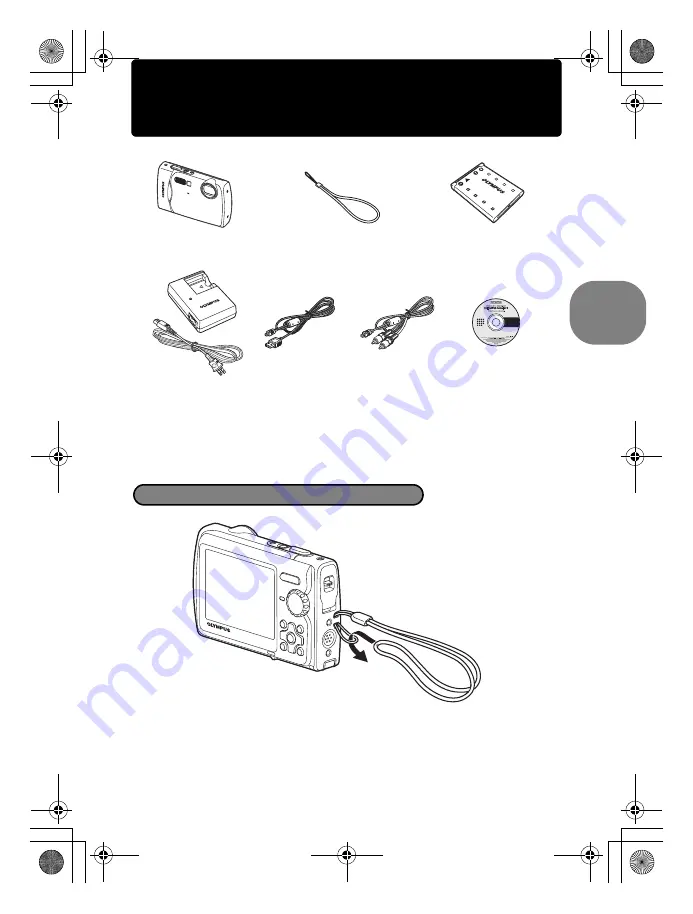
Gather these items (box contents)

(

Pull the strap tight so that it does not come loose.

Digital Camera

Strap

LI-42B 

Lithium Ion Battery

LI-40C 

Battery Charger

USB Cable

AV Cable

OLYMPUS Master 2 

Software CD-ROM

Items not shown: Instruction Manual (this manual), warranty card. Contents may vary 
depending on purchase location.

Attach the strap

Quick Start Guide

d4343_e_0000_7.book  Page 3  Monday, June 25, 2007  1:59 PM

Содержание Stylus m790SW

Страница 1: ...ptimum performance and a longer service life Keep this manual in a safe place for future reference We recommend that you take test shots to get accustomed to your camera before taking important photog...

Страница 2: ...and how to take better pictures Read about convenient functions and safety precautions on how to use your camera more effectively Learn about the menus that control the functions and settings for basi...

Страница 3: ...Camera Strap LI 42B Lithium Ion Battery LI 40C Battery Charger USB Cable AV Cable OLYMPUS Master 2 Software CD ROM Items not shown Instruction Manual this manual warranty card Contents may vary depend...

Страница 4: ...b Insert the battery and an xD Picture Card optional in the camera 2 1 3 Charging Indicator Light On Red Charging Light Off Charging complete Charging time Approx 5 hours AC Wall Outlet Power Cable B...

Страница 5: ...sert the battery by putting in the marked side first with the marks toward the battery lock knob If you insert the battery incorrectly you will not be able to remove it Do not use force Contact author...

Страница 6: ...es s This function allows you to shoot pictures by selecting a scene according to the shooting condition g This function allows you to set the target items by following the shooting guide displayed on...

Страница 7: ...tton to select M d Press the 3 button About the date and time setting screen Y M D Year Month Day Exits a setting Minute Date formats Y M D M D Y D M Y Hour MENU CANCEL X Y M D Y M D Y M D T I M E T I...

Страница 8: ...ss the 1F button and the 2Y button to select Y M D j After all items have been set press the o button For precise time setting press the o button as the time signal strikes 00 seconds MENU X CANCEL Y...

Страница 9: ...cates the focus and exposure are locked The shutter speed and aperture value are displayed Place this mark over your subject The number of storable still pictures is displayed P 1 400 1 400 F3 5 F3 5...

Страница 10: ...ton c Press the 1F button to select YES and press the o button to erase the picture IN IN 12 30 12 30 07 11 26 07 11 26 100 0001 100 0001 1 HQ HQ Arrow Pad Next Picture Prev Picture Mode Dial o Button...

Страница 11: ...picture with the focus locked and then fully press the shutter button to shoot a picture If the green lamp blinks the focus is not adjusted properly Try locking the focus again o button Turning the c...

Страница 12: ...scene mode to another one Press m and select SCN from the top menu Use the 12 to select a scene and press o By switching to another scene mode most settings will be changed to the default settings of...

Страница 13: ...ring single frame playback g MOVIE PLAY Playing back movies P 28 The still pictures registered in My Favorite are displayed Press the arrow pad to view other pictures Use the zoom button to switch amo...

Страница 14: ...can set with the Function Menu g WB Adjusting the color of a picture P 24 ISO Changing the ISO sensitivity P 24 DRIVE Using sequential continuous shooting P 24 ESP n Changing the area for measuring t...

Страница 15: ...lose up playback Press T to incrementally enlarge the picture up to 10 times the original size Press W to reduce the size Use the arrow pad during close up playback to scroll around the picture Press...

Страница 16: ...brightness Exposure Compensation 3 button Flash shooting AUTO Auto flash The flash fires automatically in low light or backlight conditions Red eye reduction flash This emits pre flashes to reduce the...

Страница 17: ...he following setting restrictions apply ESP n is fixed at ESP AF MODE is fixed at FACE DETECT IMAGE QUALITY cannot be set to 16 9 DRIVE is fixed at o PANORAMA cannot be set You can also use Shadow Adj...

Страница 18: ...4 4 HQ HQ 3072 3072 2304 2304 ISO ISO 1600 1600 P P ISO ISO 1600 1600 n j HQ HQ 3072 3072 2304 2304 2 0 2 0 k IN IN 4 4 R l 12 30 12 30 07 11 26 07 11 26 100 0004 100 0004 4 HQ HQ IN IN ISO 400 ISO 4...

Страница 19: ...illuminator is on it will be kept on for a maximum of 90 seconds To turn off the LED illuminator hold down Y again or perform no operations for 30 seconds and allow it turn off automatically Checking...

Страница 20: ...monitor Follow these guides to navigate the menus About the menus Operation guide o button Arrow pad 1243 m button OK MENU SETUP SETUP IMAGE QUALITY IMAGE QUALITY RESET RESET CAMERA MENU CAMERA MENU S...

Страница 21: ...elect FACE DETECT iESP or SPOT and press o The menu item is set and the previous menu is displayed Press m repeatedly to exit the menu To cancel changes and continue menu operation press m before pres...

Страница 22: ...n A4 11 7 8 5 in size prints This is useful for computer editing such as rotating or adding text to a picture 2304 1728 2048 1536 SQ2 1600 1200 Standard compression This is useful for postcard sized 6...

Страница 23: ...f protector when using the camera at depths exceeding 3 m 9 8 ft 5 The focus distance is fixed at approximately 5 0 m 16 4 ft RESET Restoring default settings NO YES Function Factory default setting R...

Страница 24: ...used in desk lamps y Fluorescent lamp 3 For shooting under a white fluorescent lamp This type of lamp is mainly used in offices ISO Changing the ISO sensitivity AUTO Sensitivity is automatically adjus...

Страница 25: ...GE QUALITY cannot be set to 16 9 FINE ZOOM Zooming in on your subject without reducing image quality OFF ON DIGITAL ZOOM Zooming in on your subject OFF ON ESP n Changing the area for measuring the bri...

Страница 26: ...ough indication then compose the shot so that the edges of the previous picture in the frame overlap with the next shot Press o to exit panorama shooting Panorama shooting is possible for up to 10 pic...

Страница 27: ...PLAYBACK MENU SILENT MODE SILENT MODE EXIT SET PERFECT FIX PERFECT FIX PERFECT PERFECT FIX FIX PERFECT FIX PERFECT FIX PERFECT FIX ADD FAVORITE ADD FAVORITE ADD FAVORITE ADD FAVORITE PRINT PRINT ORDE...

Страница 28: ...s m MOVIE PLAY Playing back movies 2 OK 12 30 12 30 07 11 26 07 11 26 100 0004 100 0004 4 IN IN MOVIE PLAY 12 30 12 30 07 11 26 07 11 26 100 0004 100 0004 00 00 00 36 00 00 00 36 IN IN 1 Increases the...

Страница 29: ...tting the startup screen and volume P 33 MENU THEME Setting the menu screen color and background P 34 Note Please note that registered pictures cannot be edited printed copied to a card transferred to...

Страница 30: ...ion and size of the label and press o Set the color of the label with the arrow pad and press o This function lets you select a calendar format integrate the calendar with a picture and save it as a n...

Страница 31: ...protect several frames in succession 9 is displayed when the picture is protected Pictures taken with the camera held vertically are displayed horizontally during playback This function lets you rota...

Страница 32: ...ot insert the card into the camera When erasing the picture from the card insert a card into the camera in advance Use the arrow pad to select the picture and press o to add R Press o again to cancel...

Страница 33: ...play Available languages vary depending on the area where you purchased this camera You can add other languages to your camera with the provided OLYMPUS Master software SETUP menus MEMORY FORMAT FORMA...

Страница 34: ...the camera warning sound OFF No sound LOW HIGH SHUTTER SOUND Selecting the sound of the shutter button OFF No sound 1 LOW HIGH 2 LOW HIGH 3 LOW HIGH VOLUME Adjusting the volume during playback OFF No...

Страница 35: ...f the year are fixed The time is displayed in the 24 hour format To set the time precisely with the cursor at either minute or Y M D press o as the time signal strikes 00 seconds AUTO This method is u...

Страница 36: ...a Note that pressing o will turn the camera on DUALTIME Setting the date and time for another time zone OFF Switches to the date and time set in X Pictures are recorded with the date and time set in X...

Страница 37: ...ons restores the camera from power save mode This function provides additional lighting when a quick light source is needed and to help you compose your picture in a dark environment g g E Y button Ch...

Страница 38: ...the settings screens P 40 pictures are printed according to these settings Refer to the printer s instruction manual for its standard settings or contact the printer manufacturer 1 In playback mode di...

Страница 39: ...the screen for Step 3 above and then press o 2 Select CUSTOM PRINT and press o 3 Follow the operation guide to adjust print settings You can use EASY PRINT even when the camera is turned off or in sh...

Страница 40: ...SET MENU BACK PRINTPAPER SIZE SIZE BORDERLESS BORDERLESS I N SIZE BORDERLESS STANDARD STANDARD SIZE Choose from the available paper sizes on your printer BORDERLESS Select with or without borders In M...

Страница 41: ...patible printer Printing is possible directly from a card containing print reservation data without using a computer For more details refer to the printer s instruction manual A PC card adapter may al...

Страница 42: ...prints You cannot make print reservations for pictures with A Repeat Step 3 to make print reservations for other pictures 4 When you finish making print reservations press o 5 Select the date and tim...

Страница 43: ...reservation data for all the pictures 2 Select or U and press o 3 Select RESET and press o To reset the print reservation data for a selected picture 2 Select and press o 3 Select KEEP and press o 4 P...

Страница 44: ...PUS Master Prepare the following items before starting A computer that satisfies the operating environment P 45 requirements OLYMPUS Master2 CD ROM USB cable Download images from the camera or other m...

Страница 45: ...an added USB port or IEEE 1394 port To install the software you must log on as a user with administrators privileges Macintosh OS Mac OS X v10 3 or later CPU Power PC G3 500 MHz or later Intel Core S...

Страница 46: ...Master licensing agreement is displayed read the agreement and click Yes to proceed with the installation 4 When the user information screen is displayed enter your Name select your Region and click...

Страница 47: ...hat installation is completed is displayed You must restart your computer before using OLYMPUS Master 1 Make sure the camera is turned off The monitor is off The lens cover is closed 2 Connect the mul...

Страница 48: ...ed in Step 3 3 is pressed and MTP is selected Windows 1 Double click the OLYMPUS Master 2 icon on the desktop Macintosh 1 Double click the OLYMPUS Master 2 icon in the OLYMPUS Master 2 folder The brow...

Страница 49: ...splayed saying that the hardware can be ejected safely click OK Macintosh 1 The trash icon changes to the eject icon when the Untitled or NO_NAME icon on the desktop is dragged Drag and drop it on the...

Страница 50: ...ra to your computer using the USB cable provided with the camera to download and save images without using OLYMPUS Master The following environment is required to use the USB cable to connect the came...

Страница 51: ...y Language The confirmation window for updating is displayed 6 Click OK The updating the camera window is displayed 7 Click Add Language in the updating camera display The Add Display Language of Came...

Страница 52: ...turns off Press o to turn the camera on The mode dial is set to q or P This is the playback mode for displaying pictures on the monitor Set the mode dial to a shooting mode The mode dial is in the po...

Страница 53: ...ntrast at the same distance as the intended subject recompose your shot and then take the picture If the subject has no vertical lines hold the camera vertically and focus the camera using the focus l...

Страница 54: ...ting such as when near a window When there is no white in the center of the frame g WB Adjusting the color of a picture P 24 Take pictures with K in s mode Suitable for taking pictures on a sunny day...

Страница 55: ...When the card is full you download the pictures to a computer and then either erase the pictures from the card or use a new card Pictures are not recorded to the internal memory when a card is insert...

Страница 56: ...the camera PANORAMA PRINT ORDER FORMAT BACKUP Image quality Image size Continuous recording length Internal memory Using a 1 GB card SHQ 640 480 30 frames sec 8 sec 10 sec HQ 320 240 15 frames sec 38...

Страница 57: ...to display the histogram Set the exposure so that the graph is concentrated on the outer edges and the graph is balanced on both sides g g E Y button Changing the information on display Display the me...

Страница 58: ...pictures P 32 The size of the picture displayed on a computer screen changes depending on the computer settings When the monitor setting is 1 024 768 and you are using Internet Explorer to view a pic...

Страница 59: ...cted picture and it cannot be played back on this camera Use image processing software to view the picture on a computer If that cannot be done the image file is damaged r THE IMAGE CANNOT BE EDITED P...

Страница 60: ...era Do not operate the printer while changing settings on the camera PRINT ERROR There is a problem with the printer and or camera Turn off the camera and printer Check the printer and remedy any prob...

Страница 61: ...9 9 9 9 9 9 1 9 9 9 P 16 O 9 9 2 9 2 9 9 2 9 2 9 9 9 9 9 9 P 16 Y 9 9 9 9 9 9 9 9 9 9 3 3 P 16 Shadow Adjustment Technology 9 9 9 9 9 9 9 9 9 9 P 17 Optical zoom 9 9 9 9 9 9 9 9 9 9 9 9 9 P 15 ISO 9 9...

Страница 62: ...and test the camera functions Note Avoid leaving the camera in places where chemical products are handled since this may result in corrosion This camera uses one Olympus lithium ion battery LI 42B or...

Страница 63: ...A Italy 220 50 C Honduras 110 60 A Luxemburg 230 50 C Jamaica 110 50 A Netherlands 230 50 C Mexico 120 127 60 A Norway 230 50 C Nicaragua 120 240 60 A Poland 220 50 C Panama 110 220 60 A Portugal 230...

Страница 64: ...ch the contact area on the card Compatible cards xD Picture Card 16MB 2GB TypeH M Standard Using the internal memory or card You can confirm on the monitor whether the internal memory or card is being...

Страница 65: ...e the integrity and operation of your camera To maintain camera performance please take your camera to the nearest Olympus Authorized Service Center to have it inspected after any major impact In the...

Страница 66: ...ure 10 C 14 F or less Failure to do so may break down water resistance Do not use chemicals for cleaning rust prevention anti fogging repairing etc Failure to do so may break down water resistance Do...

Страница 67: ...or store this product near any heat source such as a radiator heat register stove or any type of equipment or appliance that generates heat including stereo amplifiers SAFETY PRECAUTIONS General Preca...

Страница 68: ...h bare hands which may cause a fire or burn your hands Do not leave the camera in places where it may be subject to extremely high temperatures Doing so may cause parts to deteriorate and in some circ...

Страница 69: ...g a fire or explosion use only batteries recommended for use with this product Insert the battery carefully as described in the operating instructions If rechargeable batteries have not been recharged...

Страница 70: ...ge a battery when using it for the first time or if it has not been used for a long period When operating the camera with battery power at low temperatures try to keep the camera and spare battery as...

Страница 71: ...lusion or limitation of liability for consequential or incidental damages so the above limitations may not apply to you Olympus reserves all rights to this manual Unauthorized photographing or use of...

Страница 72: ...to USB enabled personal computers PC Any unauthorized changes or modifications to this equipment would void the user s authority to operate IBM is a registered trademark of International Business Mac...

Страница 73: ...0 5 m 1 6 ft W only super macro mode S macro LED mode Monitor 2 5 TFT color LCD display 230 000 pixels Flash charge time Approx 6 sec for full flash discharge at room temperature using a new fully ch...

Страница 74: ...3 7 V Standard capacity 740 mAh Battery life Approx 300 full charges varies on usage Operating environment Temperature 0 C to 40 C 32 F to 104 F charging 10 C to 60 C 14 F to 140 F operation 20 C to 3...

Страница 75: ...P 10 17 Arrow Pad 1243 P 14 o Button OK FUNC P 14 Strap Eyelet P 3 Battery Card Compartment Cover P 4 Tripod Socket Connector Cover P 37 38 47 Multi Connector P 37 38 47 Monitor P 35 76 m Button P 14...

Страница 76: ...P 22 13 AF target mark P 9 25 14 Number of storable still pictures Remaining recording time 4 00 36 P 55 15 Memory gauge a b c d maximum reached P 52 16 Current memory IN Recording pictures to the in...

Страница 77: ...9 Aperture value F3 5 F5 0 etc 10 Shutter speed 4 1 1000 11 White balance WB AUTO 5 3 1 w y P 24 12 ISO ISO 100 ISO 400 ISO 1600 etc P 24 13 Date and time 07 11 26 12 30 P 7 35 14 File number M100 000...

Страница 78: ...day 3 24 COLOR EDIT 30 Compression 22 Connector cover 37 38 47 Continuous recording length 56 CUSTOM PRINT 39 D Date and time X 7 35 Digital image stabilization mode h 6 12 DIGITAL ZOOM 25 Direct pri...

Страница 79: ...rotect 0 31 PW ON SETUP 33 R REC VIEW 34 Recording movies n 12 Recording sound with still pictures R 26 REDEYE FIX 29 Red eye reduction flash 16 RESET 23 Resizing Q 29 S Saturation High 30 Saturation...

Страница 80: ...80 EN Memo d4343_e_0000_7 book Page 80 Monday June 25 2007 4 38 PM...

Страница 81: ...EN 81 Memo d4343_e_0000_7 book Page 81 Monday June 25 2007 4 38 PM...

Страница 82: ...82 EN Memo d4343_e_0000_7 book Page 82 Monday June 25 2007 4 38 PM...

Страница 83: ...EN 83 Memo d4343_e_0000_7 book Page 83 Monday June 25 2007 4 38 PM...

Страница 84: ...Printed in China VS198201 d4343_e_0000_7 book Page 80 Tuesday June 26 2007 9 36 AM...

Отзывы: