background image

23

EN

Item

Description

FLASH AUTO

*1

The 

fl

 ash 

fi

 res automatically in 

low-light and backlight conditions.

REDEYE

*1

This emits pre-

fl

 ashes to reduce 

the occurrence of red eye in your 
photos.

FILL IN

The 

fl

 ash 

fi

 res regardless of the 

available light.

RED-EYE + 
FILL-IN

After the pre-

fl

 ashes that reduce 

the red eye, the 

fl

 ash 

fi

 res 

regardless of the available light.

FLASH OFF

The 

fl

 ash does not 

fi

 re.

SLOW

The 

fl

 ash 

fi

 res at a slow shutter 

speed immediately after the 
shutter is opened (

fi

 rst curtain 

sync). Both the subject in the 
foreground and the night scene in 
the background are captured.

RED-EYE SLOW

This combines the pre-

fl

 ashes of 

red-eye reduction with the 

fl

 ash in 

SLOW (

fi

 rst curtain sync).

SLOW2

The 

fl

 ash 

fi

 res at a slow shutter 

speed immediately before the 
shutter is closed (second curtain 
sync). This can be used to create 
effects such as the taillights of a 
car streaming backwards.

*1 

This cannot be set in 

S

 and 

M

 modes.

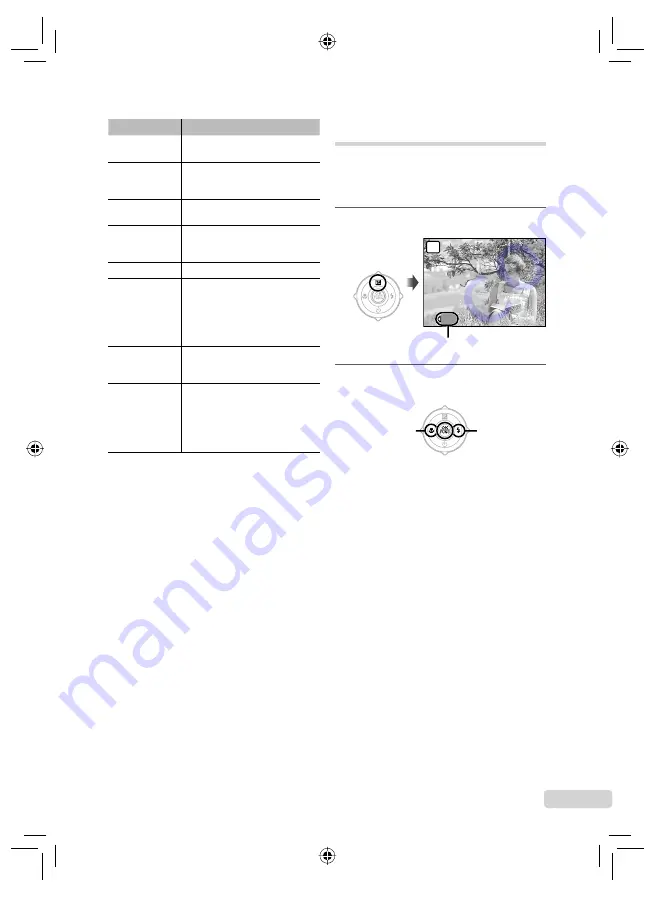
Adjusting the brightness 

(Exposure compensation)

The standard brightness (correct exposure) set 
by the camera based on the shooting mode 
(except for 

M

) can be adjusted brighter or darker 

to obtain the desired shot.

1

 Press 

7

.

1/1000

1/1000 F8.0

F8.0

+2.0

+2.0

P

Exposure compensation value

2

 Use 

9:

 to adjust the brightness, 

and press the 

o

 button to set.

:

 : Brighten

9

 : Darken

book_d4374_en.indb   23

book_d4374_en.indb   23

18/07/2008   13:39:12

18/07/2008   13:39:12

Содержание SP-565

Страница 1: ...this manual were produced during the development stages and may differ from the actual product Contents Contents Names of Parts 6 Preparing the Camera 10 Shooting Playback and Erasing 14 Using Shooti...

Страница 2: ...this manual were produced during the development stages and may differ from the actual product Contents Contents Names of Parts 6 Preparing the Camera 10 Shooting Playback and Erasing 14 Using Shooti...

Страница 3: ...row pad o button Buttons in use 4 Use 78 to select the desired submenu 1 and press the o button 1 2 3 4 5 ISO OFF OFF CAMERA MENU AUTO o FINE ZOOM DIGITAL ZOOM DRIVE AUTO WB MENU EXIT SET OK 1 2 3 4 5...

Страница 4: ...row pad o button Buttons in use 4 Use 78 to select the desired submenu 1 and press the o button 1 2 3 4 5 ISO OFF OFF CAMERA MENU AUTO o FINE ZOOM DIGITAL ZOOM DRIVE AUTO WB MENU EXIT SET OK 1 2 3 4 5...

Страница 5: ...QUALITY p 31 2 K CAMERA MENU WB p 32 ISO p 33 DRIVE p 34 FINE ZOOM p 35 DIGITAL ZOOM p 35 METERING p 35 AF MODE p 36 FOCUS MODE p 36 FULLTIME AF p 37 AF PREDICT p 37 AF ILLUMINAT p 37 IMAGE STABILIZE...

Страница 6: ...p 10 6 Battery compartment lock p 10 7 Tripod socket 8 Speaker 9 Diopter adjustment dial p 25 Camera unit 1 5 6 7 8 2 4 9 12 10 11 13 3 10 button flash flip up p 22 11 DC IN jack p 78 12 Connector co...

Страница 7: ...64 9 Arrow pad p 12 7button exposure compensation p 23 9 button macro p 24 8button self timer p 24 button flash p 22 10 o button p 26 11 f D button SHADOW ADJ erase p 16 22 12 g E button menu guide in...

Страница 8: ...9 Battery check p 10 73 10 AF lock s p 63 Manual focus a p 36 AF predict p 37 11 Flash standby camera shake warning flash charge p 72 12 Flash intensity p 38 13 Saturation p 40 14 Sharpness p 39 15 C...

Страница 9: ...Movie 1 Silent mode p 63 2 Print reservation number of prints p 66 67 3 Sound record p 39 4 Protect p 52 5 Sequential playback index slideshow p 29 6 Battery check p 10 73 7 Shutter speed p 17 8 Aper...

Страница 10: ...to replace the batteries Replace the batteries when the error message shown below appears BATTERY EMPTY Monitor top right Error message Flashes in red Checking the contents of the box Digital camera...

Страница 11: ...r movies using an xD Picture Card sold separately than using the internal memory Using an xD Picture Card p 78 Be sure to press the o button to turn off the camera before inserting or removing the car...

Страница 12: ...2 5 3 6 IN OK MENU BACK GO SEL IMAGE SET OK SCN RESET PANORAMA CAMERA MENU SILENT MODE MENU EXIT SET OK IMAGE QUALITY SETUP W T Operation guide Setting the date and time The date and time set here ar...

Страница 13: ...language for the menu and error messages displayed on the monitor viewfinder is selectable 1 Set the mode dial to a position other than R 2 Press the m button and press 789 to select x SETUP SCN SCN...

Страница 14: ...to focus if the AF target mark flashes red Try focusing again AUTO AF target mark Press halfway Focusing p 74 Shooting with automatic settings h mode This is a fully automatic mode that allows the us...

Страница 15: ...urn off the camera Press the o button to turn off the camera and attach the lens cap to the lens Viewing images 1 Set the mode dial to q 1 1 IN 10M 10M 2008 10 26 2008 10 26 12 30 12 30 100 0001 100 0...

Страница 16: ...apsed time Total recording time First last frame frame advance During pause press 7 to display the first frame and press 8 to display the last frame Press 9 to display the previous frame and press to...

Страница 17: ...Using the best mode for the shooting scene s mode 1 Set the mode dial to s PORTRAIT SET OK MENU EXIT The sample image and explanations on suitable shooting methods will be displayed on the screen The...

Страница 18: ...wer When the aperture value appears red the correct exposure cannot be obtained Selecting the shutter speed for shooting pictures S mode In this mode the aperture value is automatically set by the cam...

Страница 19: ...tter speed using 789 and pressing the o button 9 Aperture value becomes larger Aperture value becomes smaller 7 Shutter speed becomes faster 8 Shutter speed becomes slower When the difference between...

Страница 20: ...n recording Use DIGITAL ZOOM p 35 2 Press the shutter button halfway down to focus on the subject and gently press the button all the way down to start recording 00 34 00 34 REC REC Red during shootin...

Страница 21: ...Zoom bar Use of IMAGE STABILIZER p 37 is recommended when shooting with the telephoto zoom To take larger images without reducing image quality FINE ZOOM p 35 To take larger images DIGITAL ZOOM p 35 T...

Страница 22: ...n s face that has been darkened by backlight and makes it appear brighter 1 Shadow adjustment technology 1 Press the f button P OFF OK OK OFF ON SET SET SHADOW ADJ SHADOW ADJ NR 2 Use 9 to select ON a...

Страница 23: ...ED EYE SLOW This combines the pre flashes of red eye reduction with the flash in SLOW first curtain sync SLOW2 The flash fires at a slow shutter speed immediately before the shutter is closed second c...

Страница 24: ...istance from the camera h or to take pictures without the camera shake k 1 Press 8 OFF P OFF 12s 2s Y 10M NORM 1 400 F3 5 1 400 F3 5 OK OK SET SELFTIMER 2 Use 78 to select the setting option and press...

Страница 25: ...h the situation such as clearing the view of the screen or for creating a presicse compostion by the use of the grid display 1 Press the g button The displayed shooting information changes in the orde...

Страница 26: ...ess the shutter button Using a function assigned to the z button Custom button This allows you to register a frequently used function except h A R Once registered you can set the settings directly wit...

Страница 27: ...n completes the setting and makes the camera ready for shooting 10M 10M 17 17 IN GUIDE NORM NORM MODE CHANGED MODE CHANGED To adjust another setting press the m button Functions set using the shooting...

Страница 28: ...29 30 30 1 1 2 2 3 3 4 4 SUN SUN MON MON TUE TUE WED WED THU THU FRI FRI SAT SAT 2008 2008 5 5 6 6 7 7 8 8 9 9 10 10 11 11 12 12 13 13 14 14 15 15 16 16 17 17 18 18 19 19 20 20 21 21 22 22 23 23 24 2...

Страница 29: ...es that were shot sequentially with the below functions only the first frame will be displayed j i 7 TIMELAPSE i AUCTION e SHOOT SELECT 1 f SHOOT SELECT 2 S SMILE SHOT 1 Select an image with a sequent...

Страница 30: ...10 26 12 30 2008 10 26 12 30 2 2 100 0003 100 0003 2 Press the o button Current viewing area Operations during panorama image playback Zoom in Zoom out Turn the zoom lever Playback direction Press 789...

Страница 31: ...le for printing pictures up to A4 8 5 11 in 2M 1600 1200 Suitable for printing pictures at A5 5 7 in 1M 1280 960 Suitable for printing pictures at postcard size VGA 640 480 Suitable for viewing pictur...

Страница 32: ...ing scene PRESET 5 For shooting outdoors under a clear sky 3 For shooting outdoors under a cloudy sky 1 For shooting under tungsten lighting w For shooting under daylight fluorescent lighting househol...

Страница 33: ...earance Submenu 2 Application AUTO The camera automatically adjusts the sensitivity according to the shooting scene HIGH ISO AUTO The camera automatically adjusts to a higher sensitivity than AUTO to...

Страница 34: ...ges the exposure for each frame while using the focus and white balance that were locked at the first frame Bracket shooting The exposure interval and the number of shots are selectable 1 The shooting...

Страница 35: ...zoom and digital zoom are combined to zoom in for shooting Still pictures Approx 100x max Movies Approx 60x max When set to ON FINE ZOOM is canceled automatically DIGITAL ZOOM is not available when SU...

Страница 36: ...the screen To lock the AF target mark press and hold the o button until the mark changes to R To unlock the AF target mark press and hold the o button until the mark changes to V Changing the focus m...

Страница 37: ...4 Using the AF illuminator to focus on a shadowy subject AF ILLUMINAT K CAMERA MENU X AF ILLUMINAT P A S M r s Submenu 2 Application OFF The AF illuminator is not used ON When the shutter button is pr...

Страница 38: ...CH1 to CH4 An Olympus Wireless RC Flash System compatible flash is used for taking pictures The channel CH1 to CH4 can be selected SLAVE 1 to 10 The commercially available slave flash that is synchron...

Страница 39: ...directions RED BLUE MENU BACK SET OK WB p 32 Selecting the color tone of the image PICTURE MODE K CAMERA MENU X PICTURE MODE P A S M r Submenu 2 Application VIVID This gives the image a vivid color to...

Страница 40: ...ise during long exposures NOISE REDUCT K CAMERA MENU X NOISE REDUCT P A S M r s Submenu 2 Application OFF The camera takes pictures at a fast shutter speed No noise reduction is used ON The camera tak...

Страница 41: ...f time If any of the following operations are performed while the camera is in sleep mode the camera cancels timelapse mode and returns to normal shooting opening of the battery compartment cover or c...

Страница 42: ...1 UNIGHT PORTRAIT NINDOOR WCANDLE RSELF PORTAIT cAVAILABLE LIGHT SSUNSET XFIREWORKS 1 bMULTI FIREWORKS VCUISINE PBEHIND GLASS dDOCUMENTS iAUCTION eSHOOT SELECT 1 2 fSHOOT SELECT 2 3 lSMILE SHOT ZBEACH...

Страница 43: ...from the first and second frames To retake the second shot press the shutter button again Saving only selected images from sequentially shot images SHOOT SELECT 1 2 mode 1 Select e SHOOT SELECT 1 or f...

Страница 44: ...r setting this option 2 Press the shutter button to start movie shooting A 7 second movie including 2 second movie immediately before pressing the shutter button is taken The optical zoom and auto foc...

Страница 45: ...mbined by the camera The user composes the shots using the guide frame and manually releases the shutter COMBINE IN PC The frames that were taken are combined into a panorama image using the OLYMPUS M...

Страница 46: ...e the third frame in the same way as step 3 After the third frame is taken the camera automatically processes the frames and the combined panoramic image is displayed To cancel a panoramic picture dur...

Страница 47: ...o that the two adjacent frames overlap 3 Repeat step 2 until the number of required frames are taken and then press the o button when done When the g mark is displayed you cannot continue shooting any...

Страница 48: ...date in the calendar playback screen To start a slideshow Make the BGM settings and press the o button to start the slideshow To stop the slideshow press the o button or m button Retouching images w P...

Страница 49: ...cation C 640 480 This saves a high resolution image as a separate image with a smaller size for use in e mail attachments and other applications E 320 240 1 Use 9 to select an image and press the o bu...

Страница 50: ...the o button 2 Use 9 to select the calendar and then use 78 to select the image orientation and press the o button 3 Use 78 to select the Year of the calendar and press 4 Use 78 to select the Month o...

Страница 51: ...vie and press the o button First frame Last frame Frames are extracted automatically SELECT FIRST FRAME SET OK 00 00 00 36 00 00 00 36 Playback position If no fine adjustment of the frames is needed s...

Страница 52: ...saved Extracting a still image from a movie MOVIE INDEX E EDIT X MOVIE INDEX 1 Use 9 to select a movie and press the o button 2 Use 9 to select the frame to be extracted and press the o button 78 can...

Страница 53: ...le playing back the image This is useful for recording notes or comments about the image NO No sound is recorded 1 Use 9 to select an image 2 Aim the microphone towards the sound source Microphone 3 U...

Страница 54: ...2 5 3 6 IN OK MENU BACK GO SEL IMAGE R mark 3 Repeat step 2 to select the images to be erased and then press the D button to erase the selected images 4 Use 78 to select YES and press the o button The...

Страница 55: ...formatting 1 Be sure to remove the card before formatting the internal memory Copying images in the internal memory to the card BACKUP x SETUP X BACKUP Submenu 2 Application YES Backs up image data in...

Страница 56: ...screen color MENU COLOR x SETUP X MENU COLOR Submenu 2 Application NORMAL COLOR 1 COLOR 2 COLOR 3 Selects the menu screen color according to your preference Selecting the camera sound and its volume S...

Страница 57: ...witching between the monitor and viewfinder p 25 Even when set to ON you can resume shooting while the image is being displayed Selecting where the top menu is displayed MENU DISPLAY x SETUP X MENU DI...

Страница 58: ...names with sequential numbers 1 The number for the folder name is reset to 100 and the number for the file name is reset to 0001 Adjusting the CCD and image processing function PIXEL MAPPING x SETUP X...

Страница 59: ...etting the date and time in another time zone DUALTIME x SETUP X DUALTIME The date and time set in the ON setting are reflected on the image file names and date prints Submenu 2 Submenu 3 Application...

Страница 60: ...the camera is turned off The current and alarm set times are displayed for approx 3 seconds To activate the alarm To stop the alarm After making the detailed settings of ONE TIME or DAILY press the o...

Страница 61: ...es and information may be cropped Displaying grid lines FRAME ASSIST x SETUP X FRAME ASSIST Submenu 2 Application OFF No grid lines displayed w x Grid lines square diagonal are displayed on the LCD mo...

Страница 62: ...7 TIMELAPSE p 41 f p 22 AF PREDICT p 37 1 p 41 MONITOR AF ILLUMINAT p 37 INFO p 25 ZOOM IMAGE STABILIZER p 37 FRAME ASSIST p 61 IMAGE QUALITY p 31 w p 38 u p 61 WB p 32 Q FLASH p 38 ISO p 33 R p 39 To...

Страница 63: ...that locks the exposure 2 This assigns the function that locks the focus position 3 This assigns the function that locks the exposure and focus position Saving battery power between shots SLEEP x SETU...

Страница 64: ...ion manual 1 PictBridge is a standard for connecting digital cameras and printers of different makers and printing out pictures directly The printing modes paper sizes and other setting options that c...

Страница 65: ...nt reservations DPOF p 67 4 Use 78 to select SIZE Submenu 3 and press If the PRINTPAPER screen is not displayed the SIZE BORDERLESS and PICS SHEET are set to the printer s standard STANDARD PRINTPAPER...

Страница 66: ...creen This selects a portion of the image for printing To crop an image P 1 Use the zoom lever to select the size of the cropping frame use 789 to move the frame and then press the o button Cropping f...

Страница 67: ...m digital cameras Print reservations can be set only for the images stored on the card Insert a card with recorded images before making print reservations DPOF reservations set by another DPOF device...

Страница 68: ...K SET BACK MENU PRINT ORDER SET CANCEL 1 1 1 1 6 Use 78 to select SET and press the o button Reserving one print each of all images on the card U 1 Follow steps 1 and 2 in p 67 2 Use 78 to select U an...

Страница 69: ...mage with the print reservation you want to cancel Use 78 to set the print quantity to 0 5 If necessary repeat step 4 and then press the o button when finished 6 Use 78 to select the X date print scre...

Страница 70: ...he completion of the setting appears Confirm the message and click OK The camera is recognized as a removable disk Macintosh When iPhoto starts exit iPhoto and start OLYMPUS Master 2 While the camera...

Страница 71: ...while the camera and the computer are connected System requirements Windows Windows 2000 Professional XP Home Edition XP Professional Vista Macintosh Mac OS X v10 3 or later On a computer running Win...

Страница 72: ...ctures With prolonged camera use the internal temperature may increase resulting in automatic shutdown If this occurs remove the battery from the camera and wait until the camera has sufficiently cool...

Страница 73: ...before you begin shooting again Camera is cooling Please wait a moment L NO PICTURE Internal memory Card problem Take pictures before viewing them r PICTURE ERROR Problem with selected image Use phot...

Страница 74: ...easier AF ILLUMINAT p 37 Taking a picture of subjects where autofocus is difficult In the following cases after focusing on an object by pressing the shutter button halfway down with high contrast at...

Страница 75: ...tures using n for METERING p 35 The brightness is adjusted according to the subject in the center of the screen without being influenced by the background light Taking pictures using FILL IN p 23 flas...

Страница 76: ...g pictures of close objects in particular pivoting with the lens end at the center produces favorable results Batteries Making batteries last longer Avoid the conditions described below as power is co...

Страница 77: ...ded period of time The camera is connected to a computer or printer Battery life varies depending on the type of battery manufacturer shooting conditions etc Similarly the camera may turn off without...

Страница 78: ...ernal memory Use of larger capacity cards enables you to take more pictures Index area Notes can be filled in here Contact area Contact section of the card with the internal camera terminal Do not tou...

Страница 79: ...2558 C 640 480 L 237 280 4920 5814 M 385 513 7995 10660 D 1920 1080 L 43 44 900 927 M 77 81 1599 1683 Movies IMAGE SIZE FRAME RATE Recording length Internal memory Using a 1 GB xD Picture Card With so...

Страница 80: ...ontact area wipe the area with a soft dry cloth Taking pictures with the Olympus Wireless RC Flash System You can take pictures with a wireless flash when using a flash compatible with the Olympus Wir...

Страница 81: ...eath may result CAUTION If the product is used without observing the information given under this symbol minor personal injury damage to the equipment or loss of valuable data may result WARNING TO AV...

Страница 82: ...not use force Contact authorized distributors service centers Damages such as scratches on the attachment or card could result in the camera overheating and or malfunctioning CAUTION Stop using the ca...

Страница 83: ...rent manufacture or capacity etc Never attempt to charge alkaline lithium or CR V3 lithium battery packs Insert the battery carefully as described in the operating instructions Do not use batteries if...

Страница 84: ...y other device Always charge NiMH batteries included in some areas before using them for the first time or if they have not been used for a long period Always charge sets of batteries included in some...

Страница 85: ...akes no representations or warranties either expressed or implied by or concerning any content of these written materials or software and in no event shall be liable for any implied warranty of mercha...

Страница 86: ...etween the camera and receiver Connect the equipment to an outlet on a circuit different from that to which the receiver is connected Consult your dealer or an experienced radio TV technician for help...

Страница 87: ...not manufactured by Olympus and or not bearing the OLYMPUS brand label the warranty coverage for products and accessories of other manufacturers which may be distributed by Olympus is the responsibili...

Страница 88: ...it of the original customer and cannot be transferred or assigned WHAT TO DO WHEN SERVICE IS NEEDED The customer must transfer any image or other data saved on a Product to another image or data stora...

Страница 89: ...is a trademark of the SD Association All other company and product names are registered trademarks and or trademarks of their respective owners The standards for camera file systems referred to in th...

Страница 90: ...to T normal macro mode 0 01 m 0 4 in to super macro mode Monitor 2 5 TFT color LCD display 230 000 dots Flash charge time Approx 7 sec for full flash discharge at room temperature using a new fully ch...

Страница 91: ...54 Error message 73 ESP 35 Exposure 23 Exposure compensation F 23 EXPRESSION EDIT 50 Names of Parts 6 RC 38 80 q VOLUME 56 Q FLASH 38 s Scene 17 42 A AC adapter 78 Adding sound to still pictures R 53...

Страница 92: ...78 ISO 33 J JPEG 31 L LIGHTING FIX 48 M m ft 63 Macro mode 24 Macro shooting 24 Manual mode M 19 MEMORY FORMAT 55 MENU COLOR 56 MENU DISPLAY 57 Menu guide 3 METERING 35 microSD 11 80 Monitor brightne...

Страница 93: ...row pad o button Buttons in use 4 Use 78 to select the desired submenu 1 and press the o button 1 2 3 4 5 ISO OFF OFF CAMERA MENU AUTO o FINE ZOOM DIGITAL ZOOM DRIVE AUTO WB MENU EXIT SET OK 1 2 3 4 5...

Страница 94: ...this manual were produced during the development stages and may differ from the actual product Contents Contents Names of Parts 6 Preparing the Camera 10 Shooting Playback and Erasing 14 Using Shooti...

Отзывы: