background image

59

Get
ting

 to know your camera be

tt

er

5

There are two ways to record the pictures you take with this camera.

Recording pictures to the internal memory

• Pictures are recorded to the internal memory, and when the number of 

storable still pictures reaches 0, you must connect the camera to a computer 
to download the pictures, and then erase the pictures from the internal 
memory.

Using a card (xD-Picture Card) (optional)

• Pictures are recorded to the card when inserted in the camera. When the card 

is full, you must download the pictures to a computer, and then either erase 
the pictures from the card, or use a new card.

• Pictures are not recorded to the internal memory when a card is inserted in 

the camera. Pictures in the internal memory can be copied to the card using 
the [BACKUP] function.

g

“BACKUP  Copying pictures in the internal memory to the card” (P.29)
“The card” (P.71)

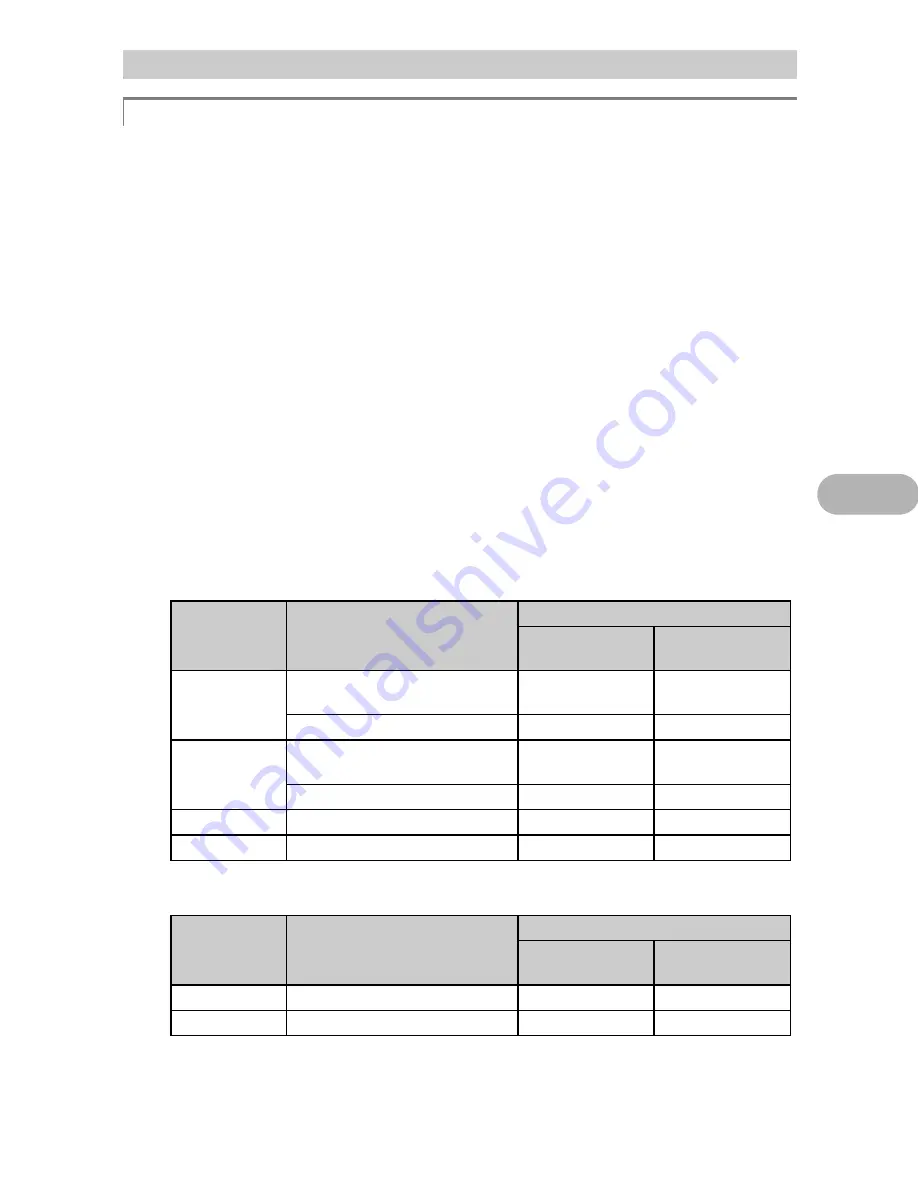
Number of the storable still pictures in the internal memory and on a card 
/ Storable recording time

Still picture

Movie

Additional shooting tips and information

Increasing the number of pictures that can be taken

Image quality

Image size

Number of storable still pictures

Internal memory

Card (Using a 

128 MB card)

SHQ

FE-130/X-720/X-740: 

2592 × 1944

5

34

FE-140/X-725: 2816 × 2112 

5

29

HQ

FE-130/X-720/X-740: 

2592 × 1944

17

102

FE-140/X-725: 2816 × 2112 

14

86

SQ1

2048

×

1536

27

162

SQ2

640

×

480

226

1,330

Image quality

Image size

Recording time

Internal memory

Card (Using a 

128 MB card)

HQ

320

×

240 (15 frames/sec.)

1 min. 5 sec.

6 min. 26 sec.

SQ

160

×

120 (15 frames/sec.)

4 min. 48 sec.

28 min. 21 sec.

Содержание FE-140 X-725

Страница 1: ...manual in a safe place for future reference We recommend that you take test shots to get accustomed to your camera before taking important photographs In the interest of continually improving product...

Страница 2: ...hooting mode 9 A AC adapter 73 ALL ERASE R 25 ALL INDEX 35 Card access lamp 50 60 73 CCD 30 67 Close up playback U 11 COLOR 30 Compression 20 Connector cover 31 33 48 Cover lock 72 CUISINE V 21 CUSTOM...

Страница 3: ...e blur reduction 10 n Recording movie 10 GUIDE Following shooting guide to set 10 Zoom lever Zooming while shooting close up playback 11 MENU button Displaying the top menu 12 Arrow pad O N X Y 12 F b...

Страница 4: ...25 SEL IMAGE Erasing selected picture 25 ALL ERASE Erasing all pictures in the internal memory or on the card 25 EDIT Editing still pictures 26 Q Reducing the size of picture 26 P Zooming in the part...

Страница 5: ...33 Other print modes and print settings CUSTOM PRINT 35 Print settings DPOF 39 How to make print reservations 39 Single frame reservation 40 All frame reservation 41 Resetting print reservation data 4...

Страница 6: ...nformation 59 Increasing the number of pictures that can be taken 59 Using a new card 60 Lamp indicators 60 Extending the useful life of the battery 60 Functions that cannot be selected from menus 61...

Страница 7: ...e battery 70 Useful use of the accessories 71 The card 71 AC adapter 73 Safety Precautions 74 Index 77 6 Miscellaneous 69 Read about convenient functions and safety precautions on how to use your came...

Страница 8: ...ock Compose your picture with the focus locked and then fully press the shutter button to shoot a picture When the green lamp blinks the focus is not adjusted properly Try locking the focus again Reco...

Страница 9: ...e images and the shooting mode to best suit the situation Selecting another scene There are two ways to select another scene Turn the mode dial to set to any of the following modes B E D L C Set the m...

Страница 10: ...UIDE to cancel the shooting guide function first When you press the MENU button or change the mode dial previously set the shooting guide setting returns to default h Shooting pictures using image blu...

Страница 11: ...ow pad during close up playback to scroll the picture in the indicated direction Index display Use the arrow pad to select the picture to play back and press F to return to single frame playback Calen...

Страница 12: ...to set 7 MENU button Displaying the top menu 8 Arrow pad O N X Y 9 F button 0 OF button Changing picture brightness a X button Shooting pictures close to the subject Macro mode This mode lets you shoo...

Страница 13: ...d Check each picture before erasing to avoid accidentally erasing pictures you want to keep g 0 Protecting pictures P 22 In playback mode select the picture you want to print and press the button g Di...

Страница 14: ...the menu guide f 06 06 02 02 16 16 12 12 30 30 4 100 100 0004 0004 HQ HQ 10 10 06 06 02 02 16 16 12 12 30 30 4 100 100 0004 0004 2 0 2 0 259 2592 1944 1944 HQ HQ 10 10 2 0 2 0 259 2592 1944 1944 HQ H...

Страница 15: ...CN OK MENU EXIT SET IMAGE IMAGE QUALITY QUALITY CAMERA CAMERA MENU MENU SETUP SETUP RESET RESET COLOR PIXEL MAPPING BACKUP MEMORY FORMAT SETUP ENGLISH NORMAL 1 2 W OK SET BACK MENU Top menu When you s...

Страница 16: ...playback mode In this section press the K button to set to the shooting mode and set the mode dial to the mode other than GUIDE Common menus for each mode are retained even if the mode is changed SCN...

Страница 17: ...AL from VIDEO OUT menu and then press F The menu item is set and the previous menu is displayed Press the MENU button repeatedly to close the menu When the MENU button is pressed before pressing F a s...

Страница 18: ...ZOOM Zooming in on your subject OFF ON SCN SCN OK MENU EXIT SET IMAGE IMAGE QUALITY QUALITY CAMERA CAMERA MENU MENU SETUP SETUP RESET RESET 1 2 3 4 g SETUP menu P 29 1 CAMERA MENU DIGITAL ZOOM PANORA...

Страница 19: ...of the previous picture where it will be joined to the next picture does not remain in the frame You have to remember what the part in the frame looked like and take the next picture so it overlaps P...

Страница 20: ...ize 8 10 size paper This is useful for performing computer image processing such as contrast adjustment and red eye reduction HQ FE 130 X 720 X 740 2592 1944 FE 140 X 725 2816 2112 Standard compressio...

Страница 21: ...he settings of each scene will return to default except a few settings 4 SCN Scene Shooting pictures by selecting a scene according to the situation M NIGHT PORTRAIT N INDOOR b CANDLE R SELF PORTRAIT...

Страница 22: ...SE EDIT EDIT CALENDAR CALENDAR MOVIE MOVIE PLAY PLAY OK MENU SET EXIT PRINT PRINT ORDER ORDER 1 PLAYBACK MENU 0 y 1 2 SLIDESHOW 3 MOVIE PLAY 4 CALENDAR 5 INDEX 6 ERASE SEL IMAGE ALL ERASE 7 EDIT 1 Q P...

Страница 23: ...power is turned off You can select the picture to rotate by pressing X Y Select the transition effect between pictures Press F to start the slideshow Only the first frame of each movie is displayed Pr...

Страница 24: ...12 12 30 30 100 100 0004 0004 Y Each time you press the button the playback speed changes in the following order 2 20 and back to 1 X Plays the movie in reverse Each time you press the button the play...

Страница 25: ...picture before erasing to avoid accidentally erasing pictures you want to keep Press O N X Y to select a picture and press F to add R Press F again to cancel the selection Press S after selecting pict...

Страница 26: ...ile This changes the picture to sepia and saves it as a new file Adds a selected frame to a picture and saves it as a new picture Press X Y to select a frame and press F Press X Y to select the pictur...

Страница 27: ...F Press O N to rotate the picture 90 clockwise or counterclockwise Set the date of the calendar and press F Press X Y to select a layout and press F Select the type of layout picture and press F Sele...

Страница 28: ...e Adjust the color strength by pressing O N This function allows you to save printing data the number of prints and the date and time information with the pictures stored on the card g Print settings...

Страница 29: ...aining Or use an AC adapter You can select a language for on screen display Available languages vary depending on the area where you purchased this camera You can add other languages to your camera wi...

Страница 30: ...RT is displayed press F The date and time is saved with each image and is used in the file name The first two digits of the year are fixed The time is displayed in the 24 hour format For more accurate...

Страница 31: ...n PAL European countries China Playing back pictures on a TV Turn off the camera and the TV before connecting 8 VIDEO OUT Playing back pictures on a TV NTSC PAL Connect to the TV s video input yellow...

Страница 32: ...ompatible printer or at a photo store that supports DPOF DPOF is a standard format used to record automatic print information from digital cameras It allows you to store data such as which pictures yo...

Страница 33: ...ttings screens P 36 and 37 pictures are printed according to these settings For its standard settings refer to the printer s instruction manual or contact the printer manufacturer 1 In the playback mo...

Страница 34: ...yed To print another picture press X Y to select a picture and press the button When you have finished disconnect the USB cable from the camera with the picture selection screen displayed 4 Disconnect...

Страница 35: ...ART PC CUSTOM PRINT USB PC OK EASY PRINT CUSTOM PRINT EXIT SET USB screen Operation guide ALL INDEX MULTI PRINT ALL PRINT PRINT PRINT MODE SELECT OK SET MENU EXIT PRINT Prints the selected picture ALL...

Страница 36: ...DERLESS Select framed or unframed In MULTI PRINT mode this function is not available OFF The picture is printed inside a blank frame ON The picture is printed filling the entire page PICS SHEET Availa...

Страница 37: ...Sets the number of prints You can select up to 10 prints DATE If you select WITH pictures are printed with the date FILE NAME If you select WITH pictures are printed with the file name P Crops part of...

Страница 38: ...38 Printing pictures 3 6 Disconnect the USB cable from the camera The camera turns off 7 Disconnect the USB cable from the printer...

Страница 39: ...so be necessary Note This camera cannot change DPOF reservations set by another device Make changes using the original device If a card contains DPOF reservations set by another device entering reserv...

Страница 40: ...ou cannot make print reservations for pictures with A Repeat this step to make print reservations for other pictures Trimming the picture Push the zoom lever to W or pull the zoom lever to T Use the z...

Страница 41: ...red on the card The number of prints is set at one print per picture 1 In the playback mode press the MENU button to display the top menu 2 Select PRINT ORDER U and press F 3 Select the date and time...

Страница 42: ...ect KEEP and press F 4 Press X Y to select the picture with the print reservations you want to cancel and press N to decrease the number of prints to 0 Repeat this step to cancel print reservations fo...

Страница 43: ...les to the computer gP 50 Disconnect the camera from the computer gP 50 Using OLYMPUS Master What is OLYMPUS Master 4 Prepare the following items before starting Computer equipped with a USB port OLYM...

Страница 44: ...or more Note Data transfer is only guaranteed on computers with a factory installed OS To install the software in Windows 2000 Professional XP you must log on as a user with administrators privileges...

Страница 45: ...ra s battery compartment card cover Windows 1 Insert the CD ROM into the CD ROM drive The OLYMPUS Master setup screen is displayed If the screen is not displayed double click the My Computer icon and...

Страница 46: ...t is displayed read the agreement and click Yes A screen asking whether or not you want to install Adobe Reader is displayed Adobe Reader is required to read the OLYMPUS Master instruction manual To i...

Страница 47: ...3 Double click the Installer icon The OLYMPUS Master installer starts up Follow the on screen instructions When the OLYMPUS Master licensing agreement is displayed read the agreement and click Continu...

Страница 48: ...recognized by the computer Windows When you connect the camera to the computer for the first time the computer attempts to recognize the camera Click OK to exit the message that is displayed The camer...

Страница 49: ...efore the main menu Enter your Name and OLYMPUS Master Serial Number and select your region After the User Information dialog box the Registration dialog box is displayed Follow the prompts and fill i...

Страница 50: ...s displayed All the images in the camera are displayed 3 Select the image files and click Transfer Images A window indicating that the download is complete is displayed 4 Click Browse images now The d...

Страница 51: ...ayed 3 When a message is displayed saying that the hardware can be ejected safely click OK Macintosh 1 The trash icon changes to the eject icon when the Untitled or NO_NAME icon on the desktop is drag...

Страница 52: ...ayed 2 Click the playback button at the bottom of the screen to play back the movie The names and functions of the controller parts are shown below Viewing still pictures and movies Item Description 1...

Страница 53: ...ick Photo The Photo Print window is displayed 3 Click Settings in the Photo Print window The printer settings screen is displayed Make the necessary printer settings 4 Select a layout and size To prin...

Страница 54: ...XP Macintosh Mac OS 9 0 to 9 2 X Note If the computer is running Windows 98SE you will need to install the USB driver Before connecting the camera to the computer with the USB cable double click the...

Страница 55: ...hutter button is fully pressed in this mode Operate the zoom lever or other buttons to restore the camera from sleep mode before taking a picture If the camera is left for several hours it automatical...

Страница 56: ...are several ways to focus depending on the subject When the subject is not in the center of the frame Place the subject in the center of the frame lock the focus on the subject and then recompose you...

Страница 57: ...and take the picture Hold the camera properly and press the shutter button gently Shoot with the h mode to avoid blurring The following factors may cause blurring Shooting with the higher magnificati...

Страница 58: ...uction functions to create clearer images If noise reduction does not function the picture may appear grainy g SCN Scene Shooting pictures by selecting a scene according to the situation P 21 Often br...

Страница 59: ...rd is inserted in the camera Pictures in the internal memory can be copied to the card using the BACKUP function g BACKUP Copying pictures in the internal memory to the card P 29 The card P 71 Number...

Страница 60: ...ndicators Lamp Status Self timer lamp The lamp lights for approximately 10 seconds blinks for approximately 2 seconds and then the picture is taken Card access lamp Blinking A picture is being recorde...

Страница 61: ...en shooting To print large images on full size paper To edit and process images on a computer SHQ or HQ To print postcard size images SQ1 To send as an e mail attachment or post on a web site SQ2 g IM...

Страница 62: ...r screen changes depending on the computer settings When the monitor setting is 1 024 768 and you are using Internet Explorer to view a picture with an image size of 2 048 1 536 at 100 the entire pict...

Страница 63: ...vailable memory and cannot store any new data Replace the card or erase unwanted data Before erasing download important pictures to a computer L NO PICTURE There are no pictures in the internal memory...

Страница 64: ...here is no paper in the printer Load some paper in the printer NO INK The printer has run out of ink Replace the ink cartridge in the printer JAMMED The paper is jammed Remove the jammed paper SETTING...

Страница 65: ...ions that can be set g Functions with restrictions in shooting scenes P 66 Functions available in shooting modes Only 2048 1536 and 640 480 are available Functions available in shooting modes and scen...

Страница 66: ...ith restrictions in shooting scenes 1 Only 2048 1536 and 640 480 are available 2 Only 640 480 are available Scene Function a Z V N M c j P d R W S X i 9 9 9 9 9 9 Y 9 Flash 9 9 Optical zoom 9 9 IMAGE...

Страница 67: ...asses through the lens aperture Image size The size of an image expressed by the number of pixels that make up the image For instance a picture taken with an image size of 640 480 fills the computer s...

Страница 68: ...millions of pixels Sleep mode A mode designed to save battery life The camera automatically enters the sleep mode if you do not operate it for a certain time To exit the sleep mode use any button on...

Страница 69: ...the lens with a commercial blower then wipe gently with a lens cleaner Note Do not use strong solvents such as benzene or alcohol or chemically treated cloth Mold may form on the lens surface if the...

Страница 70: ...zinc carbon batteries cannot be used Power consumption by the camera varies depending on which functions are used Power is consumed continuously during the conditions described below causing batteries...

Страница 71: ...ordable pictures can be increased by using a card with a larger capacity 1 Index area You can use this space to write the contents of the card 2 Contact area The part where the data transferred from t...

Страница 72: ...the illustration Insert the card straight in Insert the card until it clicks into place Removing the card 3 Push the card all the way in and release slowly The card protrudes slightly and stops Grasp...

Страница 73: ...lti adapter CB MA1 is necessary Do not use any other AC adapter with this camera Note Do not remove or load the battery or connect or disconnect the AC adapter or multi adapter while the camera is on...

Страница 74: ...era by turning it on and pressing the shutter release button to make sure that it is operating normally Always observe the operating environment restrictions described in the camera s manual Olympus N...

Страница 75: ...al temperatures The LCD used for the monitor is made with high precision technology However black spots or bright spots of light may appear constantly on the LCD Monitor Due to its characteristics or...

Страница 76: ...and found to comply with the limits for a Class B digital device pursuant to Part 15 of the FCC Rules These limits are designed to provide reasonable protection against harmful interference in a resi...

Страница 77: ...21 BEHIND GLASS V 21 BLACK WHITE 26 BRIGHTNESS 28 C CALENDAR Edit 27 CALENDAR Playback 25 Calendar display 11 CAMERA MENU 18 CANDLE b 21 Card 19 29 71 Card access lamp 50 60 73 CCD 30 67 Close up pla...

Страница 78: ...3 Multi connector 31 33 48 MUSEUM j 21 N NIGHT PORTRAIT M 21 NIGHT SCENE L 9 NiMH batteries 70 Noise reduction 67 NORMAL COLOR 30 NORMAL Monitor 30 NORMAL SLIDESHOW 23 NTSC 31 67 Number of storable st...

Страница 79: ...ll picture 8 SHQ 20 Shutter button 8 Single frame playback 11 Single frame reservation 40 Sleep mode 55 68 SLIDE 23 SLIDESHOW 23 SNOW a 21 SPORT j 9 SQ 20 SQ1 20 SQ2 20 STANDARD 33 SUNSET S 21 Super m...

Страница 80: ...40 23 07 61 Goods delivery Bredowstrasse 20 22113 Hamburg Germany Letters Postfach 10 49 08 20034 Hamburg Germany European Technical Customer Support Please visit our homepage http www olympus europa...

Отзывы: