background image

86

6

Pr

in

t s
etti

ng
 (

D

POF

)

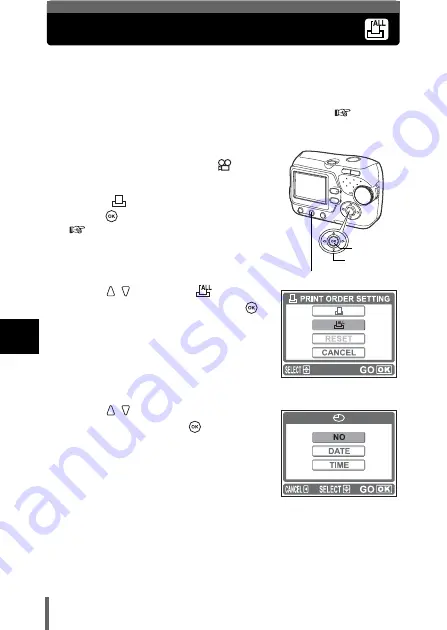
All-frame reservation

You can print one copy of all the images stored on the card. Select whether 
the print date or time will also be included.
You cannot change the number of copies for this feature. If you want to 
change the number, first make the all-frame reservation, and then change the 
number of copies using the single-frame reservation function. 

 "Single-

frame reservation" (P.88)

1

Playback a still picture.

• You cannot print pictures with 

.

2

Select [

] from the menu, and 

press .

"How to use the menus" (P.31)

3

Press 

 to select [

 (all-

frame reservation)], and press 

.

4

Press 

 to select [NO], [DATE] 

or [TIME], and press 

.

NO

: The pictures are printed without 

the date and time.

DATE

: All the pictures are printed with 

the shooting date.

TIME

: All the pictures are printed with 

the shooting time.

Menu button

OK button

Arrow pad

PRINT ORDER SETTING 

screen

Содержание CAMEDIA D-535 ZOOM

Страница 1: ...formance and a longer service life Keep this manual in a safe place for future reference We recommend that you take test shots to get accustomed to your camera before taking important photographs Scre...

Страница 2: ...lies with the European requirements for safety health environment and customer protection CE mark cameras are intended for sales in Europe For customers in USA Declaration of Conformity Model Number D...

Страница 3: ...ooting and other information Contents P 4 P 8 P 31 P 36 P 62 P 76 P 84 P 91 P 124 Direct printing PictBridge Specifications Glossary of terms P 137 P 139 Settings that make the camera easier to operat...

Страница 4: ...s or an AC adapter 17 About the internal memory and the card 19 Internal memory basics 19 Relationship between the internal memory and the card 19 Inserting a card Optional 20 Card basics 20 Power on...

Страница 5: ...vies 45 Zoom 47 Using the flash 49 Macro mode shooting 53 Self timer shooting 55 Selecting a record mode 57 Varying the image brightness Exposure compensation 60 4 Playback 62 Viewing still pictures 6...

Страница 6: ...ing functions 82 VIDEO OUT Setting the output signal type 83 6 Print setting DPOF 84 With print reservation 84 All frame reservation 86 Single frame reservation 88 Resetting print reservation data 90...

Страница 7: ...ing camera images on a computer 116 Downloading and saving images 116 Viewing still pictures and movies 119 Printing pictures 121 Saving images to a computer without using OLYMPUS Master 123 9 Miscell...

Страница 8: ...er lamp P 56 Connector cover P 17 69 92 112 VIDEO OUT jack P 69 USB connector P 92 112 Lens Extends automatically when the power switch is pressed Battery compartment card cover P 15 21 DC IN jack P 1...

Страница 9: ...button P 31 Buttons on the arrow pad have their respective functions They are also used as direction buttons and indicate which button to be pressed Erase button P 74 Zoom button W T P 47 64 66 Strap...

Страница 10: ...P 39 3 Flash standby Camera movement warning Flash charge Lit Blinks P 50 4 Shooting mode P 36 5 Macro mode P 53 6 Flash mode P 49 7 Self timer P 55 8 Exposure compensation 2 0 2 0 P 60 9 Record mode...

Страница 11: ...the index display are different from those that appear when the movie picture is displayed using the movie playback function Items Indications Ref Page 1 Battery check P 12 2 Current memory IN xD P 19...

Страница 12: ...on on the monitor changes as follows while the camera is turned on Lit Green The indicator turns off after a while Remaining power level high The green lamp and the orange lamp on the camera blink Rem...

Страница 13: ...ems Also warns of operations that should be absolutely avoided Useful information and hints that will help you get the most out of your camera Reference pages describing details or associated informat...

Страница 14: ...e strap tight making sure that it is securely fastened and does not come loose Be careful with the strap when you carry the camera as it can easily catch on stray objects causing serious damage Attach...

Страница 15: ...nded 2 Holding the lock button slide the battery compartment card cover in the direction of and then lift it in the direction of Use the ball of your finger to slide the cover Do not use your fingerna...

Страница 16: ...f If the battery compartment card cover is hard to close do not force it With the battery compartment card cover shut press the mark firmly and push it in the direction of If the camera is left for ab...

Страница 17: ...s in a hurry you can use AA R6 alkaline batteries which are easy to obtain anywhere However the number of pictures that you can take may vary considerably depending on the battery manufacturer shootin...

Страница 18: ...rned on Doing so could affect the camera s internal settings or functions The life of batteries may vary according to the type of battery manufacturer shooting conditions etc Power is consumed continu...

Страница 19: ...verwritten and or edited on a PC The internal memory cannot be replaced or removed from the camera Relationship between the internal memory and the card The monitor displays which type of the memory i...

Страница 20: ...you can record 1 Index area You can write down the card s contents 2 Contact area Comes into contact with the camera s signal read contacts Compatible cards xD Picture Card 16 to 512 MB This camera m...

Страница 21: ...ent card cover as shown in the illustration 3 Face the card the correct way and insert it into the card slot as shown in the illustration Insert the card while keeping it straight The card stops with...

Страница 22: ...down with the battery compartment card cover close the cover in the direction of and slide it in the direction of If the battery compartment card cover is hard to close do not force it With the batte...

Страница 23: ...t card cover remove the card or the batteries while the camera is turned on Doing so may destroy all data in the internal memory or on the card Destroyed data cannot be restored When changing the card...

Страница 24: ...era automatically enters to the sleep mode and stops operating if not used for 30 seconds The monitor switches off automatically Press the shutter button or to turn the monitor on You can select the l...

Страница 25: ...mera is turned on Doing so may destroy all data in the internal memory or on the card Destroyed data cannot be restored When changing the card be sure to turn the camera off before opening the cover T...

Страница 26: ...ailable languages vary depending on the area where you purchased this camera 1 Press the power switch The camera turns on in the shooting mode The lens extends and the monitor turns on The orange lamp...

Страница 27: ...a language 1 Getting started 5 Press to select a language and press 6 Press to exit the menu 7 Press the power switch to turn the camera off TIPS The language can also be set from the playback mode P...

Страница 28: ...age pictures on your PC or print them 1 Press the power switch The camera turns on in the shooting mode The lens extends and the monitor turns on The orange lamp lights 2 Press The menu screen is disp...

Страница 29: ...ettings are set to Y M D 6 Press to set the year and press to move to the month setting To move back to the previous setting press The first two digits of the year are fixed 7 Repeat this procedure un...

Страница 30: ...en the power is turned off The date and time settings will be returned to the factory default settings if the camera is left without the battery for approximately 1 day The settings will be canceled m...

Страница 31: ...u can configure various settings of the camera This chapter explains how to use the menus using the shooting mode screens as an example 1 Press to display the menu OK button Arrow pad Menu button Indi...

Страница 32: ...een are saved after the camera is turned off can be set to the default setting RESET Resetting the settings to the default P 76 3 Press to select a setting Press or to complete the setting 4 Press to...

Страница 33: ...This setting is not available when the card is not inserted P 80 Sets the date and time P 28 Selects a language for on screen display P 26 SLEEP Sets the time period that the camera automatically ent...

Страница 34: ...not available when the card is not inserted P 80 Stores print reservation information on the card This setting is not available when the card is not inserted P 84 Protects pictures from accidental er...

Страница 35: ...es and the setting is effective in both modes SLEEP Sets the time period that the camera automatically enters to the sleep mode P 81 VIDEO OUT Selects NTSC or PAL according to your TV s video signal t...

Страница 36: ...ions You can change the mode with the camera turned on As you set the mode dial the description for each mode is displayed on the monitor PROGRAM AUTO Used for regular photography The camera automatic...

Страница 37: ...r shutter speed than is used in normal shooting If you take a picture of a street at night in any other mode the lack of brightness will result in a dark picture with only dots of light showing In thi...

Страница 38: ...d zoom are locked If the distance to the subject changes focus may be compromised You cannot record movies with sound Recording movies P 45 TIPS For details of the functions for each mode List of item...

Страница 39: ...d the monitor turns on The orange lamp lights 2 Turn the mode dial to select or Shooting mode P 36 3 Position the AF target mark on the subject while looking at the monitor and decide on composition P...

Страница 40: ...at least 50 cm 1 6 ft away from the subject for wide angle shooting For telephoto 90 cm 3 0 ft If you use the super macro mode you can take pictures as close as 2 cm 0 8 from the subject Macro mode sh...

Страница 41: ...ing in a blur Never remove the batteries or disconnect the AC adapter while the orange lamp is blinking Do not open the battery compartment card cover Doing so could destroy stored pictures and preven...

Страница 42: ...e the position of the subject after focusing Focus Lock 1 Press the power switch The camera turns on in the shooting mode The lens extends and the monitor turns on The orange lamp lights 2 Turn the mo...

Страница 43: ...e focus and the exposure are locked When the green lamp blinks the focus and exposure are not locked Release your finger from the shutter button re position your subject and press the shutter button h...

Страница 44: ...the focus lock function by pressing the shutter button halfway and return the camera to the horizontal position while keeping the button pressed halfway and take the picture The green lamp blinks The...

Страница 45: ...nges focus may be compromised 1 Press the power switch The camera turns on in the shooting mode The lens extends and the monitor turns on The orange lamp lights 2 Turn the mode dial to The remaining r...

Страница 46: ...is ready to shoot the next movie During movie recording the flash is disabled If your remaining recording time is shorter than usual try formatting the internal memory and or the card with the camera...

Страница 47: ...tends and the monitor turns on The orange lamp lights 2 Press the zoom button The white area of the zoom indicator indicates the optical zoom The red area of the zoom indicator indicates the digital z...

Страница 48: ...e Pictures taken with the digital zoom may appear grainy Camera movement is likely to occur at higher magnifications Stabilize the camera with a tripod etc to avoid camera movement In the self portrai...

Страница 49: ...mode The lens extends and the monitor turns on The orange lamp lights 2 Press flash mode button Flash setting screen is displayed 3 Press to select the flash mode and press You can also set by pressin...

Страница 50: ...y mark blinks The flash is charging Wait until the mark changes from brinking status to steady If camera movement may occur with the flash mode setting of the mark blinks In such a case change the fla...

Страница 51: ...enon After the pre flashes it takes about 1 second before the shutter is released Hold the camera firmly to avoid camera movement Effectiveness may be limited if the subject is not looking directly at...

Страница 52: ...aphy is not desired or is prohibited You can also use this mode when you want to shoot a natural looking twilight or night scene Since a slow shutter speed is automatically selected in low light situa...

Страница 53: ...e time to focus on distant subjects Super macro shooting Use when shooting subjects as close as 2 cm 0 8 The position of the zoom is fixed automatically and cannot be changed The correct focus cannot...

Страница 54: ...ars 4 Take the picture If you use the flash in macro shooting shadows may be conspicuous and the correct exposure may not be achieved During the super macro shooting the zoom function and flash are no...

Страница 55: ...timer shooting 1 Press the power switch The camera turns on in the shooting mode The lens extends and the monitor turns on The orange lamp lights 2 Press The self timer setting screen is displayed 3 P...

Страница 56: ...imately 10 seconds and starts blinking After blinking for approximately 2 seconds the picture is taken In the movie mode press the shutter button again to stop the shooting Press to stop the self time...

Страница 57: ...e table are approximate Still Picture Record Modes Movie Record Modes Image becomes clearer Application Compression Resolution Low compression High compression Select for the print size 2048 1536 SHQ...

Страница 58: ...he computer screen varies depending on the computer s monitor setting For instance a picture taken in 1024 x 768 resolution is the same size as the screen if you set the picture to 1x when the monitor...

Страница 59: ...de select from the menu and press How to use the menus P 31 2 Press to select the desired record mode For still pictures you can choose from SHQ HQ SQ1 and SQ2 For movies you can choose HQ or SQ 3 Pre...

Страница 60: ...you can check the result on the monitor 1 Press the power switch The camera turns on in the shooting mode The lens extends and the monitor turns on The orange lamp lights 2 Press The setting screen fo...

Страница 61: ...ural colors Adjusting toward makes these subjects closer to their real shades For the same reason adjust toward when shooting dark subjects If the flash is used the image brightness exposure may diffe...

Страница 62: ...Playback mode is set The green lamp on the camera lights The monitor turns on and displays the last picture taken single frame playback Pressing or the shutter button switches to the shooting mode 2...

Страница 63: ...ave battery power the camera automatically enters to the sleep mode and stops operating if not used for 30 seconds The monitor switches off automatically Press to turn the monitor on You can select th...

Страница 64: ...ay press the zoom button toward T to display the selected picture in full screen mode single frame playback 3 Press the zoom button toward T The magnification increases each time the zoom button is pr...

Страница 65: ...press How to use the menus P 31 2 Press to select an image to rotate 3 Press to select or and press The picture is rotated and displayed vertically 4 Press to select EXIT and press Press to exit the m...

Страница 66: ...the camera on and press Playback mode is set The green lamp on the camera lights 2 Press the zoom button toward W to switch to the index display Use the arrow pad to select the picture Moves to the ne...

Страница 67: ...e number of pictures Select 4 or 9 frames to be displayed in the index 1 In the playback mode select from the menu and press How to use the menus P 31 2 Press to select 4 or 9 and press Press to exit...

Страница 68: ...ss How to use the menus P 31 4 Press to select or and press The slide show starts Displays the stored images one after another for one cycle Displays the stored images one after another for unlimited...

Страница 69: ...it to the video input mode For details of switching to video input refer to your TV s instruction manual 3 Press the power switch to turn the camera on and press The last picture taken is displayed o...

Страница 70: ...s the TV s video signal type VIDEO OUT Setting the output signal type P 83 The camera s monitor turns off automatically when the video cable is connected to the camera Be sure to use the video cable p...

Страница 71: ...s 2 Use the arrow pad to display the picture with Viewing still pictures P 62 3 Press The movie is played back When the playback ends the display automatically returns to the playback mode Press to st...

Страница 72: ...g the movie from the internal memory or the card Reading the movies may take considerable time Never open the battery compartment card cover while the orange lamp is blinking It may cause not only dat...

Страница 73: ...e camera lights 2 Select from the menu and press How to use the menus P 31 3 Press to select the picture to be protected 4 Press to select ON and press To cancel protection select OFF 5 Press to selec...

Страница 74: ...first You cannot erase pictures that are protecte Cancel the protection before erasing such pictures Once erased pictures cannot be restored Be careful not to accidentally erase pictures you want to...

Страница 75: ...ernal memory or on the card 1 In the playback mode select MEMORY SETUP from the menu and press How to use the menus P 31 When the card is inserted select CARD SETUP 2 Press to select ALL ERASE and pre...

Страница 76: ...on The settings affected by the RESET function are listed on the next page Example After you set to SQ1 using the RESET function reset it to its default HQ 1 Press the power switch The camera turns on...

Страница 77: ...Resetting the settings to the default 5 Useful functions Functions that RESET affects and their factory default settings Function Factory default setting Ref Page AUTO P 49 OFF P 53 0 0 P 60 OFF P 55...

Страница 78: ...en formatting the internal memory or the card To format the internal memory do not insert the card To format the card insert the card before starting formatting Before using non Olympus cards or cards...

Страница 79: ...select YES and press The BUSY bar is displayed and the internal memory or the card is formatted Never do any of the following during formatting as they may cause the internal memory or the card to ma...

Страница 80: ...ode 2 Press to select YES and press All image data stored in the internal memory is copied to the card Press to exit the menu When the card has insufficient memory CARD FULL is displayed and copying i...

Страница 81: ...if not used for the specified time period You can specify the time period to switch to the sleep mode 1 Select SLEEP from the menu and press How to use the menus P 31 This function can be set either i...

Страница 82: ...ter the monitor is used or continuous shots are taken to allow for proper performance of the Pixel Mapping function 1 In the shooting mode select PIXEL MAPPING from the menu and press How to use the m...

Страница 83: ...res will not be played back properly on your TV 1 Select VIDEO OUT from the menu and press How to use the menus P 31 This function can be set either in the shooting mode or the playback mode 2 Press t...

Страница 84: ...supports DPOF DPOF is a standard format used to record automatic print information from digital cameras You can print out pictures automatically at home or in a print shop by storing such data as whi...

Страница 85: ...arge high quality pictures set the record mode as high as possible when taking the pictures Selecting a record mode P 57 DPOF reservations set by another device cannot be changed by this camera Make c...

Страница 86: ...f copies using the single frame reservation function Single frame reservation P 88 1 Playback a still picture You cannot print pictures with 2 Select from the menu and press How to use the menus P 31...

Страница 87: ...87 All frame reservation 6 Print setting DPOF 5 Press to select SET and press Press to exit the menu...

Страница 88: ...om the menu and press How to use the menus P 31 3 Press to select single frame reservation and press 4 Press the arrow pad to display the picture you want to print and set the number of copies Press t...

Страница 89: ...s are printed without the date and time DATE All the pictures with print reservation are printed with the shooting date TIME All the pictures with print reservation are printed with the shooting time...

Страница 90: ...e 2 Select from the menu and press How to use the menus P 31 3 Press to select RESET and press All the print reservation data is cleared Press to exit the menu TIPS To cancel only unwanted print reser...

Страница 91: ...s of different makers and printing out pictures directly STANDARD All printers that support PictBridge have standard print settings Selecting STANDARD on the settings screens P 94 to 99 images are pri...

Страница 92: ...mera s USB connector The camera turns on automatically The monitor turns on and the selection screen for the USB connection is displayed 3 Press to select PRINT and press While the camera is connected...

Страница 93: ...ted picture PRINT mode P 95 PRINT ORDER Prints the pictures according to the print reservation data on the card If no print reservations With print reservation P 84 have been made this option is not a...

Страница 94: ...elect PRINT and press The PRINT PAPER screen is displayed 2 Press to select the paper size and press When the PRINT PAPER screen is not displayed SIZE and BORDERLESS are set to STANDARD Go to step 4 3...

Страница 95: ...SELECT screen will be displayed again PRINT mode 1 In the PRINT MODE SELECT screen press to select PRINT and press The PRINT PAPER screen is displayed 2 Press to select the paper size and press When t...

Страница 96: ...pictures in index format You can then select the pictures you want to print from the index 5 Select the print reservation method SINGLE PRINT Makes a single frame print reservation for the selected p...

Страница 97: ...If you select WITH pictures are printed with the date FILE NAME If you select WITH pictures are printed with the file name e After you have selected your desired settings using MORE press to select E...

Страница 98: ...MODE SELECT screen will be displayed again When printing is finished the monitor returns to the PRINT MODE SELECT screen Exiting direct printing P 101 To cancel printing Pressing during print data tra...

Страница 99: ...PRINT PAPER screen is displayed 2 Press to select the paper size and press When the PRINT PAPER screen is not displayed SIZE and BORDERLESS are set to STANDARD Go to Step 4 3 Press to select framed or...

Страница 100: ...MODE SELECT screen will be displayed again When printing is finished the monitor returns to the PRINT MODE SELECT screen Exiting direct printing P 101 To cancel printing Pressing during print data tra...

Страница 101: ...t printing When you have finished printing disconnect the camera from the printer 1 In the PRINT MODE SELECT screen press The message is displayed 2 Remove the USB cable from the camera The camera tur...

Страница 102: ...orrectly Disconnect the camera and connect it again correctly NO PAPER There is no paper in the printer Load some paper in the printer NO INK The printer has run out of ink Replace the ink cartridge i...

Страница 103: ...amera using the OLYMPUS Master software supplied with the camera Install the OLYMPUS Master software P 106 Connect the camera to the computer using the USB cable P 112 Start up the OLYMPUS Master soft...

Страница 104: ...r You are recommended to use the optional AC adapter when connecting the camera to your computer If you are using batteries make sure that there is sufficient remaining battery power The camera does n...

Страница 105: ...camera on a computer Installing it on your computer lets you do the following For details of functions and operations other than the above refer to the HELP guide and OLYMPUS Master instruction manua...

Страница 106: ...Edition Windows 2000 corresponds to Windows 2000 Professional If you are using Windows 98SE the USB driver is installed automatically When installing to a PC operating with Windows 2000 Professional X...

Страница 107: ...ag drop onto the trash icon before performing the following operations Failure to do so could result in unstable computer operation and the need to reboot Disconnect the cable connecting the camera to...

Страница 108: ...ck the CD ROM icon 2 Click the OLYMPUS Master button The QuickTime installation screen is displayed You need QuickTime to use the OLYMPUS Master The screen is not displayed if QuickTime 6 or later is...

Страница 109: ...is on sticker on the CD ROM package When the licensing agreement of DirectX is displayed during the installation read the agreement and click the Agree button A screen asking whether or not you want...

Страница 110: ...e on screen instructions The screen confirming that installation is completed is displayed 7 Click Finish The screen returns to the first screen 8 When the screen prompting you to restart the PC remov...

Страница 111: ...desktop 2 Double click on the desired language folder 3 Double click the Installer icon Follow the on screen instructions The OLYMPUS Master installer starts up When the licensing agreement is displa...

Страница 112: ...e lens is not extended 2 Plug the USB cable into the USB port on the computer Refer to your computer s instruction manual to locate the position of the USB port 3 Plug the other end of the USB cable i...

Страница 113: ...ed as a Removable Disk Windows XP When the camera is connected to the computer the screen for selecting an image file operation is displayed As OLYMPUS Master will be used to download images click Can...

Страница 114: ...on Macintosh 1 Double click the OLYMPUS Master icon in the OLYMPUS Master folder The main menu is displayed When OLYMPUS Master is started up for the first time the user data screen is displayed Enter...

Страница 115: ...r Images button Downloads images from the camera or other media 2 Upgrade button Displays a window to upgrade to OLYMPUS Master Plus 3 Backup Images button Creates backup images to other media 4 Brows...

Страница 116: ...images in the camera are displayed 3 Select the image files and click Transfer Images A confirmation dialog is displayed 4 Click Browse images now The downloaded images are displayed in the browse win...

Страница 117: ...amp on the camera is off 2 Prepare to disconnect the cable For Windows 98SE 1 Double click the My Computer icon and right click the Removable Disk icon to display the menu 2 Click Eject on the menu Fo...

Страница 118: ...op and drop it to the trash icon 3 Disconnect the USB cable from the camera For Windows Me 2000 XP When you click Eject Hardware a warning message may be displayed Make sure that image data is not bei...

Страница 119: ...mages on the OLYMPUS Master main menu The Browse Images window is displayed 2 Double click the still picture thumbnail that you want to view The camera switches to the view mode and the picture is enl...

Страница 120: ...nd functions of the controller parts are shown below Item Description 1 Playback slider Move the slider to select a frame 2 Time display Displays the time that has elapsed during playback 3 Playback P...

Страница 121: ...Print Images on the OLYMPUS Master main menu The print menu is displayed 2 Click Photo The Photo Print window is displayed 3 Click the Printer Settings in the Photo Print window Printer Settings wind...

Страница 122: ...omputer 5 Select the thumbnail image that you want to print and click Add A preview of the selected image is displayed on the layout 6 Select the number of copies 7 Click Print To return to the main m...

Страница 123: ...eed to install the USB driver Before connecting the camera to your computer with the USB cable double click the file below that is locating on the OLYMPUS Master CD ROM provided drive letter USB INSTA...

Страница 124: ...using the PC MEMORY FULL There is no empty space in the internal memory so it cannot record new data Insert a card and copy the pictures to the card or erase unwanted pictures Before erasing download...

Страница 125: ...rror codes 9 Miscellaneous CARD COVER OPEN The battery compartment card cover is open Close the battery compartment card cover The card is not formatted Format the card All data on the card will be de...

Страница 126: ...rily unable to function because of the cold Warm the batteries by putting them in your pocket for a while The camera is in the sleep mode Operate the camera with the shutter button the or P 24 Thereis...

Страница 127: ...ait until the lamp stops blinking P 15 There is a problem with the card Refer to the Error codes P 124 The picture is out of focus The subject was too close Move further away from the subject To take...

Страница 128: ...e clock adjustment is not factory preset P 28 The camera has been left with the batteries removed If the camera is left for about 1 day with the batteries removed the date and time setting will revert...

Страница 129: ...the menu to release the protection P 73 No picture is displayed on the TV when connected to the camera The video output signal is incorrect Set the video output signal according to the region where us...

Страница 130: ...ng range P 50 The flash was set to the flash off mode Select a flash mode other than flash off P 49 The subject was too small and was backlit Set the flash to fill in mode P 49 Bright subjects such as...

Страница 131: ...isconnect the USB cable and start again from step1 of Connecting the camera to a printer P 92 The printer does not support PictBridge Refer to the printer s instruction manual or contact the manufactu...

Страница 132: ...ted 2 Unavailable when the card is not inserted Function Setting Ref Page 1 SHQ HQ SQ1 SQ2 P 57 BACKUP 2 YES NO P 80 P 28 ENGLISH FRANCAIS DEUTSCH ESPA OL ITALIANO PORTUGUES P 26 SLEEP 30sec 1min 3min...

Страница 133: ...serted Function Setting Ref Page 1 CANCEL P 68 BACKUP 2 YES NO P 80 1 2 RESET CANCEL P 86 88 90 ON OFF EXIT P 73 1 EXIT P 65 MEMORY SETUP CARD SETUP ALL ERASE MEMORY FORMAT CARD FORMAT CANCEL P 75 78...

Страница 134: ...factory default settings Shooting mode Playback mode Other default settings Setting differs according to the region where the camera is sold AUTO OFF OFF 0 0 Zoom Wide HQ 9 2004 01 01 ENGLISH SLEEP 3...

Страница 135: ...ode only HQ SQ can be selected Shooting mode Item 9 9 9 9 9 9 9 9 9 9 9 9 9 9 9 9 Zoom 9 9 9 9 W Wide fixed 9 9 9 9 9 9 9 9 9 9 9 9 9 MEMORY FORMAT CARD FORMAT 9 9 9 9 9 9 RESET 9 9 9 9 9 9 BACKUP 9 9...

Страница 136: ...ff the lens with a commercially available blower and wipe gently with a commercially available lens cleaning paper Do not use strong solvents such as benzene or alcohol or chemically treated cloth Mol...

Страница 137: ...14 frames HQ 2048 x 1536 Approx 18 frames SQ1 1600 x 1200 Approx 68 frames SQ2 640 x 480 No of effective pixels 3 200 000 pixels Image pickup device 1 2 7 CCD solid state image pickup 3 340 000 pixels...

Страница 138: ...r supply 2 AA R6 alkaline batteries or NiMH batteries AC adapter optional Manganese zinc carbon batteries and lithium battery packs CR V3 cannot be used Dimensions 87 5 mm W x 62 5 mm H x 38 5 mm D 3...

Страница 139: ...re is determined by the time the shutter is open shutter speed and the amount of light that passes through the lens aperture JPEG Joint Photographic Experts Group A compression format for still images...

Страница 140: ...resolution is the same size as the PC screen when the monitor setting is 640 x 480 However if the monitor setting is 1024 x 768 the picture only takes up part of the screen Sleep Mode To get out of th...

Страница 141: ...memory 19 D DCF 139 DC IN jack 8 17 Digital zoom 47 Direct printing 91 DPOF 84 139 E Elapsed time Total recording time 71 Erase button 9 74 Erasing pictures 74 Exposure 40 139 Exposure compensation 60...

Страница 142: ...9 Portrait 36 Power switch 8 24 39 62 Pressing fully 40 Pressing halfway 40 Print reservation 84 PROGRAM AUTO 36 Protect 73 R Rechargeable batteries 17 Record mode 57 Red eye reduction flash 51 Remain...

Страница 143: ...143 Index T TFT 140 Tripod socket 8 U USB cable 92 112 USB connector 8 92 112 V Video cable 69 VIDEO OUT 83 VIDEO OUT jack 8 69 X xD Picture Card 19 20 Z Zoom button 9 47 64 66...

Страница 144: ...3 07 61 Goods delivery Bredowstrasse 20 22113 Hamburg Germany Letters Postfach 10 49 08 20034 Hamburg Germany European Technical Customer Support Please visit our homepage http www olympus europa com...

Отзывы: