background image

10

En

En

J

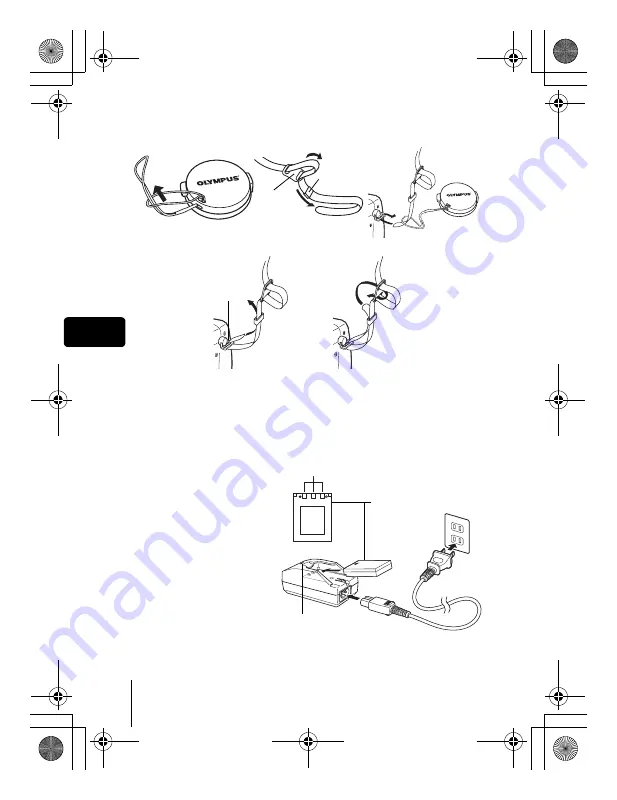
ATTACHING THE STRAP AND LENS CAP

J

CHARGING THE BATTERY

This camera uses an Olympus lithium ion battery (LI-10B). The battery is 
dedicated to this camera and other batteries do not work.
The battery is not fully charged when the camera is purchased. Fully charge 
the battery on the specified charger (LI-10C) before first use. For details, read 
the charger’s instructions (provided).

1

Make sure that the 

+


and 

-

 terminals of 

the battery shown in 
the illustration on the 
right are correctly 
oriented when 
loading the battery 
into the charger.

• The charge indicator will 

light red during charging.

• When charging is 

complete, the charger 
indicator will change 
from red to green.

• Charging normally takes approximately 2 hours.

1

2

3

4

5

Stopper

Ring

Strap 
eyelet

Connection terminals

Lithium ion battery
(LI-10B)

Charging indicator

basic_e_d4226_7.fm  Page 10  Thursday, February 5, 2004  11:47 AM

Содержание CAMEDIA C-765 Ultra Zoom

Страница 1: ...OTO NUM RIQUE DIGITALKAMERA C MARA DIGITAL C 765 Ultra Zoom BASIC MANUAL MANUEL DE BASE EINFACHE ANLEITUNG MANUAL B SICO ENGLISH 2 FRAN AIS 42 DEUTSCH 82 ESPA OL 122 basic_e_d4226_7 fm Page 1 Thursday...

Страница 2: ...LAYBACK 31 Playing back still pictures 31 Playing back movies 32 Protecting pictures 33 Erasing pictures 33 Formatting CARD SETUP 34 Playback on a TV 35 PRINT RESERVATION DIRECT PRINT 36 DOWNLOADING P...

Страница 3: ...ditions 1 This device may not cause harmful interference 2 This device must accept any interference received including interference that may cause undesired operation For customers in Canada This Clas...

Страница 4: ...AMES OF PARTS Lens Strap eyelet Self timer lamp Microphone DC IN jack Flash A V OUT jack MONO USB connector Connector cover Mode dial Shutter button Zoom lever W T GU basic_e_d4226_7 fm Page 4 Thursda...

Страница 5: ...rrow pad acbd OK Menu button e Monitor Flash mode button Diopter adjustment dial Self timer button Y Protect button 0 Rotation button y Flash button Battery compartment card cover Tripod socket Erase...

Страница 6: ...l 2 0 2 0 3 0 3 0 5 Battery check e f 6 Green lamp 7 Flash stand by Camera movement warning Flash charge Lights Blinks 8 Macro mode Super macro mode Manual focus MF 9 Noise reduction O 10 Flash mode S...

Страница 7: ...es Time remaining 30 00 36 19 AE lock AE memory B C 20 Spot metering n 21 ISO ISO 64 ISO 100 ISO 200 ISO 400 22 White Balance 5 3 1 w x y V 23 White balance compensation B1 B7 R1 R7 24 Saturation 6 5...

Страница 8: ...ue F2 8 F8 0 9 Shutter speed 15 1 1000 10 Exposure compensation 2 0 2 0 11 White balance WB AUTO 5 3 1 w x y V 12 ISO ISO 64 ISO 100 ISO 200 ISO 400 13 Date and time 04 06 17 15 30 14 File number Fram...

Страница 9: ...the camera is turned on or while the camera is in use 2288 1712 2288 1712 HQ HQ Memory gauge Battery check Before shooting Gauge is off No more pictures can be taken Fully lit Wait until the gauge re...

Страница 10: ...ils read the charger s instructions provided 1 Make sure that the and terminals of the battery shown in the illustration on the right are correctly oriented when loading the battery into the charger T...

Страница 11: ...battery as shown and insert it into the battery compartment until the battery is locked in position with the battery lock knob Removing the battery Slide the knob in the direction of the arrow When t...

Страница 12: ...ing the card Push the card all the way in to unlock it then let it return slowly The card is ejected a short way and then stops Hold the card straight and pull it out 4 Close the battery compartment c...

Страница 13: ...n When the mode dial is set to q the camera turns on in the playback mode and the monitor turns on 3 To turn the camera off press the power switch again To save battery power the camera automatically...

Страница 14: ...d on the arrow pad to select MODE MENU 4 Press ac to select the SETUP tab then press d 5 Press ac to select W then press d The green frame moves to the selected item 6 Press ac to select a language th...

Страница 15: ...ate and time settings are set to Y M D 7 Press ac to set the year then press d to move to the month setting To move back to the previous setting press b The first two digits of the year are fixed 8 Re...

Страница 16: ...urn to shooting status MODE MENU ESP Take you directly to the setting screens Display operational buttons at the bottom of the screen The functions registered in the shortcut menus can also be accesse...

Страница 17: ...d ESP 5 or MULTI Extends the maximum optical zoom making possible up to approx 40 zoom Sets the image quality and resolution Still picture TIFF SHQ HQ SQ1 SQ2 Movie SHQ HQ SQ Used to take pictures of...

Страница 18: ...Used to take pictures of a close subject Selects OFF DRIVE Selects a shooting mode from o single frame shooting j sequential shooting i high speed sequential shooting k AF sequential shooting and 7 a...

Страница 19: ...to take a picture of yourself while holding the camera PANORAMA Allows panorama pictures to be taken with Olympus CAMEDIA brand cards 2 IN 1 Combines two still pictures taken in succession and stores...

Страница 20: ...EC VIEW Selects whether to display pictures on the monitor while saving them to a card SLEEP Sets the sleep timer MY MODE SETUP Customizes settings which are activated in the r mode FILE NAME Changes...

Страница 21: ...cts whether to keep the current camera settings when you turn off the power W Selects a language for on screen display PW ON OFF SETUP Sets the picture that is displayed when the power is turned on an...

Страница 22: ...no special functions or manual adjustments The camera sets the optimal focusing and exposure This is the simplest of all shooting modes i Portrait shooting Suitable for taking a portrait style shot o...

Страница 23: ...matically selects the optimal settings for this type of shooting condition Since the shutter speed is slow make sure you stabilize the camera by using a tripod P Program shooting Allows you to take st...

Страница 24: ...perture and shutter speed automatically Even if the subject moves during recording or the distance to the subject changes correcct focusing and exposure are maintained continuously If R is set to ON s...

Страница 25: ...not be focused on you can focus the camera on another point at roughly the same distance focus lock and take the picture as explained below 1 Position the AF target mark on the subject you want to foc...

Страница 26: ...en there is space in the card memory the remaining recording time is displayed and the camera is ready to shoot During movie recording the flash and manual focus MF are disabled It takes longer to sto...

Страница 27: ...below when all modes are available To prevent the flash from firing press down on the top of the flash to retract it 3 Press the shutter button halfway In conditions where the flash will fire lights...

Страница 28: ...e 2nd curtain fires the flash just before the shutter closes 1st curtain with red eye reduction SLOW1 Adjusts the flash for slow shutter speeds and minimizes red eye J USING THE SELF TIMER This functi...

Страница 29: ...is individually locked for each frame The AF sequential shooting speed is slower than for normal sequential shooting BKT When auto bracketing is set the exposure is changed automatically for each fram...

Страница 30: ...e focusing is performed quickly When the optical zoom lever is at the maximum wide position and you are as close as 7 cm 2 8 to your subject you can fill the entire frame with your subject J SUPER MAC...

Страница 31: ...resume shooting quickly 1 Press the QUICK VIEW button in the shooting mode 2 Press the QUICK VIEW button again to return to the shooting mode Close up playback Pictures displayed on the monitor can be...

Страница 32: ...row pad to display the picture with n you want to play back 2 Press e The top menu is displayed 3 Press a to select MOVIE PLAY 4 Press ac to select MOVIE PLAYBACK then press e The movie is played back...

Страница 33: ...tect 2 Press 0 To cancel protection press 0 again Protected pictures cannot be erased by the single frame all frame erase function but they are all erased by formatting J ERASING PICTURES This functio...

Страница 34: ...mera All existing data including protected pictures are erased when the card is formatted Make sure that you save or transfer important data to a PC before formatting a card 1 In the top menu select M...

Страница 35: ...mode dial to q and turn the camera on The last picture taken is displayed on the TV Use the arrow pad to select the picture you want to display The close up playback index display and slideshow funct...

Страница 36: ...ired number of prints Resetting the print reservation data This function allows you to reset all the print reservation data for pictures stored on the card J DIRECT PRINT PictBridge By connecting the...

Страница 37: ...indows 95 Mac OS 8 6 or lower except Mac OS 8 6 equipped with USB MASS Storage Support 1 3 5 installed at the factory Data transfer is not guaranteed on a home built PC system or PCs with no factory i...

Страница 38: ...g the provided USB cable Does your computer have a USB interface The USB port is indicated by a mark Check that the port has the mark Does your computer have a built in PC card slot Consult your neare...

Страница 39: ...e card is full No more pictures movies or information such as print reservations can be recorded Replace the card or erase unwanted pictures Before erasing download important images to a PC NO PICTURE...

Страница 40: ...TIFF SQ2 640 480 pixels TIFF SQ2 No of storable pictures when using a 16 MB card Without sound Approx 1 frame TIFF 2288 1712 Approx 5 frames SHQ 2288 1712 Approx 16 frames HQ 2288 1712 Approx 49 fram...

Страница 41: ...104 F operation 20 C to 60 C 4 F to 140 F storage Humidity 30 to 90 operation 10 to 90 storage Power supply Only an Olympus LI 10B lithium ion battery AC adapter specified by Olympus optional Dimensio...

Отзывы: