background image

20

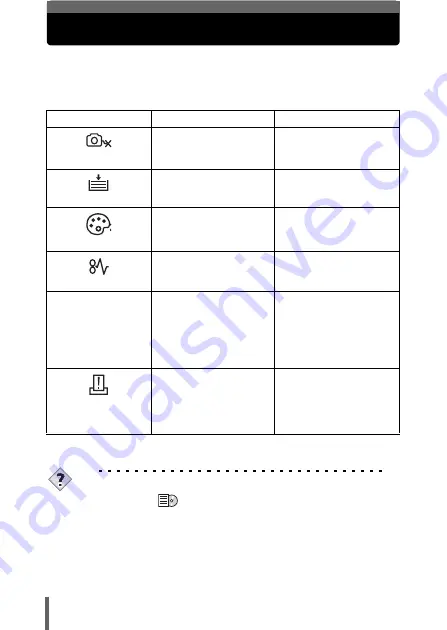
If an error code is displayed

If an error code appears on the camera’s monitor during direct print setting 
or printing, see the following table.
For more details, refer to the printer’s instruction manual.

TIPS

• If an error code other than those shown above is displayed, refer to 

“Error codes” (

 P.174).

Monitor indication

Possible cause

Corrective action

NO CONNECTION

The camera is not 
connected to the printer 
correctly.

Disconnect the camera 
and connect it again 
correctly.

NO PAPER

There is no paper in the 
printer.

Load some paper in the 
printer.

NO INK

The printer has run out of 
ink.

Replace the ink cartridge 
in the printer.

JAMMED

The paper is jammed.

Remove the jammed 
paper.

SETTINGS CHANGED

The printer’s paper 
cassette has been 
removed or the printer 
has been manipulated 
while making settings on 
the camera.

Do not manipulate the 
printer while making 
settings on the camera.

PRINT ERROR

There is a problem with 
the printer and/or 
camera.

Turn off the camera and 
printer. Check the printer 
and remedy any 
problems before turning 
the power on again.

Содержание Camedia C-750 Ultra Zoom

Страница 1: ...om z In the interest of continually improving products Olympus reserves the right to update or modify information contained in this manual DIGITAL CAMERA MANUAL FOR DIRECT PRINTING Manual outlining new features added to the camera with firmware update C 750 Ultra Zoom ...

Страница 2: ...e Manual that originally provided with your camera What is PictBridge It is the standard for connecting digital cameras and printers of different makers and printing out pictures directly Indications used in this manual Important information on factors which may lead to a malfunction or operational problems Also warns of operations that should be absolutely avoided Useful information and hints tha...

Страница 3: ...t printing function 6 2 Direct printing 7 Using the direct printing function 7 Connecting the camera to a printer 8 Printing pictures 9 PRINT mode MULTI PRINT mode 9 ALL PRINT mode 13 ALL INDEX mode PRINT ORDER mode 15 Trim the picture 17 Exiting direct printing 19 If an error code is displayed 20 Troubleshooting 21 ...

Страница 4: ...display on the web site s firmware update page only ENGLISH is displayed It is not possible to switch to other languages see below Before updating Menu List P 184 to 187 After updating Top menu Tab Function Setting MODE MENU SETUP ENGLISH FRANCAIS DEUTSCH ESPAÑOL Top menu Tab Function Setting MODE MENU SETUP ENGLISH ...

Страница 5: ... the other end of the USB cable into the camera s USB connector 4 Press the power switch to turn the camera on 5 The selection screen for the USB connection shown right is displayed on the monitor Press ac to select PC and press e 6 The computer recognizes the camera as a new device When you connect the camera to the computer for the first time the computer automatically recognizes the camera Clic...

Страница 6: ...ures can be printed directly from the camera By connecting the camera directly to a printer that supports PictBridge with the USB cable you can print pictures stored on the card inside the camera without a need to use a computer For details of printing instructions see Direct printing gP 7 ...

Страница 7: ... directly STANDARD All printers that support PictBridge have standard print settings Selecting STANDARD on the settings screens g P 10 to 15 images are printed according to the default settings See the instruction manual for your printer for its standard settings or inquire with the printer manufacturers TIPS For details of printing paper types ink cassettes etc refer to the printer s instruction ...

Страница 8: ... the camera s USB connector 3 Press the power switch to turn the camera on The monitor turns on and the selection screen for the USB connection is displayed 4 Press ac to select PRINT then press e ONE MOMENT is displayed and the camera and printer are connected The PRINT MODE SELECT screen is displayed on the monitor Make the print settings on the camera s monitor g Go to Printing pictures P 9 If ...

Страница 9: ...yout format g PRINT mode MULTI PRINT mode P 9 ALL INDEX Prints an index of all the pictures stored on the card g ALL INDEX mode PRINT ORDER mode P 15 PRINT ORDER Prints the pictures according to the print reservation data on the card If no print reservations P 163 have been made this option is not available g ALL INDEX mode PRINT ORDER mode P 15 This option may not be available depending on the ty...

Страница 10: ... set in Step 2 and the capabilities of your printer 5 Press bd to select the picture you want to print Turn the zoom lever toward W to display the pictures in index format You can then select the pictures you want to print from the index 6 Select the print reservation method SINGLE PRINT Makes a single frame print reservation for the selected picture according to standard settings MORE Sets the nu...

Страница 11: ...printer Items outside the capability of the printer are not available Sets the number of prints You can select up to 10 prints DATE If you select WITH pictures are printed with the date and time FILE NAME If you select WITH pictures are printed with the file name P Crops part of a recorded picture so that only the enlarged section is printed g Trim the picture P 17 DATE and FILE NAME are not avail...

Страница 12: ...res Press ac to select OK or CANCEL then press e OK Printing starts CANCEL The settings are canceled and the monitor returns to the PRINT MODE SELECT screen When printing is finished the monitor returns to the PRINT MODE SELECT screen g Exiting direct printing P 19 zTo cancel printing Pressing e during print data transfer displays the screen for selecting whether to continue or cancel printing To ...

Страница 13: ...page The print size settings screen is displayed 4 Press ac to select the item you want to set then press d Press ac to select the item then press e If PRINT INFO cannot be set with your printer go to Step 6 The available options vary depending on the type of printer Items outside the capability of the printer are not available Only one print of each image can be made at a time DATE If you select ...

Страница 14: ...een When printing is finished the monitor returns to the PRINT MODE SELECT screen g Exiting direct printing P 19 zTo cancel printing Pressing e during print data transfer displays the screen for selecting whether to continue or cancel printing To cancel printing press ac to select CANCEL then press e CANCEL GO SELECt PRINt OK CANCEL TRANSFERRING screen tRANSFERRING tRANSFERRING tRANSFERRING CANCEL...

Страница 15: ...cted print mode SIZE and BODERLESS cannot be selected When the PRINT PAPER screen is not displayed SIZE and BORDERLESS are set to STANDARD Go to Step 4 3 Use ac to select framed or unframed then press e OFF The image is printed inside a blank frame ON The image is printed filling the entire page The print screen is displayed BORDERLESS is not available in ALL INDEX mode Press e and go to Step 4 GO...

Страница 16: ...ing e during print data transfer displays the screen for selecting whether to continue or cancel printing To cancel printing press ac to select CANCEL then press e In ALL INDEX mode the printer automatically selects the number of pictures per sheet etc ALL INDEX printing is only available on printers with an index function The PRINT ORDER function is only available on DPOF compatible printers CANC...

Страница 17: ...izontal to vertical and vice versa when the maximum or minimum size is reached If trimming has already been set the P screen appears Press ac to select RESET then press e 2 Press e 3 Press ac to select OK then press e OK Saves the current trimming size RESET Sets a new trimming size Repeat the procedure from Step 1 CANCEL Cancels the current trimming setting Press e to complete trimming setting an...

Страница 18: ...depending on the printer settings If the trimmed picture size is small printing magnification increases accordingly resulting in a printed picture with lower resolution For best results with close up prints you are recommended to use the TIFF SHQ or HQ mode Note ...

Страница 19: ... the camera from the printer 1 In the PRINT MODE SELECT screen select b The message is displayed 2 Press the power switch to turn the camera off 3 Remove the USB cable from the camera 4 Remove the USB cable from the printer GO SELECt EXIt TURN OFF THE POWER Power switch ...

Страница 20: ...nnect the camera and connect it again correctly NO PAPER There is no paper in the printer Load some paper in the printer NO INK The printer has run out of ink Replace the ink cartridge in the printer JAMMED The paper is jammed Remove the jammed paper SETTINGS CHANGED The printer s paper cassette has been removed or the printer has been manipulated while making settings on the camera Do not manipul...

Страница 21: ...dating the firmware take the action described below The printer fails to connect Possible cause Corrective action Ref Page PC was selected on the monitor after connecting to the printer with a USB cable Disconnect the USB cable from the camera and start again from the beginning g P 8 ...

Страница 22: ... 20097 Hamburg Germany Tel 49 40 23 77 3 0 Fax 49 40 23 07 61 Letters Postfach 10 49 08 20034 Hamburg Germany European Technical Customer Support Please visit our homepage http www olympus europa com or call our TOLL FREE NUMBER 00800 67 10 83 00 for Austria Belgium Denmark Finland France Germany Italy Luxemburg Netherlands Norway Portugal Spain Sweden Switzerland United Kingdom Please note some m...

Отзывы: