background image

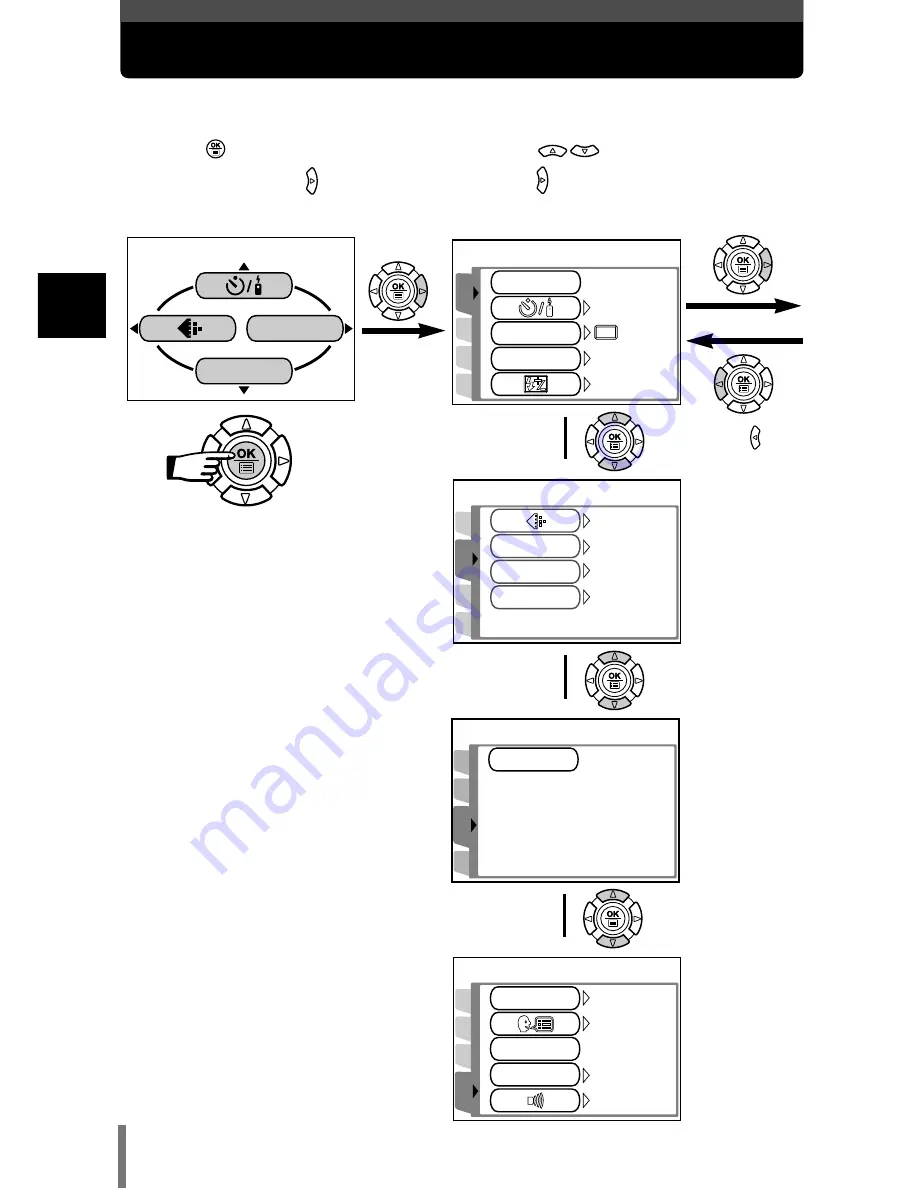
How to use the menus

28

2

Using the men

us

The instructions below show how to use the menus using the 

P

mode screen.

MODE MENU

MONITOR OFF

PICTURE

CAM

SETSET

CARDCARD

AUTO

HQ

WB

CONTRAST

SHARPNESS

0

0

PICPIC

SETSET

CARDCARD

ISO

CAMERA

DRIVE

SCENE

OFF

AUTO

0.0

CAM

SETSET

PIC

CARD SETUP

CARD

SETUP

CAM

CARDCARD

PICPIC

ENGLISH

ON

REC VIEW

ALL RESET

ON

LOW

PW 

ON

ON/OFF

OFF 

SETUP

SETUP
tab

Top menu

CAMERA tab

PICTURE
tab

CARD tab

¥

˙

¥

˙

¥

˙

Press to
return to the
tab selection
screen.

1

Press 

to display the

top menu. Press     .

2

Press 

to select a tab, then

press .

Содержание C60 - C60 6MP Digital Camera

Страница 1: ...L CAMERA REFERENCE MANUAL Click Here C 60ZOOM DIGITAL CAMERA PC CONNECTION OPERATION MANUAL Explanation of digital camera functions and operating instructions Explanation of how to download images between your digital camera and PC ...

Страница 2: ...lease read these instructions carefully to enjoy optimum performance and a longer service life Keep this manual in a safe place for future reference We recommend that you take test shots to get accustomed to your camera before taking important photographs The images and illustrations in this manual may differ from their real versions ...

Страница 3: ...n Rule for Camera File System DCF standards stipulated by the Japan Electronics and Information Technology Industries Association JEITA For customers in USA Declaration of Conformity Model Number C 60 ZOOM RM 2 Remote control Trade Name OLYMPUS Responsible Party Olympus America Inc Address 2 Corporate Center Drive Melville New York 11747 3157 U S A Telephone Number 1 631 844 5000 Tested To Comply ...

Страница 4: ...8 Playing back and editing pictures 7 Useful functions P 103 8 Print setting DPOF P 125 9 Direct printing PictBridge P 129 Troubleshooting and other information 10 Miscellaneous P 143 5 Adjusting the image P 79 quality and exposure 6 Playback P 89 C C C Co o o om m m mp p p po o o os s s si i i it t t ti i i io o o on n n n o o o of f f f t t t th h h he e e e m m m ma a a an n n nu u u ua a a al ...

Страница 5: ... mode 21 Startup Shutdown screen 22 If the card is not recognized Card check 23 Date time setting 24 Language selection 26 2 Using the menus 27 What are the menus 27 How to use the menus 28 Shortcut menus shooting playback 30 MODE MENU shooting 31 MODE MENU playback 33 3 Shooting basics 35 Shooting modes 35 Holding the camera 39 How to press the shutter button 40 Taking still pictures 41 Taking st...

Страница 6: ...y shooting S 59 Manual shooting M 60 FULLTIME AF A reliable time saving way to focus 61 Selecting the metering area 62 Macro mode shooting Taking close up pictures 63 Super macro shooting 64 Self timer shooting 65 Remote control shooting 66 Sequential shooting BKT 68 Sequential shooting AF sequential shooting 68 Auto bracketing Shooting pictures sequentially with a different exposure for each fram...

Страница 7: ...ure rotation 93 Viewing movies 94 INDEX Creating an index 96 Playback on a TV 97 Recording sound 98 Editing still pictures 99 Protecting pictures 100 Erasing pictures 101 Single frame erase 101 All frame erase 102 7 Useful functions 103 ALL RESET Saving the camera s settings 103 SHORT CUT 105 Registering functions to the shortcut menus 106 Using the shortcut menu 107 MY MODE SETUP Registering cust...

Страница 8: ...cking the image processing functions 124 8 Print setting DPOF 125 How to print pictures 125 Applying print reservation to a card 127 9 Direct printing PictBridge 129 Using the direct printing function 129 Connecting the camera to a printer 130 Printing pictures 131 Printing basics 132 PRINT mode MULTI PRINT mode 133 ALL PRINT mode 137 ALL INDEX mode PRINT ORDER mode 139 Exiting direct printing 141...

Страница 9: ...lash P 53 Self timer Remote control lamp P 65 66 Microphone P 75 77 98 AF sensor Strap eyelet P 15 Lens Lens barrier Remote control receiver P 66 Shutter button P 40 Mode dial P 35 Speaker Zoom lever W T P 51 90 91 Power lamp P 21 ...

Страница 10: ...2 AF target mark P 41 46 Monitor P 10 41 117 Playback button P 21 89 Card access lamp P 40 41 DC IN jack P 20 Connector cover P 20 97 A V OUT jack MONO P 97 USB connector P 130 Tripod socket Battery Card compartment cover P 18 OK Menu button P 27 Arrow pad P 27 89 Macro Spot button P 62 63 Protect button P 100 ...

Страница 11: ...FO is set to ON Indications during still picture playback When INFO is set to OFF When INFO is set to ON Indications during movie playback When INFO is set to OFF HQ 04 07 01 16 00 00 00 00 20 31 25 30 27 28 32 100 0015 6 HQ SIZE 320x240 0 3 WB AUTO WB AUTO 04 07 01 16 00 00 00 00 20 6 7 4 22 100 0015 100 0018 HQ 04 07 01 12 30 18 10 23 25 24 6 28 29 27 26 30 4 22 21 7 2 3 100 0018 HQ SIZE 2816x21...

Страница 12: ...x 1920 P 79 1600 x 1200 etc 8 Number of storable 24 still pictures P 80 still pictures Remaining recording 00 24 min sec movies P 49 time 9 Memory gauge P 13 10 Battery check P 13 11 Noise reduction P 88 12 Flash stand by mark P 55 13 Green lamp P 40 14 Macro mode P 63 Super macro mode P 64 15 Flash mode SLOW P 53 SLOW 16 Flash intensity control 2 0 to 2 0 P 57 17 Drive mode BKT P 68 18 Self timer...

Страница 13: ...er 100 0018 27 Date 04 07 01 P 24 28 Time 07 15 12 30 17 45 P 24 29 Frame number 18 30 Sound record P 98 31 Movie P 94 32 Movie playback time 00 00 00 20 00 00 00 20 Overall recording time Elapsed playback time The monitor indications differ depending on the camera s settings You can select the amount of information displayed on the monitor INFO Displaying shooting information on the monitor P 111...

Страница 14: ...ndication The green lamp and orange lamp next to the viewfinder blink Remaining power level Exhausted Replace with a charged battery If the remaining battery power is low the battery check indication changes as follows when the camera is turned on or while the camera is in use One picture taken Lit When taking still pictures Shoot Shoot Wait Wait No more pictures can be taken Fully lit Wait until ...

Страница 15: ...s into a single panoramic image using CAMEDIA Master software contained on the provided CD ROM Available modes How to use this manual 14 Sets the camera to any of the modes shown Step through the menus in the order of the arrows P 27 This represents the arrow pad Only arrows applicable to the operation are shown Important information on factors that may lead to a malfunction or operational problem...

Страница 16: ...rough the eyelet 3 Pull on the strap to make sure it is securely fastened Strap eyelet Be careful with the strap when you carry the camera as the strap can easily catch on stray objects causing serious damage Attach the strap correctly as shown so that the camera does not fall off If the strap is attached incorrectly and the camera falls off the strap Olympus is not responsible for any damages Not...

Страница 17: ...links red this may indicate that the battery is not properly attached or that the battery has malfunctioned Charging of the battery may cause noise on a television or radio sharing the same wall outlet however this is not a malfunction If this should happen plug the battery charger into a separate wall outlet The battery may become hot during charging however this does not indicate a malfunction T...

Страница 18: ...he following cards can be used Read the instructions for the card carefully before use Index area Write the card s contents here Compatible xD Picture Card xD Picture Card 16 to 512 MB Contact area The camera reads the card here Do not touch This camera may not recognize a non Olympus card or a card that was formatted on another device such as a computer Before use be sure to format the card on th...

Страница 19: ...f your finger to slide the cover Do not use your fingernail as this could result in injury 3 Loading the battery Insert the battery in the correct direction in the battery card compartment Make sure the knob is locked securely If the knob is not locked the battery may pop out when opening the battery card compartment cover Unloading the battery Slide the knob in the direction of the arrow The batt...

Страница 20: ... the arrow D D C Do not press on the card with hard or pointed items such as ballpoint pens Never open the battery card compartment cover or disconnect the optional AC adapter while the camera is turned on Doing so could destroy all data on the card Destroyed data cannot be restored The card may eject forcibly if you take your finger off the card immediately after pushing it Note If the battery is...

Страница 21: ... jack Connection cord plug Power plug Before using the AC adapter remove the battery from the camera If the battery power runs out while the camera is connected to a computer image data may be corrupted It is recommended that you use the optional AC adapter when transferring images to a computer Do not disconnect or connect the AC adapter while the camera is communicating with the computer Do not ...

Страница 22: ... barrier to turn the camera off about halfway across the lens Wait until the monitor turns off and the lens is fully retracted Close the lens barrier all the way The camera turns off the power lamp turns off Playback mode Power on Press the playback button with the lens barrier closed The camera turns on in the playback mode the monitor turns on Power off Press The camera turns off the monitor tur...

Страница 23: ...minutes regardless of the sleep mode setting The power lamp stays lit in the following cases When the camera is connected to a computer When the camera is in the sleep mode When closing the lens barrier do not push the lens barrier against the lens Forcing the lens barrier may damage the camera body or cause a malfunction Note Startup Shutdown screen You can select whether to display the startup s...

Страница 24: ...lect POWER OFF then press Replace the card with a new one TFormat the card 1 Press to select FORMAT then press The FORMAT screen appears 2 Press to select YES then press to start formatting When formatting is complete the camera is ready for shooting CARD ERROR Indications CARD SETUP POWER OFF FORMAT FORMA FORMAT YES NO CAUTION ERASING ALL All data stored on the card is erased when the card is for...

Страница 25: ...ress to select the date format Select any one of the following formats D M Y Day Month Year M D Y Month Day Year Y M D Year Month Day The following instructions show the procedure used when the date and time settings are set to Y M D Set the date time Because the date and time are saved with the recorded pictures be sure to set them correctly CARD SETUP Mode dial Arrow pad SELECT SET GO 2004 01 01...

Страница 26: ... digits of the year cannot be changed 7 Press For a more accurate setting press when the clock hits 00 seconds The clock starts when you press the button 8 To turn the camera off close the lens barrier SELECT SET GO 2004 01 01 SELECT SET GO 2004 01 01 The current settings remain the same even when the power is turned off unless they are readjusted The date setting will return to the factory defaul...

Страница 27: ...ons and explanations 1 Open the lens barrier Set the mode dial to any mode except 2 Press The top menu is displayed 3 Press on the arrow pad to select MODE MENU 4 Press to select the SETUP tab then press 5 Press to select then press 6 Press to select a language then press 7 Press again to exit the menu 8 To turn the camera off close the lens barrier SETUP SETUP CAM CAM CARD PIC ENGLISH REC VIEW RE...

Страница 28: ...SQ1 SQ2 TIFF SHQ PIC PIC SET SET CARD CARD ISO CAMERA DRIVE SCENE OFF AUTO AUTO 0 0 Shortcut menus MODE MENU Take you directly to the setting screens Display operational buttons at the bottom of the screen You can change the shortcut menus in any mode other than and modes SHORT CUT P 105 Top menu Press the arrow pad to display the shortcut menus or MODE MENU Lets you access various menu functions ...

Страница 29: ... WB CONTRAST SHARPNESS 0 0 PIC PIC SET SET CARD CARD ISO CAMERA DRIVE SCENE OFF AUTO 0 0 CAM SET SET PIC CARD SETUP CARD SETUP CAM CARD CARD PIC PIC ENGLISH ON REC VIEW ALL RESET ON LOW PW ON ON OFF OFF SETUP SETUP tab Top menu CAMERA tab PICTURE tab CARD tab Press to return to the tab selection screen 1 Press to display the top menu Press 2 Press to select a tab then press ...

Страница 30: ...frame moves to the selected item To return to select an item press or Not all items can be selected depending on the status of the camera and the settings performed You can take pictures by pressing the shutter button in the shooting mode with the menu open If you want to save the settings for when the camera is turned off set ALL RESET to OFF ALL RESET Saving the camera s settings P 103 Note 3 Pr...

Страница 31: ...s the record mode P 79 CARD SETUP Formats a card P 115 MONITOR OFF Selects whether to turn the monitor on or P 45 MONITOR ON off MONITOR OFF is displayed when the monitor is on and MONITOR ON is displayed when it is off Runs through all saved pictures one after P 92 another MOVIE PLAY Plays back movies You can also make P 94 indexes of still shots from movies INFO Changes the amount of information...

Страница 32: ...ntensity P 57 NOISE REDUCTION Reduces the noise in images that is generated P 88 by long exposures when shooting under low light conditions DIGITAL ZOOM Digitally increases the optical zoom range to P 52 a maximum of approximately 12x FULLTIME AF Keeps the image in focus at all times without P 61 having to press the shutter button halfway ACCESSORY Sets when using an underwater housing P 78 Record...

Страница 33: ...selects the sound volume SHUTTER SOUND Sets the sound generated when the shutter P 118 button is pressed and adjusts the volume PICTURE tab Sets the record mode P 79 WB Sets the white balance appropriate to the P 85 light source SHARPNESS Adjusts the sharpness of images P 86 CONTRAST Adjusts the contrast of images P 87 2 IN 1 Combines two still pictures taken in succession P 73 and stores them as ...

Страница 34: ...hem Stores print reservation data on the card P 127 Adds sound to a still picture already taken P 98 SLEEP Sets the time before the sleep mode P 122 idle mode begins MY MODE SETUP Registers settings you customized P 108 FILE NAME Selects how to name files and folders of P 123 images to be saved PIXEL MAPPING Checks the CCD and image processing P 124 functions for errors Adjusts the monitor brightn...

Страница 35: ...the power is turned on off Turns off the beep warning sound or P 117 selects the sound volume VOLUME Adjusts the sound volume during playback P 119 Adjusts the monitor brightness P 117 Sets the date and time P 24 VIDEO OUT Selects NTSC or PAL according to your P 122 TV s video signal type Selects the number of frames in the index P 91 display CARD tab CARD SETUP Erases all image data stored on the...

Страница 36: ...ctures of outdoor scenes in the evening or at night For example if you take a picture of a street at night in other modes the lack of brightness will result in a dark picture with only the sparkle of lights such as street lamps appearing In the Night Scene shooting mode the true appearance of the street can be captured The camera automatically selects the optimal settings for this type of shooting...

Страница 37: ...aking it ideal for shooting natural scenery Landscape Portrait shooting Suitable for taking photos of both your subject and the background The picture is taken with the background as well as the subject in the foreground in focus The camera automatically sets the optimal shooting settings Self Portrait shooting Enables you to take a picture of yourself while holding the camera Point the lens towar...

Страница 38: ...8 P Program shooting Allows you to shoot using an aperture and shutter speed that the camera sets You can set the flash white balance or other functions manually A Aperture priority shooting Allows you to set the aperture manually The camera sets the shutter speed automatically By decreasing the aperture value F number the camera will focus within a smaller range producing a picture with a blurred...

Страница 39: ...ws you to set the shutter speed manually The camera sets the aperture automatically Set the shutter speed according to the subject and the type of effect you want Shutter priority shooting P 59 M Manual shooting Allows you to set the aperture and shutter speed manually To check the exposure refer to the exposure differential This mode gives you more creative control allowing you to make the settin...

Страница 40: ... When using a tripod attach it after opening the lens barrier The lens barrier is difficult to open with a tripod attached Note Vertical grip Horizontal grip Flash Keep your fingers and the strap away from the lens and flash Correct Incorrect When shooting vertically using the flash hold the camera so that the flash is higher than the lens Lens ...

Страница 41: ...r light steadily 2 Press the shutter button all the way fully Shooting starts and the card access lamp blinks In the mode the camera starts recording a movie and the orange lamp next to the viewfinder lights 40 3 Shooting basics How to press the shutter button Half press Full press P 1 800 F2 8 0 3 HQ 2816x2112 2816x2112 Number of storable still pictures AF target mark Green lamp Card access lamp ...

Страница 42: ...N How to use the menus P 28 2 Position the AF target mark on the subject while looking at the image on the monitor 3 Press the shutter button gently halfway to adjust the focus When the focus and exposure are locked the green lamp on the monitor lights steadily lights when the flash fires P 55 4 Press the shutter button all the way fully The bottom of the memory gauge lights the card access lamp b...

Страница 43: ...The card access lamp blinks while the picture is stored on the card Taking still pictures using the viewfinder The camera actually records a wider area than the picture you compose while looking through the viewfinder Shutter button Viewfinder Available modes Card access lamp Power lamp S C E N E TIPS The monitor turned off TIf the camera is not used for over 3 minutes the monitor turns off automa...

Страница 44: ...lash is charging Wait until the lamp goes off To check the picture you have just taken immediately TSet REC VIEW to ON REC VIEW Checking the picture immediately after shooting P 121 TYou can check the picture you have taken by pressing the playback button P 89 Press the shutter button gently using the ball of your finger If the button is pressed hard the camera may move and pictures may come out b...

Страница 45: ...movement can occur easily and subjects may be difficult to see in bright dark places The monitor uses more battery power than the viewfinder Use the viewfinder for general snapshots landscape pictures casual shots etc Use the monitor when you want to shoot while checking the picture area that the camera actually records Use also for close up shots of people or flowers or for macro shooting The cam...

Страница 46: ...f when the camera is powered on in the shooting mode 1 Press The top menu is displayed 2 Press 3 The monitor turns off MONITOR OFF To turn the monitor back on press to display the top menu and press to select MONITOR ON MONITOR ON is displayed on the top menu when the monitor is set to off MODE MENU MONITOR OFF ...

Страница 47: ...reen lamp lights steadily When the focus and exposure are locked the green lamp lights steadily If the green lamp blinks the focus and exposure are not locked Release your finger from the shutter button re position the AF target mark on the subject and press the shutter button halfway again Available modes Shutter button When the subject you want to focus on is not in the center of the frame and y...

Страница 48: ...If correct focus cannot be obtained 3 Shooting basics 3 Keeping the shutter button pressed halfway recompose your shot 4 Press the shutter button all the way fully Green lamp P 1 800 F2 8 0 3 HQ 2816x2112 ...

Страница 49: ...ake the picture If the subject has no vertical lines hold the camera vertically and lock the focus then return the camera to the horizontal position to take the picture The green lamp blinks The subject cannot be brought into focus Subjects with low contrast Subjects with no vertical lines Subjects in excessively bright light in the center of the frame The green lamp lights but the subject cannot ...

Страница 50: ...ng lights red 4 Press the shutter button again to stop recording When the remaining recording time has been used up recording stops automatically Available modes Remaining recording time Sound is recorded at the same time The focus and zoom are locked If the distance to the subject changes focus may be compromised The optical zoom is not available HQ TIPS To record movies without sound TIn the top...

Страница 51: ...pends on the selected record mode free space available on the card etc Note Recording will continue until the card is full unless stopped by pressing the shutter button If a single movie recording uses up all of the card s memory create space on the card by deleting the movie or downloading it to a PC Notes for recording movies over a long time ...

Страница 52: ...reased to a maximum of approximately 12x Camera movement is likely to occur at higher magnifications Stabilize the camera with a tripod etc to avoid camera movement The optical zoom is not available in the mode Using the optical zoom Available modes 1 Operate the zoom lever Wide angle Push the zoom lever toward W to zoom out Telephoto Push the zoom lever toward T to zoom in HQ 2816x2112 HQ 2816x21...

Страница 53: ...dicator When you reach the limit of the optical zoom the digital zoom is enabled DIGITAL ZOOM Using the digital zoom Available modes Zoom lever The cursor moves up and down on the zoom indicator according to the zoom magnification The cursor turns orange when inside the digital zoom field In the mode the maximum digital zoom magnification is 3 0x Pictures taken with the digital zoom may appear gra...

Страница 54: ...You can select a flash mode appropriate to the light conditions and the effect you want to achieve You can also adjust the amount of light emitted using the flash intensity control P 57 The flash modes are as follows The subject s eyes appear red Auto flash No indication Automatically fires in low light and backlight conditions After the pre flash it takes approximately 1 second before the shutter...

Страница 55: ... in low light conditions Use this mode in situations where flash photography is not desired or is prohibited You can also use this mode when you want to shoot a natural looking twilight or night scene Slow synchronization SLOW Regardless of the shutter speed the flash fires right after the shutter fully opens Slow synchronization with red eye reduction SLOW This is for when you want to use slow sy...

Страница 56: ...tion screen disappears 2 Take the picture The orange lamp and the flash standby mark light when the flash is ready to fire Flash working range W max Approx 0 2 m to 3 4 m 0 6 ft to 11 2 ft T max Approx 0 3 m to 2 0 m 1 0 ft to 6 6 ft Auto flash SLOW SLOW Mode indication button Shutter button Available modes Orange lamp P 1 30 F2 8 HQ 2816x2112 0 0 mark P 1 30 F2 8 HQ 2816x2112 0 0 ...

Страница 57: ...nge lamp or camera movement warning lights up the shutter speed locks at its current level This helps prevent camera movement problems shutter speeds that are too slow can cause blur However if the zoom magnification is increased the camera will increase the locked shutter speed accordingly Zoom position shutter speed W max 1 30 sec T max 1 100 sec The flash does not fire in the following situatio...

Страница 58: ... the menus P 28 2 Press to adjust then press Press again to exit the menu Factory default setting 0 Available modes Flash intensity control You can adjust the amount of light emitted by the flash In some situations you may get better results by adjusting light emission Examples include small subjects distant backgrounds or situations when increased contrast is desired This function is also useful ...

Страница 59: ...the aperture value appears Press to increase the aperture value Aperture value F number Zoom position Value Wide W f2 8 to f8 0 Tele T f4 8 to f8 0 A 1 600 F5 6 HQ 2816x2112 2816x2112 0 0 Available modes To increase the aperture value F number press To decrease the aperture value F number press Open aperture the widest aperture setting depends on the zoom position When the flash is set to the auto...

Страница 60: ...ter speed you have set will provide optimum exposure The shutter speed is displayed in red The shutter speed you have set is unsuitable for the conditions appears Press to set the shutter speed slower appears Press to set the shutter speed faster Shutter speed Shutter speed range 4 to 1 1000 sec To set a faster shutter speed press To set a slower shutter speed press Available modes Mode dial S ...

Страница 61: ...y selected aperture and shutter speed and the exposure considered optimal by the camera appears in the upper right hand corner When the exposure differential is set to less than 3 0 or more than 3 0 the exposure differential appears in red To increase the aperture value F number press To decrease the aperture value F number press To set a faster shutter speed press To set a slower shutter speed pr...

Страница 62: ...utton halfway The focusing time is reduced letting you take successive snapshots 1 In the top menu select MODE MENU T CAMERA T FULLTIME AF T ON and press How to use the menus P 28 If the monitor is turned off FULLTIME AF does not function Press again to exit the menu Available modes Battery consumption increases when FULLTIME AF is used Note ...

Страница 63: ...mark to determine exposure A subject can be shot with optimal exposure regardless of the background light such as when the subject is dark due to back lighting When is set you can use spot metering when shooting up close to a subject 1 Press the macro spot button repeatedly until spot metering or spot metering macro mode appears If is not pressed for 2 seconds the selection screen disappears 2 Tak...

Страница 64: ... 0 ft to a subject while the zoom lever is pressed to the maximum T position You can fill the entire frame with a very small subject As the center of the frame within the AF target mark is metered and optimal exposure is obtained when is set the picture turns out well Selecting the metering area P 62 Normal shooting Macro mode shooting Available modes P 1 800 F2 8 HQ 2816x2112 2816x2112 0 0 Macro ...

Страница 65: ... to the maximum W position Available modes 1 In the top menu select MODE MENU T CAMERA T T ON and press How to use the menus P 28 Press again to exit the menu 2 Take a picture while observing your subject on the monitor In the mode the flash is set to the off mode When taking pictures close to the subject shadows may become noticeable and the auto focus may not be able to maintain correct focus No...

Страница 66: ...starts blinking After blinking for approximately 2 seconds the picture is taken Movie recording starts approximately 12 seconds after pressing the shutter button To stop recording press the shutter button fully again To stop the self timer press The self timer remote control lamp will turn off This function is useful for taking pictures where you want to be included in the photograph Available mod...

Страница 67: ...ress the shutter button on the remote control The camera s self timer remote control lamp blinks for about 2 seconds before taking the picture The remote control mode is not canceled automatically after shooting Perform step 1 Set to OFF Shooting is possible using the remote control This is useful when you want to take a picture with yourself in it or a night scene without touching the camera Avai...

Страница 68: ...tton again on the remote control TThe battery in the remote control device is running low Replace with a new battery How to replace the battery CR2025 of the remote control device P 162 If the remote control receiver is exposed to strong light such as direct sunlight shooting may not take place even if the remote control is within the effective signal distance To shoot sequential shots using the r...

Страница 69: ...ce until you release the button Available modes Shutter button There are 3 sequential shooting modes sequential shooting AF sequential shooting and auto bracketing BKT Drive mode Shoots 1 frame Shoots a maximum number of 3 frames in the HQ mode sequentially at approximately 1 frame sec Focus exposure and white balance are locked at the first frame Shoots pictures sequentially Adjusts the focus 1 f...

Страница 70: ... 0 3 x3 x5 1 0 Available modes Auto bracketing Shooting pictures sequentially with a different exposure for each frame BKT Under some conditions you may obtain better results shooting with exposure compensation than by using the exposure setting considered optimal by the camera During auto bracketing exposure is changed for each frame The exposure differential and number of frames can be selected ...

Страница 71: ...e to autoflash If sequential shooting is attempted when the flash mode is set to slow synchronization with red eye reduction the flash mode will change to slow synchronization During auto bracketing BKT the flash is set to the off mode Sequential shooting BKT is not available when the record mode is set to TIFF If there is not enough space available on the card for the number of frames you have se...

Страница 72: ...verlap then take your pictures Focus exposure and white balance are set by the first picture Do not select an extremely bright subject such as the sun for the first picture You cannot adjust the zoom after the first picture Panorama shooting is possible for up to 10 pictures You can take advantage of panorama shooting with an Olympus xD Picture Card Panorama shooting lets you connect images with o...

Страница 73: ...or the right edge if you are connecting pictures from right to left Shutter button Shutter button If is set to A S or M panorama shooting is not available During panorama shooting the flash and sequential shooting are not available If you take 10 pictures a warning screen appears and no more pictures can be taken Panorama shooting is only available using cards with panorama function The camera its...

Страница 74: ...IN 1 picture mode is set The monitor turns on automatically 2 Take the first shot The subject will be on the left in the combined image To cancel the two in one picture mode after taking the first shot press The first shot will not be stored 3 Take the second shot in succession The subject will be on the right in the combined image 2 IN 1 Playback of two in one picture P 1 800 F2 8 0 0 HQ 2816x211...

Страница 75: ...cial effects to pictures During two in one 2 IN 1 shooting the following functions are not available Panorama shooting Sequential shooting AF sequential shooting Auto bracketing BKT recording sound with pictures histogram display When taking two in one 2 IN 1 pictures in the TIFF record mode the pictures are saved with the same resolution in the JPEG format If the camera enters the sleep mode afte...

Страница 76: ... record sound when taking a still picture Recording starts about 0 5 seconds after the shutter is released and lasts about 4 seconds When is set to ON sound is recorded automatically every time you take a picture Available modes Shutter button Microphone TIPS appears on all still pictures and movies that have recorded sound During playback sound is output from the speaker The volume can be adjuste...

Страница 77: ...ake another picture during sound recording Sound recording is not possible in the following cases When the record mode is set to TIFF during sequential shooting BKT Panorama shooting two in one picture shooting Sound recording may also pick up camera noises such as button operations shutter movement etc If memory space is insufficient on the card recording sound may not be possible Note ...

Страница 78: ...nu 2 Recording starts at the same time as shooting Sound can be recorded while shooting a movie Available modes Microphone Zoom cannot be used during movie recording If is set to OFF you can use the digital zoom during movie recording If the camera is more than 1 m 3 3 ft away from the source of the sound sound may not be recorded clearly Note ...

Страница 79: ...ousing and press How to use the menus P 28 Press again to exit the menu The appropriate setting must be made in the MODE MENU when an optional underwater housing is attached to the camera Available modes Focusing may take some time when the underwater housing is attached to the camera In the mode FULLTIME AF is canceled Note ...

Страница 80: ...umber of pixels horizontal x vertical used when saving an image If the image will be printed higher resolutions larger numbers are recommended so that the image will be clearer However higher resolutions make the file size amount of data larger so the number of pictures that can be saved will be fewer Compression In record modes other than TIFF image data are compressed The higher the compression ...

Страница 81: ... 3 Approx 9 5 1600 x 1200 5 Approx 5 8 1280 x 960 8 Approx 3 7 1024 x 768 13 Approx 2 4 640 x 480 34 Approx 0 9 SHQ 2816 x 2112 JPEG Approx 4 4 HQ 2816 x 2112 7 7 21 21 8 8 26 25 Approx 1 5 Approx 3 7 Approx 1 2 SQ1 2272 x 1704 2560 x 1920 11 11 Approx 2 9 HIGH NORMAL HIGH NORMAL HIGH NORMAL HIGH NORMAL HIGH NORMAL HIGH NORMAL HIGH NORMAL 32 33 Approx 1 0 2048 x 1536 13 13 Approx 2 3 39 40 Approx ...

Страница 82: ...112 0 0 Movie record modes Movie data is stored until the card is full Remaining recording time on the card that you are using is displayed in the movie mode Record mode Resolution HQ 320 x240 15 frames sec SQ 160 x120 15 frames sec Record mode Available modes Selecting still picture record modes Number of remaining pictures listed in the table is approximate The number of remaining pictures may c...

Страница 83: ...xit the menu Selecting movie record modes 1 In the top menu select MODE MENU T PICTURE T T HQ or SQ Press How to use the menus P 28 Press again to exit the menu Available modes TIFF TIFF 2560x1920 2816x2112 2272x1704 2048x1536 CANCEL SELECT GO SQ1 SQ1 2560x1920 2560x1920 2272x1704 2272x1704 2048x1536 2048x1536 1600x1200 CANCEL CANCEL SELECT GO GO HIGH NORMAL SQ2 SQ2 1280x960 1024x768 640x480 CANCE...

Страница 84: ...ot clear sharp images in 400 daylight With a higher ISO setting you can shoot in dark places 1 In the top menu select MODE MENU T CAMERA T ISO then press to choose the most suitable ISO sensitivity and press How to use the menus P 28 Press again to exit the menu Available modes Modes ISO AUTO 64 100 200 400 Modes ISO Sensitivity A S M Higher ISO settings produce more electrical noise When ISO is s...

Страница 85: ...Factory default setting 2 0 Adjusts towards images become brighter Adjusts towards images become darker Available modes 1 Press to compensate the exposure TIPS Often bright subjects such as snow will turn out darker than their natural colors Adjusting toward makes these subjects closer to their real shades For the same reason adjust toward when shooting dark subjects If the flash is used the image...

Страница 86: ...RE T WB Press 2 Press to select the best WB for your shooting conditions Press How to use the menu P 28 Press again to exit the menu Available modes AUTO The white balance is adjusted automatically so that No indication colors look natural irrespective of the light source Sunlight For natural colors under a clear sky Overcast For natural colors under a cloudy sky Tungsten For natural colors under ...

Страница 87: ...mage contours are softened Use this setting when you want to edit images on a PC When you have finished setting the sharpness press Press again to exit the menu Adjusts towards Adjusts towards If you adjust the sharpness too far towards noise may become noticeable in the picture Note Set white balance to AUTO for normal shooting White balance may not be effective under certain light sources After ...

Страница 88: ... T PICTURE T CONTRAST and press How to use the menus P 28 2 Press to adjust the contrast between 2 and 2 To increase the contrast The light and dark areas are defined more clearly making the image look crisper To reduce the contrast The light and dark areas become less defined giving the image a softer impression Use this setting when you want to edit images on a PC When you have finished setting ...

Страница 89: ...he top menu select MODE MENU T CAMERA T NOISE REDUCTION T ON and press How to use the menus P 28 Press again to exit the menu The purpose of these pictures is to illustrate the effects of noise reduction They are not actual pictures When the mode is set NOISE REDUCTION is fixed to ON When NOISE REDUCTION is set to ON the camera implements noise reducing processes after each shot For this reason sh...

Страница 90: ... displayed on movies P 94 3 Press to cancel playback The monitor and camera turn off If you start playback while in the shooting mode in step 1 pressing again resumes the shooting mode Pressing the shutter button halfway also resumes the shooting mode Displays the next picture Jumps to the picture 10 frames back Jumps to the picture 10 frames ahead Displays the previous picture Arrow pad button Sh...

Страница 91: ... picture is displayed moves the picture in the corresponding direction 90 Viewing still pictures 6 Playback If slideshow is attempted during close up playback close up playback is canceled You cannot save the enlarged image Note Close up playback Pictures displayed on the monitor can be enlarged 1 5 2 2 5 3 3 5 or 4 times Arrow pad Zoom lever 2 5x 2 5x 3 5x 3 5x 4 0x 4 0x Pushing the zoom lever to...

Страница 92: ...lever toward during single frame playback Pictures appear in the index display Pressing the arrow pad selects a frame during index display Moves to the previous frame Moves to the next frame Jumps to the previous index display the frames preceding the top left frame Jumps to the next index display the frames following the bottom right frame 1 4 7 2 5 8 9 3 6 1 In the top menu select MODE MENU T SE...

Страница 93: ...to stop the slideshow The slideshow will not stop until you cancel it by pressing Slideshow This function displays still pictures stored in the card one after another Only the first frame of a movie is played back You are recommended to use the optional AC adapter when running a slideshow for a long period of time If a battery is used the camera will stop the slideshow after about 30 minutes and t...

Страница 94: ...play the picture you want to rotate Pictures with cannot be rotated 2 In the top menu select MODE MENU T PLAY T and press How to use the menus P 28 3 Press to select 90 or 90 and press The rotated image is saved Press again to exit the menu New picture orientations are saved even when the power is turned off Protected pictures cannot be rotated P 100 Note 100 0024 HQ 04 12 23 21 56 24 100 0024 HQ ...

Страница 95: ... playback When movie playback ends the display automatically returns to the beginning of the movie You can fast forward reverse during playback Fast forward Each press of the button changes the speed in the following sequence x2 T x20 T x1 Fast reverse Each press of the button changes the speed in the following sequence x2 T x20 T x1 This function lets you play back or edit movies MOVIE PLAYBACK I...

Страница 96: ...ovie Every time you press the button the next frame appears The movie can be displayed continuously by holding the button down Every time you press the button the previous frame appears The movie can be displayed continuously in reverse by holding the button down Displays the MOVIE PLAYBACK screen PLAYBACK FRAME BY FRAME FRAME BY FRAME EXIT MOVIE PLAYBACK While the card access lamp blinks the came...

Страница 97: ... PLAYBACK INDEX MOVIE PLAY CANCEL SELECT GO Record mode when the movie is shot Record mode when stored as an index HQ SQ2 1024 x 768 SQ SQ2 640 x 480 INDEX Creating an index Movies can be displayed as indexes of 9 still frames Indexes can be saved on the card as still pictures Indexes are not stored in the same record mode as movies see below The interval between automatically selected frames vari...

Страница 98: ...able A V OUT jack MONO Connect to the TV s video input yellow and audio input white terminals TIPS The close up playback index display slideshow and other playback functions can also be used on a TV screen You are recommended to use the optional AC adapter when using the camera with a TV Make sure that the camera s video output signal type is the same as the TV s video signal type VIDEO OUT Select...

Страница 99: ...ound that has already been recorded Total recording time per picture is approximately 4 seconds START SET PLAY EDIT EDIT CARD To obtain the optimum sound the microphone should be placed no farther than 1 m 3 3 ft away from the subject If you re record the sound the original sound is erased You may not be able to record sound when there is insufficient card memory the CARD FULL message is displayed...

Страница 100: ... top menu select MODE MENU T EDIT T How to use the menus P 28 The screen appears 3 Press to select the file size and press A bar is displayed to show editing progress and the screen returns to normal display To cancel resizing select CANCEL and press 640x480 320x240 CANCEL EXIT SELECT GO In the following cases EDIT is not available The card does not have enough memory Movie mode Pictures recorded ...

Страница 101: ...re To cancel protection press again Protect mark HQ It is highly recommended that you protect important pictures to avoid accidentally erasing them Protected pictures cannot be erased by the single frame all frame erase function button Protected pictures cannot be deleted with the single frame all frame erase functions but they can be deleted with the FORMAT function Note ...

Страница 102: ...d You can select either single frame erase or all frame erase Notes You cannot erase pictures that are protected Cancel protection before erasing such pictures Once erased pictures cannot be restored Check each picture before erasing to avoid accidentally erasing pictures you want to keep Protecting pictures P 100 ERASE YES NO SELECT GO button Single frame erase This function only erases the pictu...

Страница 103: ...ress to select ALL ERASE then press 3 Press to select YES then press The BUSY bar is displayed to show the progress of erasing and all the pictures are erased EXIT SELECT GO ALL ERASE CARD SETUP FORMAT All frame erase This function erases all still pictures and movies on the card ALL ERASE SELECT GO YES NO CAUTION ERASING ALL ...

Страница 104: ...ned to the factory default settings after the power is turned off Ex When ALL RESET is set to ON even if you change the record mode setting to SQ1 it will return to HQ factory default setting next time the camera is turned on OFF The settings made before the power is turned off are saved 1 In the top menu select MODE MENU T SETUP T ALL RESET T ON or OFF and press How to use the menus P 28 Press ag...

Страница 105: ...MODE 1 AUTO 2 P 53 1 OFF P 62 63 OFF P 65 66 DRIVE P 68 ISO AUTO P 83 0 P 57 NOISE REDUCTION OFF P 88 DIGITAL ZOOM 1 OFF P 52 FULLTIME AF OFF P 61 ACCESSORY OFF P 78 OFF P 64 still pictures OFF P 75 movies ON P 77 FUNCTION OFF P 74 INFO OFF P 111 OFF P 113 HQ P 79 WB AUTO P 85 SHARPNESS 0 P 86 CONTRAST 0 P 87 1 Even when ALL RESET is set to OFF settings may not be saved depending on the shooting m...

Страница 106: ...n you want to go quickly to frequently used functions Default setting A B MODE MENU MONITOR OFF Available menu Ref page functions SCENE P 36 P 65 66 DRIVE P 68 ISO P 83 P 57 NOISE P 88 REDUCTION DIGITAL ZOOM P 52 FULLTIME AF P 61 ACCESSORY P 78 still pictures P 75 Available menu Ref page functions P 64 PANORAMA P 71 2 IN 1 P 73 FUNCTION P 74 INFO P 111 P 113 P 79 WB P 85 SHARPNESS P 86 CONTRAST P ...

Страница 107: ...3 Press to select the function you want to register then press The function is registered in the shortcut menu Press again to exit the menu Available modes A B MODE MENU MONITOR OFF SHORT CUT A B SELECT SELECT GO SHORT CUT A B SELECT SELECT GO ISO DRIVE SCENE Registering functions to the shortcut menus Assign functions to the A and B positions on the top menu ...

Страница 108: ...s this button Pressing takes you directly to the SCENE screen 1 Press to display the top menu The function you have registered in the shortcut menu appears on the top menu 2 Press or to select the function The monitor jumps directly to the setting screen for that menu function Available modes You cannot assign different functions to the shortcut menus for each mode Note ...

Страница 109: ...TO P 53 OFF P 62 63 OFF P 65 66 DRIVE P 68 ISO AUTO P 83 0 0 P 57 NOISE OFF P 88 REDUCTION Factory Ref Functions default page settings DIGITAL ZOOM OFF P 52 FULLTIME AF OFF P 61 ACCESSORY OFF P 78 still OFF P 75 pictures OFF P 64 FUNCTION OFF P 74 INFO OFF P 111 OFF P 113 HQ P 79 WB AUTO P 85 SHARPNESS 0 P 86 CONTRAST 0 P 87 This lets you customize function settings for shooting and register them ...

Страница 110: ... use the menus P 28 2 Press to select an item you want to set then press CURRENT Registers the current camera settings RESET Restores the factory default settings CUSTOM Registers settings one by one Available modes SETUP CAM CARD PIC SLEEP SHUTTER SOUND SHUTTER SOUND CURRENT CURRENT RESET RESET CUSTOM CUSTOM MYMODESETUP FILE NAME PIXELMAPPING PIXELMAPPING ...

Страница 111: ...or MY MODE SETUP and factory default settings P 108 Press to change the setting then press The setting is saved You can also change the other CUSTOM settings 4 When you have made all the settings you want press The screen displayed in Step 2 appears Press again to exit the menu F 2 8 CUSTOM P A S M FNo SHUTTER MONITOR 1 500 F 2 8 M OFF CUSTOM P A S M FNo SHUTTER MONITOR MY MODE SETUP MY MODE SETUP...

Страница 112: ... around 3 seconds after you have made the function settings Press again to display the menu This function lets you display detailed shooting information on the monitor for 3 seconds For details on the information displayed refer to Monitor indications P 10 Available modes P 1 800 F2 8 0 3 HQ 2816x2112 2816x2112 When INFO is ON When INFO is OFF Example Indications during shooting for still pictures...

Страница 113: ... during still picture playback 1 Press in the top menu to display the full amount of shooting information on the monitor ON To turn INFO off press again to bring up the top menu and press OFF Available modes If the picture has been taken with a different camera not all the information may be displayed even when INFO is set to ON If is set to ON the histogram is displayed regardless of whether INFO...

Страница 114: ... Checking the histogram during shooting enables more precise exposure control During playback you can check the brightness and contrast of recorded pictures The histogram display can be set separately for shooting mode and playback mode When the image is bright When the image is dark If the peak fills too much of the right frame the image will appear mostly white If the peak fills too much of the ...

Страница 115: ... to use the menus P 28 Press again to exit the menu Available modes The histogram is not displayed in the following situations even if histogram display is set to ON In the M mode during panorama shooting during two in one 2 IN 1 shooting You can turn the histogram on and off during exposure compensation Exposure compensation P 84 The histogram displayed during shooting may differ from that displa...

Страница 116: ...tion lets you format a card Formatting prepares cards to receive data Olympus CAMEDIA brand cards are highly recommended for use with this camera If you are going to use non OLYMPUS cards or cards formatted by other devices such as a computer you must format them with the camera before use All data stored on the card including protected pictures is erased when the card is formatted When formatting...

Страница 117: ...gress of formatting Do not perform any of the following actions during formatting as they may render the card unusable Open the battery card compartment cover remove the battery connect or disconnect the AC adapter regardless of whether or not the battery is loaded in the camera Note FORMA FORMAT YES NO CAUTION ERASING ALL CAUTION ERASING ALL ...

Страница 118: ...you have set the desired level press Pressing brightens the monitor and pressing darkens it Press again to exit the menu Available modes ADJUST GO 1 In the top menu select MODE MENU T SETUP T T OFF LOW or HIGH Press How to use the menus P 28 Press again to exit the menu You can select the volume of the beep sound used for warnings from OFF LOW or HIGH You can turn the sound off completely by setti...

Страница 119: ...ry default settings are 1 for the kind of sound and LOW for the volume Select OFF when you want to turn the sound off completely 1 In the top menu select MODE MENU T SETUP T SHUTTER SOUND and press How to use the menus P 28 2 Select 1 or 2 and press Then select LOW or HIGH and press To turn the sound off completely select OFF and press Press repeatedly until the menu disappears Available modes 1 2...

Страница 120: ...E and press How to use the menus P 28 2 Press to select the volume level then press Press again to exit the menu You can adjust the volume when playing back a still picture with sound or a movie You can select the volume from LOW or HIGH Select OFF when you want to turn the sound off completely Available modes ...

Страница 121: ...28 2 Press to select SCREEN then press Press to select OFF or ON then press OFF No picture is displayed ON The picture is displayed 3 Press to select VOLUME then press Press to select OFF LOW or HIGH then press To turn off the sound completely select OFF When you have made all the settings you want press Press repeatedly until the menu disappears Available modes PW ON ON OFF OFF SETUP SELECT SELEC...

Страница 122: ...l for making a brief check of the picture you have just taken You can release the shutter during REC VIEW OFF The picture being recorded to the card is not displayed This is useful when you want to compose your next shot using the monitor while the previous picture is being recorded 1 In the top menu select MODE MENU T SETUP T REC VIEW T OFF or ON and press How to use the menus P 28 Press again to...

Страница 123: ...turns off if the camera is left in playback mode for about 3 minutes Note You can select NTSC or PAL according to your TV s video signal type Select the video signal type before connecting the AV cable If you use the wrong video signal type you will not be able to play back the recorded pictures properly on your TV 1 In the top menu select MODE MENU T SETUP T VIDEO OUT T NTSC or PAL and press How ...

Страница 124: ...ings AUTO Even when a new card is inserted the folder numbers are retained from the previous card If the new card contains an image file whose file number coincides with one saved on the previous card the new card s file numbers start at the number following the highest number on the previous card RESET When a new card is inserted folder numbers start at 100 and file numbers start at 0001 If a car...

Страница 125: ...fter using the monitor or taking continuous shots wait for at least one minute before using the PIXEL MAPPING function to ensure that it operates correctly 1 In the top menu select MODE MENU T SETUP T PIXEL MAPPING and press How to use the menus P 28 START appears 2 Press The BUSY bar is displayed during PIXEL MAPPING When PIXEL MAPPING is finished press to exit the menu Available modes If you acc...

Страница 126: ... information from digital cameras You can print out pictures automatically at home or in a print shop by storing such data as which pictures you wish to print and the number of prints on a card Pictures taken with print reservation can be printed using the following procedures Printing using a DPOF compatible print shop You can print the pictures using the print reservation data Printing using a D...

Страница 127: ...changed by this camera Make changes using the original device If a card contains DPOF reservations set by another device entering reservations using this camera may overwrite the previous reservations If there is not enough space in the card memory CARD FULL will be displayed and you may not be able to enter the reservation data You can make DPOF print reservations for up to 999 images per card Ev...

Страница 128: ...d on the card the PRINT ORDER SETTING screen appears You can then reset the data or keep it If RESET is selected all print reserve data is canceled 3 Press to select or Press Performs print reservation for only selected pictures and sets the number of prints and date time Go to step 4 Performs print reservation for all the pictures stored on the card and sets date time makes one print for each fra...

Страница 129: ...oting date TIME Prints the frame together with the shooting time 6 Check the number of print reservation frames the total number of prints and date time printing data Press to select SET and press CANCEL clears all print reserve data 7 Press to finish print reservation Increases the number 100 0018 HQ 04 07 01 12 30 18 2 GO SELECT Decreases the number To apply print reservation for other frames pr...

Страница 130: ...d printers made by different manufacturers and enables direct printing STANDARD All printers that support PictBridge have standard print settings By selecting STANDARD on the settings screens P 132 to 139 you can print images according to these settings For details on your printer s standard settings refer to the printer s instruction manual or contact the printer manufacturer TIPS For details of ...

Страница 131: ... selection screen for the USB connection is displayed 3 Press to select PRINT then press ONE MOMENT is displayed and the camera and printer are connected The PRINT MODE SELECT screen is displayed on the monitor Make the print settings on the camera s monitor Go to Printing pictures P 131 Use the USB cable provided to connect the camera to a PictBridge compatible printer P C PRINT EXIT USB If PC is...

Страница 132: ...cture in multiple layout format PRINT mode MULTI PRINT mode P 133 ALL INDEX Prints an index of all the pictures stored on the card ALL INDEX mode PRINT ORDER mode P 139 PRINT ORDER Prints the pictures according to the print reservation data on the card If no print reservations P 125 have been made this option is not available ALL INDEX mode PRINT ORDER mode P 139 EXIT SELECT GO PRINT MODE SELECT P...

Страница 133: ... the PRINT PAPER screen is not displayed SIZE BORDERLESS and PICS SHEET are set to STANDARD Go to step 4 3 Use to select framed or unframed then press Go to step 5 OFF The image is printed inside a blank frame ON The image is printed filling the entire page 4 Press to select the picture you want to print Press The PRINT screen is displayed Zoom lever SIZE SIZE BORDERLESS STANDARD ST STANDARD ANDAR...

Страница 134: ... 4 When the PRINT PAPER screen is not displayed SIZE BORDERLESS and PICS SHEET are set to STANDARD Go to step 5 Zoom lever 5 Press to select OK then press Printing starts If you select CANCEL and press the monitor returns to the PRINT MODE SELECT screen When printing is finished the monitor returns to the screen in step 4 Repeat steps 4 and 5 to continue printing PRINT OK CANCEL CANCEL SELECT GO S...

Страница 135: ...nt Push the zoom lever toward W to display the pictures in index format You can then select the pictures you want to print from the index 6 Select the print reservation method SINGLE PRINT Makes a single frame print reservation for the selected picture according to standard settings MORE Sets the number of prints of the selected picture in the print reservation data You can also add the date or fi...

Страница 136: ... want to set then press Press to select the item then press x Sets the number of prints You can select up to 10 prints DATE If you select WITH pictures are printed with the date and time FILE NAME If you select WITH pictures are printed with the file name DATE and FILE NAME are not available in MULTI PRINT mode Print resevation mark is displayed FILE 100 0018 SELECT PRINT MORE CANCEL PRINT INFO DA...

Страница 137: ... to select OK or CANCEL then press OK Printing starts CANCEL The settings are canceled and the monitor returns to the PRINT MODE SELECT screen When printing is finished the monitor returns to the PRINT MODE SELECT screen Exiting direct printing P 141 To cancel printing Pressing during print data transfer displays the screen for selecting whether to continue or cancel printing To cancel printing pr...

Страница 138: ...and BORDERLESS are set to STANDARD Go to Step 4 3 Use to select framed or unframed then press OFF The image is printed inside a blank frame ON The image is printed filling the entire page The PRINT INFO screen is displayed EXIT SELECT GO PRINT MODE SELECT PRINT MODE SELECT PRINT ALL PRINT MULTI PRINT ALL INDEX SIZE SIZE BORDERLESS STANDARD ST STANDARD ANDARD PRINT PAPER CANCEL CANCEL SELECT SELECT...

Страница 139: ...int the pictures Press to select OK or CANCEL then press OK Printing starts CANCEL The settings are canceled and the monitor returns to the PRINT MODE SELECT screen When printing is finished the monitor returns to the PRINT MODE SELECT screen Exiting direct printing P 141 To cancel printing Pressing during print data transfer displays the screen for selecting whether to continue or cancel printing...

Страница 140: ...o STANDARD printer s factory default setting Go to Step 4 3 Use to select framed or unframed then press OFF The image is printed inside a blank frame ON The image is printed filling the entire page The print screen is displayed BORDERLESS is not available in ALL INDEX mode Press and go to Step 4 EXIT SELECT GO PRINT MODE SELECT PRINT MODE SELECT PRINT ALL PRINT MULTI PRINT ALL INDEX SIZE SIZE BORD...

Страница 141: ...LECT screen When printing is finished the monitor returns to the PRINT MODE SELECT screen Exiting direct printing P 141 To cancel printing Pressing during print data transfer displays the screen for selecting whether to continue or cancel printing To cancel printing press to select CANCEL then press PRINT OK CANCEL CANCEL SELECT GO TRANSFERRING TRANSFERRING CANCEL During data transfer PRINT CONTIN...

Страница 142: ...he message is displayed 2 Remove the USB cable from the camera The camera turns off 3 Remove the USB cable from the printer When you have finished printing disconnect the camera from the printer EXIT SELECT GO PRINT MODE SELECT PRINT MODE SELECT PRINT ALL PRINT MULTI PRINT ALL INDEX REMOVE USB CABLE ...

Страница 143: ... the printer Replace the ink cartridge in the printer Remove the jammed paper Do not manipulate the printer while making settings on the camera Turn off the camera and printer then turn them on again Possible cause The camera is not connected to the printer correctly There is no paper in the printer The printer has run out of ink The paper is jammed The printer s paper cassette has been removed or...

Страница 144: ...itor indication NO CARD CARD ERROR WRITE PROTECT CARD FULL NO PICTURE Corrective action Insert a card or insert a different card If the problem persists format the card If the card cannot be formatted it cannot be used Use a different card Insert a new card The recorded image has been protected read only on a PC Download the image to a PC and cancel the read only setting Replace the card or erase ...

Страница 145: ...is used or when it is left with the battery removed for a long time the default date and time setting are restored Monitor indication PICTURE ERROR CARD COVER OPEN Y M D Corrective action Use image processing software to view the picture on a PC If that cannot be done the image file is damaged Close the battery card compartment cover Format the card All data on the card is deleted Set the date and...

Страница 146: ...the shutter button or the zoom lever The camera will not operate while it is connected to a PC or printer P 21 P 16 P 22 The lens barrier is closed The battery is exhausted The flash has not finished charging The card is full The battery ran out of power during shooting or while the images were being written to the card The monitor turned off The memory gauge on the monitor is full Open the lens b...

Страница 147: ...in the viewfinder The brightness is not adjusted properly The monitor is exposed to direct sunlight Vertical lines appear on the monitor screen during shooting The date time is not set The camera has been left with the battery removed ALL RESET is set to ON P 143 P 117 P 24 P 24 P 103 Refer to Error codes Wait until the camera dries before turning it on again Select in the MODE MENU and adjust the...

Страница 148: ...ff remain unchanged Turn on the monitor and turn off the power Select a flash mode other than flash off If you want the flash to fire on a brightly illuminated subject set the flash to fill in mode If the flash is set to the red eye reduction or Slow synchronization with red eye reduction SLOW the flash does not fire in the BKT mode Set DRIVE to any mode other than BKT The flash does not fire in t...

Страница 149: ... The remaining battery power is not indicated correctly The battery is exhausted P 64 P 71 P 13 16 P 16 The flash does not fire in the super macro mode Set to OFF The flash does not fire in the panorama mode Cancel the panorama mode Battery performance deteriorates in low temperatures Keep the camera warm by putting it inside your coat or clothing When battery consumption fluctuates greatly the ca...

Страница 150: ...is left dirty Press the shutter button while looking into the viewfinder not while standing in front of the camera Select a flash mode other than fill in flash If the center of the subject is too dark the surrounding area emerges as too bright Adjust the exposure compensation toward minus Set the ISO to AUTO or to a low sensitivity 64 P 46 P 39 P 55 P 161 P 65 P 55 P 84 P 83 A subject unsuited to ...

Страница 151: ...l Set DRIVE to in the MODE MENU If the center of the subject is too bright the image as a whole emerges darker Adjust the exposure compensation toward plus Decrease the aperture value or set the camera to the P mode Decrease the shutter speed or set the camera to the P mode P 58 P 59 P 39 P 55 P 55 P 55 62 P 68 P 84 P 58 P 59 The aperture value is small in the A M mode The shutter speed setting is...

Страница 152: ...ht at night reflection of metal in direct sunlight etc Set the white balance according to the lighting Include something white in the picture or shoot using the fill in flash mode Adjust the white balance according to the light source Hold the camera correctly keeping your fingers and the strap away from the lens Process the picture using a graphics application Photoshop Paint Shop Pro etc For exa...

Страница 153: ...al setting is incorrect The brightness is not adjusted properly The monitor is exposed to direct sunlight Press the playback button Close the lens barrier and press the playback button NO PICTURE appears on the monitor Record pictures Refer to Error codes The monitor does not function when the AV cable is connected to the camera Display pictures with and press the protect button to cancel protecti...

Страница 154: ... USB cable The printer does not support PictBridge It is necessary to install the USB driver for Windows 98 98SE For how to install see DIGITAL CAMERA PC CONNECTION OPERATION MANUAL on the CD ROM Disconnect the USB cable from the camera and start again from the beginning Refer to the printer s instruction manual or contact the manufacturer P 130 Possible cause Corrective action Ref Page The camera...

Страница 155: ... BKT 0 3 0 7 x3 1 0 x5 ISO AUTO 3 P 83 64 4 100 200 400 2 0 0 2 P 57 NOISE OFF P 88 REDUCTION 5 ON DIGITAL ZOOM 6 OFF P 52 ON FULLTIME AF OFF P 61 ON ACCESSORY OFF P 78 OFF P 75 ON 6 OFF P 64 ON PANORAMA 7 P 71 2 IN 1 P 73 FUNCTION OFF P 74 BLACK WHITE SEPIA INFO OFF P 111 ON To the next page P A S M mode Factory default setting ...

Страница 156: ...048x1536 1600x1200 1280x960 1024x768 640x480 SHQ HQ SQ1 2560x1920 2272x1704 2048x1536 1600x1200 HIGH SQ2 1280x960 NORMAL 1024x768 640x480 WB AUTO P 85 SHARPNESS 2 0 2 P 86 CONTRAST 2 0 2 P 87 CARD CARD SETUP YES P 115 NO SETUP ALL RESET ON P 103 OFF ENGLISH P 26 FRANCAIS DEUTSCH ESPAÑOL ITALIANO PORTUGUES PW ON OFF SCREEN OFF P 120 SETUP ON VOLUME OFF LOW HIGH To the next page ...

Страница 157: ...6 using the SHORT CUT setting P 79 MONITOR OFF MONITOR ON P 45 1 Not available in the modes other than the mode 2 Not available in the mode 3 The factory default setting is set to AUTO in the P mode 4 The factory default setting is set to 64 in the A S M mode 5 Not available in the modes other than the P A S M mode May not be available depending on the shooting mode P A S or M registered in the mo...

Страница 158: ...79 HQ SQ1 SQ2 P 24 CARD SETUP YES P 115 NO mode mode Top menu Tab Function Setting Ref page MODE MENU CAMERA OFF P 65 66 ISO AUTO P 83 64 100 200 400 DIGITAL ZOOM OFF P 52 ON ACCESSORY OFF P 78 OFF P 64 ON FUNCTION OFF P 74 BLACK WHITE SEPIA To the next page Factory default setting ...

Страница 159: ...ARD CARD SETUP YES P 115 NO SETUP ALL RESET ON P 103 OFF ENGLISH P 26 FRANCAIS DEUTSCH ESPAÑOL ITALIANO PORTUGUES PW ON OFF SCREEN OFF P 120 SETUP ON VOLUME OFF LOW HIGH OFF P 117 LOW HIGH FILE NAME RESET P 123 AUTO PIXEL MAPPING P 124 P 117 P 24 VIDEO OUT NTSC P 122 PAL OFF P 77 ON WB AUTO P 85 MONITOR OFF MONITOR ON P 45 Factory default setting ...

Страница 160: ...0 P 125 P 98 EDIT 640x480 P 99 320x240 CANCEL CARD CARD SETUP ALL ERASE P 102 FORMAT P 115 SETUP ALL RESET ON P 103 OFF ENGLISH P 26 FRANCAIS DEUTSCH ESPAÑOL ITALIANO PORTUGUES PW ON OFF SCREEN OFF P 120 SETUP ON VOLUME OFF LOW HIGH OFF P 117 LOW HIGH VOLUME OFF P 119 LOW HIGH P 117 P 24 VIDEO OUT NTSC P 122 PAL 4 P 91 9 16 P 92 INFO P 112 P 113 ...

Страница 161: ...RD CARD SETUP ALL ERASE P 102 FORMAT P 115 SETUP ALL RESET ON P 103 OFF ENGLISH P 26 FRANCAIS DEUTSCH ESPAÑOL ITALIANO PORTUGUES PW ON OFF SCREEN OFF P 120 SETUP ON VOLUME OFF LOW HIGH OFF P 117 LOW HIGH VOLUME OFF P 119 LOW HIGH P 117 P 24 VIDEO OUT NTSC P 122 PAL 4 P 91 9 16 MOVIE PLAY MOVIE PLAYBACK P 94 INDEX INFO P 112 ...

Страница 162: ...nd viewfinder T Wipe gently with a soft cloth Lens T Blow dust off the lens with a commercially available blower then wipe gently with a lens cleaner Card T Wipe gently with a soft dry cloth Storage When storing the camera for extended periods remove the battery and the card and keep in a cool dry place that is well ventilated Replace the battery periodically and test camera functions Do not use s...

Страница 163: ... remove the cover Remove the old battery and insert a new battery CR2025 with the battery facing up as shown 3 Replace the cover turn the remote control device over and turn the screw on the bottom clockwise to tighten Do not apply excessive force to the remote control device Never heat the remote control device or dispose of it in fire The working temperature range for the remote control device i...

Страница 164: ...Q2 1024 x 768 pixels TIFF SQ2 640 x 480 pixels TIFF SQ2 No of storable pictures Approx 1 frame TIFF 2816x2112 When a 32 MB card is Approx 7 frames SHQ 2816x2112 used Without sound Approx 21 frames HQ 2816x2112 Approx 66 frames SQ1 1600x1200 NORMAL Approx 398 frames SQ2 640x480 NORMAL No of effective pixels 6 070 000 pixels Image pickup device 1 1 76 CCD solid state image pickup 6 370 000 gross Len...

Страница 165: ...C IN jack USB connector mini B A V OUT jack Automatic calendar 2000 up to 2099 system Operating environment Temperature 0 C to 40 C 32 F to104 F operation 20 C to 60 C 4 F to 140 F storage Humidity 30 to 90 operation 10 to 90 storage Power supply Only an Olympus LI 10B 12B lithium ion battery AC adapter specified by Olympus optional Dimensions 99 5 mm x 58 5 mm x 41 5 mm W X H X D 3 9 x 2 3 x 1 6 ...

Страница 166: ... the background The smaller the aperture the greater the depth of field and the sharper the background Larger aperture values indicate smaller apertures and smaller aperture values indicate larger apertures Backlight A light source to illuminate the monitor from behind the screen CCD Charge Coupled Device This converts light passing through the lens into electrical signals With this camera light i...

Страница 167: ... ISO settings Exposure The amount of light used to capture an image The exposure is determined by the time the shutter is open shutter speed and the amount of light that passes through the lens aperture ISO A method for indicating film speed by the International Organization for Standardization ISO e g ISO100 Higher ISO values indicate greater sensitivity to light so images can be exposed even in ...

Страница 168: ...ter Priority Mode Also called Shutter Priority AE mode The user selects the shutter speed and the camera automatically varies the aperture so that the picture is taken with the best exposure Sleep Mode A mode designed to save battery life The camera automatically enters the sleep mode if you do not operate it for a certain time To get out of the sleep mode use any button on the camera shutter butt...

Страница 169: ...53 AV cable 97 B Battery 16 Battery check 13 Battery card compartment cover 9 18 Beep 117 BKT 69 BLACK WHITE 74 C CARD 17 CARD SETUP 102 115 Card access lamp 9 40 41 Center weighted metering 62 Charger 16 Close up playback 90 Connector cover 9 20 97 CONTRAST 87 D Date time setting 24 DC IN jack 9 20 DIGITAL ZOOM 52 Direct printing 129 DPOF 125 166 DRIVE 68 E Exposure compensation 84 Exposure diffe...

Страница 170: ...dial 8 35 MONITOR OFF MONITOR ON 45 Monitor 9 10 41 117 Monitor brightness adjustment 117 MOVIE PLAY 94 MOVIE PLAYBACK 94 Movie recording 37 49 MY MODE SETUP 108 My mode 37 N Night Scene shooting 35 NOISE REDUCTION 88 NORMAL Record mode 79 NTSC 122 166 Number of frames in an index display 91 Number of storable pictures 80 O OK Menu button 9 27 Orange lamp 9 40 55 Overcast 85 P PAL 122 166 PANORAMA...

Страница 171: ... SHQ 80 SHUTTER SOUND 118 Shutter button 8 40 Shutter priority shooting S 38 59 Shutter speed 59 Single frame erase 101 Single frame playback 89 Single frame reservation 127 Single frame shooting 68 Slideshow 92 Slow synchronization SLOW 54 Slow synchronization with red eye reduction flash SLOW 54 Speaker 8 Sports shooting 36 Spot metering 62 SQ1 80 SQ2 80 STANDARD 129 Startup shutdown screen 22 S...

Страница 172: ...171 10 Miscellaneous W White balance 85 Wide angle W 51 X xD Picture Card 17 Z Zoom lever 8 51 90 91 Index ...

Страница 173: ...asse 14 18 20097 Hamburg Germany Tel 49 40 23 77 3 0 Fax 49 40 23 07 61 Letters Postfach 10 49 08 20034 Hamburg Germany European Technical Customer Support Please visit our homepage http www olympus europa com or call our TOLL FREE NUMBER 00800 67 10 83 00 for Austria Belgium Denmark Finland France Germany Italy Luxemburg Netherlands Norway Portugal Spain Sweden Switzerland United Kingdom Please n...

Страница 174: ...structions on how to install the USB driver To ensure correct installation refer only to these installation procedures DIGITAL CAMERA PERSONAL COMPUTER DIGITAL CAMERA PC CONNECTION OPERATION MANUAL How to use your PC to get the most from images taken with your digital camera ...

Страница 175: ...re its accuracy However if you find any errors or incomplete information please contact your local Olympus representative It is prohibited by copyright laws to duplicate in part or in whole the information contained in this manual except for personal use Reproduction without permission of the copyright owner is prohibited The PC screens shown in this manual may differ slightly from the actual disp...

Страница 176: ...3 Macintosh Windows INDEX Flowchart 4 Identifying the OS 6 Windows 98 Me 2000 XP 8 Macintosh OS 9 X 23 Downloading image files using other OS For other OS users 31 ...

Страница 177: ... on USB connector extension card etc Windows 95 NT 4 0 Windows 98 98 SE upgrade from Windows 95 Mac OS 8 6 or lower except Mac OS 8 6 equipped with USB MASS Storage Support 1 3 5 installed at the factory Data transfer is not guaranteed on a home built PC system or PCs with no factory installed OS Identifying the OS p 6 Windows 98 98 SE Second Edition Windows Me 2000 XP MacOS 9 0 9 2 OS X For OS 8 ...

Страница 178: ...the AC adapter disconnect the camera from the computer and make sure that the camera is turned off To avoid computer malfunctions do not turn off the camera when the camera is connected to a computer If the camera is connected to the computer via a USB hub operation may not be stable if there are any compatibility problems between the computer and the hub In such cases do not use the hub and conne...

Страница 179: ... your desktop When the My computer icon is not on your desktop click Control Panel from the Start menu 2 Double click the Control Panel icon 3 Double click the System icon The way the file icons inside the folder appear may vary depending on your version of Windows If you don t see the icon you are looking for click on view all Control Panel options on the left of the window ...

Страница 180: ...lose the window If your OS is Windows 98 98 SE proceed to Installing the USB driver for Windows 98 p 9 Users running Windows Me 2000 XP p 11 Users running other OS p 31 Mac OS Macintosh Select About This Computer from the Apple menu on the menu bar A window appears with the name of the computer s OS Confirm that the OS is OS 9 0 9 2 or OS X Users running Mac OS 9 X p 23 Users running other OS p 31...

Страница 181: ...e camera the camera will turn off in the middle of the operation and this could destroy image files data If you are using batteries make sure that there is sufficient remaining battery power Installing the USB driver for Windows 98 When using Windows 98 98 SE 9 Connecting the camera to the computer 11 Confirming the computer recognizes the camera 14 Confirming the USB driver is installed 15 Downlo...

Страница 182: ...nnecting the camera to the computer p 11 1 Insert the provided software CD into your CD ROM drive 2 The Olympus Windows Installer should automatically launch Click USB Driver If the USB driver is already installed in your computer this option will not appear This option will not appear if you are using Windows Me 2000 XP If the installer is not automatically launched select Run on the Start menu a...

Страница 183: ...k Continue The installation of the USB driver will start 4 Click OK to restart your computer and the installation is complete 5 When the computer has restarted installation is complete If the Olympus Windows Installer screen appears click Close and remove the CD ROM from the CD ROM drive ...

Страница 184: ...he marked end of the provided USB cable into the USB port on your computer as shown below 3 After making sure that the camera is turned off connect the end of the USB cable to the USB connector on the camera The location of the USB connector or multi connector varies depending on the camera model Refer to the camera manual for details The location of the USB port varies depending on the computer F...

Страница 185: ...K button 6 The computer recognizes the camera as a new device Depending on the camera model when you connect the camera to the computer the lamp on the right of the viewfinder or the self timer lamp may light When you connect the camera to the computer for the first time the computer automatically recognizes the camera Click OK when the message saying that the installation is completed appears The...

Страница 186: ...hen follow the on screen instructions You may also select take no action to bypass the Microsoft Scanner and Camera Wizard You may then use a more advanced image viewing editing program such as Olympus CAMEDIA Master software For detailed instructions on downloading refer to the CAMEDIA Master software user s guide When the camera is connected to the computer none of the camera buttons are functio...

Страница 187: ... be other Removable Disk icons for other devices such as a removable media drive or USB SmartMedia Reader Writer In this case the digital camera is recognized as another Removable Disk If you cannot find the icon the camera and computer are not connected properly Turn the camera off disconnect the camera from the computer and connect again or proceed to Confirming the USB driver is installed p 15 ...

Страница 188: ...le Disk follow the procedure below to check whether the USB driver has been fully installed 1 Open My Computer and double click the Control Panel icon For users running Windows XP open Control Panel from the Start menu 2 Double click the System icon 3 The System window will appear Click the Device Manager tab ...

Страница 189: ...and start again Users running Windows 98 98 SE start again from Confirming the USB driver is installed and Users running Windows Me 2000 XP start from Connecting the camera to the computer If the USB driver was successfully installed you can find the following in the Device Manager the name of the camera you have connected listed under Disk drives OLYMPUS Digital Camera listed as one of the items ...

Страница 190: ...d as a Removable Disk 3 Double click the Dcim folder If an error message appears when you double click the icon there may be a problem with one of the following the camera s power source the AC adapter is not properly connected or the battery power is low Make sure that the AC adapter is correctly connected or that the batteries are not running low the card there is no card in the camera or there ...

Страница 191: ...the My Documents icon The camera automatically assigns folder names and file names according to the following rules Serial numbers of image files run from 0001 to 9999 Serial numbers of folders run from 100 to 999 When file number 9999 is reached a new folder is created and assigned the next number Months January through September are expressed by the numbers 1 through 9 October by the letter A No...

Страница 192: ...age files downloaded to your computer The files will be opened in the default image viewer of the operating system If you want to view the image a different size or process it you will need to open the image with software that supports JPEG or TIFF images files such as Paint Shop Pro Photoshop or CAMEDIA Master software The lamp on the right of the viewfinder or the card access lamp blinks while t...

Страница 193: ...ewfinder or the self timer lamp which on some models light while the camera is connected to the computer or the card access lamp is not blinking The lamps and their location vary depending on the model Refer to your camera s reference manual 2 Double click the My Computer icon and right click the Removable Disk to display the menu 3 Click Eject on the menu Lamp Card access lamp ...

Страница 194: ...e lit while the camera was connected to the computer may go off If the lamp is not flashing then the cable can be removed 5 Remove the USB cable from the camera 6 Remove the USB cable from your computer Windows Me 2000 XP 1 Make sure that the lamp on the right of the viewfinder or the self timer lamp which on some models light while the camera is connected to the computer or the card access lamp i...

Страница 195: ...ars 3 Click on the message The Unplug or Eject Hardware window appears 4 When a message appears click OK 5 Remove the USB cable from the camera 6 Remove the USB cable from your computer If the window returns the following message when you click Unplug or Eject Hardware first make sure that no image data is being downloaded from the camera and then remove the USB cable ...

Страница 196: ...mage files data If you are using batteries make sure that there is sufficient remaining battery power If you are running Mac OS X the connection to the computer and downloading the image data are verified Restrictions such as the following may occur due to the OS The image file properties are not displayed correctly Images in the camera cannot be opened without first downloading them etc For more ...

Страница 197: ...mputer as shown below 3 After making sure that the camera is turned off connect the end of the USB cable to the USB connector on the camera The location of the USB connector or multi connector varies depending on the camera model Refer to the camera manual for details The location of the USB port varies depending on the computer For details refer to your computer s manual Menu button Arrow pad PLA...

Страница 198: ...device Depending on the camera model when you connect the camera to the computer the lamp on the right of the viewfinder or the self timer lamp may light The computer recognizes the camera automatically and an Untitled icon appears on the desktop If you cannot find this icon turn off the camera and connect again Mac OS X When the computer has recognized the camera the Apple Image Capture software ...

Страница 199: ...rror message appears when you double click the icon there may be a problem with one of the following the camera s power source the AC adapter is not properly connected or the battery power is low the card there is no card in the camera or there is a problem with the card Check that you can play back pictures on the monitor of your camera the USB cable the camera is not properly connected to the co...

Страница 200: ...e names according to the following rules Serial numbers of image files run from 0001 to 9999 Serial numbers of folders run from 100 to 999 When file number 9999 is reached a new folder is created and assigned the next number Months January through September are expressed by the numbers 1 through 9 October by the letter A November by B and December by C Folder name Example File name Example Serial ...

Страница 201: ...iles in the Hard Disk folder The files will be opened in the default image viewer of the operating system If you want to view the image a different size or process it you will need to open the image with software that supports JPEG or TIFF images files such as Paint Shop Pro Photoshop or CAMEDIA Master software The lamp on the right of the viewfinder or the card access lamp blinks while the image ...

Страница 202: ... Capture software dialog appears 1 From the Download To menu select a destination folder 2 To download all images click Download All To selectively download images click Download Some and highlight the desired images The images are transferred from the camera to your computer If you are operating Mac OS X and you want to download images using the same procedure as for Mac OS 9 select File Close an...

Страница 203: ...al 2 Drag the untitled icon on the desktop to Trash 3 Make sure that the lamp on the right of the viewfinder or the self timer lamp which on some models light while the camera is connected to the computer or the card access lamp is not blinking Depending on the camera model the green lamp may light or lamps that were lit while the camera was connected to the computer may go off If the lamp is not ...

Страница 204: ...omputer have a USB interface Is there a port marked on your computer Does your computer have a built in PC card slot Consult your nearest Olympus representative Is your OS one of the following Windows 98 Windows 2000 Windows Me Windows XP Mac OS 9 X Yes No No Yes Connect the camera directly to your computer using the provided USB cable Use the optional USB reader writer Certain card readers may no...

Страница 205: ... 20097 Hamburg Germany Tel 49 40 23 77 3 0 Fax 49 40 23 07 61 Letters Postfach 10 49 08 20034 Hamburg Germany European Technical Customer Support Please visit our homepage http www olympus europa com or call our TOLL FREE NUMBER 00800 67 10 83 00 for Austria Belgium Denmark Finland France Germany Italy Luxemburg Netherlands Norway Portugal Spain Sweden Switzerland United Kingdom Please note some m...

Отзывы: