manualshive.com logo in svg
background image

151

MOVIE PICTURE DISPLAY MENU

* Press the Menu button to set the following items when the Mode dial is

set to

and a movie picture is displayed on the LCD monitor. (p. 44)
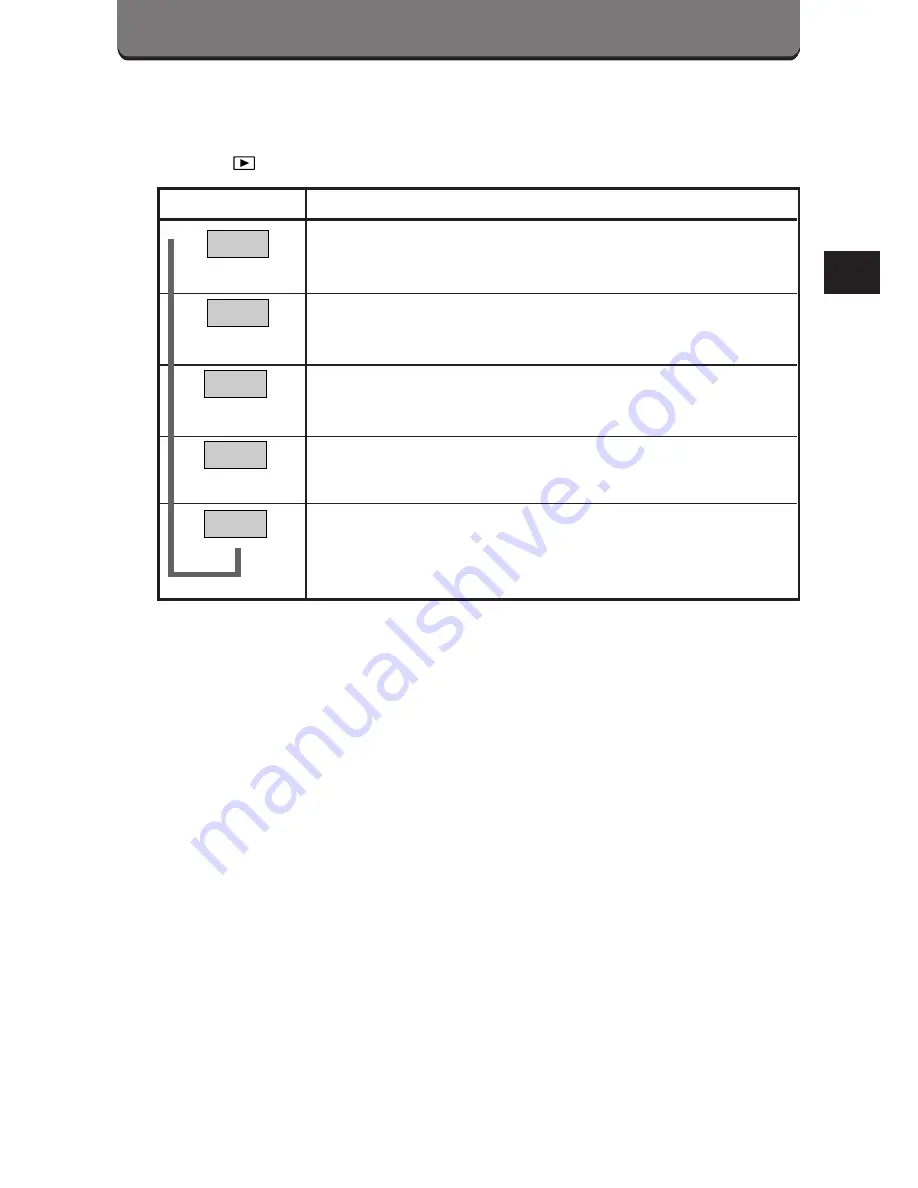
Monitor Display

Use

Displaying movie pictures as a movie. (p. 152)

Displaying information about the image (date and
time, file name, etc.). (p. 154)

Creating a movie index (p. 156) and editing 
movies. (p. 158)

Performing All-Frame erase (p. 160) or Card format.
(p. 162)

Making adjustments. [All reset (p. 194), Beep sound
(p. 204), Index-Display adjustment (p. 218),
Brightness (p. 215), Date/time set (p. 34)]

MODE

SETUP

CARD

SETUP

FUNCTION

INFO

MOVIE

PLAY

Содержание C-3000 - 3.2MP Digital Camera

Страница 1: ...splaying movie pictures as a movie p 152 Displaying information about the image date and time file name etc p 154 Creating a movie index p 156 and editing movies p 158 Performing All Frame erase p 160...

Страница 2: ...button to display the picture information again Press the Menu button to display the Menu Press the top bottom arrows on the Jog dial to select MOVIE PLAY To cancel press the Menu button Press the rig...

Страница 3: ...e Press the bottom arrow to pause at the ending of the movie Press the right arrow on the Jog dial to start the movie Press the left arrow to play it backwards Press the Menu button when movie playbac...

Страница 4: ...top bottom arrows to select INFO To cancel press the Menu button Press the right arrow on the Jog dial then press the top bottom arrows to select ON Press the left arrow on the Jog dial to confirm the...

Страница 5: ...s During movie recording FILE 123 3456 Movie picture Battery check File name When a movie picture is selected Note When picture information is displayed the frame number will not be displayed Unless O...

Страница 6: ...FUNCTION After pressing the right arrow on the Jog dial press the top bottom arrows to select MOVIE INDEX then press the OK button Press the right left arrows on the Jog dial to select the first frame...

Страница 7: ...n the first frame is selected the image can be selected by using the Jog dial When the last frame is selected the displayed images other than the top frame will change accordingly Press the Menu butto...

Страница 8: ...ith the mark on the LCD monitor Press the Menu button to display the Menu Press the top bottom arrows on the Jog dial to select FUNCTION After pressing the right arrow on the Jog dial press the top bo...

Страница 9: ...e last frame then press the OK button Just as when selecting the top frame the top bottom arrows on the Jog dial can be used to select the frame Press the right left arrows on the Jog dial to select N...

Страница 10: ...utton to display the Menu Press the top bottom arrows on the Jog dial to select CARD SETUP Press the right arrow on the Jog dial then press the top bottom arrows to select Press the OK button to displ...

Страница 11: ...will remain in the card and the last frame will be displayed p 112 8 7 161 Caution Be careful not to erase important picture data by mistake as it cannot be retrieved Never open the card cover eject t...

Страница 12: ...rrow on the Jog dial then press the top bottom arrows to select Press the OK button to display Press the OK button again with YES selected to format the card To cancel select NO using the right arrow...

Страница 13: ...formatting a recorded card Formatting will not be engaged when a write protect adhesive seal is placed on the card Non Olympus brand cards or cards formatted from or used in a computer must be formatt...

Страница 14: ...164...

Страница 15: ...DATA FOR PRINTING PICTURES Recorded images can be printed out with a printer Selected images can be reserved in a SmartMedia card for printing on a printer or at a photo lab that supports the DPOF Di...

Страница 16: ...rformed at the touch of a button For more information consult your printer s user manual 3 Images can be transferred directly to a personal computer via USB or a PC connection kit or by using an optio...

Страница 17: ...s camera may overwrite the previous reservations Even if an image appears with the message PICTURE ERROR print reserve may be performed on it In such a case the print reserve icon does not appear on t...

Страница 18: ...Print button to display the Print reserve setting screen If Print reserve data is already stored in the card a screen will appear giving you the choice of resetting the data or keeping it p 177 Select...

Страница 19: ...ct Press the left right arrows on the Jog dial to select DATE TIME or NO Press the OK button The Menu screen disappears and the print reserve indicator and the number of prints are displayed on the sc...

Страница 20: ...int reserve data is already stored in the card a screen will appear giving you the choice of resetting the data or keeping it p 177 Press the top bottom arrows on the Jog dial to select then press the...

Страница 21: ...to the previous frame Right arrow Moves to the next frame Top arrow Displays the previous page Bottom arrow Displays the next page The index is displayed as follows when the number of frames shown in...

Страница 22: ...y set number is displayed Press the top bottom arrows on the Jog dial to select Press the left right arrows on the Jog dial to select DATE TIME or NO Press the top bottom arrows on the Jog dial to sel...

Страница 23: ...images can be printed Print reserve may take considerable time in some cases Press the OK button The Menu screen disappears and the print reserve indicator and the number of prints are displayed on t...

Страница 24: ...ge 10 frames forward Press the zoom lever toward T to display the Trimming mode screen The selected item is displayed in green Move the cursor to set the top left corner of the image you would like to...

Страница 25: ...size The image is displayed on the LCD monitor Press the OK button again to display the Single frame print reserve screen Following the procedure for Single frame print reserve set the number of prin...

Страница 26: ...ettings An image trimmed to a small size will have lower resolution For best results with close up prints it is recommended to use the TIFF SHQ or HQ mode The vertical to horizontal ratio in the trimm...

Страница 27: ...een is not displayed Press the left right arrows on the Jog dial to select RESET then press the OK button To keep the print order select KEEP and press the OK button To remove the selected image only...

Страница 28: ...178...

Страница 29: ...5 USING A PERSONAL COMPUTER OLYMPUS DIGITAL CAMERA...

Страница 30: ...ofessional NT 4 0 SP3 or later Available HD space 100MB or more RAM 32MB or more 64MB or more recommended Connectors USB port USB connection RS 232C port serial connection D SUB 9 pin connector serial...

Страница 31: ...4 0 must be installed on the computer to play back movies Apple Macintosh CPU PowerPC OS Mac OS 8 6 to 9 USB Mac OS 7 6 1 to 9 serial Available HD space 100MB or more RAM 32MB or more 8MB or more fre...

Страница 32: ...able to the USB port on your computer For serial port equipped computers IBM PC AT compatible Connect the optional RS 232C PC serial cable to the serial port COM1 COM2 etc on your computer Note In ord...

Страница 33: ...Start CAMEDIA Master on the computer 5 4 3 2 1 Note If you are using a USB cable to make connections make sure that your personal computer support it Contact your personal computer maker concerning y...

Страница 34: ...to a personal computer equipped with a 3 5 FDD using the optional FlashPath Floppydisk Adapter SmartMedia READER WRITER The picture data in the SmartMedia can be directly transferred to a personal co...

Страница 35: ...ING IMAGES STORED IN THE CARD ON YOUR COMPUTER You can view images stored in a SmartMedia card via CAMEDIA Master Start CAMEDIA Master on the computer Click on My Camera A thumbnail index of stored im...

Страница 36: ...o your computer Start CAMEDIA Master on the computer Select Camera Download All Images on the menu bar The computer will start transferring images from the camera to the computer 2 1 Note You can view...

Страница 37: ...MAKING DARK IMAGES BRIGHT Some images may come out darker than expected You can try taking pictures again right after shooting but may often miss the right moment for a good picture This is where CAM...

Страница 38: ...GES Backlight sometimes makes the whole image blurry and an object which stands before the subject may be out of focus Use CAMEDIA Master Sharpen when this happens to sharpen the whole image However y...

Страница 39: ...n it This will display the selected image Select Image Filter Sharpen on the menu bar Specify the degree of sharpness either by sliding the slide bar or inputting a value from 1 to 9 while comparing O...

Страница 40: ...SING IMAGES WITH TEMPLATES You can easily compose images with templates in CAMEDIA Master Place the cursor on the image you want to compose and double click on it This will display the selected image...

Страница 41: ...his will display the preview image When you are happy with the sample image click on OK The composed image will be displayed There are a lot of functions for editing images in additions to those menti...

Страница 42: ...192...

Страница 43: ...AMERA SETTINGS The settings can be adjusted in the Menu Each Menu still picture record menu still picture display menu movie picture record menu and movie picture display menu has different available...

Страница 44: ...ight arrow on the Jog dial then press the top bottom arrows to select ON or OFF When ON is selected settings will be canceled and reset to the default when the power is turned off When OFF is selected...

Страница 45: ...e compensation p 63 134 Flash modes p 64 Spot metering mode p 68 Macro mode p 69 Macro Spot metering mode p 70 Manual focus p 71 135 Sequence mode p 74 Selftimer Remote control p 76 138 Auto bracket p...

Страница 46: ...ect MODE SETUP then press the right arrow to select SETUP Press the OK button to display the Mode setting screen Press the top bottom arrows on the Jog dial to select ALL RESET Press the right arrow o...

Страница 47: ...er more settings repeat steps 7 8 and 9 Press the OK button to exit from the Custom settings screen and return to the MODE SETUP screen Confirm that CUSTOM is selected then press the OK button to canc...

Страница 48: ...e 1 3 EV increments up to 2 EV compensation Slow shutter Off Before shutter After shutter synchronizing flash Flash select Main extension Extension Digital zoom Off On White balance Auto Daylight Over...

Страница 49: ...arrow on the Jog dial then press the top bottom arrows to select NORMAL SOFT or HARD Press the left arrow on the Jog dial to confirm the setting Press the OK button to save the setting Press again to...

Страница 50: ...E SETUP then press the right arrow to select SETUP Press the OK button to display the Mode setting screen Press the top bottom arrows on the Jog dial to select TIFF Press the right arrow on the Jog di...

Страница 51: ...setting screen Confirm the setting using the image in the LCD monitor Press the OK button to save the setting Press again to cancel the Menu 9 8 7 Note The setting will remain until it is readjusted...

Страница 52: ...TUP then press the right arrow to select SETUP Press the OK button to display the Mode setting screen Press the top bottom arrows on the Jog dial to select SQ1 or SQ2 then press right arrow on the Jog...

Страница 53: ...IGH High quality NORMAL HIGH High quality 203 Note The setting will remain until it is readjusted The greater the number of pixels the longer the playback time and the smaller the number of frames tha...

Страница 54: ...bottom arrows on the Jog dial to select Press the right arrow on the Jog dial then press the top bottom arrows to select HIGH LOW or OFF Press the left arrow on the Jog dial to confirm the setting Pre...

Страница 55: ...OK button to display the MODE SETUP screen Press the top bottom arrows on the Jog dial to select FULL TIME AF Press the right arrow on the Jog dial then press the top bottom arrows to select ON or OFF...

Страница 56: ...ess the OK button to save the setting Press again to cancel the Menu 8 7 Note Using Full time AF will drain the battery more quickly Full time AF is not available when the LCD monitor is turned off Th...

Страница 57: ...select REC VIEW Press the right arrow on the Jog dial then press the top bottom arrows to select ON OFF or CHECK When OFF is selected the image will not be displayed on the LCD monitor after it is re...

Страница 58: ...he image in the previous frame Displays the image in the next frame Displays the first frame Displays the last frame If Bracketing was used to take a picture the darkest frame will be displayed first...

Страница 59: ...e Frame erase screen appears Press the left right arrows on the Jog dial to select YES then press the OK button to discard the image on the LCD monitor The next image will appear To cancel press the E...

Страница 60: ...n halfway to change to the recording mode The recording view with focus lock will appear on the LCD monitor If no action is performed the screen will automatically change back to the Save confirmation...

Страница 61: ...h normal images 1235 1237 OK Note If Bracketing was used to take a picture you must choose whether to save or discard it before you can record another image Also refer to Note on page 209 To display a...

Страница 62: ...hen RESET is selected the file number and folder number will be reset every time a card is inserted in the camera AUTO When AUTO is selected the same folder number and a continuing number from the las...

Страница 63: ...hen press the right arrow to select SETUP Press the OK button to display the Mode setting screen 4 3 2 1 1 4 3 2 3 3 F2 8 1 800 2 0 P A S M MODE CARD SETUP MODE SETUP SETUP POW E R M O D E D I A L P A...

Страница 64: ...even if you record several pictures in different cards at one time Press the left arrow on the Jog dial to confirm the setting Press the OK button to save the setting Press again to cancel the Menu 8...

Страница 65: ...to display the Menu Press the top bottom arrows on the Jog dial to select MODE SETUP then press the right arrow to select SETUP Press the OK button to display the Mode setting screen 4 3 2 1 Still pi...

Страница 66: ...n the LCD monitor Press the right left arrows on the Jog dial to select the brightness Press the OK button to confirm the setting Press the OK button to save the setting Press again to cancel the Menu...

Страница 67: ...the OK button to display the Mode setting screen Press the top bottom arrows on the Jog dial to select m ft Press the right arrow on the Jog dial then press the top bottom arrows to select m meters or...

Страница 68: ...the Jog dial to select Press the right arrow on the Jog dial then press the top bottom arrows to select the number Press the left arrow on the Jog dial to confirm the setting Press the OK button to s...

Страница 69: ...7 MISCELLANEOUS OLYMPUS DIGITAL CAMERA...

Страница 70: ...rom the camera or from the computer p 34 Q How should I store the camera A Cameras are susceptible to damage caused by dust moisture and salt Wipe and dry the camera thoroughly before storing it After...

Страница 71: ...ter or a hood A conversion lens adapter optional is required to attach a conversion lens to the camera Q Can I use an extension flash A Yes you can You can use an extension flash with a grip p 90 For...

Страница 72: ...harging or the previous picture is being written into the card Remove your finger from the Shutter release button and wait until the Green lamp or the Orange lamp stops blinking P 48 64 2 There is a p...

Страница 73: ...is connected to a TV P 124 The LCD monitor is hard to read 1 The brightness may be incorrectly set Adjust the brightness P 215 2 It is under sunlight Block the sunlight 3 The LCD monitor is broken Ha...

Страница 74: ...correctly Shoot with the Macro mode when the subject is within the range of 8 31 For further distances shoot with the Standard mode P 56 69 5 The Shutter release button was pressed while atanding in f...

Страница 75: ...e exposure compensation or change the camera position toward the subject P 63 134 The colors of pictures taken indoors look unnatural 1 The lighting fixture s affected the picture Set the flash mode t...

Страница 76: ...equipment Printer P 330N P 330 TV Personal computer MO drive SmartMedia FlashPath PC card adapter AC adapter Camera Wide conversion lens Macro conversion lens Conversion lens adapter Tele Conversion...

Страница 77: ...record play back or erase pictures in this card The recorded image cannot be played back with this camera Remedy Insert a card and close the cover Insert a card Or insert the card again Replace the ca...

Страница 78: ...LL Error content The card is not formatted There are no picutures in the card so there is nothing to play back There is no empty space in the card so print data or sound cannot be recorded Remedy Form...

Страница 79: ...egin to darken or flicker contact your nearest service center In cold conditions the display backlight may be slow to come on or may change color suddenly To avoid this keep the camera warm when using...

Страница 80: ...E PICTURE DATA Images taken by this camera may not be properly displayed or printed with other Olympus digital cameras Images taken by other Olympus digital cameras may not be properly displayed or pr...

Страница 81: ...Erase One Frame erase All Frames erase Image pickup element 1 1 8 inch CCD solid state image pickup 3 340 000 pixels gross Recording image 2048 x 1536 pixels TIFF SHQ HQ 1600 x 1200 pixels TIFF SQ1 1...

Страница 82: ...ies Flash working range W Approx 31 12 5 ft T Approx 8 12 5 ft Flash modes Auto Flash automatic flash activation in low light and backlight Red Eye Reducing Flash Fill In Flash forced activation Off n...

Страница 83: ...NiMH batteries NiCd batteries alkaline batteries or lithium batteries AC adapter optional Dimensions 4 3 W x 3 0 H x 2 6 D 109 5 x 76 4 x 66 4 mm Weight 10 6 oz without batteries card SPECIFICATIONS...

Страница 84: ...234...

Страница 85: ...235...

Страница 86: ...r Drive Melville NY 11747 3157 U S A Tel 516 844 5000 Customer support Tel 1 888 553 4448 www olympusamerica com distec olympus com OLYMPUS OPTICAL CO EUROPA GMBH Premises Goods delivery Wendenstra e...

Отзывы: