


Complete Teardown, Cleaning, and Reassembly of the Olympus BHSU/BHTU Reverse Nosepiece Assembly
Revision 3
Page 12 of 19
Figure 27
–
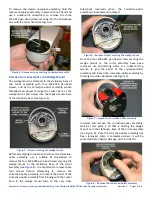
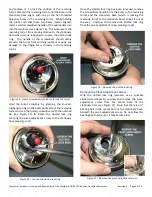
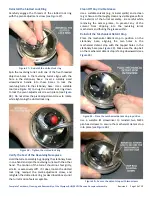
Reinstall stationary base into revolving turret
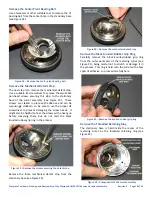
Apply a Ring of Grease for the Perimeter Balls
The next step is to apply grease into the ring in which
the perimeter bearing balls will be placed. Carefully
apply a ring of grease (item 8 of
) into the
channel formed between the outer perimeter of the
stationary base and the inner perimeter of the revolving
turret (see
). Do not apply too much grease
here, to minimize the squeeze-out that will occur when
the threaded retaining ring is reinstalled to hold the
stationary base into the recess of the revolving turret.
Figure 28
–
Apply ring of fresh grease for the bearing balls
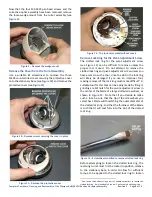
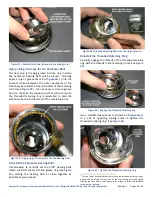
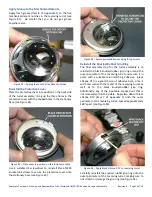
Reinstall the Perimeter Bearing Balls
Use tweezers to carefully set the 3/32” bearing balls
(there are 80 of them) into the grease ring (see
), placing the bearing balls as close together as
possible as you proceed.
Figure 29
–
Place the bearing balls into the ring of grease
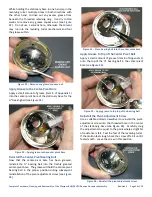
Reinstall the Threaded Retaining Ring
Carefully engage the threads of the threaded retaining
ring with the threads in the revolving turret (see
Figure 30
–
Engage the threaded retaining ring
Use a suitable lens-spanner tool (item 6 of
in a pair of opposing tooling holes to tighten the
threaded retaining ring
2
(see
Figure 31
–
Tighten the threaded retaining ring
2
Or use a center punch or nailset tool to snug the threaded retaining ring by
placing the tip of the tool into one of the four tooling holes and lightly
tapping the tool with a small hammer or mallet to drive the threaded
retaining ring clockwise.


