background image

16

EN

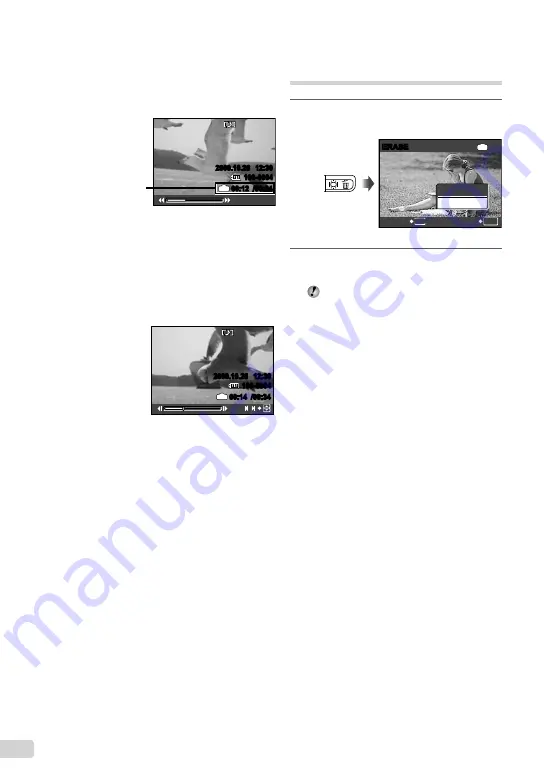
Operations during movie playback

Fast-forward:

 Press and hold down 

n

.

Rewind:

 Press and hold down 

m

.

Pause:

 Press the 

B

 button.

2009.10.26 12:30

100-0004

00:12 /00:34

IN

During playback

Elapsed time/

Total recording time

First (last) frame/frame advance:


During pause, press 

k


to display the 

fi

 rst 

frame, and press 

l

 to display the last 

frame. 
Press and hold down 

n

 to play a movie, and 

press and hold down 

m

 to play a movie in 

reverse.
Press the 

B

 button to resume playback.

2009.10.26 12:30

100-0004

00:14 /00:34

IN

/

During pause

To stop movie playback

Press the 

m


button

.

Erasing images during 

playback ( Single image erase)

1

 Press the 

D

 button when the image 

to be erased is displayed.

ERASE

OK

IN

YES

NO

SET

CANCEL

MENU

2

 Press 

k

 to select [YES], and 

press the 

B

 button

.

  [

K

 ERASE] (p. 29)

Содержание 227101

Страница 1: ... a safe place for future reference We recommend that you take test shots to get accustomed to your camera before taking important photographs In the interest of continually improving our products Olympus reserves the right to update or modify information contained in this manual The screen and camera illustrations shown in this manual were produced during the development stages and may differ from...

Страница 2: ...aster 2 39 Usage Tips 41 Appendix 45 Index 59 Contents Contents Step 2 Shooting and Playing Back Images Shooting Playback and Erasing p 14 Step 3 How to Use the Camera Three Types of Setting Operations p 3 Step 4 Printing Direct printing PictBridge p 34 Print Reservations DPOF p 37 Step 5 2 EN Checking the contents of the box Step 1 Other accessories not shown Instruction Manual this manual OLYMPU...

Страница 3: ...e tab Submenu 2 To quickly move to the desired submenu press m to highlight the page tab and then use kl to move the page Press n to return to the submenu Some menus include submenus that appear by pressing the B button 4 Use kl to select Submenu 2 and press the B button Once a setting is selected the display returns to the previous screen There may be additional operations Menu Settings p 24 to 3...

Страница 4: ...g functions can be accessed using the direct buttons Shutter button p 14 K button shooting switching shooting modes p 17 18 q button playback p 15 Zoom buttons p 19 F button exposure compensation p 20 button macro p 20 button flash p 19 Y button self timer p 21 g E button changing information display menu guide p 22 23 p 17 D button backlight boost erase p 21 p 16 29 B button p 22 Arrow pad Button...

Страница 5: ... MODE p 33 1 A IMAGE QUALITY p 24 2 B CAMERA MENU WB p 25 ISO p 25 R Still images movies p 25 PANORAMA p 26 AF MODE p 26 3 C SWITCH SHOOTING MODES P p 14 G p 17 DIS MODE p 18 s p 17 MOVIE p 18 4 Q MAGIC FILTER p 27 5 D RESET p 27 6 E SETUP MEMORY FORMAT FORMAT p 30 BACKUP p 30 W Language p 30 PIXEL MAPPING p 30 K q p 31 SAVE SETTINGS p 31 MENU COLOR p 31 BEEP p 31 s Monitor p 31 X Date time p 31 V...

Страница 6: ... of Parts 1 Strap eyelet p 10 2 Battery card compartment cover p 10 3 Microphone p 25 29 4 Flash p 19 Camera unit 8 7 1 3 4 5 6 2 5 Self timer lamp p 21 6 Lens p 45 58 7 Tripod socket 8 Multi connector p 32 34 39 ...

Страница 7: ...on p 3 5 D button backlight boost erase p 21 p 16 29 6 Shutter button p 14 7 Zoom buttons p 19 8 Card access lamp p 46 9 K button shooting switching shooting modes p 17 18 10 q button playback p 15 11 B button OK FUNC p 3 22 12 Arrow pad p 3 12 F button exposure compensation p 20 button macro p 20 Y button self timer p 21 button flash p 19 ...

Страница 8: ...lent mode p 33 4 Macro super macro p 20 5 Battery check p 10 6 Flash standby camera shake warning flash charge p 19 41 7 AF target mark p 14 8 Recording with sound p 25 9 Number of storable still pictures remaining recording time p 14 p 18 10 Current memory p 46 11 Self timer p 21 12 Aperture value p 14 13 Shutter speed p 14 14 Exposure compensation p 20 15 Compression frame rate p 24 16 Image siz...

Страница 9: ...5 1 12 13 Still image Movie 1 Silent mode p 33 2 Print reservations number of prints p 37 p 36 3 Adding sound p 29 4 Protect p 28 5 Battery check p 10 6 Aperture value p 14 7 Exposure compensation p 20 8 White balance p 25 9 Image size p 24 10 File number 11 Frame number Elapsed time total recording time p 15 p 16 12 Current memory p 46 13 Compression frame rate p 24 14 ISO p 25 15 Date and time p...

Страница 10: ...camera be sure to close the battery card compartment cover When to replace the batteries Replace the batteries when the error message shown below appears BATTERY EMPTY Monitor top right Error message Flashes in red Attaching the camera strap Pull the strap tight so that it does not come loose Loading the batteries and the xD Picture Card sold separately into the camera Do not insert anything other...

Страница 11: ...he microSD card straight out Do not touch the contact area of the microSD Attachment and or microSD card 3 Index area Notch Insert the card straight until it clicks into place Do not touch the contact area directly 1 2 4 This camera allows the user to take pictures using the internal memory even when no xD Picture Card sold separately is inserted Using an xD Picture Card p 46 Number of storable pi...

Страница 12: ...e Setting the date and time The date and time set here are saved to image file names date prints and other data 1 Press the n button to turn on the camera The date and time setting screen is displayed when the date and time are not set X Y M Y M D D TIME MENU CANCEL Date and time setting screen 2 Use kl to select the year for Y 2009 X Y M Y M D D TIME MENU CANCEL 3 Press n to save the setting for ...

Страница 13: ...s adjustable 1 Press the m button and press klmn to select E SETUP MENU EXIT SET OK SETUP 2 Press the B button 1 2 3 BACKUP NO SETUP ENGLISH PIXEL MAPPING MEMORY FORMAT MENU EXIT SET OK 3 Use kl to select W and press the B button 4 Use klmn to select your language and press the B button 5 Press the m button ...

Страница 14: ...rk flashes red Try focusing again 1 400 F3 5 P AF target mark Press halfway Shutter speed Aperture value Focusing p 43 Shooting with the optimum aperture value and shutter speed P mode In this mode automatic shooting settings are activated while also allowing changes to a wide range of shooting menu functions such as exposure compensation white balance etc as needed 1 Press the n button to turn on...

Страница 15: ...18 Viewing images 1 Press the q button 1 IN 12M 2009 10 26 12 30 100 0001 NORM Playback image Number of frames 2 Use klmn to select an image Displays 10 frames before the current image Displays next image Displays previous image Displays 10 frames after the current image The display size of the images can be changed Index view and close up view p 23 To play back movies Select a movie and press the...

Страница 16: ...he first frame and press l to display the last frame Press and hold down n to play a movie and press and hold down m to play a movie in reverse Press the B button to resume playback 2009 10 26 12 30 100 0004 00 14 00 34 IN During pause To stop movie playback Press the m button Erasing images during playback Single image erase 1 Press the D button when the image to be erased is displayed ERASE OK I...

Страница 17: ... on the scene that the camera automatically selects 12M 4 IN NORM iAUTO AF ON Press the shutter button halfway down or press the g button to check which shooting mode the camera has automatically selected The shooting mode changes in the order of P G h s A each time the K button is pressed By switching to other shooting mode most settings set in other than P mode will be changed to the default set...

Страница 18: ...s to set h h mode indicator 4 IN NORM 12M By switching to any of other shooting modes most function settings in h mode will change to the default settings of the newly selected mode Shooting movies n mode 1 Press the K button a few times to set n A mode indicator 00 34 00 34 IN QVGA QVGA 15 15 2 Press the shutter button halfway down to focus on the subject and gently press the button all the way d...

Страница 19: ...e occurrence of red eye in your photos FILL IN The flash fires regardless of the available light FLASH OFF The flash does not fire Using the zoom Pressing the zoom buttons adjusts the shooting range Pressing the wide W button Pressing the telephoto T button 12M P 4 IN NORM 12M P 4 IN NORM Zoom bar Optical zoom 5x digital zoom 4x Use of h mode p 18 is recommended when shooting with the telephoto zo...

Страница 20: ...g This function enables the camera to focus and shoot subjects at close distances 1 Press the button P OK OK SET SET OFF OFF OFF OFF 2 Use mn to select the setting option and press the B button to set Option Description OFF Macro mode is deactivated MACRO This enables shooting as close as 20 cm 7 9 in 1 60 cm 23 6 in 2 to the subject SUPER MACRO 3 This enables shooting as close as 3 cm 1 2 in to t...

Страница 21: ...Description OFF The self timer is deactivated ON The self timer lamp turns on for approx 10 seconds then blinks for approx 2 seconds and then the picture is taken Self timer shooting is automatically canceled after one shot To cancel the self timer after it starts Press the Y button again Increasing the brightness of the monitor Backlight boost Press in shooting mode The monitor becomes brighter I...

Страница 22: ...ion and then press the B button to set Changing the shooting information display The display of the screen information can be changed to best match the situation for example the need for a clear view of the screen or for making a precise composition by using the grid display 1 Press the g button The displayed shooting information changes in the order shown below each time the button is pressed Sho...

Страница 23: ...elect an image in index view Use klmn to select an image and press the B button to display the selected image in single image view To scroll an image in close up view Use klmn to move the viewing area Changing the image information display Shooting information settings displayed on the screen can be changed 1 Press the g button The displayed image information changes in the order shown below each ...

Страница 24: ...A4 8 5 11 in 2M 1600 1200 Suitable for printing A5 5 7 in pictures 1M 1280 960 Suitable for printing pictures at postcard size VGA 640 480 Suitable for viewing pictures on a TV or using pictures in emails and on websites 16 9 1920 1080 Suitable for playing pictures on a wide screen TV COMPRESSION FINE Shooting at high quality NORMAL Shooting at normal quality Movies Submenu 1 Submenu 2 Application...

Страница 25: ...es can be taken at fast shutter speeds even under low light conditions However high sensitivity introduces noise into the resulting picture which may give it a grainy appearance Submenu 2 Application AUTO The camera automatically adjusts the sensitivity according to the shooting scene 100 200 400 800 1600 The value of the ISO sensitivity is fixed Recording sound when shooting still images R B CAME...

Страница 26: ...bmenu 2 Application FACE DETECT 1 This is used for taking pictures of people The camera automatically detects a face and a frame appears Press the shutter button halfway down and when the face is in focus the green AF target mark appears The orange target mark indicates that the area other than the face is in focus iESP This enables you to compose the shot without worrying about the focusing posit...

Страница 27: ...IE Shooting movies p 18 Restoring the shooting functions to the default settings D RESET D RESET E P G h s n Submenu 1 Application YES Restores the following menu functions to the default settings Flash p 19 Exposure compensation p 20 Macro p 20 Self timer p 21 A IMAGE QUALITY p 24 s p 17 Menu functions in B CAMERA MENU p 25 to 26 NO The current settings will not be changed Shooting with special e...

Страница 28: ...hod and press the B button 2 Use mn to select an image for retouching and press the B button The retouched image is saved as a separate image Changing the image size Q I EDIT X Q Submenu 2 Application C 640 480 This saves a high resolution image as a separate image with a smaller size for use in e mail attachments and other applications E 320 240 Cropping image P I EDIT X P 1 Use mn to select an i...

Страница 29: ... Recording starts Erasing images K ERASE K ERASE Submenu 1 Application SEL IMAGE Images are individually selected and erased ALL ERASE All images in the internal memory or card will be erased When erasing pictures in the internal memory do not insert the card into the camera When erasing pictures from the card insert a card into the camera in advance To individually select and erase images SEL IMA...

Страница 30: ...ng the backup Changing the display language W E SETUP X W Changing the display language p 13 Submenu 2 Application Languages 1 The language for the menus and error messages displayed on the monitor is selected 1 The available languages vary depending on the country and or region where the camera was purchased Adjusting the CCD and the image processing function PIXEL MAPPING E SETUP X PIXEL MAPPING...

Страница 31: ...order 1 Press n after setting Minute and use kl to select the date display order X Y M Y M D D TIME 2009 10 26 12 30 MENU CANCEL SET Y M D OK Date order Turning on the camera with the K or q button K q E SETUP X K q Submenu 2 Application YES Pressing K turns on the camera and starts the camera in the shooting mode Pressing q turns on the camera and starts the camera in the playback mode NO The pow...

Страница 32: ...efault settings differ according to the region where the camera is sold To play back camera images on a TV 1 Connect the TV and camera Connect to the TV video input jack yellow and audio input jack white Multi connector AV cable supplied 2 Use the camera to select the same video signal system as the one of connected TV NTSC PAL 3 Turn on the TV and change INPUT to VIDEO an input jack connected to ...

Страница 33: ...E SETUP X BATTERY TYPE Submenu 2 Application ALKALINE Select this option when using alkaline batteries NiMH Select this option when using NiMH batteries If ALKALINE is selected with NiMH batteries the camera may fail to turn on when the batteries are low If NiMH is selected with alkaline batteries the camera may be turned off without displaying the low battery warning p 10 Turning off the camera s...

Страница 34: ... refer to the printer s instruction manual 1 PictBridge is a standard for connecting digital cameras and printers of different makers and printing out pictures directly The printing modes paper sizes and other parameters that can be set with the camera vary depending on the printer that is used For details refer to the printer s instruction manual For details on the available paper types loading p...

Страница 35: ...splayed the SIZE BORDERLESS and PICS SHEET are set to the printer s standard STANDARD STANDARD PRINTPAPER SET OK MENU BACK SIZE BORDERLESS 5 Use kl to select the BORDERLESS or PICS SHEET settings and press the B button Submenu 4 Application OFF ON 1 The image is printed with a border around it OFF The image is printed to fill the entire paper ON The number of images per sheet varies depending on t...

Страница 36: ... B button P MENU BACK SET OK IN OK CANCEL 8 If necessary repeat Steps 6 and 7 to select the image to be printed make the detailed settings and set SINGLEPRINT 9 Press the B button PRINT SET OK MENU BACK PRINT CANCEL 10Use kl to select PRINT and press the B button Printing starts When OPTION SET is selected in ALL PRINT mode PRINT INFO screen is displayed When printing is finished the PRINT MODE SE...

Страница 37: ...s camera will erase the reservations made by the other device DPOF print reservations can be made for up to 999 images per card Single frame print reservations 1 Press the q button and then press the m button to display the top menu 2 Use klmn to select L PRINT ORDER and press the B button PRINT ORDER SET OK U EXIT MENU 3 Use kl to select and press the B button x 12M 2009 10 26 12 30 100 0004 4 0 ...

Страница 38: ... kl to select RESET and press the B button Resetting the print reservation data for selected images 1 Follow Steps 1 and 2 of Resetting all print reservation data p 38 2 Use kl to select and press the B button 3 Use kl to select KEEP and press the B button 4 Use mn to select the image with the print reservation you want to cancel Use kl to set the print quantity to 0 5 If necessary repeat Step 4 a...

Страница 39: ... detects the camera a message indicating setup completion appears Confirm the message and click OK The camera is recognized as a removable disk Macintosh If iPhoto has started exit iPhoto and start OLYMPUS Master 2 While the camera is connected to the computer shooting functions are disabled Connecting the camera to a computer via a USB hub may cause unstable operation When MTP is set for the subm...

Страница 40: ...save the image data on your computer while the camera and the computer are connected System requirements Windows Windows 2000 Professional XP Home Edition XP Professional Vista Macintosh Mac OS X v10 3 or later On a computer running Windows Vista if MTP is set for the submenu that appears by pressing n after selecting PC in Step 3 of Connecting the camera to a computer p 39 Windows Photo Gallery w...

Страница 41: ... the camera is left for another 12 minutes it automatically turns off Press the n button to turn the camera on Press the K button to set a shooting mode Wait until flash charge stops blinking before taking pictures Monitor Difficult to see Condensation 1 may have occurred Turn off the power and wait for the camera body to become acclimated to the surrounding temperature and dry out before taking p...

Страница 42: ... view the image on a computer If the image still cannot be viewed the image file is corrupted r THE IMAGE CANNOT BE EDITED Problem with selected image Use photo retouch software etc to edit the image on a computer CARD COVER OPEN Operation problem Close the battery card compartment cover g BATTERY EMPTY Battery problem Insert new batteries If using rechargeable batteries charge the batteries NO CO...

Страница 43: ... the picture When objects are at different distances Fast moving object The subject is not in the center of the frame Camera shake Taking pictures without camera shake Taking pictures using h mode p 18 Select j SPORT in s mode p 17 The j SPORT mode uses a fast shutter speed and can reduce the blur incurred by a moving subject Taking pictures at a high ISO sensitivity If a high ISO sensitivity is s...

Страница 44: ...h a high ISO sensitivity noise small colored spots and color unevenness that were not in the original image can occur and the image can appear grainy The resulting image is grainier than with low ISO sensitivity as well ISO p 25 Batteries Making batteries last longer Avoid any of the following operations when not actually taking pictures because they deplete the battery power Repeatedly pressing t...

Страница 45: ...is pressed halfway repeatedly in shooting mode activating the auto focus A picture is displayed on the monitor for an extended period of time The camera is connected to a computer or printer Battery life varies depending on the type of battery manufacturer shooting conditions etc Similarly the camera may turn off without displaying the battery level warning or may display the battery level warning...

Страница 46: ... a computer or other device use MEMORY FORMAT FORMAT p 30 to format the card Checking the image saving location The memory indicator shows whether the internal memory or card is being used during shooting and playback Current memory indicator IN Internal memory is being used None Card is being used 12M 2009 10 26 12 30 4 100 0004 IN NORM Current memory indicator Playback mode 12M P 4 IN NORM Shoot...

Страница 47: ... 1 639 1 728 Movies IMAGE SIZE FRAME RATE Continuous recording length Internal memory Using a 1 GB xD Picture Card With sound Without sound With sound Without sound C 640 480 N 10 sec 10 sec 8 min 59 sec 9 min 5 sec O 20 sec 20 sec 17 min 48 sec 18 min 11 sec E 320 240 N 28 sec 29 sec 24 min 43 sec 25 min 27 sec O 54 sec 58 sec 48 min 2 sec 50 min 55 sec The maximum file size of a single movie is ...

Страница 48: ...provided with the product DANGER If the product is used without observing the information given under this symbol serious injury or death may result WARNING If the product is used without observing the information given under this symbol injury or death may result CAUTION If the product is used without observing the information given under this symbol minor personal injury damage to the equipment ...

Страница 49: ...ard or the microSD Attachment into the camera If you insert a card by mistake such as a microSD card do not use force Contact authorized distributors service centers CAUTION Stop using the camera immediately if you notice any unusual odors noise or smoke around it Never remove the batteries with bare hands which may cause a fire or burn your hands Never hold or operate the camera with wet hands Do...

Страница 50: ... and uncharged batteries batteries of different manufacture or capacity etc Never attempt to charge alkaline lithium or CR V3 lithium battery packs Insert the battery carefully as described in the operating instructions Do not use batteries if their body is not covered by the insulating sheet or if the sheet is torn as this may cause fluid leaks fire or injury CAUTION Do not remove batteries immed...

Страница 51: ...gital cameras Never use these batteries with any other device Always charge NiMH batteries included in some areas before using them for the first time or if they have not been used for a long period Always charge sets of batteries included in some areas 2 or 4 together Do not use alkaline batteries unless it is absolutely necessary In some cases alkaline batteries may have a shorter service life t...

Страница 52: ...claimer of Warranty Olympus makes no representations or warranties either expressed or implied by or concerning any content of these written materials or software and in no event shall be liable for any implied warranty of merchantability or fitness for any particular purpose or for any consequential incidental or indirect damages including but not limited to damages for loss of business profits b...

Страница 53: ...eceiving antenna Increase the distance between the camera and receiver Connect the equipment to an outlet on a circuit different from that to which the receiver is connected Consult your dealer or an experienced radio TV technician for help Only the OLYMPUS supplied USB cable should be used to connect the camera to USB enabled personal computers PC Any unauthorized changes or modifications to this...

Страница 54: ... by statute are a products and accessories not manufactured by Olympus and or not bearing the OLYMPUS brand label the warranty coverage for products and accessories of other manufacturers which may be distributed by Olympus is the responsibility of the manufacturers of such products and accessories in accordance with the terms and duration of such manufacturers warranties b any Product which has b...

Страница 55: ...mited warranty is exclusively for the benefit of the original customer and cannot be transferred or assigned WHAT TO DO WHEN SERVICE IS NEEDED The customer must transfer any image or other data saved on a Product to another image or data storage medium and or remove any film from the Product prior to sending the Product to Olympus for service IN NO EVENT SHALL OLYMPUS BE RESPONSIBLE FOR SAVING KEE...

Страница 56: ... be made under conditions of this Guarantee This Guarantee is valid only if the Guarantee Certificate and proof of purchase are presented at the Olympus repair service station Please note that this Guarantee is in addition to and does not affect the customer s legal warranty rights under the applicable national legislation governing the sale of consumer goods mentioned above 2 This Guarantee does ...

Страница 57: ...e information contained in it is incomplete or illegible 2 Since this Guarantee Certificate will not be re issued keep it in a safe place Please refer to the list on the web site http www olympus com for the authorized international Olympus service network Trademarks IBM is a registered trademark of International Business Machines Corporation Microsoft and Windows are registered trademarks of Micr...

Страница 58: ...c Shooting range 0 6 m 2 0 ft to W 1 0 m 3 3 ft to T normal 0 2 m 0 7 ft to W 0 6 m 2 0 ft to T macro mode 0 03 m 0 1 ft to super macro mode Monitor 2 7 TFT color LCD display 230 000 dots Connector Multi connector USB connector A V OUT jack Automatic calendar system 2000 up to 2099 Operating environment Temperature 0 C to 40 C 32 F to 104 F operation 20 C to 60 C 4 F to 140 F storage Humidity 30 t...

Страница 59: ...a care 45 PIXEL MAPPING 30 MEMORY FORMAT 30 MENU COLOR 31 microSD Attachment 11 48 N Natural color 25 A AF MODE 26 AF TRACKING 18 26 Arrow pad 12 AV cable 32 B Backlight boost 21 BACKUP 30 Battery 10 45 BATTERY TYPE 33 Beep 31 Brightness Backlight boost 21 Exposure compensation 20 Monitor brightness s 31 C Card microSD Card 11 48 microSDHC card 11 48 xD Picture Card 10 46 Compression 24 Connecting...

Страница 60: ...4 POWER SAVE 33 Print 34 Print Reservations DPOF 37 Protecting images 0 28 R RESETD 27 Rotating images y 29 S s mode 17 Self timer 21 Shooting 14 Shooting movies n 18 SILENT MODE F 33 SLIDESHOW G 28 Sound recording R 25 29 SPOT 26 Strap 10 SUPER MACRO 20 SWITCH SHOOTING MODES C 27 T Turning on the camera 12 K q 31 U USB cable 34 39 Using the Menu 3 V VIDEO OUT 32 W WB 25 Z Zoom 19 ...

Страница 61: ...VN389701 ...

Отзывы: