background image

8-50

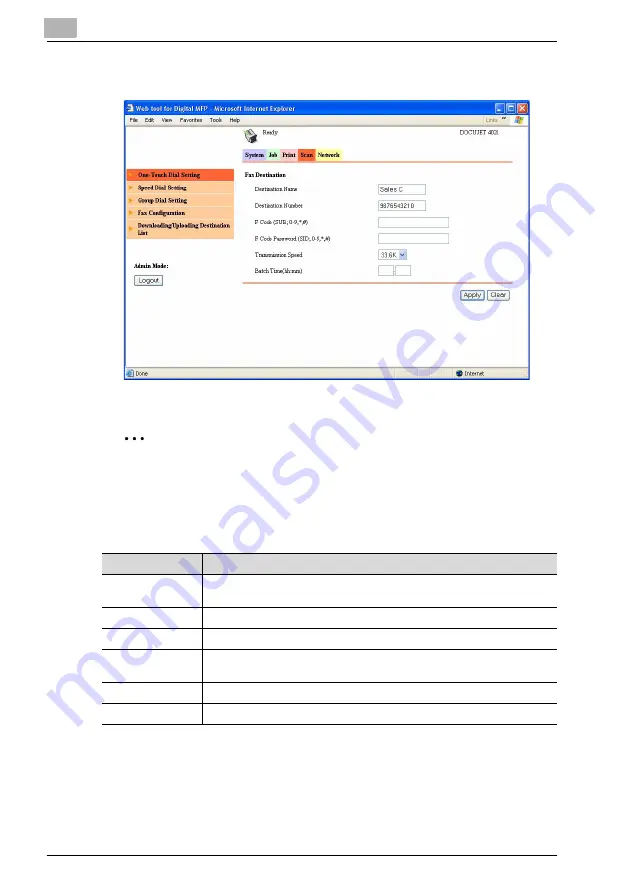
Sample page: For a fax destination

2

Note 

To view or change the settings registered with a one-touch dial number, click the 
one-touch dial number whose settings are to be changed.

When “Fax” is selected:

Item

Description

Destination Name

Type in the name of the recipient. The display name appears in the control panel 
display.

Destination Number

Type in the fax number of the recipient. (maximum 30 characters)

F Code (SUB)

Type in the SUB address of the F-code. (maximum 20 characters)

F Code Password 
(SID)

Type in the password for the F-code. (maximum 20 characters)

Transmission Speed

Select the transmission speed.

Batch Time

To specify a batch transmission, type in the transmission time.

Содержание Omega 2140

Страница 1: ...Omega 1640 2140 NC 4000 User s Guide...

Страница 2: ......

Страница 3: ...untries Ethernet is a registered trademark of Xerox Corporation PCL is a registered trademark of Hewlett Packard Company Limited All other product and brand names are trademarks or registered trademar...

Страница 4: ...ortions of src lib crypto have the following copyright Copyright 1998 by the FundsXpress INC All rights reserved Export of this software from the United States of America may require a specific li cen...

Страница 5: ...S OF THE SOFTWARE BE LIABLE FOR ANY DIRECT INDIRECT INCIDEN TAL SPECIAL EXEMPLARY OR CONSEQUENTIAL DAMAGES INCLUD ING BUT NOT LIMITED TO PROCUREMENT OF SUBSTITUTE GOODS OR SERVICES LOSS OF USE DATA OR...

Страница 6: ...AGES OR ANY DAMAGES WHATSOEVER RESULTING FROM LOSS OF USE DATA OR PROFITS WHETHER IN AN ACTION OF CONTRACT NEGLIGENCE OR OTHER TORTIOUS ACTION ARISING OUT OF OR IN CONNECTION WITH THE USE OR PERFORMAN...

Страница 7: ...ment This product includes software developed by the OpenSSL Project for use in the OpenSSL Toolkit http www openssl org 4 The names OpenSSL Toolkit and OpenSSL Project must not be used to en dorse or...

Страница 8: ...SSL documentation included with this distribution is covered by the same copyright terms except that the holder is Tim Hudson tjh cryptsoft com Copyright remains Eric Young s and as such any Copyright...

Страница 9: ...N 1 12 Connecting the network cable 1 12 Network port LEDs 1 12 2 Network printing 2 1 Selecting the network printing method 2 1 When using a Windows operating system 2 1 When using a NetWare environm...

Страница 10: ...el 4 7 4 3 NETWORK SETTING 4 9 Specifying the IP address subnet mask and default gateway 4 9 Specifying the DNS settings 4 13 Specifying the gateway transmission setting 4 14 Specifying the WEB settin...

Страница 11: ...the maximum number of search items 4 41 Selecting the authentication method 4 42 Specifying the LDAP account name 4 43 Specifying the LDAP password 4 44 Specifying the domain name 4 44 4 7 USER SETTIN...

Страница 12: ...e resolution 6 28 Selecting the file format 6 29 Selecting the compression encoding method 6 30 6 6 If the memory becomes full while scanning documents 6 31 6 7 Specifying a one touch dial destination...

Страница 13: ...sion 8 14 System tab Details Interface Information 8 15 System tab Details Consumable 8 16 System tab Maintenance Counter 8 17 System tab Online Assistance 8 18 Job tab Print Job Management 8 19 Job t...

Страница 14: ...en E Mail or LDAP Search is selected 8 51 When Group Dial is selected 8 51 Scan tab Speed Dial Setting 8 52 Sample page For an e mail destination 8 55 When Fax is selected 8 55 When E Mail or LDAP Sea...

Страница 15: ...ror messages and their remedies 9 1 9 2 Troubleshooting 9 2 Network printing 9 2 Scan to E mail 9 2 Easy Web Management 9 3 10 Appendix 10 1 Main product specifications 10 1 Network printing 10 1 Scan...

Страница 16: ...x 17 Explanation of manual conventions...

Страница 17: ...x 18...

Страница 18: ...machine can be used as a network print er In addition since the machine is preprogrammed with scanning functions paper documents can easily be converted to electronic data and used for example with el...

Страница 19: ...their settings Press the OK key to apply the current setting 6 Printer key indicator This indicator lights up while data is being printed from the computer and flashes while data is being sent For det...

Страница 20: ...Press to select a copy Finishing function 18 Combine Original key indicator Press to specify 2in1 or 4in1 copy settings 19 Confirm key Press to view the counters or transmission results or to print a...

Страница 21: ...achine is in Copy mode 25 123 ABC key Press to switch between number input mode and letter input mode 26 Reset key Press to cancel all settings The currently specified job is canceled Press ing this k...

Страница 22: ...essed while this machine is warming up the next copy job is queued The key lights up in green to indicate that jobs can be queued and the key lights up in orange to indicate that the machine is not re...

Страница 23: ...last recipient called While dialing this key is used to generate a pause when transferring from an internal to an external line or receiving information services 35 One touch dial keys Used to dial pr...

Страница 24: ...1 appears in the display numbers will be entered When A appears in the display letters symbols will be entered is treated as a tilde The following characters can be entered by each key in the keypad C...

Страница 25: ...123 ABC key until input mode A is selected The cursor _ flashes alternately in the display with the character at its current lo cation 0 0 space 0 Keypad key Available characters Additional available...

Страница 26: ...1 9 Press the 3 key 7 times Press the key Press the 3 key 7 times Press the 4 key 7 times Press the 2 key 7 times...

Страница 27: ...1 10 Press the 3 key 6 times Press the 0 key Press the 123 ABC key Press the 0 key...

Страница 28: ...elow the character that you wish to change and then enter the new character The entered character is inserted at the cur sor s position Entering text with the keypad keys To enter a character with the...

Страница 29: ...on the network hub 2 Reminder The network cable is not included with this machine therefore use Category 5 or 5e cable for the network cable Network port LEDs LED1 LINK This indicator lights up when t...

Страница 30: ...n available network printing method according to the operating system being used When using a Windows operating system Peer to peer printing Compatible operating systems Windows 98 SE Windows Me Peer...

Страница 31: ...k The LPR print service is supported by the operating system as the standard Use a TCP IP port and use LPR as the print protocol PORT9100 printing Using the PORT9100 print service the computer and thi...

Страница 32: ...cations are established with HTTP Hyper Text Transfer Protocol one of the TCP IP protocols In order to prevent unauthorized access in companies and organizations a firewall must be installed However H...

Страница 33: ...owing methods are supported 2 Note If the GDI printer driver is to be used in a NetWare environment run the repair program provided for the operating system by Microsoft Access the following URL and t...

Страница 34: ...ntroller PCL 4000 are not in stalled the settings information cannot be printed from the machine s con trol panel 4 Install the printer driver The Peer to Peer Utility is installed when the printer dr...

Страница 35: ...2 13 If optional fax kit FAX 4000 and image controller PCL 4000 are not in stalled the settings information cannot be printed from the machine s con trol panel 4 Install the printer driver If the GDI...

Страница 36: ...and image controller PCL 4000 are not in stalled the settings information cannot be printed from the machine s con trol panel 4 Install the printer driver Specify the network port when the driver is...

Страница 37: ...LAN on page 1 12 2 From the machine s control panel specify the IP address subnet mask and de fault gateway Refer to Specifying an IP address on page 2 9 3 Print the settings information and then chec...

Страница 38: ...control panel 2 Note The IP address setting should be specified according to instructions from the net work administrator The IP address setting is specified in Utility mode by the administrator 1 Pre...

Страница 39: ...de was incorrectly entered press the Clear Stop key to erase the number and then type it in correctly 4 Press the or key until NETWORK SETTING is selected and then press the OK key If fax kit FAX 4000...

Страница 40: ...available only if a DHCP server is on the network If AUTO is selected it will not be necessary to specify the subnet mask or gateway settings 7 Use the keypad to type in the IP address and then press...

Страница 41: ...o erase it and then type it in correctly 10 Press the OK key The message ACCEPTED appears and then the NETWORK SETTING menu appears again 11 Press the Reset key in the control panel After the screen s...

Страница 42: ...ttings 2 Note This feature is available only if optional fax kit FAX 4000 and image controller PCL 4000 are installed 1 From the control panel press the Confirm key The CONFIRM MODE menu appears 2 Pre...

Страница 43: ...2 14 3 Press the or key until CONFIGURATION PAGE is selected 4 Press the OK key After the message PRINTING appears the settings information is printed...

Страница 44: ...ing print settings for the NetWare client Windows Peer to peer printing Compatible operating systems Windows 98 SE Windows Me 2 Reminder Before specifying settings check that the following preparation...

Страница 45: ...ontroller PCL 4000 included with the PCL 4000 option 1 On the Start menu point to Settings and then click Printers to open the Printers folder 2 Right click the icon for the installed printer 3 Click...

Страница 46: ...the PCL driver optional is to be in stalled refer to the User s Guide for image controller PCL 4000 included with the PCL 4000 option 1 For Windows 2000 On the Start menu point to Settings and then c...

Страница 47: ...10 Type 9100 for the port number in the RAW Settings group box and then click the OK button 11 Click the Next button 12 Click the Finish button 13 Touch Close 14 Click the Close or Apply button IPP pr...

Страница 48: ...ver optional is to be in stalled refer to the User s Guide for image controller PCL 4000 included with the PCL 4000 option Checking IPP related settings from Easy Web Management For details on Easy We...

Страница 49: ...Other Hardware and then click View installed printers or fax printers to open the Printers and Faxes folder For Windows Vista On the Start menu click Control Panel then Hardware and Sound and then cl...

Страница 50: ...twork tab in Administrator mode select NetWare Configuration and then specify the following settings for this machine For details on using Easy Web Management refer to Using Easy Web Management on pag...

Страница 51: ...work tab in Administrator mode select NetWare Configuration and then specify the following settings for the copier For details on using Easy Web Management refer to Using Easy Web Management on page 8...

Страница 52: ...type according to the network environ ment Print Server Name Print server name created in step 4 NDS Context Name Name of the context that connects to PServer Not necessary to specify Print Server Pa...

Страница 53: ...ort handler 9 In the connection type dialog box select Remote Printer LPR TCPIP 10 Type in the IP address specified for the controller as the host address and the queue name as the printer name to com...

Страница 54: ...ecipient s computer by e mail or it can be uploaded to an FTP server The scan data can be sent using any of the following methods Choose the appropriate method according on the network environment and...

Страница 55: ...includes a mail server is required Scan data is attached to an e mail message as a TIFF or PDF file then sent to a com puter on the network or to a computer through the Internet Mail server Client co...

Страница 56: ...ded as TIFF or PDF files to a specified directory on an FTP server 2 Note A network environment that includes an FTP server is required An FTP server on the Internet can be accessed through a proxy se...

Страница 57: ...d in order to use the network scanning features FTP server FTP server Internet Client computer Intranet Mail server Client computer Internet Scan to E mail Scan to Server FTP Required environment for...

Страница 58: ...y Web Management refer to Using Easy Web Management on page 8 1 List of network settings Parameter Description Scan to E mail Scan to Server FTP Settings Machine control pan el Easy Web Manage ment o...

Страница 59: ...pecify the protocol for searching for services on the TCP IP network and for automatically specifying clients Con sult with the network administrator o o SNMP SET TING Specify the manage ment protocol...

Страница 60: ...image data has been attached when scan data is being sent attached to an e mail message o 1 o o DEFAULT SUBJECT Specify the default sub ject used when sending scan data attached to an e mail message o...

Страница 61: ...on to the POP3 server Consult with the net work administrator 6 7 o o POP3 PASS WORD Specify the password used to log on to the POP3 server Consult with the net work administrator 6 7 o o AUTO RE CEP...

Страница 62: ...n be set Cannot be set LDAP SERVER AD DRESS Specify the IP address or host name for the LDAP server Consult with the network ad ministrator o o LDAP PORT NO Specify the port number between 1 and 65535...

Страница 63: ...setting other than ANONY MOUS was selected as the authentication method Consult with the network adminis trator o o LDAP PASSWORD Specify the password used to connect to the LDAP server Type in a pas...

Страница 64: ...IN MANAGEMENT menu Menu Submenu Parameter NETWORK SETTING IP ADDRESS SETTING AUTO SPECIFY SUBNET MASK 1 GATEWAY 1 DNS CONFIG DISABLE ENABLE GATEWAY TX 3 DISABLE ENABLE WEB SETTING DISABLE ENABLE LPD S...

Страница 65: ...installed 3 Can be specified if the optional fax kit FAX 4000 is installed LDAP SETTING LDAP SERVER ADDR LDAP PORT NO 1 to 65535 SSL SETTING DISABLE ENABLE SEARCH BASE ATTRIBUTE SEARCH METHOD LDAP TIM...

Страница 66: ...TING SUBNET MASK GATEWAY DNS CONFIG GATEWAY TX WEB SETTING LPD SETTING SLP SETTING SNMP SETTING 2 Reminder Before specifying network settings check with the network administrator for the necessary inf...

Страница 67: ...or access code and then press the OK key The manufacturer s default setting is 000000 If the number was incorrectly entered press the Clear Stop key to erase the number and then type it in correctly 4...

Страница 68: ...tomatically be obtained from the DHCP server After the message ACCEPTED appears the NETWORK SETTING menu appears again If SPECIFY is selected a screen appears allowing you to specify the IP address Co...

Страница 69: ...in the gateway 10 Press the OK key After the message ACCEPTED appears the NETWORK SETTING menu appears again 11 Press the Reset key in the control panel After the screen shown above appears turn the...

Страница 70: ...ey 2 Press the or key until DISABLE or ENABLE is selected and then press the OK key If DISABLE is selected the message ACCEPTED appears and then the NETWORK SETTING menu appears again If ENABLE was se...

Страница 71: ...n the machine off then on again to restart it 2 Reminder In order to apply the new settings the machine must be turned off then on again to be restarted Specifying the gateway transmission setting 1 I...

Страница 72: ...s when optional fax kit FAX 4000 is installed Specifying the WEB setting 1 In the NETWORK SETTING menu press the or key until WEB SETTING is selected and then press the OK key 2 Press the or key until...

Страница 73: ...s the or key until LPD SETTING is selected and then press the OK key 2 Press the or key until DISABLE or ENABLE is selected and then press the OK key Whether DISABLE or ENABLE is selected the message...

Страница 74: ...s the or key until SLP SETTING is selected and then press the OK key 2 Press the or key until DISABLE or ENABLE is selected and then press the OK key Whether DISABLE or ENABLE is selected the message...

Страница 75: ...s the or key until SNMP SETTING is selected and then press the OK key 2 Press the or key until DISABLE or ENABLE is selected and then press the OK key Whether DISABLE or ENABLE is selected the message...

Страница 76: ...ters SENDER NAME E MAIL ADDRESS SMTP SERVER ADDRESS SMTP PORT NO SMTP TIMEOUT TEXT INSERT DEFAULT SUBJECT POP BEFORE SMTP E MAIL MODE available only when optional fax kit FAX 4000 is installed 2 Remin...

Страница 77: ...cted and then press the OK key 3 Type in the administrator access code and then press the OK key The manufacturer s default setting is 000000 4 Press the or key until E MAIL SETTING 1 is selected and...

Страница 78: ...K key 6 Type in the sender s name The sender s name can contain a maximum of 20 characters 7 Press the OK key After the message ACCEPTED appears the E MAIL SETTING 1 menu appears again 2 Note If a num...

Страница 79: ...f 64 characters If this machine will not be used to receive e mail messages enter the e mail address of the administrator Be sure to first obtain from the network administrator the e mail address to b...

Страница 80: ...ost name can contain a maximum of 64 characters To specify a host name for the SMTP server the DNS setting must be spec ified For the IP address or host name of the SMTP server consult with the net wo...

Страница 81: ...ort number of the SMTP server A port number between 1 and 65535 can be specified Normally port number 25 is used 3 Press the OK key After the message ACCEPTED appears the E MAIL SETTING 1 menu appears...

Страница 82: ...ssage ACCEPTED appears the E MAIL SETTING 1 menu appears again Specifying the text input setting 1 In the E MAIL SETTING 1 menu press the or key until TEXT IN SERT is selected and then press the OK ke...

Страница 83: ...and then press the OK key 2 Type in the subject for e mail messages The subject can contain a maximum of 20 characters 3 Press the OK key After the message ACCEPTED appears the E MAIL SETTING 1 menu a...

Страница 84: ...CEPTED appears and then the E MAIL SETTING 1 menu appears again If ON is selected specify the length of time in seconds for POP before SMTP Specify the number of seconds and then press the OK key The...

Страница 85: ...4 28 2 Note E MAIL MODE is available only when optional fax kit FAX 4000 is installed For details on specifying the settings refer to the User s Guide for fax kit FAX 4000...

Страница 86: ...his section provides details on specifying settings for the following parameters POP3 SERVER ADDRESS POP3 PORT NO POP3 TIMEOUT POP3 ACCOUNT POP3 PASSWORD Specifying the POP3 server address 1 Press the...

Страница 87: ...The manufacturer s default setting is 000000 4 Press the or key until E MAIL SETTING 2 is selected and then press the OK key If fax kit FAX 4000 is installed 5 In the E MAIL SETTING 2 menu press the...

Страница 88: ...ost name of the POP3 server consult with the net work administrator 7 Press the OK key After the message ACCEPTED appears the E MAIL SETTING 2 menu appears again 2 Note If a number was incorrectly ent...

Страница 89: ...ETTING 2 menu appears again Specifying the POP3 server connection timeout 1 In the E MAIL SETTING 2 menu press the or key until POP3 TIMEOUT is selected and then press the OK key 2 Type in the length...

Страница 90: ...n the account name The account name can contain a maximum of 64 characters For the account name consult with the network administrator 3 Press the OK key After the message ACCEPTED appears the E MAIL...

Страница 91: ...Type in the password The password can contain a maximum of 32 characters For the password consult with the network administrator 3 Press the OK key After the message ACCEPTED appears the E MAIL SETTI...

Страница 92: ...provides details on specifying settings for the following parameters LDAP SERVER ADDRESS LDAP PORT NO SSL SETTING SEARCH BASE ATTRIBUTE SEARCH METHOD LDAP TIMEOUT MAX SEARCH RESULTS AUTHENTICATION LD...

Страница 93: ...strator access code and then press the OK key The manufacturer s default setting is 000000 If the number was incorrectly entered press the Clear Stop key to erase it and then type it in correctly 4 Pr...

Страница 94: ...rver the DNS setting must be spec ified For the IP address or host name of the LDAP server consult with the net work administrator If the setting was incorrectly entered press the Clear Stop key to er...

Страница 95: ...message ACCEPTED appears the LDAP SETTING menu ap pears again Selecting the SSL setting 1 In the LDAP SETTING menu press the or key until SSL SET TING is selected and then press the OK key 2 Press the...

Страница 96: ...n a maximum of 64 characters For the search base consult with the network administrator If the setting was incorrectly entered press the Clear Stop key to erase it and then type it in correctly 3 Pres...

Страница 97: ...n correctly 3 Press the OK key After the message ACCEPTED appears the LDAP SETTING menu ap pears again Selecting the search method 1 In the LDAP SETTING menu press the or key until SEARCH METHOD is se...

Страница 98: ...ength of time in seconds until the LDAP search times out The timeout period can be set between 5 and 300 seconds 3 Press the OK key After the message ACCEPTED appears the LDAP SETTING menu ap pears ag...

Страница 99: ...ecting the authentication method 1 In the LDAP SETTING menu press the or key until AUTHENTI CATION is selected and then press the OK key 2 Press the or key until ANONYMOUS SIMPLE DIGEST MD5 or GSS SPN...

Страница 100: ...UNT is selected and then press the OK key 2 Type in the account name for the LDAP server The account name can contain a maximum of 64 characters For the account name for the LDAP server consult with t...

Страница 101: ...f 32 characters For the password consult with the network administrator If the setting was incorrectly entered press the Clear Stop key to erase it and then type it in correctly 3 Press the OK key Aft...

Страница 102: ...64 characters For the domain name consult with the network administrator If the setting was incorrectly entered press the Clear Stop key to erase it and then type it in correctly 3 Press the OK key A...

Страница 103: ...hine while fax kit FAX 4000 is not installed Specifying the NTP server By connecting this machine to an NTP server time data can be accurately maintained by retrieving it from the NTP server automatic...

Страница 104: ...entered press the Clear Stop key to erase the number and then type it in correctly 4 Press the or key until USER SETTING is selected and then press the OK key 5 In the USER SETTING menu press the or...

Страница 105: ...Mail or Scan to FTP operation the transmission date and time are not added to the data In addition the date and time are not recorded in the transmission log For the NTP server address consult with th...

Страница 106: ...ess the Clear Stop key to erase the number and then type it in correctly 4 Press the or key until USER SETTING is selected and then press the OK key 5 In the USER SETTING menu press the or key until T...

Страница 107: ...4 50 The message ACCEPTED appears and then the USER SETTING menu appears again 7 Press the or key until RETURN is selected and then press the OK key...

Страница 108: ...il One touch dial keys Available only if fax kit FAX 4000 is installed Press a one touch dial key to easily specify the destination In an environment where an LDAP server is being used the LDAP server...

Страница 109: ...e touch dial destinations optional fax kit FAX 4000 must be installed 1 Press the Utility key in the control panel 2 Press the or key until DIAL REGISTRATION is selected and then press the OK key 3 Pr...

Страница 110: ...n be programmed The number of the key to be programmed appears and then the screen for reg istering settings appears 5 Select MANUAL SETTING or LDAP SEARCH and then press the OK key If MANUAL SETTING...

Страница 111: ...sending Internet faxes can be spec ified These settings are applied when a transmission is specified using the procedure for Internet fax transmissions The settings are not applied when a transmission...

Страница 112: ...he OK key 10 Select NAME or E MAIL for the destination information to be searched and then press the OK key The remainder of the procedure is the same regardless of whether NAME or E MAIL is selected...

Страница 113: ...cted the registration name or e mail address con taining the entered characters is searched for If END was selected the registration name or e mail address ending with the entered characters is search...

Страница 114: ...to the previous screen If the e mail address that was found contains 64 characters or more the message CAUTION appears and then the DIAL REGISTRATION menu appears again 13 After checking the displaye...

Страница 115: ...e not applied when a transmission is specified using the procedure for Scan to E mail transmissions For details on the Scan to E mail operation refer to Performing a Scan to E mail operation on page 6...

Страница 116: ...ey Speed dial numbers 001 through 240 can be programmed from the control panel The speed dial number to be programmed appears and then the screen for reg istering settings appears 5 Select MANUAL SETT...

Страница 117: ...ed using the pro cedure for Internet fax transmissions The settings are not applied when a transmission is specified using the procedure for Scan to E mail transmis sions For details on the Scan to E...

Страница 118: ...key NAME E MAIL A maximum of 10 characters can be entered to be searched for The registration name or e mail address searched for differs depending on the search method selected with the SEARCH METHO...

Страница 119: ...ration name or e mail address is selected in the search results and then press the OK key NAME E MAIL Press the key to display the destination name and e mail address After checking the displayed info...

Страница 120: ...on size and resolution for sending In ternet faxes to be specified These settings are applied when a transmission is specified using the procedure for Internet fax transmissions The settings are not a...

Страница 121: ...trator mode of Easy Web Management For details on accessing Easy Web Management refer to Using Easy Web Management on page 8 1 Registering group dial destinations 2 Note In order to register a group d...

Страница 122: ...OUP DIAL is selected and then press the OK key 4 Press the one touch dial key to be programmed for group dialing The number of the one touch dial key to be programmed for group dialing ap pears with a...

Страница 123: ...ient The recipient information appears Press the OK key 7 To add a recipient to the group press the or key until ADD is select ed and then press the OK key 8 Use the one touch dial keys and speed dial...

Страница 124: ...5 17 10 Press the or key until RETURN is selected and then press the OK key After the message REGISTERED appears the DIAL REGISTRATION menu appears again...

Страница 125: ...Editing or deleting a one touch dial destination 1 Press the Utility key in the control panel 2 Press the or key until DIAL REGISTRATION is selected and then press the OK key 3 Press the or key until...

Страница 126: ...en the DIAL REGISTRATION menu appears 5 Press the or key until EDIT or DELETE is selected If DELETE was selected and the OK key is pressed the message DE LETED appears and then the DIAL REGISTRATION m...

Страница 127: ...enu appears again 2 Note If an edited one touch dial destination is registered with a group dial destination the following screen appears Press the or key until YES or NO is selected and then press th...

Страница 128: ...y 4 Type in the speed dial number for the destination to be edited or deleted and then press the OK key After the registered information is displayed the following screen appears 5 Press the or key un...

Страница 129: ...Press the OK key The destination appears To correct destination press the Clear Stop to erase it and then type in the correct destination OTHER SETTING appears only if fax kit FAX 4000 is installed th...

Страница 130: ...a group dial destination 1 Press the Utility key in the control panel 2 Press the or key until DIAL REGISTRATION is selected and then press the OK key 3 Press the or key until GROUP DIAL is selected a...

Страница 131: ...N menu appears 5 Press the or key until EDIT or DELETE is selected If DELETE was selected and the OK key is pressed the message DE LETED appears and then the DIAL REGISTRATION menu appears again 6 To...

Страница 132: ...new recipient registered with the group appears Press the OK key to display the screen shown in step 7 To add more re cipients repeat steps 7 and 8 until all recipients to be added have been reg ister...

Страница 133: ...5 26...

Страница 134: ...tion documents are sent through a mail server In addition as soon as transmission with the server is finished correctly the trans mission is considered complete In order to perform this operation the...

Страница 135: ...red OTHER SETTING appears To change the transmission settings such as the subject cc address or file format press the key The SCAN OTHER SETTING menu appears For details on changing the transmission s...

Страница 136: ...mail recipients Up to 64 characters can be entered To stop scanning press the Clear Stop key If the transmission could not be completed correctly a transmission result report is printed To cancel a q...

Страница 137: ...documents on the original glass 2 Note E mail addresses specified after the Scan key is pressed are set as Scan to E mail recipients 1 Press the Scan key The machine enters Scan mode and the Scan mode...

Страница 138: ...hat can be used and the scanning area of the image refer to the User s Guide included with this machine 3 Using the keypad type in the e mail address of the recipient When the destination address is e...

Страница 139: ...FAX 4000 is installed Refer to Specifying a speed dial destination on page 6 35 Refer to Selecting a destination from the phone book on page 6 39 Up to 64 characters can be entered 4 Press the Start k...

Страница 140: ...ss and then press the OK key Repeat this step until all pages of the document are scanned 3 After all pages of the document are scanned press the Start key When transmission is finished the message CO...

Страница 141: ...e for the scanning size are METRIC A3w A4w A4v A5w A5v B4w B5w B5v FLSw 8Kw 16Kw 16Kv and INCH 11 17 11 14 LGLw LTRw LTRv INVw and INVv 1 If MANUAL was selected in step 5 and the OK key is pressed the...

Страница 142: ...the document are scanned 4 After all pages of the document are scanned press the Start key When transmission is finished the message COMPLETE appears and the Scan mode screen appears again 2 Note To s...

Страница 143: ...the subject cc address file format and compression encoding method can be specified for the scanned data Specifying the subject 1 Press the Scan key The machine enters Scan mode and the Scan mode scr...

Страница 144: ...or key until SUBJECT is selected and then press the OK key 5 Type in the subject title for the e mail message to be sent and then press the OK key The SCAN OTHER SETTING menu appears again Up to 64 ch...

Страница 145: ...e screen appears 2 Position the document and then specify the recipient OTHER SETTING appears 3 Press the key The SCAN OTHER SETTING menu appears 4 In the SCAN OTHER SETTING menu press the or key unti...

Страница 146: ...c address appears specify the e mail address of the recipients to be added Repeat this step until all of the recipients are specified A maximum of 254 cc addresses can be specified To check or edit an...

Страница 147: ...f cc addresses appears To delete another address repeat this step If the OK key is pressed only the selected address is displayed To delete on character at a time press the Clear Stop key If all chara...

Страница 148: ...AD DRESS menu which contains ADD and CHECK EDIT appears 4 Press the or key until RETURN is selected and then press the OK key The SCAN OTHER SETTING menu appears again Selecting the file format 1 Pres...

Страница 149: ...key The SCAN OTHER SETTING menu appears 4 Press the or key until IMAGE FORMAT is selected and then press the OK key 5 Press the or key until either TIFF or PDF is selected as the desired file format 6...

Страница 150: ...n encoding method 1 Press the Scan key The machine enters Scan mode and the Scan mode screen appears 2 Position the document and then specify the recipient OTHER SETTING appears 3 Press the key The SC...

Страница 151: ...until MH MR or MMR is selected as the com pression encoding method 6 Press the OK key After the message ACCEPTED appears the SCAN OTHER SETTING menu appears again 7 After specifying all settings pres...

Страница 152: ...NAL the scanning quality resolution and document quality settings can be changed If the settings are not changed the scan data is sent with the scan settings displayed when the Scan key is pressed Sel...

Страница 153: ...s the OK key 4 Press the or key to select the appropriate resolution The settings available for the resolution are 150 150dpi 300 300dpi and 600 600dpi The manufacturer s default setting is 300 300dpi...

Страница 154: ...6 21 Selecting the document quality 1 Press the Scan key The machine enters Scan mode and the Scan mode screen appears 2 Press the Quality key...

Страница 155: ...key until the type of document to be attached to e mail messages is selected The settings available for the document quality are TEXT PHOTO TEXT and PHOTO The manufacturer s default setting is TEXT PH...

Страница 156: ...screen the scanning density for the document can be changed When TEXT PHOTO or TEXT was selected When TEXT PHOTO or TEXT is selected the density can be specified as de scribed below 1 Press the Scan k...

Страница 157: ...NSITY screen appears 3 Press the or key until AUTO or MANUAL is selected and then press the OK key If AUTO is selected the message ACCEPTED appears and then the Scan mode screen appears again with AUT...

Страница 158: ...ft reduces the density lightens the image Adjusting the setting to the right increases the density darkens the image When the OK key is pressed after the density setting is adjusted the message ACCEPT...

Страница 159: ...6 When PHOTO was selected When PHOTO is selected the density can be specified as described below 1 Press the Scan key The machine enters Scan mode and the Scan mode screen appears 2 Press the Density...

Страница 160: ...again with the adjusted density setting indicated If the density setting is adjusted to the left the setting on the left side is in dicated in the Scan mode screen If the density setting is adjusted t...

Страница 161: ...rver FTP op erations can be changed Selecting the resolution 1 Press the Utility key 2 Press the or key until SCAN SETTING is selected and then press the OK key 3 Press the or key until RESOLUTION is...

Страница 162: ...key 2 Press the or key until SCAN SETTING is selected and then press the OK key 3 Press the or key until IMAGE FORMAT is selected and then press the OK key 4 Press the or key until either TIFF or PDF...

Страница 163: ...3 Press the or key until CODING METHOD is selected and then press the OK key 4 Press the or key to select the appropriate compression encoding meth od from the available settings The settings availabl...

Страница 164: ...nd the OK key is pressed the message ACCEPT ED appears and then the Scan mode screen appears again If NO is selected and the OK key is pressed the message WAIT MEMORY SPACE appears and transmission of...

Страница 165: ...he message MEMORY FULL appears after the length of time for an automatic reset operation has passed and a transmission result report is printed After any key is pressed the message JOB CANCELED appear...

Страница 166: ...ying a one touch dial destination 2 Note In order to use the one touch dial destinations optional fax kit FAX 4000 must be installed 1 Press the Scan key The machine enters Scan mode and the Scan mode...

Страница 167: ...ough 32 programmed with the e mail address of the recipient 2 Note The recipient must have been registered with a one touch dial key in advance For details on programming the one touch dial keys refer...

Страница 168: ...6 35 6 8 Specifying a speed dial destination 1 Press the Scan key The machine enters Scan mode and the Scan mode screen appears...

Страница 169: ...mail address 3 Press the OK key The destination is specified 2 Note The recipient must have been registered with a speed dial number in advance For details on programming speed dial numbers refer to...

Страница 170: ...a recipient from a group dial destination 2 Note In order to use the group dial destinations optional fax kit FAX 4000 must be in stalled 1 Press the Scan key The machine enters Scan mode and the Scan...

Страница 171: ...been registered with a group dial destination in advance For details on registering group dial destinations refer to Registering destina tions on page 5 1 If even one fax number is registered with a g...

Страница 172: ...and speed dial numbers In addition in an environment where an LDAP server is being used the LDAP server can be searched for destinations to be registered The trans mission can be sent to the destinat...

Страница 173: ...H or LDAP SEARCH is se lected and then press the OK key If LIST was selected the list of all destinations registered with one touch dial keys and speed dial numbers appears Press the or key un til the...

Страница 174: ...the search in the phone book refer to Searching the phone book on page 6 41 If LDAP SEARCH was selected the address of a recipient registered with the LDAP server can be searched for For details on p...

Страница 175: ...e or key until SEARCH is selected and then press the OK key 4 Type in the first few characters of the name registered for the desired recipient Enter part of the name registered with the one touch dia...

Страница 176: ...ars 6 Select the destination and then press the OK key The destination appears in the Scan mode screen When the destination address is entered OTHER SETTING appears To change transmission settings suc...

Страница 177: ...6 44 Searching the LDAP server 1 Press the Scan key The machine enters Scan mode and the Scan mode screen appears 2 Press the Phone Book key...

Страница 178: ...nation information to be searched and then press the OK key The remainder of the procedure is the same regardless of whether NAME or E MAIL is selected LDAP SEARCH NAME or LDAP SEARCH E MAIL appears i...

Страница 179: ...rched for If CONTAIN was selected the registration name or e mail address con taining the entered characters is searched for If END was selected the registration name or e mail address ending with the...

Страница 180: ...he message CAUTION appears and then the DIAL REGISTRATION menu appears again 7 Press the OK key To change the transmission settings such as the subject cc address or file format press the key The SCAN...

Страница 181: ...the communication results The communication results for scan data can be viewed 1 Press the Scan key The machine enters Scan mode and the Scan mode screen appears 2 Press the Confirm key The CONFIRM...

Страница 182: ...controller PCL 4000 has been installed on the machine The transmission results appear differently depending on whether or not an NTP server has been specified If an NTP server was specified The transm...

Страница 183: ...6 50...

Страница 184: ...ng Easy Web Management For details on Easy Web Management refer to Using Easy Web Management on page 8 1 In addition the FTP server address must be registered as a speed dial number Refer to Registeri...

Страница 185: ...o be sent into the document feeder Adjust the document guides to fit the size of the document Load the document pages with the side to be scanned face up For information on documents that can be used...

Страница 186: ...pression en coding method press the key The SCAN OTHER SETTING menu appears For details on changing the transmission settings refer to Chang ing the transmission settings on page 6 10 Specify a speed...

Страница 187: ...to the User s Guide for fax kit FAX 4000 Detail Only FTP server address registered as speed dial numbers can be specified FTP server addresses can be registered as speed dial number by using Easy Web...

Страница 188: ...nters Scan mode and the Scan mode screen appears 2 Lift open the original cover and then position the document to be sent on the original glass Load the document page with the side to be scanned face...

Страница 189: ...R SETTING appears To change the transmission settings such as the subject cc address or file format press the key The SCAN OTHER SETTING menu appears For details on changing the transmission settings...

Страница 190: ...ed dial numbers can be specified FTP server addresses can be registered as speed dial number by using Easy Web Manage ment Refer to Registering speed dial destinations FTP servers on page 5 14 A notif...

Страница 191: ...this step until all pages of the document are scanned 3 After all pages of the document are scanned press the Start key A connection to the FTP server is established and uploading begins When the tra...

Страница 192: ...ze are METRIC A3w A4w A4v A5w A5v B4w B5w B5v FLSw 8Kw 16Kw 16Kv and INCH 11 17 11 14 LGLw LTRw LTRv INVw and INVv 1 If MANUAL was selected in step 6 and the OK key is pressed the follow ing screen ap...

Страница 193: ...t key A connection to the FTP server is established and uploading begins When the transmission is finished the message COMPLETE appears and the Scan mode screen appears again 2 Note To stop scanning p...

Страница 194: ...full while scanning a document from the original glass select NO when the warning message appears and then press the OK key to begin sending the scanned pages When the transmission is finished the me...

Страница 195: ...he message MEMORY FULL appears after the length of time for an automatic reset operation has passed and a transmission result report is printed After any key is pressed the message JOB CANCELED appear...

Страница 196: ...rface card NC 4000 and image controller PCL 4000 must be installed 8 2 About Easy Web Management Easy Web Management is a device management utility integrated into the printer con troller for this mac...

Страница 197: ...r settings when PCL 4000 is installed Changing network settings Remotely managing the status Viewing this machine paper tray information consumables information and counter totals Checking print jobs...

Страница 198: ...work interface card NC 4000 and image controller PCL 4000 must be installed Network Ethernet TCP IP Operating system Windows 98 SE Windows Me Windows 2000 Windows XP Windows Server 2003 Compatible Web...

Страница 199: ...browser 2 In the Address bar type the following IP address for the machine and then press the Enter key http IP_address_for_this_machine Example If the IP address for this machine is 192 168 1 20 http...

Страница 200: ...ap pear on your computer In addition the specifications and other information con cerning this product may change without notice Description of the pages 1 1 2 No Item Description 1 Status display Ic...

Страница 201: ...ffer depending on the parameter refer to the page containing the cor responding description for the parameter Easy Web Management is used in the same way that Internet Web pages are viewed Click page...

Страница 202: ...emains locked and cannot be used the machine must be restarted with the main power switch In order to avoid this problem disable the cache With Internet Explorer 1 On the Tools menu click Internet Opt...

Страница 203: ...y Web Management should only be specified by the admin istrator These parameters do not appear unless you are logged on to Administrator mode To log on to Administrator mode 1 In the Admin Password bo...

Страница 204: ...sysadm We recommend that the administrator password be changed This machine cannot be used while a user is logged on to Administrator mode of Easy Web Management In addition a user cannot log on to Ad...

Страница 205: ...level This section contains descriptions of the items in the menu that appears on the left side of the page when each User mode tab is clicked User mode tabs You can select from five tabs System Job P...

Страница 206: ...8 11 System tab Summary The system configuration and status of the machine are displayed This is the first page that appears when Easy Web Management is accessed with the Web browser...

Страница 207: ...aper drawer the size and type of the loaded paper the printing orientation the paper drawer capacities and the status of the paper drawers are displayed 2 Note The information that is displayed differ...

Страница 208: ...put Tray The name of each installed output tray the tray capacities and the status of the output trays are displayed 2 Note The information that is displayed differs depending on the installed options...

Страница 209: ...m tab Details ROM Version The name of each installed controller and their ROM version are displayed 2 Note The information that is displayed differs depending on the installed options and the specifie...

Страница 210: ...Details Interface Information The name of each installed interface and their information are displayed 2 Note The information that is displayed differs depending on the installed options and the spec...

Страница 211: ...8 16 System tab Details Consumable Information about the machine consumables is displayed 2 Note The information that is displayed differs depending on the installed options and the specified settings...

Страница 212: ...8 17 System tab Maintenance Counter Counters managed by the machine can be displayed 2 Note The information that is displayed differs depending on the installed options and the specified settings...

Страница 213: ...nline Assistance Support information for the machine can be displayed The information entered on the page that appeared after clicking Online Assistance in the menu on the System tab in Administrator...

Страница 214: ...rint jobs can be displayed and jobs that have been printed will automatically be deleted Jobs specified as secure print jobs are not displayed 2 Note The number assigned to the job when it was queued...

Страница 215: ...downloaded to this machine then printed 2 Reminder Downloading the file is possible only if image controller PCL 4000 is installed 2 Note Some files cannot be printed depending on their file format F...

Страница 216: ...o settings specified is printed with these settings 2 Note The Print tab appears only if the image controller PCL 4000 is installed Item Description Copies Displays the specified number of copies Pape...

Страница 217: ...out The paper size specified for the printer output paper size can be viewed A print job sent with no settings specified is printed with these settings 2 Note The Print tab appears only if the image c...

Страница 218: ...ings 2 Note The Print tab appears only if the image controller PCL 4000 is installed Item Description Orientation Displays the selected paper orientation Size Displays the specified font size Pitch Di...

Страница 219: ...Configuration Page PCL Font List 1 Click Test Print in the menu on the Print tab 2 Select the test page that you wish to print 3 Click the Print button The selected test page is printed 2 Note The Pri...

Страница 220: ...8 25 Print tab Font Information The PCL font list can be checked 2 Note The Print tab appears only if the image controller PCL 4000 is installed...

Страница 221: ...8 26 Scan tab One Touch Dial Setting Registered one touch dial settings can be viewed 2 Reminder One Touch Dial Setting appears in the menu only if fax kit FAX 4000 is in stalled...

Страница 222: ...8 27 Scan tab Speed Dial Setting Registered speed dial settings can be viewed...

Страница 223: ...8 28 Scan tab Group Dial Setting Registered group dial settings can be viewed 2 Reminder Group Dial Setting appears in the menu only if fax kit FAX 4000 is installed...

Страница 224: ...8 29 Network tab Summary The basic network settings can be viewed...

Страница 225: ...administrator level This section contains descriptions of the items in the menu that appears on the left side of the page when each Administra tor mode tab is clicked Administrator mode tabs You can...

Страница 226: ...8 31 System tab Summary A summary of the system configuration for the machine and its status is displayed...

Страница 227: ...s output trays ROM version interface and consum ables can be viewed The information that is displayed is the same as that displayed in User mode 2 Note The information that is displayed differs depend...

Страница 228: ...is lost it is no longer possible to log on to Administrator mode 2 Note To change the password type the new password in both the New Password and Retype New Password boxes To clear the entered data wh...

Страница 229: ...8 34 System tab Save Setting Easy Web Management settings can be saved and restored...

Страница 230: ...t mask default gateway port number and DHCP which appear after clicking TCP IP Configuration in the menu on the Network tab are not saved Restore Setting The Easy Web Management settings can be change...

Страница 231: ...restarted 1 Click the Reset button 2 When the confirmation message appears click the Yes button To stop resetting click the No button 2 Reminder Jobs being processed are not saved when the reset oper...

Страница 232: ...d image controller can be updated Contact your technical representative for update files 1 Click the Browse button and then select the file to be used for updating 2 Click the Send button The firmware...

Страница 233: ...button 2 Reminder Jobs being processed are not saved when the initialize operation is performed Be careful since the current Easy Web Management settings will be lost Initializing the printer control...

Страница 234: ...Apply button Item Description Contact Specify the contact name maximum 32 characters Contact Tel Number Specify the contact telephone number maximum 32 characters Product Help URL Specify the URL of...

Страница 235: ...be displayed and jobs that have been printed will automatically be deleted Jobs specified as secure print jobs are not displayed 2 Note The number assigned to the job when it was queued in the machin...

Страница 236: ...ttings specify the various settings and then click the Apply button 2 Note The Print tab appears only if the image controller PCL 4000 is installed To reset the settings to their defaults click the Re...

Страница 237: ...is printed with these settings To change the settings specify the various settings and then click the Apply button 2 Note The Print tab appears only if the image controller PCL 4000 is installed To re...

Страница 238: ...tings and then click the Apply button 2 Note The Print tab appears only if the image controller PCL 4000 is installed 2 Note To reset the settings to their defaults click the Restore Factory Default b...

Страница 239: ...Print A test page can be printed The information that is displayed and the procedure for printing test pages are the same as in User mode 2 Note The Print tab appears only if the image controller PCL...

Страница 240: ...tab Font Information The PCL font list can be checked The information that is displayed is the same as that displayed in User mode 2 Note The Print tab appears only if the image controller PCL 4000 is...

Страница 241: ...splays the name of the recipient registered with the one touch dial number The display name appears in the control panel display Address Displays the recipient registered with the one touch dial numbe...

Страница 242: ...th one touch dial numbers 1 Click a one touch dial number that has not yet been programmed with a recip ient The One Touch Registration page appears 2 From the drop down list select the transmission m...

Страница 243: ...nd type in the characters to be searched for and then click the Apply button From the Network tab specify the settings for the connection to the LDAP server For the characters to be entered for the LD...

Страница 244: ...ts of the LDAP server search select the desired destination and then click the Add button 5 Specify the various settings and then click the Apply button The settings that appear differ depending on th...

Страница 245: ...ype in the name of the recipient The display name appears in the control panel display Destination Number Type in the fax number of the recipient maximum 30 characters F Code SUB Type in the SUB addre...

Страница 246: ...tails refer to Scan tab Group Dial Setting on page 8 28 Item Description Destination Name Type in the name of the recipient The display name appears in the control panel display Destination Address Ty...

Страница 247: ...of the recipient registered with the speed dial number The dis play name appears in the control panel display Address Displays the address of the recipient registered with the speed dial number Depen...

Страница 248: ...s with speed dial numbers 241 through 250 1 Click a speed dial number that has not yet been programmed with a recipient If a speed dial number between 001 and 240 transmission addresses was selected c...

Страница 249: ...click the Apply button From the Network tab specify the settings for the connection to the LDAP server For the characters to be entered for the LDAP search consult with the net work administrator 4 F...

Страница 250: ...e the settings registered with a speed dial number click the speed dial number whose settings are to be changed When Fax is selected Item Description Destination Name Type in the name of the recipient...

Страница 251: ...transmission speed Item Description Item Description Destination Name Type in the name of the recipient The display name appears in the control panel display Destination Address Type in the e mail ad...

Страница 252: ...er is not used Normally port number 21 is used E mail Notification Select this check box to send an e mail message as notification that the scan data has been uploaded to the FTP server Notification A...

Страница 253: ...al number between 01 and 32 Name Displays the name of the recipient registered with the group dial number The dis play name appears in the control panel display Address Displays the recipient register...

Страница 254: ...ingle one touch dial number 1 Click a group dial number that has not yet been programmed with recipients The Group Dial Registration page appears 2 Type in the name of the group dial destination 3 Sel...

Страница 255: ...8 60 2 Note FTP server addresses cannot be registered as a group To view or change the settings registered with a group dial number click the group dial number whose settings are to be changed...

Страница 256: ...8 61 Scan tab Fax Configuration User information and transmission conditions for faxes can be viewed and registered...

Страница 257: ...ocument to the specified fax number or e mail address Print Forward Select this setting to forward the received fax document to the specified fax number or e mail address at the same time that this ma...

Страница 258: ...h dial and speed dial settings can be saved and restored Download The specified one touch dial and speed dial settings can be saved This can be used to back up the settings 1 Click the Apply button be...

Страница 259: ...n select the file to be uploaded 2 Click the Apply button The one touch dial and speed dial settings are changed to those in the selected file 2 Reminder Be careful since the current one touch dial an...

Страница 260: ...ected network Default Gateway Specify the default gateway address of the connected network Base Port Number Specify the port number for RAW printing DHCP APIPA Select this option when a DHCP server or...

Страница 261: ...fy the NetWare information for the network To change the settings specify the various settings and then click the Apply button Item Description Frame Type Select the frame type Print Server Name Type...

Страница 262: ...in the Nprinter Rprinter printer number Range 0 to 254 Connection Mode Specify the NetWare emulation mode Directory Services NDS Bindery and Directory Services Bindery Item Description Service mode Np...

Страница 263: ...Notnecessaryto specify Name of the tree where Pserver logs on Notnecessaryto specify Print Queue Scan Rate 1 Change as necessary 1 Change as necessary Mode Nprinter PServer Printer Number 1 Change acc...

Страница 264: ...ion Type in the printer information maximum 127 characters Printer Driver In staller Type in the URL for the printer driver maximum 127 characters Printer Maker and Model Type in the name of the print...

Страница 265: ...rinter Controller Reset in the menu under Maintenance on the System tab otherwise the changes to the settings will not be applied vnd hp pcl under Document Format Supported can be used only if the im...

Страница 266: ...name for the SMTP server maximum 64 characters Default Subject for E mail Attachment Specify the default subject used when sending scan data attached to an e mail mes sage maximum 20 characters Sende...

Страница 267: ...og on to the POP3 server maximum 32 characters Auto Reception Select whether or not the Auto Reception function is used INTERVAL Specify the time interval between 1 and 60 minutes for checking for new...

Страница 268: ...FTP DNS Configuration Specify the FTP proxy server information and the DNS information To change the settings specify the various settings and then click the Apply button Item Description FTP Proxy Se...

Страница 269: ...tings specify the various settings and then click the Apply button Item Description Server Address Specify the LDAP server address maximum 64 characters Port Number Specify the port number between 1 a...

Страница 270: ...the search base Timeout Specify the amount of time between 5 and 300 seconds until an LDAP search times out Maximum Search Results Specify the maximum number of items between 5 and 100 that can be re...

Страница 271: ...8 76...

Страница 272: ...ss could not be as signed by the DNS or DHCP server Consult with the network admin istrator DISCONNECT XXXX server The connection to the server was cut Consult with the network admin istrator WRONG PA...

Страница 273: ...he computer The printer driver is not in stalled correctly Follow the procedure to cor rectly uninstall then re install the printer driver No The machine is temporarily malfunctioning Restart the mach...

Страница 274: ...In the Address box type the IP address of the specified de vice p 8 4 The settings in the Web browser are incorrect Even though the device can be accessed certain settings must be specified according...

Страница 275: ...it may be a problem for displaying Some characters cannot be specified or dis played Depending on the operating system some characters can not be specified or displayed Spacecharacterscannot be specif...

Страница 276: ...can communicate with each other Scan to E mail Scan to Server FTP Interface Ethernet 10 100Base T TX RJ 45 TCP IP service ARP BootP DHCP IPP lpr lpd Raw Socket HTTPd 1 1 SLP AutoIP 1 NetWare service...

Страница 277: ...10 2...

Отзывы: