Olympia A 6040 Скачать руководство пользователя страница 42

40

Vista generale

Vista generale

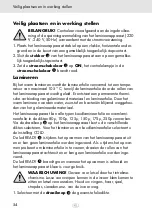
La seguente figura illustra la plastificatrice in dettaglio. 

1

3

5

6
7

9

4

8

2

I

1

Plastificatrice

2

Lato di uscita

3

Supporto per pouches

4

Connettore di rete

5

Interruttore di rete ON / OFF

6

LED READY

7

Tasto AUTO / REVERSE

8

Selettore per spessore di 

pellicola

9

Lato di caricamento

Содержание A 6040

Страница 1: ...D Laminierger t G Laminator F Plastifieuse I Plastificatrice n Lamineerapparaat E Aparato laminador g OLYMPIA A 6040 07 2019...

Страница 2: ...wendung 1 Zu Ihrer Sicherheit 2 bersicht 4 Verpackungsinhalt 5 Bevor Sie loslegen 5 Sicher aufstellen und in Betrieb nehmen 6 Laminieren 6 Wenn etwas nicht funktioniert 8 Regelm ige Wartung und Pflege...

Страница 3: ...mungsgem e Verwendung Das Laminierger t ist geeignet f r das Laminieren mit Hei laminierfolien bis zu einer maximalen Gr e von DIN A2 mit einer Laminierfolienst r ke von 80 250 micron wobei die Gesamt...

Страница 4: ...en Kleinteile Verpa ckungsmaterialien oder Schutzfolien verschlucken Halten Sie Kinder von Ihrem Laminierger t und dessen Verpackung fern WARNUNG Das Laminierger t kann von Kindern ab einem Alter von...

Страница 5: ...m Reinigen f hrt das austretende Papier sehr hei e Laminierreste mit sich Entnehmen Sie das austretende Papier nur am abgek hlten Ende VORSICHT Stolpergefahr durch unsachgem verlegte Kabel Verlegen Si...

Страница 6: ...Abbildung zeigt Ihnen das Laminierger t im Detail 1 3 5 6 7 9 4 8 2 1 Laminierger t 6 LED READY 2 Ausgabeseite 7 Taste AUTO REVERSE 3 Folienf hrung 8 Drehregler f r Folienst rke 4 Netzstecker 9 Einga...

Страница 7: ...nebenen Materialien F hren Sie Laminierfolien immer mit der geschlossenen Seite voran und in gerader Ausrichtung in die Eingabeseite 9 des Laminierger ts ein Schneiden Sie Laminierfolien falls notwend...

Страница 8: ...erfolie Durch das Hei laminie ren werden Wasser Sauerstoff und Bakterien dauerhaft vom laminierten Material ferngehalten Das Laminierger t kann alle Kaltlaminierfolien und Hei laminierfolien in den St...

Страница 9: ...allen Seiten 3 bis 5 mm Ab stand zum Folienrand vorhanden sein 3 F hren Sie die vorbereitete Laminierfolie mit der geschlossenen Seite voran und in gerader Ausrichtung auf der Eingabeseite 9 des Lamin...

Страница 10: ...k nnen den R cklauf des Laminierger ts bei Problemen auch manuell ber die Taste AUTO REVERSE 7 ausl sen 1 Dr cken und halten Sie die Taste AUTO REVERSE 7 Das Laminierger t l uft jetzt r ckw rts VORSI...

Страница 11: ...nn wenn sich das Laminierergeb nis nicht so darstellt wie erwartet 1 Schalten Sie den Netzschalter 5 auf ON die Kontrollleuchte im Netzschalter 5 leuchtet rot VORSICHT Verbrennungsgefahr durch hei e G...

Страница 12: ...inierst rke 0 8 mm Aufw rmzeit 4 8 min Abk hlzeit ca 15 min Laminiergeschwindigkeit 400 mm min Spannungsversorgung 220 240 V 50 Hz Leistungsaufnahme 1000 W Abmessungen B x H x T 718 x 145 x 230 mm Gew...

Страница 13: ...Vorschriften Garantie Die Garantiezeit betr gt 24 Monate Die Garantiezeit beginnt ab Kaufdatum Bitte bewahren Sie den Kaufbe leg und die Originalverpackung auf Sollte ein Problem auftreten besu chen...

Страница 14: ...Safety 14 General View 16 Package Contents 17 Before You Start 17 Setting Up Safely and Putting Into Operation 18 Laminating 18 If Problems Occur 20 Regular Maintenance and Service 21 Technical Data 2...

Страница 15: ...pass the laminator on to third parties Intended Use The laminator has been designed for lamination using hot laminating pouches up to a maximum size of A2 with a lamination foil thickness of 80 250 m...

Страница 16: ...can swallow small parts packaging materials and protective foils Keep children away from the laminator and its packaging materials WARNING The laminator can be used by children from the age of eight...

Страница 17: ...erial After cleaning very hot residual laminated material is stuck to the ejected paper Only remove the ejected paper holding it at the cooled end CAUTION Risk of tripping through improperly laid cabl...

Страница 18: ...eral View The following figure shows the laminator in detail 1 3 5 6 7 9 4 8 2 1 Laminator 6 READY LED 2 Output 7 AUTO REVERSE button 3 Foil guide 8 Dial for foil thickness 4 Power plug 9 Infeed 5 ON...

Страница 19: ...or uneven materials Always feed the laminating pouches into the laminator infeed 9 with the closed side first and aligned straight If necessary only cut laminating pouches after laminating Please rem...

Страница 20: ...al and the laminating pouch Hot lamination permanently prevents the laminated material from coming into contact with water oxygen and bacteria The laminator can process all cold and hot laminating foi...

Страница 21: ...n all round spacing of 3 to 5 mm from the edges of the pouch 3 Feed the prepared laminating pouch with the closed side first keeping it straight into the infeed 9 of the laminator CAUTION Risk of burn...

Страница 22: ...ch at the infeed 9 In case of problems you can also manually reverse the rollers by press ing the AUTO REVERSE button 7 1 Press and hold the AUTO REVERSE button 7 The laminator goes into reverse CAUTI...

Страница 23: ...as good as expected 1 Switch the power switch 5 to ON the control lamp on the power switch 5 lights up red CAUTION Risk of burns through hot machine surface During the laminating process the machine s...

Страница 24: ...minating thickness 0 8 mm Warm up phase 4 8 min Cool down phase Approx 15 min Laminating speed 400 mm min Power supply 220 240 V 50 Hz Power consumption 1000 W Dimensions W x H x D 718 x 145 x 230 mm...

Страница 25: ...ly obliged to dispose of old electronic and electrical devices separately The adjacent symbol indicates that the laminator must not be disposed of in normal domestic waste Packaging materials must be...

Страница 26: ...rit 26 Aper u 28 Contenu du coffret 29 Avant de commencer 29 Positionnement et mise en service de la plastifieuse 30 Plastification 30 Si quelque chose ne fonctionne pas 32 Entretien et maintenance 33...

Страница 27: ...mettre l ensemble de la documentation Utilisation conforme l usage pr vu La plastifieuse est pr vue pour la plastification de pochettes chaud jusqu un format maximum DIN A2 d une paisseur comprise ent...

Страница 28: ...sque d touffement li des petits objets des films d emballage ou de protection Les enfants peuvent avaler des petits objets des films d emballage ou de protection Tenir la plastifieuse et son emballage...

Страница 29: ...La plastification et le nettoyage entra nent la sortie du papier des r sidus qui peuvent provoquer des br lures Ne retirez le que par son extr mit refroidie PRUDENCE Risque de tr bucher en raison de...

Страница 30: ...r sente votre plastifieuse dans le d tail 1 3 5 6 7 9 4 8 2 1 Plastifieuse 6 LED READY 2 C t sortie 7 Touche AUTO REVERSE 3 Guide pochette 8 Molette de r glage de l paisseur de la pochette 4 Fiche de...

Страница 31: ...plastifiez aucun support en m tal humide ou irr gulier Ins rez les pochettes toujours du c t soud et tout droit c t entr e 9 Si n cessaire d coupez les pochettes uniquement apr s la plastifica tion Ve...

Страница 32: ...i avec la pochette Gr ce la plastification chaud l eau l oxyg ne et les bact ries sont limin es durablement du document La plastifieuse peut traiter toutes les pochettes de plastification froid et cha...

Страница 33: ...Pour que le r sultat de plastification soit optimal laisser sur tous les c t s une bordure de 3 5 mm 3 Ins rez la pochette pr par e du c t soud et tout droit c t entr e 9 de la plastifieuse PRUDENCE R...

Страница 34: ...ressort alors c t entr e 9 En cas de probl mes vous pouvez galement d clencher manuellement la marche en inversion de la plastifieuse en utilisant la touche AUTO REVERSE 7 1 Appuyez longuement sur la...

Страница 35: ...s r guliers et chaque fois que le r sultat de plastification n est pas comme vous le souhaitez 1 Positionnez l interrupteur de r seau 5 sur ON le voyant de contr le dans l interrupteur 5 devient rouge...

Страница 36: ...paisseur maximum de plastification 0 8 mm Temps de chauffe 4 8 min Temps de refroidissement 15 min env Vitesse de plastification 400 mm min Alimentation en courant 220 240 V 50 Hz Puissance absorb e...

Страница 37: ...es et lectroniques les propri taires d appareils usag s sont tenus de mettre tous les appareils lectriques et lectroniques usag s dans un collecteur s par L ic ne ci contre signifie que vous ne devez...

Страница 38: ...ezza 38 Vista generale 40 Contenuto della confezione 41 Prima della messa in funzione 41 Posizionamento e messa in funzione sicuri 42 Plastificazione 42 Malfunzionamenti 44 Cura e manutenzione regolar...

Страница 39: ...caso di ulteriore cessione della plastificatrice Impiego conforme La plastificatrice preposta alla plastificazione con pouches a caldo fino a massimo il formato standard DIN A2 con uno spessore di 80...

Страница 40: ...ole protettive I bambi ni possono ingerire componenti piccoli materiali d imballo o pellicole protettive Tenere la plastificatrice e la confezione lontani dalla portata dei bambini AVVERTENZA La plast...

Страница 41: ...po la pulizia la carta non correttamente saldata all interno della pouches pu presentare residui di plastificazio ne molto caldi Per estrarre la carta non correttamente saldata afferrarla solo da un e...

Страница 42: ...tra la plastificatrice in dettaglio 1 3 5 6 7 9 4 8 2 I 1 Plastificatrice 2 Lato di uscita 3 Supporto per pouches 4 Connettore di rete 5 Interruttore di rete ON OFF 6 LED READY 7 Tasto AUTO REVERSE 8...

Страница 43: ...e materiali metallici umidi bagnati o con superficie irregolare Introdurre le pouches per plastificare sempre con il lato chiuso per primo e con orientamento rettilineo sul lato di caricamento 9 della...

Страница 44: ...materiale plastificato in modo per manente da acqua ossigeno e batteri La plastificatrice in grado di processare pellicole di plastificazione a freddo e a caldo con spessore 80 100 125 150 175 250 Il...

Страница 45: ...distanza di 3 5 mm dal bordo della pouches 3 Introdurre la pouches per plastificare cos predisposta con il lato chiuso per primo e con orientamento rettilineo sul lato di caricamen to 9 della plastifi...

Страница 46: ...i problemi possibile selezionare la marcia indietro della plastificatrice anche in manuale premendo il tasto AUTO REVERSE 7 1 Premere e tenere premuto il tasto AUTO REVERSE 7 La plastificatrice proced...

Страница 47: ...osizionare il connettore di rete 5 su ON la spia di controllo integrata nel connettore di rete 5 si accende in rosso ATTENZIONE Pericolo di ustioni dovute alla superficie calda dell apparecchio Durant...

Страница 48: ...0 8 mm Tempo di riscaldamento 4 8 min Tempo di raffreddamento ca 15 min Velocit di plastificazione 400 mm min Alimentazione 220 240 V 50 Hz Potenza assorbita 1000 W Dimensioni L x H x P 718 x 145 x 2...

Страница 49: ...differenziata di tutti gli apparecchi elettrici ed elettronici Il simbolo riportato qui a lato indica che non assolutamente consentito smaltire la plastificatrice assie me ai normali rifiuti domestici...

Страница 50: ...veiligheid 50 Overzicht 52 Inhoud van de verpakking 53 Voordat u begint 53 Veilig plaatsen en in werking stellen 54 Lamineren 54 Als er iets niet werkt 56 Regelmatig onderhoud en verzorging 57 Techni...

Страница 51: ...e bij het doorgeven van het lamineerapparaat aan derden Beoogd gebruik Het lamineerapparaat is geschikt voor het lamineren met warmlamineer folie tot een maximumgrootte van DIN A2 met een lamineerfoli...

Страница 52: ...mineerapparaat alleen in droge ruimtes binnenshuis WAARSCHUWING Gevaar voor verstikking door kleine onderdelen verpakkingsmaterialen of beschermende folie Kinderen kunnen kleine onderdelen verpakkings...

Страница 53: ...de uiteinde van de lamineerfolie vast VOORZICHTIG Gevaar voor brandletsel lamineerresten Na het reinigen voert het eruit komende papier zeer hete lamineer resten mee Pak het eruit komende papier allee...

Страница 54: ...nde afbeelding toont het lamineerapparaat in detail 1 3 5 6 7 9 4 8 2 1 Lamineerapparaat 6 Led READY 2 Uitvoerzijde 7 Knop AUTO REVERSE 3 Foliegeleider 8 Draaiknop voor foliedikte 4 Stekker 9 Invoerzi...

Страница 55: ...zorgen dat het lami neerapparaat altijd werkt zoals u verwacht Lamineer geen metalen natte of oneffen materialen Voer lamineerfolie altijd met de gesloten zijde naar voren en recht in de invoerzijde...

Страница 56: ...oor het warm lamineren worden water zuurstof en bacteri n blijvend weggehou den van het gelamineerde materiaal Het lamineerapparaat kan alle typen koudlamineerfolie en warmlami neerfolie in de dikten...

Страница 57: ...van de folie beschikbaar zijn 3 Voer de voorbereide lamineerfolie met de gesloten zijde naar voren en recht in de invoerzijde 9 van het lamineerapparaat in VOORZICHTIG Gevaar voor brandletsel door het...

Страница 58: ...n problemen kunt u het achteruit draaien van het lamineerap paraat ook handmatig activeren via de knop AUTO REVERSE 7 1 Druk de knop AUTO REVERSE 7 in en houd hem ingedrukt Het lamineerapparaat draait...

Страница 59: ...s wanneer het lamineerresultaat niet zo is als verwacht 1 Zet de stroomschakelaar 5 op ON het controlelampje in de stroomschakelaar 5 brandt rood VOORZICHTIG Gevaar voor brandletsel door heet opper vl...

Страница 60: ...aximale lamineerdikte 0 8 mm Opwarmtijd 4 8 min Afkoelingstijd ca 15 min Lamineersnelheid 400 mm min Voedingsspanning 220 240 V 50 Hz Opgenomen vermogen 1000 W Afmetingen b x h x d 718 x 145 x 230 mm...

Страница 61: ...om oude elektrische en elektronische apparaten naar een gescheiden afvalinzame ling te brengen Het symbool hiernaast betekent dat u het lamineerapparaat in geen geval bij het huishoudelijk afval mag...

Страница 62: ...su seguridad 62 Vista general 64 Contenido del embalaje 65 Antes de empezar 65 Instalaci n y puesta en servicio seguras 66 Laminaci n 66 Si algo no funciona 68 Mantenimiento y cuidado peri dicos 69 Da...

Страница 63: ...visto El aparato laminador ha sido concebido para la laminaci n con pel cu las transparentes de laminaci n en caliente hasta un tama o m ximo de DIN A2 con un espesor de pel cula transparente de lamin...

Страница 64: ...or piezas peque as materiales de embalaje o pel culas de protecci n Los ni os pueden ingerir piezas peque as materiales de embalaje o pel culas de protecci n Mantenga alejados a los ni os del apara to...

Страница 65: ...tire la pel cula transparente de laminaci n saliente solo por el extremo fr o de la pel cula PRECAUCI N Peligro de quemaduras provocado por restos de laminaci n calientes Despu s de la limpieza el pap...

Страница 66: ...nador en detalle 1 3 5 6 7 9 4 8 2 E 1 Aparato laminador 2 Lado de salida 3 Gu a de pel cula transparente 4 Clavija de alimentaci n 5 Interruptor de red ON OFF 6 LED READY 7 Tecla AUTO REVERSE 8 Regul...

Страница 67: ...roduzca las pel culas transparentes de laminaci n siempre con el lado cerrado recto orientado hacia delante a trav s del lado de entrada 9 del aparato laminador No corte las pel culas transparentes de...

Страница 68: ...mantienen permanentemente alejados del material laminado El aparato laminador es capaz de procesar todas las pel culas transpa rentes de laminaci n en fr o y pel culas transparentes de laminaci n en...

Страница 69: ...el cula transparente en todos los lados 3 Introduzca la pel cula transparente de laminaci n preparada con el lado cerrado recto orientado hacia delante a trav s del lado de entrada 9 del aparato lamin...

Страница 70: ...le activar el retroce so del aparato laminador a mano a trav s de la tecla AUTO REVER SE 7 1 Pulse y mantenga pulsada la tecla AUTO REVERSE 7 El aparato laminador ahora marcha hacia atr s PRECAUCI N P...

Страница 71: ...ultado de laminaci n no sea el esperado 1 Cambie la posici n del interruptor de red 5 a ON La l mpara de control del interruptor de red 5 se ilumina en rojo PRECAUCI N Peligro de quemaduras provocado...

Страница 72: ...de laminaci n m ximo 0 8 mm Tiempo de calentamiento 4 8 min Tiempo de enfriamiento Aproximadamente 15 minutos Velocidad de laminaci n 400 mm min Alimentaci n de tensi n 220 240 V 50 Hz Consumo de ene...

Страница 73: ...est n obligados desecharlos por separado El s mbolo adjunto significa que en ning n caso se debe tirar el aparato laminador a la basura dom stica Los materiales de embalaje se deben eliminar de forma...

Страница 74: ...g 73 73 73 74 76 77 77 78 78 80 81 82 82 83 83...

Страница 75: ...73 A 6040 DIN A2 80 250 micron 0 8 mm g...

Страница 76: ...74 8 g...

Страница 77: ...75 g...

Страница 78: ...76 1 3 5 6 7 9 4 8 2 g 1 2 3 4 5 ON OFF 6 LED READY 7 AUTO REVERSE 8 9...

Страница 79: ...77 Service A 6040 9 2 Olympia g...

Страница 80: ...78 220 V 240 V 50 Hz 1 2 4 3 5 ON 5 105 C 80 100 125 150 175 250 8 COLD LED READY 6 LED READY 6 g...

Страница 81: ...79 1 8 2 3 5 mm 3 9 4 2 3 g...

Страница 82: ...80 9 9 AUTO REVERSE 7 1 AUTO REVERSE 7 2 9 3 AUTO REVERSE 7 9 g...

Страница 83: ...81 1 4 2 3 1 5 ON 5 2 9 3 g...

Страница 84: ...82 4 80 250 micron 460 mm 0 8 mm 4 8 min 15 min 400 mm min 220 240 V 50 Hz 1000 W x x 718 x 145 x 230 mm 10 1 kg CE www go europe com g...

Страница 85: ...83 g...

Страница 86: ...GO Europe GmbH Zum Kraftwerk 1 45527 Hattingen Germany V 1 07 2019 Art No 3148...

Отзывы: