5
Installation
Fig. 2
Fig. 3
Filter Housing Assembly
Remove main system bracket, 3 filters and housings from packaging and assemble the filter
housings onto the main system bracket as follows:
I. Install Filters into Housings:
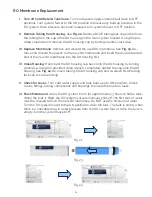
See
Fig. 1.
Stand 3 housings upright. Check each housing
to ensure the black O-ring is properly seated in its groove.
Remove the plastic from the Polypropylene Sediment Filter and place into the 1st
Stage housing.
Remove the plastic from both Carbon Block Filters and place into the middle (2nd
Stage) and left (3rd Stage) housings.
II. Install Housings onto System:
See
Fig. 2.
Starting with the 1st Stage housing on the
right, hand twist the housing onto the main bracket turning clockwise under the 1st
Stage label. Using the provided large wrench, completely tighten the 1st Stage hous
-
ing onto the main system bracket. One at a time, hand twist and then tighten with the
provided large wrench, the 2nd Stage and 3rd Stage housings under their corrospond
-
ing labels on the main system bracket. See
Fig. 3.
Once all three housings are installed,
stand system upright.
1
2
3
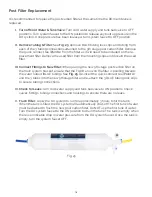
How to Use Quick Connect Fittings
To Attach Tubing
Remove BLUE tubing lock clip. Insert tubing until
it hits the backstop. Pull on insterted tubing to
ensure it is secure and re-attach BLUE lock clip.
To Release Tubing
Remove BLUE tubing lock clip. Use two fingers
to push in collet to release tubing. While collet is
being held, pull tubing straight out.
1
2
3
1
2
3
Fig. 1


