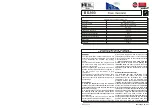
TECHNICAL CHARACTERISTICS
Operation temperature range
Produced in accordance with
Humidity
Dimensions
Weight
Guarantee
Operation Voltage
Description
Outputs
Contacts
Indicators
Temperature adjustment
Differential
Degrees of cover protection
220 - 240V AC / 50 - 60Hz
Contact 8Α (for resistive load)
ON - OFF
Output activation indicator
ο
5 to 35 C
o
1 C
IP 20
ο
Up to 50 C
Up to 65% relative humidity
86x83x35mm
120gr.
2 years
Room thermostat
EN 60730
980190000_09_007
Page 1 of
3
BS-90
0
Room thermostat
Thank you for your trust in our products
Olympia Electronics - European manufacturer
GENERAL
The room thermostat is used in areas where it is
essential to control the temperature. The contact
of the thermostat can activate any heating
device.
The thermostat is mounted at a height of about
1,5 meters and away from doors, drafts and
heating or cooling units.
When the switch of the thermostat is in the OFF
position then the thermostat does not operate. In
the ON position, the thermostat is fully
operational.
The adjustment of the thermostat must be done
30 minutes after powering the unit. This time is
required in order for the thermostat to adjust to its
surroundings.
Connections
1. Rotate the adjustment knob to the maximum
ο
position (35 C).Place a flat blade screwdriver in the
notch between the base and the knob and lift until
the knobs comes freely.
2. To separate the cover from the base, unfasten
the retaining screw and press the plastic hooks,
found on the top and bottom side and pull the cover
with extra care.
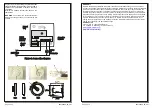
After removing the cover we can see 4 terminal
blocks that are numbered and shown in page 1.
First we connect the burner with the neutral of the
mains power supply and with terminal 3 of the
thermostat. Connect terminal 1 of the thermostat
with the mains phase wire and terminal 4 with the
mains neutral wire.
3.
Place vertically and with extra care the
plastic cover in order not to destroy the
indication lamp
and after the plastic hooks are
locked, fasten the removed screw in step 2, refit the
adjustment knob and
the thermostat is ready to
operate.
Scale adjustment (if necessary).
The thermostat has been pre-adjusted at the
factory. If for any reason, the scale of the
thermostat does not correspond the actual
temperature then it can be adjusted. This
procedure must be done at least 48 hours after
installing the thermostat. To adjust the scale first
measure the temperature near the thermostat with
another thermometer. Subtract this temperature
with the indicated temperature on the scale of the
thermostat. (e.i. If the measured temperature is 23
degrees and the scale reads 25 degrees then we
have 25-23 = 2 degrees difference). Remove the
adjustment knob. This knob consists of two
sections. The external section(Fig.2) with the anti-
slipping area and the internal area (Fig.3) with the
scale On the back side of the knob we can see a
scale with lines. Each line corresponds to 1


