Olivetti d-Copia 2001 Скачать руководство пользователя страница 36

32

CONVENIENT COPY FUNCTIONS

Using the SPF

1

Place the originals. (p.19)
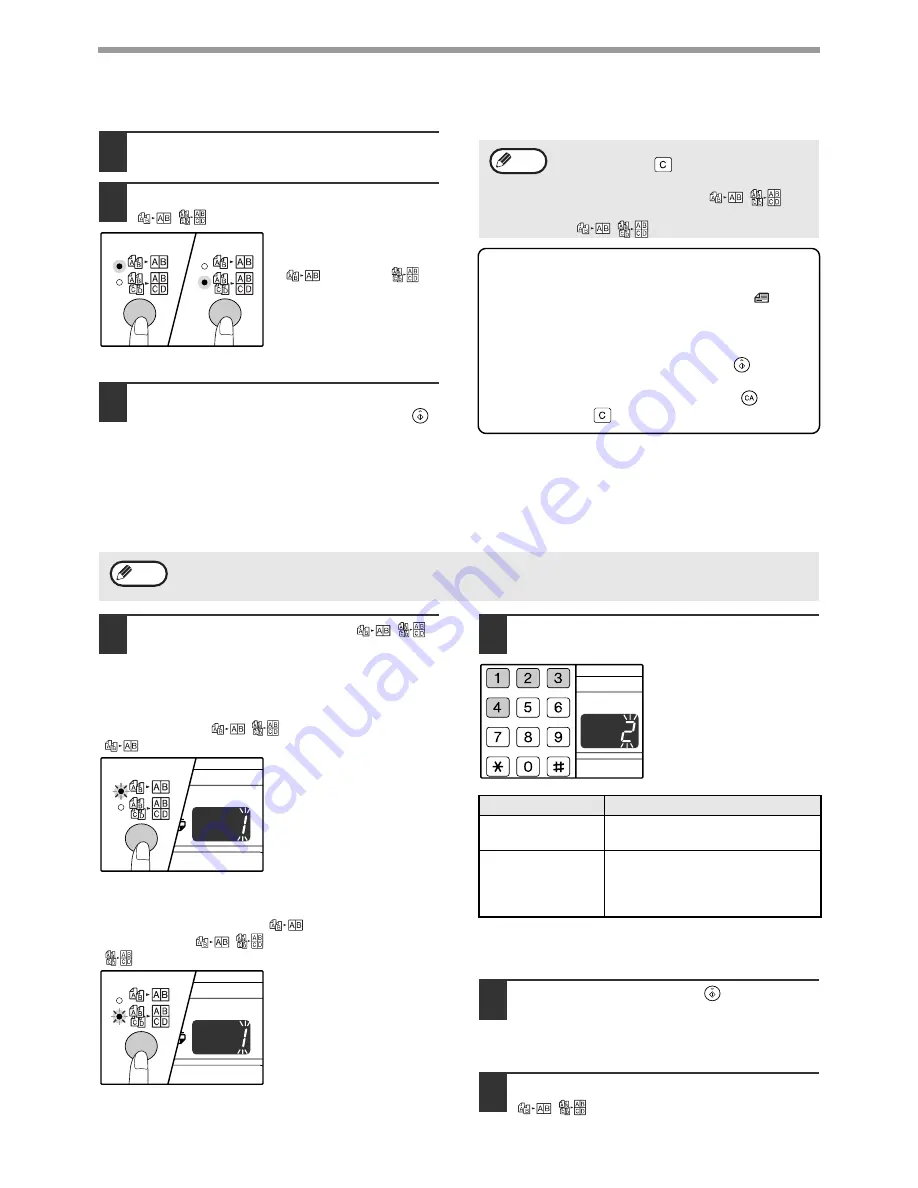
2

Press the [2 IN 1 / 4 IN 1] key


(

/

) to select the mode.

The mode is selected in 
the order "2 IN 1" 
(

), "4 IN 1" (

), 

"Off".

3

Set the number of copies and other 
settings, and press the [START] key (

).

The copy is delivered to the paper output tray.

If the memory becomes full

• If the memory becomes full while scanning the 

originals, the ORIGINAL DATA indicator (

will blink, "FUL" will appear in the display, and the 
machine will stop copying.

• To copy the originals that have been scanned up 

to that point, press the [START] key (

).

• To clear the data that has been scanned into 

memory, press the [CLEAR ALL] key (

) or the 

[CLEAR] key (

).

Setting the layout pattern

You can select the layout pattern for copying 2 original pages or 4 original pages onto one sheet of paper. The 
available layout patterns are shown on the first page of this section.

1

Use the [2 IN 1 / 4 IN 1] key (

/

to access the setting.

Selecting the layout for 2 IN 1 copy

With the 2 IN 1 / 4 IN 1 indicators off, hold down the [2 
IN 1 / 4 IN 1] key (

/

) until the 2 IN 1 indicator 

(

) blinks.

The setting code of the 
currently selected pattern 
will blink in the first digit 
of the display.

Selecting the layout for 4 IN 1 copy

With the 2 IN 1 indicator lit (

), hold down the [2 IN 

1 / 4 IN 1] key (

/

) until the 4 IN 1 indicator 

(

) blinks.

The setting code of the 
currently selected pattern 
will blink in the first digit 
of the display.

2

Select the setting code by pressing a 
numeric key.

To select "Pattern 2", 
press the [2] key.

See page 31 for layout pattern.
The factory default settings are indicated by " * ".
The entered number blinks in the first digit of the display.

3

Press the [START] key (

).

The selected setting code stops blinking and 
lights steadily. This completes the setting.

4

Press the [2 IN 1 / 4 IN 1] key 
(

/

) to exit the setting.

The display returns to the number of copies display.

• To cancel 2 IN 1 / 4 IN 1 copying, press the

[CLEAR] key


(

)

.

• To cancel 2 IN 1 / 4 IN 1 copy mode, press 

the [2 IN 1 / 4 IN 1] key (

/

repeatedly until the 2 IN 1 / 4 IN 1 indicators 
(

/

) are both off.

Note

DATA

The layout pattern can also be selected in the user programs. (p.41)

Note

Function

Setting code (p.41)

2 IN 1 layout

* 1 (Pattern 1)

2 (Pattern 2)

4 IN 1 layout

* 1 (Pattern 1)

2 (Pattern 2)
3 (Pattern 3)
4 (Pattern 4)

READ END

Содержание d-Copia 2001

Страница 1: ...Code 539506EN Printed in Italy GB OPERATOR MANUAL ...

Страница 2: ...oduct certifies that the product satisfies the basic quality requirements Your attention is drawn to the following actions which could compromise the conformity attested to above as well as the characteristics of the product incorrect electrical power supply incorrect installation incorrect or improper use or use not in compliance with the warnings provided in the User s Manual supplied with the p...

Страница 3: ... for OFF Caution For a complete electrical disconnection pull out the main plug The socket outlet shall be installed near the equipment and shall be easily accessible Do not make copies of anything which is prohibited from copying by law The following items are normally prohibited from copying by national law Other items may be prohibited by local law Checks Passports Driver s licenses Money Stamp...

Страница 4: ......

Страница 5: ...S 22 REDUCTION ENLARGEMENT ZOOM 22 AUTOMATIC RATIO SELECTION 22 MANUAL RATIO SELECTION 23 SELECTING THE VERTICAL AND HORIZONTAL COPY RATIOS SEPARATELY 24 TWO SIDED COPYING USING THE BYPASS TRAY 26 DUAL PAGE COPYING 27 INTERRUPTING A COPY RUN 28 3 CONVENIENT COPY FUNCTIONS ROTATING THE IMAGE 90 DEGREES 29 SORT COPY GROUP COPY 29 COPYING MULTIPLE ORIGINALS ONTO A SINGLE SHEET OF PAPER 31 CREATING MA...

Страница 6: ...TAL OUTPUT COUNT AND TONER LEVEL 64 CHECKING THE TOTAL OUTPUT COUNT 64 CHECKING THE TONER LEVEL 65 ROUTINE MAINTENANCE 66 CLEANING THE DOCUMENT GLASS AND SPF DOCUMENT COVER 66 CLEANING THE ORIGINAL SCANNING GLASS ONLY WHEN A SPF IS INSTALLED 66 CLEANING THE BYPASS TRAY PAPER FEED ROLLER 67 CLEANING THE TRANSFER CHARGER 67 8 PERIPHERAL DEVICES AND SUPPLIES PERIPHERAL DEVICES 68 SINGLE PASS FEEDER 6...

Страница 7: ...machine with a dust cover cloth or plastic film while the power is on Doing so may prevent heat dissipation damaging the machine Use of controls or adjustments or performance of procedures other than those specified herein may result in hazardous laser radiation exposure The socket outlet should be installed near the machine and should be easily accessible IMPORTANT POINTS WHEN SELECTING AN INSTAL...

Страница 8: ... on the drum will cause dirty copies CAUTIONS ON LASER Trademark acknowledgements Microsoft Windows operating system is a trademark or copyright of Microsoft Corporation in the U S A and other countries Windows 95 Windows 98 Windows Me Windows NT 4 0 Windows 2000 Windows XP and Windows Vista are trademarks or copyrights of Microsoft Corporation in the U S A and other countries IBM and PC AT are tr...

Страница 9: ...on the accessory CD ROM This manual explains the procedures for using the machine as a printer Software Setup Guide separate manual This manual contains instructions for installing the software that allows the machine to be used with your computer and procedures for establishing initial printer settings THE MEANING OF R IN ORIGINAL AND PAPER SIZE INDICATIONS An R appearing at the end of an origina...

Страница 10: ...user that injury may result if the contents of the warning are not properly followed Cautions the user that damage to the machine or one of its components may result if the contents of the caution are not properly followed Notes provide information relevant to the machine regarding specifications functions performance operation and such that may be useful to the user Warning Caution Note Model d C...

Страница 11: ... copies is possible Can be changed to a maximum of 99 copies in the user programs The user programs allow customised machine settings and management Access to the machine can be controlled by enabling audit mode The optional dual function board can be installed to enable use of Rotation copy and other convenient functions Scan once Print many The machine is equipped with a memory buffer allowing t...

Страница 12: ... prints are deposited to this tray Front cover Open to remove paper misfeeds and perform machine maintenance p 60 p 64 Paper trays Each tray holds 250 sheets of paper p 14 Side cover Open to remove paper misfeeds and perform machine maintenance p 58 p 59 Side cover handle Pull to open the side cover p 58 Bypass tray guides Adjust to the width of the paper p 15 Bypass tray Paper including special p...

Страница 13: ...ginals p 57 Exit area when the SPF is installed Originals exit the machine here after copying Toner cartridge lock release lever To replace the toner cartridge pull out the toner cartridge while pushing on this lever Toner cartridge Contains toner p 64 Roller rotating knob Turn to remove misfed paper p 59 p 60 Fusing unit release levers To remove a paper misfeed from the fusing unit push down on t...

Страница 14: ...ion board is installed Shifts text or image on the copy to leave a binding margin on the edge of the copy p 33 AUTO TEXT PHOTO key indicators Use to select the exposure mode AUTO TEXT or PHOTO p 21 AUDIT CLEAR key Closes an open account p 47 AUTO PAPER SELECT indicator Paper of the proper size will be automatically selected depending on the original size and selected copy ratio when this indicator...

Страница 15: ...7 PRESET RATIO selector keys indicators Use to select preset reduction enlargement copy ratios p 23 Numeric keys Use to select the desired copy quantity or to make user program entries p 22 To display the total number of pages output by the machine hold the 0 key down p 64 READ END key Use to check the total number of copies made p 64 When copying in sort mode and 2 in 1 4 in 1 from the document g...

Страница 16: ... panel is pressed an original is placed or a print job is received Auto power shut off mode This function automatically switches the machine to a state that consumes even less power than preheat mode if the set duration of time elapses without the machine being used when the power is on All lights except the POWER SAVE indicator and ON LINE indicator go off To resume normal operation press the STA...

Страница 17: ...ETTI recommended media must be used feed each sheet one at a time using the bypass tray do not attempt continuous copying or printing There are many varieties of special paper available on the market and some cannot be used with this machine Before using special paper contact your authorised service representative Before using other than OLIVETTI recommended paper make a test copy to see if the pa...

Страница 18: ...paper is not fanned double feeds or misfeeds may occur 4 Load paper into the tray 5 Gently push the paper tray into the machine Do not load paper higher than the line on the tray up to 250 sheets Make sure that the paper fits under the tabs on the right side of the tray Make sure the stack of paper is straight before loading it When adding paper take the remaining paper out and combine it into a s...

Страница 19: ...re that they are straight and flat and do not have loosely glued construction flaps not the closure flap Special papers except OLIVETTI recommended transparency film labels and envelopes must be fed one sheet at a time through the bypass tray When adding paper first remove any paper remaining in the tray combine it with the paper to be added and then reload as a single stack The paper to be added ...

Страница 20: ...aper feed location indicator will blink and the corresponding paper size which is currently set indicator will light steadily All other indicators will go out 2 If the machine has two or more paper trays use the TRAY SELECT key to select the paper tray for which you wish to change the paper size setting Each time the TRAY SELECT key is pressed a paper tray will be indicated with a blinking paper f...

Страница 21: ...ft guide in the slot at the left front of the paper tray 5 Press the START key and then the PAPER SIZE ENTER key To change the paper size setting of another tray repeat steps 2 to 5 after pressing the START key Important points when using the printer mode If the dual function board is not installed printing will not take place correctly if the tray paper size setting is A4R 8 1 2 x 11 R To prevent...

Страница 22: ...ray has the same size of paper as the original Load paper of the required size in a tray or select the bypass tray with the TRAY SELECT key and copy from the bypass tray The bypass tray must be manually selected To copy on paper of a different size than the original select the paper with the TRAY SELECT key If the ORIGINAL SIZE indicator is blinking rotate the original so that it is in the same or...

Страница 23: ...ay must be manually selected To copy on paper of a different size than the original select the paper with the TRAY SELECT key 4 Set the number of copies 5 Press the START key to begin copying The copy is delivered to the paper output tray The default output mode for copying from the SPF is sort mode p 29 The default output mode can be changed using Sort auto select in the user programs p 42 Do not...

Страница 24: ...document cover SPF is not completely closed shadows may appear on the copy or it may be fuzzy Straighten originals with folds or creases well before placing Originals that can be used in the SPF Originals that are A5 to A3 5 1 2 x 8 1 2 to 11 x 17 and 56 g m2 to 90 g m2 15 lbs to 24 lbs can be used A maximum of 40 pages can be placed at once For originals that are B4 8 1 2 x 14 or larger B4 A3 8 1...

Страница 25: ...xposure level 2 or 4 is selected the two indicators will light simultaneously SELECTING THE TRAY Auto paper select mode p 20 normally operates unless it has been disabled and thus when the original is placed on the document glass and the original size is selected or when the original is placed in the SPF the tray with the same size of paper as the original is automatically selected If you wish to ...

Страница 26: ...ey AUTOMATIC RATIO SELECTION below Reduction and enlargement ratios can be selected manually with the PRESET RATIO selector keys and or the ZOOM keys MANUAL RATIO SELECTION p 23 Separate settings can be selected for the vertical and horizontal ratios SELECTING THE VERTICAL AND HORIZONTAL COPY RATIOS SEPARATELY p 24 Ratios that can be selected will vary depending on whether the original is placed o...

Страница 27: ...ess the Zoom keys or to increase or decrease the ratio To decrease or increase the zoom ratio rapidly hold down the Zoom keys or When a Zoom key or is pressed the ZOOM indicator will light up and the zoom ratio will appear in the display for about two seconds 4 Set the number of copies and other copy settings and then press the START key The copy will be delivered to the paper output tray If the O...

Страница 28: ...ll appear in the display 4 Use the PRESET RATIO selector keys and Zoom keys to change the copy ratio in the vertical direction Press the PRESET RATIO selector keys to select a ratio close to the desired ratio and then press the Zoom keys to adjust the ratio in increments of 1 The ratio appears in the display 5 Press the Copy ratio display key The selected ratio for the vertical direction will be e...

Страница 29: ...d and the display will change to the number of copies display 8 Set the number of copies and other copy settings and then press the START key The copy will be delivered to the paper output tray To verify the copy ratios press and hold down the Copy ratio display key The vertical and horizontal ratios will be alternately displayed If you need to change the ratios press the PRESET RATIO selector key...

Страница 30: ... original A 3 Turn the copy of original A over and without changing the position of the edge closest to you insert it in the bypass tray Insert the paper all the way in 4 Select the bypass tray with the TRAY SELECT key and then press the START key The copy is delivered to the paper output tray 1 2 1 Original A Original B Copy 1 1 Original A Copied original A 1 1 Original A Copied original A 2 Orig...

Страница 31: ...for dual page copying When rotation copy is enabled the dual function board must be installed A4R 8 1 2 x 11 R paper can also be used Dual page copying can be enabled when Sort Group copy p 29 When used in combination with XY ZOOM copying enlargement is not possible Dual page copying cannot be used in combination with the following functions Enlargement 2 IN 1 4 IN 1 copying when the dual function...

Страница 32: ...es made before the interrupt copy job B Interrupt copy job C Copies made after the interrupt copy job 4 When the copy job is finished press the INTERRUPT key and remove the original s The INTERRUPT indicator will go off indicating that the interrupt function is no longer operating The copy settings will automatically revert to the settings selected for the copy run before the run was interrupted 5...

Страница 33: ...y The rotation copy function is initially enabled It can be disabled in the user programs p 41 SORT COPY GROUP COPY Copies of multiple original pages can be sorted into sets Sort copy Copies of multiple original pages can be grouped by page Group copy Rotation copy will not operate when a copy is enlarged to a paper size greater than A4 8 1 2 x 11 In this case place the original in the same orient...

Страница 34: ...ar in the display and the machine will stop copying To copy the originals that have been scanned up to that point press the START key To clear the data that has been scanned into memory press the CLEAR ALL key or the CLEAR key If the paper output tray becomes full When the maximum number of pages about 250 pages that can be held in the paper output tray are output copying will temporarily stop Whe...

Страница 35: ... and then perform steps 1 through 6 The 2 IN 1 4 IN 1 copies will be sorted 2 IN 1 copy 4 IN 1 copy Pattern 2 Pattern 1 Pattern 1 Pattern 2 Pattern 3 Pattern 4 First select the layout pattern as explained in Setting the layout pattern p 32 and Border line for 2 IN 1 4 IN 1 solid line or broken line in the user programs p 40 When finished follow the steps below An appropriate ratio setting will be ...

Страница 36: ...IN 1 4 IN 1 key until the 2 IN 1 indicator blinks The setting code of the currently selected pattern will blink in the first digit of the display Selecting the layout for 4 IN 1 copy With the 2 IN 1 indicator lit hold down the 2 IN 1 4 IN 1 key until the 4 IN 1 indicator blinks The setting code of the currently selected pattern will blink in the first digit of the display 2 Select the setting code...

Страница 37: ...inal size lights up 3 Press the MARGIN SHIFT key The MARGIN SHIFT indicator lights up 4 Set the number of copies and other settings and then press the START key The copy is delivered to the paper output tray A A Margin Original Left edge This feature cannot be used with the 2 IN 1 4 IN 1 feature or rotation copy feature The margin width can be changed in the user programs p 41 Note that a margin i...

Страница 38: ...y to select the desired erase mode To select the EDGE CENTRE ERASE mode press the ERASE key until both the EDGE and CENTRE indicators light up 4 Set the number of copies and other settings and then press the START key The copy is delivered to the paper output tray A A A B A B A B A B EDGE ERASE CENTRE ERASE EDGE CENTRE ERASE Original Copy Original Copy Original Copy Centre erase cannot be used in ...

Страница 39: ...hine s user programs must be set to Hi Speed To change the setting see USB 2 0 mode switching in the user programs p 42 Even when the Microsoft USB 2 0 driver is installed some USB 2 0 expansion cards are not capable of attaining the speed stipulated by the Hi Speed standard This problem can often be fixed by installing a more recent driver for the card To obtain the most recent driver for your ca...

Страница 40: ...URING THE PRINTER DRIVER in the Software Setup Guide Pausing a print job To pause a print job during printing press the ON LINE key on the operation panel to switch the machine off line Printing will be paused and the ON LINE indicator will blink To cancel a print job press the CLEAR key or the CLEAR ALL key To resume printing press the ON LINE key to switch the machine online When Use close paper...

Страница 41: ...2 Printing will begin when the CLEAR ALL key is pressed after the copy job is finished or when the ON LINE key is pressed to switch the machine online Printing will also begin after the set auto clear time elapses or after 60 seconds if Auto clear time is disabled 3The print job is paused and copying begins Modes Copying Printing Copy Copy key input Yes Yes During copying Yes 1 No 2 Printer During...

Страница 42: ...e automatic exposure level in the SPF place the original in the SPF p 19 Make sure that the SPF indicator is lit 2 Press the AUTO TEXT PHOTO key to select PHOTO 3 Hold down the AUTO TEXT PHOTO key until the AUTO indicator blinks The exposure level indicators show the current setting 4 Press the Light key or Dark key to lighten or darken the automatic exposure level as desired 5 Press the AUTO TEXT...

Страница 43: ...EXT 2 Hold down the AUTO TEXT PHOTO key until the PHOTO indicator blinks The exposure level indicators show the current setting 3 To enable toner save mode press the Light key To enable high image quality mode press the Dark key When enabling toner save mode make sure that 1 is lit When enabling high image quality mode make sure that 5 is lit 4 Press the AUTO TEXT PHOTO key to complete the setting...

Страница 44: ... Auto power shut off timer 1 5 min 2 30 min 3 60 min 4 120 min 5 240 min This function automatically switches the machine to a state that consumes even less power than preheat mode if the set duration of time elapses without the machine being used when the power is on All lights except the POWER SAVE indicator and ON LINE indicator go off To resume normal operation press the START key Normal opera...

Страница 45: ...et the width of erasure of shadows that appear around the edges and at the binding margin when a book or similar original is copied 17 Layout in 2 IN 1 copy 2 1 Pattern 1 2 Pattern 2 Use this setting to select the layout pattern when two original pages are copied onto a single sheet of paper see page 31 for the layout patterns 18 Layout in 4 IN 1 copy 2 1 Pattern 1 2 Pattern 2 3 Pattern 3 4 Patter...

Страница 46: ...Use this setting to select 99 or 999 for the maximum number of copies 30 Use close paper size 0 OFF 1 ON When this function is enabled printing in printer mode will automatically continue using a different size of paper if the specified size of paper runs out in all trays This feature does not function in copy mode 31 Default tray setting 4 1 Upper paper tray 2 Lower paper tray 3 250 sheet paper f...

Страница 47: ...he machine sounds three different types of beep signals a key entry beep that sounds when a valid key is pressed an invalid key beep that sounds when an invalid key is pressed and a base setting beep that sounds when a setting is the same as the base setting base settings are explained below The base setting beep is initially disabled If you wish to enable the base setting beep see Base setting be...

Страница 48: ...ld Explanation 10 Auditing mode 0 OFF 1 ON Use to enable or disable Auditing mode Auditing mode is initially disabled 11 Account number entry None Use to set up account numbers Up to 20 accounts can be established 12 Account number change None Use to change an account number 13 Account number deletion 0 Delete single account 1 Delete all accounts Use to delete an account number A single account nu...

Страница 49: ...tly selected setting code blinks on the right side of the display 4 Enter the desired setting code for the program as explained in the detailed procedures on the following pages For the setting codes see AUDITING MODE SETTINGS p 44 5 Press the Light key to complete the settings The alarm indicators go off and the display returns to the number of copies display If you enter the wrong number press t...

Страница 50: ...to be deleted with the Copy ratio display key and then press the START key Number of copies per account program No 14 Use this procedure to display the copy count of each account If no account numbers have been established the error code 14E will appear in the display 1 Select the account number with the Copy ratio display key 2 Hold down the 0 key The copy count of the selected account will appea...

Страница 51: ...rs in the display 1 Enter your 3 digit account number with the numeric keys When you enter your account number 0 appears in the display to indicate that copying is possible 2 Follow the appropriate steps to make the copy 3 When finished press the AUDIT CLEAR key To reset another account number enter the program number 15 for account number deletion and then repeat the procedure for Resetting a sin...

Страница 52: ...the image disappears in places 49 Paper misfeed 50 Original size not selected automatically 50 Copies are smudged or dirty 51 White or black lines appear on copies 51 Paper size for a paper tray cannot be set 51 A copy job stops before it is finished 51 The POWER SAVE indicator is lit 51 Any one of the alarm indicators is lit or blinking 51 Lighting fixture flickers 51 PRINTING PROBLEMS The machin...

Страница 53: ...elect AUTO with the AUTO TEXT PHOTO key or press the Light key and Dark key to manually select an appropriate exposure If the copy is too light or too dark even though AUTO was selected with the AUTO TEXT PHOTO key adjust the automatic exposure level 21 38 Blank copies The original is not placed face up in the SPF or face down on the document glass Place the original face up in the SPF or face dow...

Страница 54: ...oad so that the stack does not exceed the line 14 Some sheets of paper stick together Fan the paper well before loading it 14 The guides on the bypass tray do not match the width of the paper Adjust the guides to match the width of the paper 15 The bypass tray extension is not pulled out When loading a large size of paper pull out the extension 15 The bypass paper feed roller is dirty Clean the ro...

Страница 55: ...paused every 250 copies Remove the copies in the paper output tray and press the START key to resume copying 22 FUL appear in the display The memory became full during sort group copy or 2 IN 1 4 IN 1 copy Copy only the originals that have been scanned to that point or cancel the job and clear the data from memory 30 32 The tray is out of paper Load paper 14 The POWER SAVE indicator is lit Any oth...

Страница 56: ...talled 1 Click the start button click Control Panel click Printers and Other Hardware and then click Printers and Faxes On Windows 95 98 Me NT 4 0 2000 click the Start button select Settings and then click Printers 2 The Olivetti d Copia XXXX printer driver icon is not shown where XXXX is the model name of your machine 3 If the icon is shown but you still cannot print the printer driver may not ha...

Страница 57: ...ified print quality area Set the margins in the software application within the specified print quality area The printed image is skewed or it runs off the paper The paper loaded in the tray is not the same size as that specified in the printer driver Check if the Paper Size options suit the size of the paper loaded in the tray If the Fit To Page setting is activated make sure that the paper size ...

Страница 58: ... and then click Control Panel On Windows 95 98 Me NT 4 0 2000 click the Start button select Settings and then click Control Panel 2 Click Add or Remove Programs On Windows 95 98 Me NT 4 0 2000 double click the Add Remove Programs icon 3 Select Olivetti d Copia 1601 2001 Series Printer Driver from the list and remove the software For more information refer to your operating manual or to the help fi...

Страница 59: ...paper size setting To clear the display do one of the following Use the TRAY SELECT key to change the tray selection Open and close the tray Press the CLEAR ALL key 16 CH appears in display Steadily lit The front cover or the side cover is open Close the front cover or the side cover Blinking The toner cartridge is not installed correctly Reinstall the toner cartridge If CH still blinks in the dis...

Страница 60: ...eeder tray Close the feeding roller cover Section B Open the SPF and rotate the two release rollers in the direction of the arrow to feed the original out Close the SPF and then remove the original If a small original A5 5 1 2 x 8 1 2 etc is misfed open the right side cover and remove the original Close the right side cover The paper may tear when you remove a misfeed In this event be sure to remo...

Страница 61: ... opening and closing the feeding roller cover or the right side cover 3 Return the originals indicated by the minus number in the display to the document feeder tray and press the START key Copying will resume from the originals that still remained when the misfeed occurred MISFEED IN THE BYPASS TRAY 1 Gently pull the misfed paper out 2 Open and close the side cover The misfeed indicator will go o...

Страница 62: ...e misfeed indicator will go out If paper is misfed here go to B Misfeed in the fusing area If paper is misfed here go to A Misfeed in the paper feed area If the misfed paper is visible here go to C Misfeed in the transport area The fusing unit is hot Do not touch the fusing unit when removing misfed paper Doing so may cause a burn or injury Do not touch the photoconductive drum green portion when ...

Страница 63: ...over The misfeed indicator will go out The fusing unit is hot Do not touch the fusing unit when removing misfed paper Doing so may cause a burn or injury Do not touch the photoconductive drum green portion when removing the misfed paper Doing so may damage the drum and cause smudges on copies Be careful about unfixed toner on the misfed paper not to soil your hands or clothes Roller rotating knob ...

Страница 64: ...t area remove the paper by pulling it into the paper output area Be careful not to tear the misfed paper during removal 3 Close the side cover The misfeed indicator will go out The fusing unit is hot Do not touch the fusing unit when removing misfed paper Doing so may cause a burn or injury When closing the side cover press on the handle If the paper was torn make sure that no torn pieces remain i...

Страница 65: ...emoval 2 Open and close the side cover The misfeed indicator will go out 3 Close the upper paper tray Push the upper paper tray in completely Make sure that there is no misfed paper in the tray before pulling it out p 58 Note When closing the side cover press on the handle If the misfeed indicator does not stop blinking check for torn pieces of paper in the machine Note ...

Страница 66: ... tray and remove the misfed paper Be careful not to tear the misfed paper during removal 4 Close the lower side cover The misfeed indicator will go out 5 Close the lower paper tray Make sure that there is no misfed paper in the tray before pulling it out p 58 Use the following procedure to remove misfeeds that occur in the 250 sheet paper feed unit 2 x 250 sheet paper feed unit Note If the misfeed...

Страница 67: ...of the toner cartridge Discard the shutter 6 Close the front cover The toner cartridge replacement required indicator will go out When the toner cartridge replacement indicator lights up little toner remains and thus copies may be faint Note After removing the toner cartridge do not shake it or tap on it Doing so may cause toner to leak from the cartridge Put the old cartridge immediately in the b...

Страница 68: ...99 999 Total output count Hold down the 0 key The total output count appears sequentially in two parts while you hold down the 0 key Example Total number of pages output is 12 345 Total copy count Hold down the READ END key The total copy count appears in the display while you hold down the key The count display and counting method are the same as for the total output count Each A3 11 x 17 size pa...

Страница 69: ...ink The display will show 2 Hold down the Copy ratio display key for more than 5 seconds The approximate quantity of toner remaining will be indicated in the display as a percentage 100 75 50 25 10 is displayed When the percentage is less than 10 LO will be displayed 3 Press the Light key to return to the normal display The alarm indicators go off The display returns to the number of copies displa...

Страница 70: ... or similar volatile cleaning agents CLEANING THE ORIGINAL SCANNING GLASS ONLY WHEN A SPF IS INSTALLED If white or black lines appear in copies made with using the SPF use the provided glass cleaner to clean the original scanning glass If white or black lines appear in copies or printed pages when the SPF is not used see CLEANING THE TRANSFER CHARGER on page 67 1 Open the SPF and take out the glas...

Страница 71: ...the side cover 3 Lift and pull out the upper paper tray 4 Take the charger cleaner out by holding the tab 5 Set the charger cleaner onto the transfer charger and gently slide the cleaner in the direction indicated by the arrow two or three times If the white sheet metal is smudged with toner wipe it with a soft clean cloth 6 Return the charger cleaner to its original position Close the upper paper...

Страница 72: ...d specification changes for product improvement without prior notice The performance specification figures indicated are nominal values of production units There may be some deviations from these values in individual units Some options may not be available in some countries and regions Note d Copia 2001 d Copia 1601 2 x 250 sheet paper feed unit PF 25 250 sheet paper feed unit PF 24 Dual function ...

Страница 73: ... duplex copy mode Capacity Up to 40 sheets Thickness 4 mm 5 32 and below For B4 8 1 2 x 13 and larger sizes up to 30 sheets Detectable original sizes A5 B5 B5R A4 A4R B4 A3 5 1 2 x 8 1 2 8 1 2 x 11 8 1 2 x 11 R 8 1 2 x 13 8 1 2 x 14 11 x 17 Weight 5 0 kg 11 1 lbs Dimensions 583 mm W x 435 mm D x 133 mm H 22 61 64 W x 17 9 64 D x 5 1 4 H Trays Side cover Side cover Tray PF 24 250 sheet paper feed u...

Страница 74: ...opy group copy 2 IN 1 4 IN 1 copying rotation copy border erase copying centre erase copying margin copying USB 2 0 connector printer function for the dual function board ROPM function High speed data transfer when connected to a USB 2 0 connector Electronic sort compression method JBIG Electronic sort memory 16 MB Electronic sort scannable pages 100 standard A4 8 1 2 x 11 originals For best copyi...

Страница 75: ...5R A4 B5 A5 8 1 2 x 11 5 1 2 x 8 1 2 Continuous copy Max 999 copies subtractive counter First copy time Approx 7 2 sec Warm up time Approx 45 sec Copy ratio Variable 25 to 400 in 1 increments total 376 steps 50 to 200 when SPF is installed Fixed preset 50 70 81 86 100 115 122 141 200 50 64 77 95 100 121 129 141 200 Exposure system Document glass Moving optical source slit exposure stationary plate...

Страница 76: ...ess Styrene 0 07 mg m3 or less Print speed d Copia 2001 Max 20 ppm d Copia 1601 Max 16 ppm Dual function board must be installed Resolution 600 dpi Memory 16 MB Emulation SHARP GDI SPLC Sharp Printer Language with Compression dual function board must be installed Memory expansion Up to 256 MB can be only added by installing a 256 MB optional memory AR SM5 in one DIMM expansion slot dual function b...

Страница 77: ...ner 8 67 Checking the total output count 64 Checking the toner level 65 Cleaning Bypass tray paper feed roller 67 Document cover 66 Document glass 66 SPF 66 Transfer charger 67 CLEAR ALL key 11 12 CLEAR key 11 18 19 Conventions used in this manaual 6 Copy functions 18 Copy ratio display key 10 23 46 65 D Dark indicator 11 21 Dark key 11 21 38 39 Developer replacement required indicator 10 55 Diffe...

Страница 78: ...IZE ENTER key 11 16 PAPER SIZE indicator 11 16 18 19 Paper tray 8 14 61 62 Parallel connector 9 Part names and functions 8 Peripheral devices 68 Photoconductive drum 4 9 Power 12 Power off 8 12 Power on 8 12 POWER SAVE indicator 10 12 Power save modes 12 Power switch 8 12 Preheat mode 12 40 PRESET RATIO selector indicator 11 23 PRESET RATIO selector keys 11 23 24 Printer functions 35 R READ END ke...

Страница 79: ...moving 20 Original size specifying 18 Original placing Document cover 18 SPF 19 Tray selection 21 Two sided copies using bypass tray 26 XY Zoom 24 Convenient copying functions 2 IN 1 4 IN 1 copy Document cover 31 SPF 32 Centre erase copy 34 Edge erase copy 34 Layout setting 32 Rotating copies 29 Sort group copying Document cover 30 SPF 30 Machine settings Auditing mode Copies how to make 47 Settin...

Страница 80: ......

Страница 81: ...n you need and the instructions for handling the waste correctly for example location and times of the waste collection centres etc b When you purchase a new device of ours give a used device similar to the one purchased to our dealer for disposal The crossed dustbin symbol on the device means that when it to be disposed of the device is to be taken to the equipped waste collection centres and is ...

Страница 82: ...LUOKAN 1 LASERLAITE KLASS 1 LASERAPPARAT CLASS 1 LASER PRODUCT LASER KLASSE 1 ...

Отзывы: