Olivetti d-COLOR MF3300 Скачать руководство пользователя страница 58

5-19

d-Color MF 3300/3800

Printing a file stored on USB memory

5

5.5

5.5

Printing a file stored on USB memory

Supported USB memory devices

USB memory devices that have the following specifications can be connected to this machine.

Tips

Note the following points when connecting a USB memory device to this machine.

-

Use the USB connector on the side that is near the 

Control Panel

.

-

Do not disconnect the USB memory device while saving a file to the USB memory or printing a file in 
the USB memory.

-

Use only a USB memory device on this machine. Do not use other USB devices (such as a hard disk 
unit or USB switching hub).

-

Do not connect or disconnect the USB memory device when the hourglass is displayed in the 

Control 

Panel

 while this machine is active.

-

Do not disconnect the USB memory device directly after connecting it.
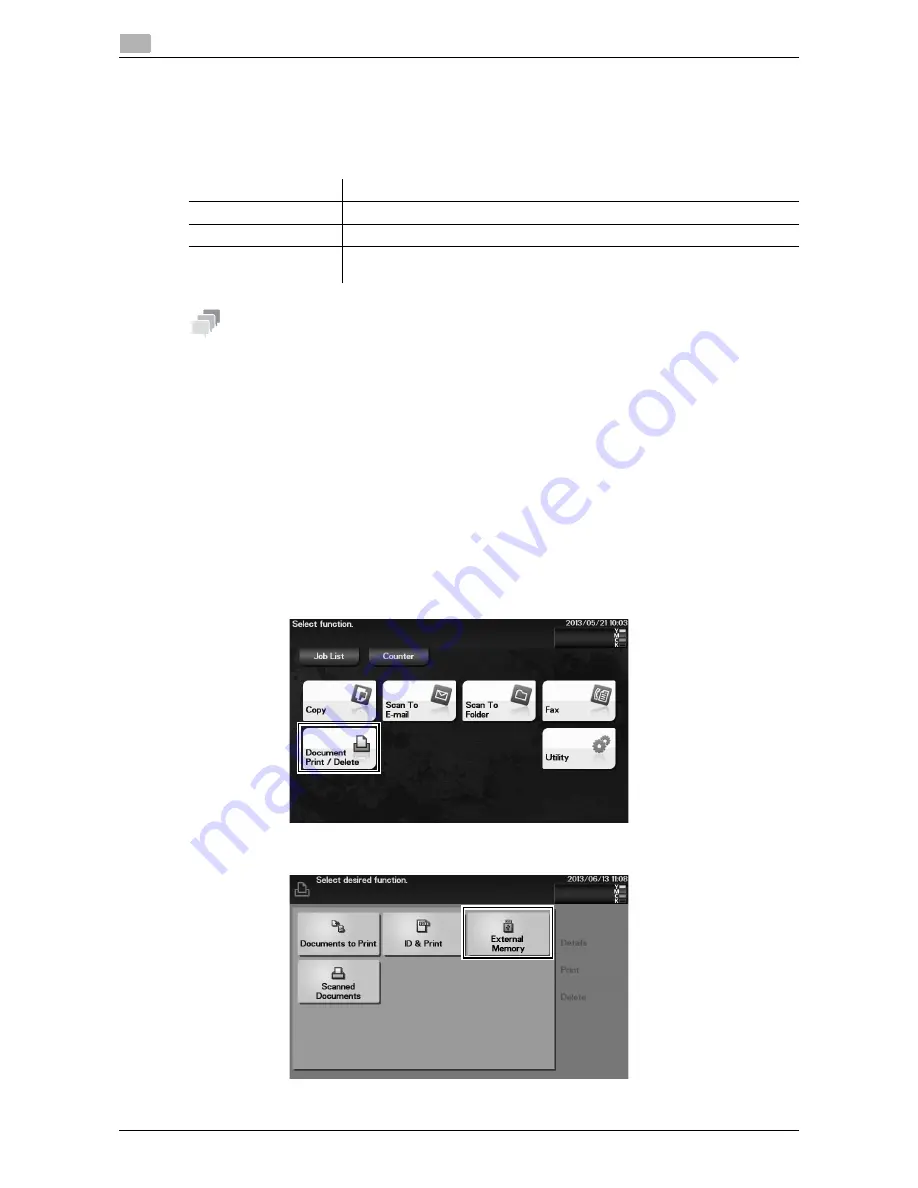
How to print

1

Connect a USB memory device to the USB port of this machine.

2

Tap [Document Print/Delete].

3

Tap [External Memory].

Item

Specifications

Supported media

USB memory device (USB 2.0 supported)

File system

FAT32 

File Type

PDF, Compact PDF, JPEG, TIFF, XPS, Compact XPS, OpenXPS, OOXML 
(.docx/.xlsx/.pptx), and PPML (.ppml/.vdx/.zip) 

Содержание d-COLOR MF3300

Страница 1: ...Quick Start Guide Schnelleinstieg Guide de d marrage rapide Gu a r pida de inicio Snabbstartsguide Kvikstartguide Pika aloitusopas Rychl n vod H zl Ba latma K lavuzu l l l l l l Gyors tmutat Snelgids...

Страница 2: ...which could compromise the conformity attested to above as well as the characteristics of the product incorrect electrical power supply incorrect installation incorrect or improper use or use not in...

Страница 3: ...r supply 2 7 2 2 1 Power Switch and Power key locations 2 7 2 2 2 Turning the Power Switch ON or OFF 2 8 2 2 3 Using the Power key 2 9 When using the Power key as a Power Save key 2 9 When using the P...

Страница 4: ...king the network settings 5 4 Installing the printer driver 5 4 5 1 3 Preparation for printing USB connection 5 5 Changing the installation settings Windows 7 8 Server 2008 R2 Server 2012 5 5 Installi...

Страница 5: ...1 Introduction...

Страница 6: ......

Страница 7: ...ter driver as well as basic usage and applications User s Guide Copy This guide describes various methods to make copies User s Guide Scan This guide describes scan transmission operations and neces s...

Страница 8: ...ust be enabled Item Description Supported operating systems Microsoft Windows XP SP3 Windows Vista SP2 Windows 7 SP1 Win dows 8 Apple Mac OS X 10 4 10 5 10 6 10 7 10 8 Supported browsers For Windows I...

Страница 9: ...ocuments Follow the instructions to avoid property damage Tips This symbol indicates supplemental information of a topic as well as options required to use a function dReference This symbol indicates...

Страница 10: ...2 Overview of This Machine...

Страница 11: ......

Страница 12: ...hine 2 1 1 Name of each part Front side No Name 1 Control Panel 2 Automatic Document Feeder ADF 2 a ADF Feed Cover 2 b Document Guide 2 c Document Feed Tray 2 d Document Output Tray 2 e Document Stopp...

Страница 13: ...tional Fax Kit FK 512 and Mount Kit MK 738 installed These are provided as standard on d Color MF 3800 models sold in North America No Name 1 Power Switch 2 Power Connection 3 USB Port Type B 4 Ethern...

Страница 14: ...be installed 6 DESK DK P03 Used to install this machine on the floor This component may not be able to be used depending on the re gion the machine is used in The following optional components are bui...

Страница 15: ...d Color MF 3300 3800 2 6 2 1 About this machine 2 dReference For details on how to register i Option license kits refer to Chapter 2 in User s Guide Advanced Functions...

Страница 16: ...a paper jam If the Power Switch is turned off or the Power key is pressed while this machine is running the system de letes the currently loaded data or communicating data as well as queued jobs No Na...

Страница 17: ...een appears to show that this machine is in the process of start up When the main menu icon is displayed this machine is ready to use 2 When turning the main power off press o of the Power Switch NOTI...

Страница 18: ...Supply Power Save Set tings Power Save Settings Default Low Power Power key Status of this ma chine Status of LED Description Short press Low Power mode Default Flash Blue Turns off the display of the...

Страница 19: ...ve data or faxes however it cannot scan or print an original If data or faxes are received while the sub power is turned off they are printed when the machine returns to Normal mode To enable the mach...

Страница 20: ...nabling you to view them Access Tap this key to perform authentication on the Login screen if user au thentication or account track is installed on this machine Tap Access under the login condition to...

Страница 21: ...o switch the display of the Touch Panel to a function assigned to a Register key The default function assigned to the Register key varies depend ing on the region the machine is used in A function to...

Страница 22: ...screen with your finger then take your finger off the screen immediately This action is avail able when selecting or determining a menu Flick Make a slight fillip while sliding your finger on the scre...

Страница 23: ...amage the Touch Panel and potentially cause a breakage When operating the Touch Panel do not press on it using excessive force or with a pointed object such as a mechanical pencil Be careful not to op...

Страница 24: ...mode For details on the copy mode refer to page 5 16 Scan To E mail Tap this button to display the main screen in Scan To E mail mode For details on the Scan To E mail mode refer to page 5 8 Scan To...

Страница 25: ...em Description Keyboard Tap the keys of characters you want to enter C Tap this key to delete a character or value you entered Tap this key to move the cursor e Tap this key to delete characters you e...

Страница 26: ...3 Loading Paper...

Страница 27: ......

Страница 28: ...pecial Paper 2 Letterhead 3 Colored Paper 4 User Paper 1 5 User Paper 2 5 15 15 16 lb to 23 15 16 lb 60 g m2 to 90 g m2 Manual Feed Tray 100 sheets Tray 1 550 sheets Thick 1 User Paper 3 5 24 3 16 lb...

Страница 29: ...that an image is included in the printable area of this machine Paper feed port Allowable sizes Manual Feed Tray A4 A5 A6 B5 JIS B6 Legal 8 1 2 e 14 Letter 8 1 2 e 11 SP Folio 8 1 2 e 12 11 16 Executi...

Страница 30: ...clips Paper with labels attached Paper with ribbons hooks buttons etc attached Paper with different paper quality roughness on the front and back sides Paper that is too thin or too thick Paper contai...

Страница 31: ...r than for paper trays use the Manual Feed Tray To use the Manual Feed Tray load paper and specify the paper type 0 For details on the available paper types and sizes refer to page 3 3 1 Open the Manu...

Страница 32: ...t NOTICE Load paper within the guide indicating the upper limit If paper is curled flatten it before loading 5 Align the paper guide to the paper size 6 Change the paper type and paper size on the Con...

Страница 33: ...ilable paper types and sizes refer to page 3 3 0 Tray 2 3 is available when the optional Paper Feed Unit is installed For details on how to load paper into Tray 2 3 refer to Chapter 6 in User s Guide...

Страница 34: ...he right side of the tray NOTICE Do not load the sheets up to the point where the top of the stack is higher than the mark If paper is curled flatten it before loading 5 Align the paper guide to the p...

Страница 35: ...4 Initial Settings of This Machine...

Страница 36: ......

Страница 37: ...machine s IP address is changed and the network settings are completed this machine restarts To check the IP address assigned to this machine print out the Configuration Page To print out the Configu...

Страница 38: ...tside line number To configure settings Utility Administrator Settings Fax Settings PBX Connection Settings Selecting a receiving method Methods of receiving faxes include the following This machine r...

Страница 39: ...ore we recommend that you finish an HDD encryption setting before using this machine To configure settings Utility Administrator Settings Security Settings HDD Settings HDD Encryp tion Setting Related...

Страница 40: ...5 Basic Usage...

Страница 41: ......

Страница 42: ...owing types of printer drivers are available Select the printer driver that meets your printing aims Printer driver Page description lan guage Description PCL driver PCL6 This is a standard driver for...

Страница 43: ...eement then click AGREE 4 Check the contents of the Readme window then click Next 5 Select Install printers MFPs then click Next Connected printers are detected For Windows Vista 7 8 Server 2008 Serve...

Страница 44: ...rol Panel in the Start window In Windows 7 Server 2008 R2 open the Start menu then click Control Panel 2 Click System and Security System 3 Click Advanced system settings on the menu in the left hand...

Страница 45: ...Check the contents of the Readme window then click Next 6 Select Install printers MFPs then click Next Printers being connected via USB ports are detected 7 Select this machine then click Next 8 Sele...

Страница 46: ...ndow appears 3 In the Configure tab configure the information such as what options are installed on this machine and whether or not authentication settings have been configured By default Auto in Acqu...

Страница 47: ...erted file to the FTP server This function is useful when transfer ring a file through the FTP server WebDAV Send Sends a converted file to the WebDAV server This function is useful when transferring...

Страница 48: ...n To E mail To use SMB Send FTP Send WebDAV Send Save to HDD Save to USB Memory or WS Scan tap Scan To Folder 3 Specify the destination You can select the desired destination from the pre registered d...

Страница 49: ...an Size then specify the original size If you fail to set the original size correctly the image may be cut off 5 Press the Start key Tap Check Settings before sending data and check the specified dest...

Страница 50: ...e can be connected to the following types of telephone lines Public switch telephone network including fax communication line PBX Private Branch Exchange 2 wire Fax data cannot be sent or received in...

Страница 51: ...al 2 Tap Fax 3 Enter a fax number You can select the desired destination from the pre registered destination list or directly enter des tination information For details on how to register a destinatio...

Страница 52: ...n Size then specify the original size If you fail to set the original size correctly the image may be cut off 5 Press the Start key Tap Check Settings before sending data and check the specified desti...

Страница 53: ...a fax with a password It is used to send faxes to a device on which fax peers are restricted by passwords a device with Closed Network RX enabled Polling TX Polling TX stores a file beforehand on the...

Страница 54: ...e fax via enterprise network and Internet The same network as the one used by the computers is used to transmit faxes Therefore you can send and receive faxes to from distant locations without having...

Страница 55: ...n this machine you need to specify the size of the original to be scanned Before scanning the original specify the original size in Original Size If you fail to set the original size correctly the ima...

Страница 56: ...ess the Register key to display the Keypad on the Touch Panel and enter data To re enter the number of copies tap C Clear 5 Press the Start key If necessary before starting a copy tap Check Settings t...

Страница 57: ...ings for the original to copy it at the optimum image quality level Original Size Select the size of the original to be scanned Paper Select the size and type of the paper for copying You can also cha...

Страница 58: ...g a file in the USB memory Use only a USB memory device on this machine Do not use other USB devices such as a hard disk unit or USB switching hub Do not connect or disconnect the USB memory device wh...

Страница 59: ...tings Description Paper Size Select the size of paper for printing The paper size can be specified when the selected file type is TIFF or JPEG Duplex Select whether or not to print data on one side or...

Страница 60: ...rs A registered outside line number is automatically inserted When you use this machine in a PBX environment tap Pause following the outside line number P appears to ensure dialing is successful If yo...

Страница 61: ...ame using up to 72 characters Favorites Select this option to register a frequently used destination The registered des tination is displayed in Favorites enabling you to easily specify a destination...

Страница 62: ...6 Index...

Страница 63: ......

Страница 64: ...l Feed Tray 3 6 N Name of each Part 2 3 Front Side 2 3 Rear Side 2 4 Network Setting 4 3 O Option Configuration 2 5 P Paper Available Paper Sizes 3 4 Available Paper Types 3 3 Storing Paper 3 5 Unavai...

Страница 65: ...d Color MF 3300 3800 6 4 6...

Страница 66: ...you need and the instructions for handling the waste correctly for example location and times of the waste collection centres etc b When you purchase a new device of ours give a used device similar t...

Отзывы: