background image

8


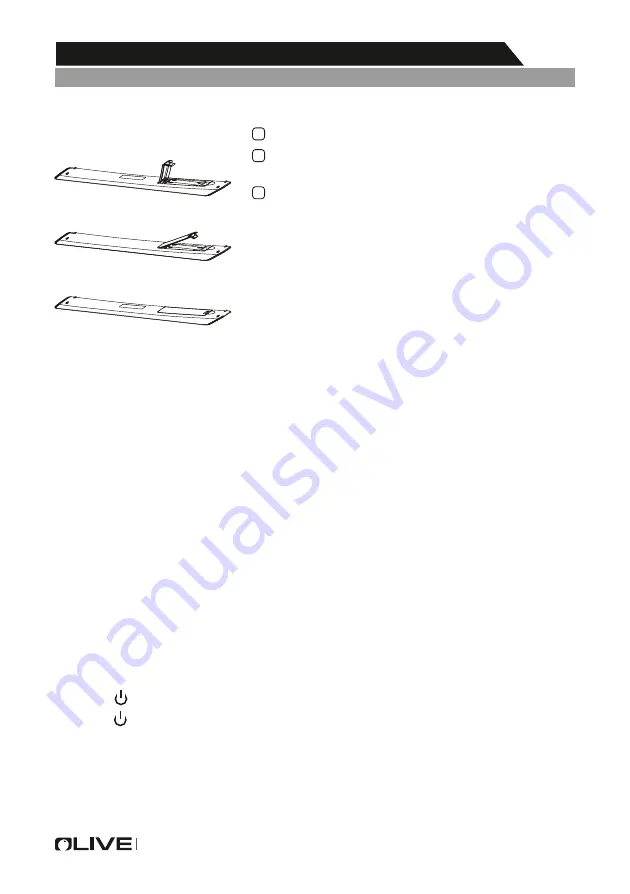
1  Open the back lid of the remote control.

2  Install two 7#(AAA)1.5V batteries.

    Ensure the correct polarity of the batteries.

3  Cover the back lid.

    Please take out of the batteries from the remote 
    control for long time of no use. 

If the remote control doesn't work properly, 
please carry out the following checks.

- Check the TV is turned on.
- Check the polarity of the batteries are correct.
- Check the batteries are not drained.
- Check the power supply is normal or the power cord   

   is correctly connected.

- Check there are no special fluorescent light or neon 

   light around.

(Here is only the sketch, please in kind prevail)

2. Basic Operation

2.1 Power ON/OFF(optional)

 - Connect the power cord to the 

AC input

. Insert the power cord into the 

   appropriate socket.

 - Press the  

Power switch

 to switch on the TV, then press 

Power

 button to 

   turn on the unit.

 - Press the 

Power switch

 again to switch off the TV.

Note: After switch off the TV, please don t immediately re-open the power             

         switch ,should be delayed one minute more to re-open the power  switch. 

2.2 Setting of Standby Mode

- Press ( 

 ) button to turn on the unit. 

 - Press ( 

 ) button again to return the display to standby mode. The   

   power indicator turns red.

 - Be sure not to set your TV in standby mode for a long period of time.

1.Connecttion and Preparation of TV

1.5 Installation of Batteries

Содержание 50UC7410

Страница 1: ...LED TV 50UC7410...

Страница 2: ......

Страница 3: ...1...

Страница 4: ...2...

Страница 5: ...3...

Страница 6: ...5 1 5 1 1 5 1 2 6 1 3 7 1 4 8 1 5 8 2 8 2 1 8 2 2 9 3 9 4 9 4 1 11 4 2 11 4 3 12 4 4 12 4 5 13 4 6 14 5 14 5 1 15 5 2 16 5 3 17 5 4 18 6 19 7 20 8 4...

Страница 7: ...UM 4 R03P AAA 5...

Страница 8: ...6 VIDEO L R AV IN HDMI1 HDMI2 EARPHONE OPTICAL YPbPr AUDIO HDMI3 USB1 5V 500mA USB2 YPbPr IN Y Pb Pr RF IN...

Страница 9: ...CE P MODE P MODE S MODE S MODE FREEZE FREEZE TXT TXT FAV LIST FAV LIST SUBTITLE SUBTITLE AUDIO AUDIO RECORD RECORD MIX MIX SIZE SIZE CANCEL CANCEL INDEX INDEX HOLD HOLD REVEAL REVEAL SUBPAGE SUBPAGE T...

Страница 10: ...AAA 8...

Страница 11: ...SOURCE ENTER EXIT 4 4 1 4 1 1 Auto Tuning ENTER EXIT 9...

Страница 12: ...4 1 3 10 ENTER 4 1 4 Delete Rename Move CH Skip ENTER Fav List FAV Menu...

Страница 13: ...Picture Menu MENU ENTER Standard Soft User Vivid HDMI HDMI Mode 4 3 ENTER MENU Standard Music Movie User Sports Sound Mode Balance Auto Volume Level O PCM Auto SPDIF MODE AD Switch 11...

Страница 14: ...p Timer O O 3Hours 4Hours 5Hours Auto Sleep OSD Timer 12 4 5 SETUP Menu MENU ENTER OSD Language AUDIO Language Subtitle Language Hearing Impaired O On Hearing Impaired PVR File System ENTER Check PVR...

Страница 15: ...Aspect Ratio Reset Software Update USB ENTER HDMI CEC HDMI CEC 13 4 6 ENTER Lock Menu MENU System Lock 0000 Set Password Channel Lock Parental Guidance Parental Guidance On O Key Lock On O Hotel Mode...

Страница 16: ...5 1 ENTER ENTER PAUSE PAUSE NEXT PREV NEXT PREV STOP STOP Repeat 1 ALL None ENTER REPEAT ALL MUSIC PLAYLIST INFO ROTATE 14 ENTER USB Photo Music Movie Text USB...

Страница 17: ...5 2 MENU PLAY PAUSE FB FF PREV NEXT STOP Repeat 1 ALL None REPEAT ALL AB SET A MUTE PLAYLIST PLAYLIST info INFO goto time GOTO TIME 15 ZOOME IN ZOOME OUT ENTER MOVE VIEW...

Страница 18: ...ENTER PLAY PAUSE FB FF PREV NEXT STOP CHARSET Repeat 1 ALL NONE REPEAT ALL AB SET A PLAYLIST INFO SLOW STEP goto time GOTO TIME ZOOM IN ZOOM OUT Auto 4 3 16 9 ASPECT RATIO ENTER MOVE VIEW 16...

Страница 19: ...PREV PAGE NEXT PAGE PREV NEXT STOP Charset CHARSET MUSIC O PLAYLIST INFO 17...

Страница 20: ...PAL B G D K I SECAM B G D K DVB T T2 C S S2 s s2 option 16 9 AC 100 240V 50 60Hz 20 80 Non condensing 0C 40C YPbPr 1 1 18 1 2 1 1 1 120 2 8 50UC7410 1...

Страница 21: ...4 59 94 50 00 50 00 50 00 60 00 50 00 60 00 60 00 50 00 15 734 31 468 15 625 31 25 37 50 45 00 28 13 33 75 67 50 56 25 480p 576p 720p 1080i 1080p 1920x1080 59 94 50 00 60 00 60 00 60 00 31 468 31 25 4...

Страница 22: ...20...

Страница 23: ......

Страница 24: ......

Страница 25: ...Note...

Страница 26: ...Note...

Страница 27: ...nal Check the batteries are not drained Use new batteries Check that the remote control is within the operating range Check that the remote control is pointed to the remote control window on the displ...

Страница 28: ...l Frequency Hz Resolution Horizontal Frequency Khz Vertical Frequency Hz 480p 576p 720P 1080i 1080P 1920x1080 59 94 50 00 60 00 60 00 60 00 31 468 31 25 45 00 33 75 67 50 When the signal received by t...

Страница 29: ...18 6 Technical Speci cation Note the speci cation shown above may change without notice for quality improvement 50UC7410 3...

Страница 30: ...PREV Press to play previous text STOP Press to stop and back to folder interface MUSIC Press to play or stop the background music PLAYLIST Press to view the list of texts INFO Press to display the inf...

Страница 31: ...ode PLAYLIST Press to view the list of pictures INFO Press to display the information of the current movie SLOW FORWARD slow forward STEP FORWARD step forward GOTO TIME seclet goto time to setup play...

Страница 32: ...REPEAT ALL Press to select the repeat mode Repeat 1 ALL None MUTE PLAYLIST select playlist to display play list INFO info to display the music informa on GOTO TIME select goto me to setup play me 5 2...

Страница 33: ...s detected a USB memory or not Blue Yes Gray No Press to select Photo Music Movie Text icon and ENTER to enter the USB memory For details PAUSE Press PAUSE bu on to pause the slideshow NEXT PREV STOP...

Страница 34: ...pgrade the software Contact Customer Service to see if an update is available Hotel Mode Turn Key Lock on or o from viewing certain channels Enter Parental Guidance sub menu to prevent children the de...

Страница 35: ...Time Select the me in minutes t the me Cancel by se ng it to O Auto Sleep Press to select O 3Hours 4Hours 5Hours OSD Timer 4 5 SETUP MENU Press MENU to display the main menu and press ENTER OSD Langu...

Страница 36: ...the Picture Menu Highlight the item and press 4 3 SOUND MENU Press MENU to display the main menu and press ENTER to select corresponding sub menu Picture Mode Color Temperature Noise Reduc on HDMI Mo...

Страница 37: ...NUAL TUNING Press There are four shortcut keys for programming the channel First press to highlight the channel then Delete Delete the channel Move Set the channel to moving state then press to move i...

Страница 38: ...e menu will be automa cally hidden in a few seconds or press EXIT to clear on screen menu mode The channel menu is available only in DTV 4 1 1 AUTO TUNING Auto Tuning can nd out all automa cally Press...

Страница 39: ...t around Here is only the sketch please in kind prevail 2 Basic Operation 2 1 Power ON OFF optional Connect the power cord to the AC input Insert the power cord into the appropriate socket Press the P...

Страница 40: ...P MODE Select the picture Mode 7 S MODE Select the sound mode 10 TXT Enter or exit teletext 23 TIMESHIFT DTV mode time shift MEDIA mode Press one time to pause press again to playback 13 SUBTITLE DTV...

Страница 41: ...er indicator 3 Speaker 4 Menu key 5 Program key 6 Program key 7 Volume key 8 Volume key 9 Source key 10 Standby key 11 Power plug input 1 Connecttion and Preparation of TV 1 3 Keys and Interfaces 6 VI...

Страница 42: ...Kit Pre assembled Optional 1 2 Installation of Stand 1 Place the TV with the front panel facing downwards on the soft cloth or soft pads on a desk 2 Insert the stand into the bottom socket of the TV...

Страница 43: ...on 2 2 Setting of Standby Mode 6 Technical Speci cation 7 Supported Signal Modes 8 Simple Troubleshooting 5 5 5 6 7 8 8 8 9 9 9 18 19 20 3 INPUT SOURCE 4 Menu Function Description 4 1CHANNEL MENU 4 2...

Страница 44: ...e TVis positioned close to the wall to avoid it falling when pushed 10cm 30cm 10cm 10cm When you turning theTV set donot hold the top side of the TVset you should hold the bottom side When you lifting...

Страница 45: ...to the display Be sure not to display motionless picture on the LEDTV formore than 2 hours because it would cause picture remnants to appear which is called screen burns To avoid suchpicture remnants...

Страница 46: ...ing simpleprecautions such as If your existingtelevision set isbeing retained andrelocated the same considerations as aboveshould be applied IMPORTANT INFORMATION Using cabinets orstands recommended b...

Страница 47: ......

Страница 48: ...LED TV 50UC7410 Please read these instructions before operating your set and retain them for future reference Operating Instruction...

Отзывы: