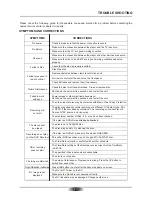
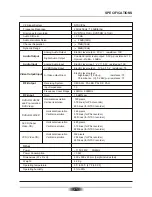
Olin DVR-250 Скачать руководство пользователя страница 25

TROUBLE SHOOTING

23

Please  check the  following  guide  for the possible  cause and  solution for a  problem before  contacting the 
nearest service center or dealer for repairs.

SYMPTOMS AND CORRECTIONS

Check to make sure that the power connection is secure.

No power

SYMPTOMS CORRECTIONS 

No picture

No sound

Failed to Play

Make sure the connection between the player and the TV is secure.

Make sure that the TV is in good working condition.

Make sure that the TV and AMP are in good working condition and setup 
properly.

Check that the disc is properly inserted.

Clean the disc.

Failed to respond to 

remote control

Remove obstacles between remote control and unit.

Aim remote control at the sensor on the front panel.

Check batteries and replace them if necessary.

Picture Disturbance

Check the disc for dirt and scratches.  Clean or replace disc.

Shut down the unit, wait ten seconds, and restart the unit.

Failed to work 

with keys

Power surges or other electrical phenomena.  
Shut down the unit, wait ten seconds, and restart the unit.

Make sure the connection between the player and other devices are secure.

Recording will 

not start

The Video input source may be protected with Macro Vision Copy Protection.

The disc may already contain recording of a different TV System type - PAL 
or NTSC. If the disc already contains a PAL recording, you cannot record 
from an NTSC source, and vice versa.

The maximum number of titles - 48 -  may have been reached.

If the disc is a DVD+R 

may already be finalized.

The disc is not a DVD+RW disc.

The disc may be dirty. Try cleaning the disc.

If the disc is a DVD+R, make sure it has been FINALIZED.

The other DVD recorder

 may not support DVD+R/RW disc.

The disc cannot

be erased

Recording do not play 

on other DVD Recorder

The Time/Date is invalid or conflicts with another schedule.

The Time/Date settings of the Recorder are incorrect. Set the Time/Date 
in SETUP.

The specified Video input source is unavailable.

The disc is out of space.

Timer recording 

does not start

DV image is not

displayed

The DV is off. Power on the DV.

Make sure the DV cable is connected correctly.

The DV link cable may be damaged. Change another one.

The image is distorted

The setup of Interlaced or Progressive is wrong. Press the I/P button to 
switch from each other.

Plug USB button  ineffective

Press USB button to enter after the banner appears on screen.

Содержание DVR-250

Страница 1: ......

Страница 2: ...you for purchasing this unit It is a progressive scan DVD Recorder you the ability to create your own DVD discs from you home movies favorite TV programs and more Because of the outstanding compatibil...

Страница 3: ...N THIS MANUAL MAY CAUSE FIRE OR ELECTRIC SHOCK When replace the direct plug in power supply or a separable cord connected power supply the replacement must be exact duplicate or one recommended by the...

Страница 4: ...Laboratories Confidential unpublished works Copyright 1992 1997 Dolby Laboratories All rights reserved Disposal of your old appliance 1 When this crossed out wheeled bin symbol is attached to a produ...

Страница 5: ...03...

Страница 6: ...04 The pickup may be condensed with water under the following situation...

Страница 7: ...emote control 5 TRAY Open to load or eject a disc 6 OPEN CLOSE Open Close open close disc tray 7 PLAY PAUSE Play Pause playback a disc and Temporarily pauses DVD playback or recording 8 STOP Stop Stop...

Страница 8: ...LE REPEAT AUDIO A B RPT SUBTITLE INFO MENU PBC TITLE DVR 250 STEP REAR PANEL and ACCESSORIES 06 REAR PANEL OUTPUT ACCESSORIES 3 2 1 4 5 6 9 10 11 7 8 1 RF IN OUT For Antenna or Cable TV 2 VIDEO INPUT...

Страница 9: ...er Box To connect devices that you will be recording from DV DV S VIDEO VIDEO AV2 IN L R DV IN RF IN RF OUT LEFT RIGHT VIDEO Y CB PB CR PR OPTICAL COAXIAL 5 1 CH AUDIO OUT FL FR SL SR CENTER SUB WOOFE...

Страница 10: ...IN USB BASIC CONNECTION 08 To audio inputs of the amplifier Connecting to an audio system and TV equipped with YUV video input Red Red White White Connecting to an amplifier equipped with a digital a...

Страница 11: ...ER S VIDEO 2 CH AUDIO IN YUV P SCAN DIGITAL AUDIO OUT VIDEO S VIDEO VIDEO OUT VIDEO IN USB Connecting to an amplifier equipped with 5 1ch audio input and TV To 5 1ch audio inputs To video input To 5 1...

Страница 12: ...UTTONS 7 INTERLACE PROGRESSIVE SCAN 8 GOTO 9 SETUP 10 ENTER 11 STOP 12 CHANNEL UP 13 RECORD 14 CHANNEL DOWN 15 RECORD MODE 16 FAST REVERSE 17 FAST FORWARD 18 RECORD QUALITY 19 STEP 20 TIMER 21 USB 22...

Страница 13: ...ext During playing press PREV key can then each press this key will skip a chapter still the start of the disc Note disc function will difference that depending on disc format Each press of NEXT durin...

Страница 14: ...title to select up to 32 languages displayed on screen Valid if the discs itself has that function Some discs possess two subtitle languages some three some more MENU PBC According to some DVD discs P...

Страница 15: ...menu will be displayed automatically if the disc is loaded in succession In the menu use UP or DOWN button in the cursors to choose folder then press ENTER button to confirm In the folder use UP or D...

Страница 16: ...Kodak Picture CD is inserted on the unit an automatic slide show is launched Each picture in the Kodak Picture CD will be displayed consecutively in a slide show fashion and will be scaled to fit in t...

Страница 17: ...ese discs do not require a finalization procedure Note For a new DVD R RW it will take about a few minutes to format it before recording Introduction to Recording Recording Quality The recorder offers...

Страница 18: ...the file you want to copy and then press the EDIT key on remote control 3 Choose Copy from the pop up window OSD will display as the interface 4 Select HDD as the destination and then specify a direc...

Страница 19: ...ion is available only under the DVD mode 2 Select the file to be copied and then press the EDIT key on a remote control 3 Choose Copy from the pop up window and OSD will display the interface 4 Select...

Страница 20: ...ram playback select the Delete Chapter Mark item on the pop up menu to delete chapter mark Note Selecting the Delete All Chapter Mark item will delete all the existing chapter marks Play Full Title Se...

Страница 21: ...the Instant Recording 1 choose a record source TV AV1 AV2 S Video and DV 2 Select a destination storage device DISC HDD or USB 3 Select a recording quality 1Hr 6Hr corresponding to HQ SEP respectively...

Страница 22: ...ecord interface In Timer Record interface you also can set Source Date Start End Quality After setup you can press RETURN to exit the Timer Record interface RETURN ENTER Select Exit Input recording sc...

Страница 23: ...setting RETURN ENTER Select Exit Select Setup option Setup System Playing A V Set Recording TV Tuner Audio Lang Subtitle Lang Password Menu Lang Rating 6 2 Playing Setup Audio lang Subtitle lang Passw...

Страница 24: ...nmix Dual mono etc including Video output TV type SPDIF output Downmix Dual mono RETURN ENTER Select Exit Select Setup option Setup System Playing A V Set Recording TV Tuner Video Output TV Type SPDIF...

Страница 25: ...ther devices are secure Recording will not start The Video input source may be protected with Macro Vision Copy Protection The disc may already contain recording of a different TV System type PAL or N...

Страница 26: ...he initial password is 3308 SETTING THE TV SCREEN SIZE Multi aspect ratio suit to different TV screen size There are many functions available on DVD discs and the functions vary per player and per man...

Страница 27: ...00 x 63 mm height includes feet Weight 4 2 Kg Receiving System Input Impedance Frequency Cover Range Gain SECAM L PAL BG PAL DK PAL I 75 45MHz 900MHz 1 5dB Type RF Input RF Output 110V 240V 50 60Hz Po...

Отзывы: