background image

CALDO ROCK

CALDO ROCK

ISTRUZIONI PER INSTALLAZION

E, USO E MANUTENZIONE

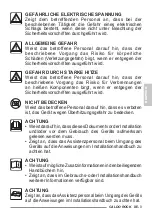
IL PRESENTE PRODOTTO E’ ADATTO SO

LO A AMBIENTI 

CORRETTAMENTE ISOLATI O AD UN USO O

CCASIONALE

INSTRUCTIONS FOR INSTALLATION, 

USE AND MAINTENANCE

THIS PRODUCT IS ONLY SUITABLE F

OR WELL INSULATED 

SPACES OR OCCASIONAL USE

INSTRUCTIONS POUR L’INSTALL

ATION, L’EMPLOI ET L’ENTRETIEN

CE PRODUIT NE PEUT ÊTRE UTILISÉ QUE 

DANS DES LOCAUX

BIEN ISOLÉS OU DE MANIÈRE OCCASIONNELLE

INSTALLATIONS, BEDIENUNGS AND 

WARTUNGSANWEISUNGEN

DIESES PRODUKT IST NUR FÜR GUT I

SOLIER TE RÄUME ODER FÜR DEN GELE

-

GENTLICHEN GEBRAUCH GEEIGNET

INSTRUCCIOES PARA LA INSTA

LACIÓN, USO Y MANTENIMIEN

TO

ESTE PRODUCTO ESTÁ INDICADO ÚNI

CAMENTE EN LUGARES

ABRIGADOS O PARA UNA UTILIZACIÓN PUNT

UAL

IT

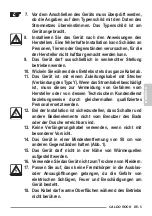
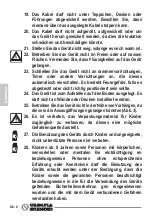
EN

FR

DE

ES

1

10

3

2

9

5

1

7

7

6

4

8

8

FRANÇAIS

FR- 11

1 - DESCRIPTION DE L’APPAREIL ET COMMANDES

Modèles « Caldo Rock M » et « Caldo Rock O »

1.

  Corps de l’appareil

2.

  Grilles de sortie d’air

3. 

Poignée

4.

  Grilles de entrée d’air

5.

  Câble d’alimentation

6. 

Livret d’utilisation et d’entretien

7. 

Molette ON/OFF et réglage de la 

température de l’air de sortie

8.

  Molette de réglage de la 

température ambiante

9.

  Led « appareil en marche »

10.

 Bouton ON/OFF oscillation 

(uniquement pour le modèle « 

O »

)

Содержание Caldo Rock M

Страница 1: ...ACES OR OCCASIONAL USE INSTRUCTIONS POUR L INSTALLATION L EMPLOI ET L ENTRETIEN CE PRODUIT NE PEUT TRE UTILIS QUE DANS DES LOCAUX BIEN ISOL S OU DE MANI RE OCCASIONNELLE INSTALLATIONS BEDIENUNGS AND W...

Страница 2: ...50cm 50cm 50cm DO NOT COVER 1 2 5 3 4 2...

Страница 3: ...esto prodotto contattarel ufficiocomunale ilserviziolocaledismaltimentorifiuti o il negozio in qui stato acquistato il prodotto Questadisposizione validasolamenteneglistatimembridell UE INDICE GENERAL...

Страница 4: ...alisideveinformareilSERVICE aziendale interno SERVIZIO ASSISTENZA TECNICA CLIENTI Indice Iparagrafiprecedutidaquestosimbolocontengonoinformazioni e prescrizioni molto importanti particolarmente per qu...

Страница 5: ...di sicurezza il rischio di subire bruciature per contatto con componenti con elevata temperatura Non coprire Segnala al personale interessato che vietato coprire l apparecchio per evitarne il surrisc...

Страница 6: ...lteriore consultazione 4 Dopo aver tolto l imballaggio assicurarsi dell integrit dell apparecchio gli elementi dell imballaggio non devono essere lasciati alla portata dei bambini in quanto potenziali...

Страница 7: ...que da una persona qualificata similare in modo da prevenire ogni rischio 12 Installare l apparecchio garantendo che interruttori e altri comandi non siano raggiungibili da chi sta usando il bagno o l...

Страница 8: ...in quanto il materiale potrebbe essere risucchiato nelle prese d aria fig 3 26 vietato disperdere e lasciare alla portata di bambini il materiale dell imballo in quanto pu essere potenziale fonte di p...

Страница 9: ...on usare la stufetta nelle immediate vicinanze della vasca da bagno della doccia o di una piscina 34 ATTENZIONE Alcune parti del presente prodotto possono diventare molto calde e provocare ustioni Bis...

Страница 10: ...o 41 Spegnere ed utilizzare l impugnatura dove prevista per effettuare gli spostamenti fig 2 42 Non lavare o immergere l apparecchio in acqua o in altri liquidi Potrebbero verificarsi corto circuiti o...

Страница 11: ...di aver spento l apparecchio 51 Dopo aver tolto l imballaggio assicurarsi che l apparecchio si presenti integro senza visibili danneggiamenti che potrebbero essere stati causati dal trasporto In caso...

Страница 12: ...ome termoventilatore con il solo scopo di rendere confortevole l ambiente dove si soggiorna 56 Questo apparecchio destinato solo per un utilizzo domestico o similare non di tipo commerciale o industri...

Страница 13: ...N DIESESPRODUKTISTNURF RGUTISOLIERTER UMEODERF RDENGELE GENTLICHENGEBRAUCHGEEIGNET INSTRUCCIOES PARA LA INSTALACI N USOY MANTENIMIENTO ESTE PRODUCTO EST INDICADO NICAMENTE EN LUGARES ABRIGADOS O PARA...

Страница 14: ...MIENTO ESTE PRODUCTO EST INDICADO NICAMENTE EN LUGARES ABRIGADOS O PARA UNA UTILIZACI N PUNTUAL IT EN FR DE ES 1 3 2 5 1 11 6 4 12 ITALIANO IT 12 Modello Caldo Rock DT 2 INSTALLAZIONE L apparecchio no...

Страница 15: ...VENTILAZIONE ruotare la manopola nella posizione Funzione POTENZA MINIMA ruotare la manopola nella posizione Funzione POTENZA MASSIMA ruotare la manopola nella posizione Manopola 8 Termostato Avviare...

Страница 16: ...i accensione spegnimento apparecchio Premere il tasto per accendere l apparecchio il led 13a si accende Premere una seconda volta il tasto per spegnere l apparecchio il led 13a si spegne La ventola co...

Страница 17: ...unge il valore impostato Con l apparecchio acceso premere contemporaneamente per 3 secondi entrambi i tasti per visualizzare la temperatura in C o in F 16 Tasto impostazione timer valore impostabile d...

Страница 18: ...ni all apparecchio cavo di alimentazione e spina Se non ci sono danni collegare la spina nella presa di corrente riavviare l apparecchio Se l apparecchio rimane ancora spento contattare il servizio as...

Страница 19: ...nte delicato per pulirne le parti esterne Asciugare con un panno asciutto Utilizzare un pennello o un aspirapolvere per rimuovere la polvere dalle griglie di entrata uscita dell aria fig 5 Assicurarsi...

Страница 20: ...intende utilizzare l apparecchio per un periodo di tempo particolarmente lungo o si devono effettuare lavori che potrebbero produrre molta polvere si consiglia di riporre l apparecchio come segue Speg...

Страница 21: ...ella temperatura ambiente Con controllo della temperatura ambiente tramite termostato meccanico Con controllo elettronico della temperatura ambiente Con controllo elettronico della temperatura ambient...

Страница 22: ...temperatura ambiente Con controllo della temperatura ambiente tramite termostato meccanico Con controllo elettronico della temperatura ambiente Con controllo elettronico della temperatura ambiente e t...

Страница 23: ...rrect disposal Further information about the recycling of this product can be obtained from your local town hall your refuse collection service or in the store at which you bought the product This reg...

Страница 24: ...department in the company CUSTOMER TECHNICAL SERVICE Index Paragraphs marked with this symbol contain very important informationandrecommendations particularlyasregardssafety Failure to comply with th...

Страница 25: ...it presents the risk of burns due to contact with components at very high temperatures Do not cover Indicates to the personnel concerned that it is prohibited to cover the appliance to prevent over he...

Страница 26: ...ained in each chapter 3 Keep the manual carefully for future reference 4 After removing the packaging check that the appliance is in perfect condition The packaging materials must not be left within r...

Страница 27: ...l service or a similarly qualified person in order to eliminate all possible risks 12 Install it in such a way that the switches and other controls cannot be reached by persons using the bath or showe...

Страница 28: ...erial could be sucked into the air vents fig 3 26 It is forbidden to dispose of or leave in the reach of children the packaging materials which could become a source of danger 27 It is forbidden for t...

Страница 29: ...urroundings of a bath a shower or a swimming pool 34 Some parts of this product may become very hot and could cause burns Be very careful when children or vulnerable adults are nearby 35 WARNING in or...

Страница 30: ...may occur 43 Do not let the appliance work in enclosed areas such as a cabinet since it could cause a fire 44 If the appliance s plug is incompatible with the socket have the socket replaced with a su...

Страница 31: ...is complete without visible damage that could have been caused during transport In case of doubt do not use the appliance and contact the authorised Technical Assistance centres 52 When left unattende...

Страница 32: ...u are staying comfortable 56 This appliance is only designed for domestic use or similar not for commercial or industrial use 57 An improper use of the appliance with possible damages caused to people...

Страница 33: ...D WARTUNGSANWEISUNGEN DIESESPRODUKTISTNURF RGUTISOLIERTER UMEODERF RDENGELE GENTLICHENGEBRAUCHGEEIGNET INSTRUCCIOES PARA LA INSTALACI N USOY MANTENIMIENTO ESTE PRODUCTO EST INDICADO NICAMENTE EN LUGAR...

Страница 34: ...T INSTRUCCIOES PARA LA INSTALACI N USOY MANTENIMIENTO ESTE PRODUCTO EST INDICADO NICAMENTE EN LUGARES ABRIGADOS O PARA UNA UTILIZACI N PUNTUAL IT EN FR DE ES 1 3 2 5 1 11 6 4 12 ENGLISH EN 12 Caldo Ro...

Страница 35: ...b set to O appliance OFF VENTILATION function rotate the knob to position MINIMUM POWER function rotate the knob to position MAXIMUM POWER function rotate the knob to position Knob 8 Thermostat Start...

Страница 36: ...appliance 13 Appliance ON OFF key Press the key to switch on the appliance the led 13a lights up Press the key a second time to switch off the appliance the led 13a goes off Fan will continue to work...

Страница 37: ...erature at the set level With the appliance on press both keys simultaneously for 3 seconds to display the temperature in C or in F 16 Timer setting key settable value from 0 to 12 hours With the appl...

Страница 38: ...the appliance the cord and the plug If there is no damage plug the unit back in switch it on as described above If the heater still does not turn on please contact Customer Service for assistance 6 SA...

Страница 39: ...pened with warm water max 50 C and a mild detergent to clean its external parts Dry with a dry cloth Use a vacuum cleaner to remove dust from the air inlet outlet grids fig 5 Make sure the appliance i...

Страница 40: ...ANCE If you do not intend to use the appliance for a particularly long period of time or if operations which could produce a lot of dust must be performed it is advised to store the appliance as follo...

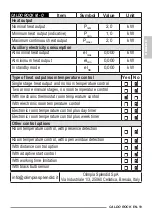
Страница 41: ...temperature control Two or more manual stages no room temperature control With mechanic thermostat room temperature control With electronic room temperature control Electronic room temperature control...

Страница 42: ...rature control Two or more manual stages no room temperature control With mechanic thermostat room temperature control With electronic room temperature control Electronic room temperature control plus...

Страница 43: ...ncorrecte du produit Pourtoutesinformationscompl mentairesconcernantlerecyclage de ce produit adressez vous votre municipalit votre service des ordures ou au magasin o vous avez achet le produit Cette...

Страница 44: ...e des situations o il faut informer le SERVICE interne de la soci t SERVICE APRES VENTE CLIENTS Index Les paragraphes pr c d s par ce symbole contiennent des informations et des prescriptions tr s imp...

Страница 45: ...risque de subir des br lures par contact avec des composants haute temp rature Ne pas couvrir Il indique au personnel concern qu il est interdit de couvrir l appareil afin d en viter la surchauffe At...

Страница 46: ...e 4 Apr s avoir retir l emballage s assurer que l appareil est en parfait tat Les l ments de l emballage ne doivent pas tre laiss s port e des enfants pour qui ils repr sentent des sources potentielle...

Страница 47: ...ayant des qualifications similaires de fa on pr venir tout risque 12 L installer en veillant ce que les interrupteurs et autres commandes ne soient pas accessibles par les personnes utilisant la baign...

Страница 48: ...ils pourraient tre aspir s par les prises d air fig 3 26 Il est d fendu de jeter dans la nature ou de laisser la port e des enfants le mat riau d emballage car il peut tre une source potentielle de d...

Страница 49: ...po le proximit imm diate d une baignoire d une douche ou d une piscine 34 ATTENTION Certaines parties de cet appareil peuvent devenir tr s chaudes et provoquer des br lures Il faut faire tr s attenti...

Страница 50: ...es o elles sont pr vues pour effectuer les d placements fig 2 42 Ne pas immerger l appareil dans de l eau ou autres liquides Des courts circuits ou des incendies peuvent survenir 21 Ne pas faire fonct...

Страница 51: ...e en marche l appareil 50 Ne pas d brancher l appareil du secteur avant d avoir teint l appareil 51 Apr s avoir enlev l emballage s assurer que l appareil est en bon tat sans d t riorations visibles p...

Страница 52: ...appareil doit tre utilis exclusivement comme thermo ventilateur dans le seul but d am liorer le confort de l espace dans lequel il se trouve 56 Cet appareil est con u pour un usage domestique unique...

Страница 53: ...RODUKTISTNURF RGUTISOLIERTER UMEODERF RDENGELE GENTLICHENGEBRAUCHGEEIGNET INSTRUCCIOES PARA LA INSTALACI N USOY MANTENIMIENTO ESTE PRODUCTO EST INDICADO NICAMENTE EN LUGARES ABRIGADOS O PARA UNA UTILI...

Страница 54: ...SOY MANTENIMIENTO ESTE PRODUCTO EST INDICADO NICAMENTE EN LUGARES ABRIGADOS O PARA UNA UTILIZACI N PUNTUAL IT EN FR DE ES 1 3 2 5 1 11 6 4 12 FRAN AIS FR 12 Mod le Caldo Rock DT 1 Corps de l appareil...

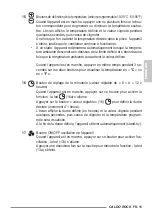
Страница 55: ...UTILISATION mod les M et O Molette 7 Molette en position O appareil teint Fonction VENTILATION tourner la molette dans la position Fonction PUISSANCE MINIMUM tourner la molette sur Fonction PUISSANCE...

Страница 56: ...e d extinction de l appareil Appuyer sur le bouton pour allumer l appareil la led 13a s allume Appuyer une deuxi me fois sur le bouton pour teindre l appareil la led 13a s teint Le ventilateur continu...

Страница 57: ...t la valeur d finie Quand l appareil est en marche appuyer en m me temps pendant 3 se condes sur les deux boutons pour visualiser la temp rature en C ou en F 16 Bouton de r glage de la minuterie valeu...

Страница 58: ...de l appareil le c ble d alimentation et la fiche S il n y a pas de dommages rebrancher la fiche dans la prise lectrique rallumer l appareil Si l appareil reste encore teint contacter le service d ass...

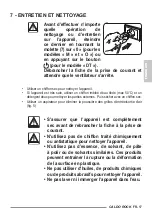
Страница 59: ...C et un d tergent doux pour nettoyer les parties externes Puis s cher avec un chiffon sec Utiliser un aspirateur pour liminer la poussi re des grilles d entr e sortie d air fig 5 S assurer que l appar...

Страница 60: ...eil ne doit pas tre utilis pendant une p riode particuli rement longue ou si des travaux susceptibles de provoquer beaucoup de poussi re sont pr vus il est recommand de ranger l appareil de la mani re...

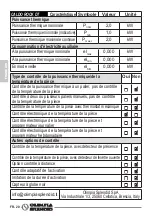
Страница 61: ...e Contr le deux ou plusieurs paliers manuels pas de contr le de la temp rature de la pi ce Contr le de la temp rature de la pi ce avec thermostat m canique Contr le lectronique de la temp rature de la...

Страница 62: ...tr le deux ou plusieurs paliers manuels pas de contr le de la temp rature de la pi ce Contr le de la temp rature de la pi ce avec thermostat m canique Contr le lectronique de la temp rature de la pi c...

Страница 63: ...GesundheitwerdendurchfalschesEntsorgengef hrdet WeitereInformationen berdasRecyclingdiesesProdukteserhalten Sie von Ihrem Rathaus Ihrer M llabfuhr oder dem Gesch ft in dem Sie das Produkt gekauft habe...

Страница 64: ...ist KUNDENDIENST Inhaltsverzeichnis Die Paragrafen denen dieses Symbol vorausgeht enthalten sehr wichtige Informationen und Vorschriften insbesondere bez glich der Sicherheit Die Nichtbeachtung diese...

Страница 65: ...f r Verbrennungen an hei en Komponenten birgt wenn er entgegen der Sicherheitsvorschriften ausgef hrt wird Nicht bedecken Weist das betroffene Personal darauf hin dass es verboten ist das Ger t wegen...

Страница 66: ...3 Bewahren Sie das Handbuch sorgf ltig auf damit Sie es bei Bedarf stets zur Hand haben 4 berpr fen Sie das Ger t nach dem Auspacken auf einwandfreien Zustand Die Verpackungsr ckst nde nie in Reichwe...

Страница 67: ...gt ist muss dieses zur Vermeidung von Gefahren vom Hersteller oder von dessen Technischem Kundendienst beziehungsweise durch gleicherma en qualifiziertes Personal ersetzt werden 12 Bei der Installatio...

Страница 68: ...er t ist zum Aufstellen auf den Boden ausgelegt Es darf nicht an W nde oder Decken installiert werden 25 Betreiben Sie das Ger t nicht in der N he von Vorh ngen da diese in die Ansaug ffnungen gelange...

Страница 69: ...schen 3 und 8 Jahren d rfen den Stecker nicht einstecken das Ger t nicht einstellen oder reinigen oder benutzerseitige Wartungsarbeiten durchf hren 33 Die Verwendung des Heizger tes in der N he von Ba...

Страница 70: ...warmen Reinigungsl sung befeuchteten nicht nassen Lappen Bei Reinigungsarbeiten immer den Netzstecker ziehen 40 Das Ger t darf nicht an das Stromnetz angeschlossen werden bevor es vollst ndig zusammen...

Страница 71: ...st u erst gef hrlich das Ger t selbst zu reparieren 49 Bei Gasaustritt aus anderen Ger ten den Raum vor dem Einschalten des Klimager ts gut l ften 50 Den Netzstecker nie ziehen bevor das Ger t ausgesc...

Страница 72: ...ich zu machen 56 Dieses Ger t wurde f r den Hausgebrauch nicht f r die Verwendung in Gewerbe und Industrie konzipiert 57 Der unsachgem e Gebrauch des Ger ts enthebt OLIMPIA SPLENDID von jeglicher Haft...

Страница 73: ...UNGS AND WARTUNGSANWEISUNGEN DIESESPRODUKTISTNURF RGUTISOLIERTER UMEODERF RDENGELE GENTLICHENGEBRAUCHGEEIGNET INSTRUCCIOES PARA LA INSTALACI N USOY MANTENIMIENTO ESTE PRODUCTO EST INDICADO NICAMENTE E...

Страница 74: ...S PARA LA INSTALACI N USOY MANTENIMIENTO ESTE PRODUCTO EST INDICADO NICAMENTE EN LUGARES ABRIGADOS O PARA UNA UTILIZACI N PUNTUAL IT EN FR DE ES 1 3 2 5 1 11 6 4 12 DEUTSCH DE 12 Modell Caldo Rock DT...

Страница 75: ...haltet Funktion L FTUNG Den Drehknopf in Stellung bringen Funktion MINDEST LEISTUNG Den Drehknopf in Stellung bringen Funktion H CHST LEISTUNG Den Drehknopf in Stellung bringen Drehknopf 8 Thermostat...

Страница 76: ...Ausschalttaste des Ger ts Die Taste dr cken um das Ger t einzuschalten die Led 13a leuch tet auf Ein zweites Mal die Taste dr cken um das Ger t auszuschalten die Led 13a erlischt Der L fter l uft noch...

Страница 77: ...ei eingeschaltetem Ger t 3 Sekunden lang gleichzeitig beide Tasten dr cken um die Temperatur in C oder in F anzuzeigen 16 Taste Timereinstellung einstellbarer Wert von 0 bis 12 Stunden Bei eingeschalt...

Страница 78: ...el und dem Stecker berpr fen Liegen keine Besch digungen vor Den Stecker in die Steckdose einf hren Das Ger t neu starten Bleibt das Ger t ausgeschaltet den Kundendienst benachrichtigen 6 SICHERHEITSK...

Страница 79: ...tel verwendet werden um die Au enseiten zu reinigen Danach mit einem trockenen Tuch abtrocknen Einen Staubsauger benutzen um den Staub an den Lufteintritts Luftaustrittsgittern zu entfernen Abb 5 Kont...

Страница 80: ...beabsichtigt wird das Ger t f r einen besonders langen Zeitraum nicht zu benutzen oder falls Arbeiten durchgef hrt werden m ssen bei denen viel Staub entsteht empfehlen wir das Ger t folgenderma en au...

Страница 81: ...wei oder mehr manuell einstellbare Stufen keine Raumtemperaturkontrolle Raumtemperaturkontrolle mit mechanischem Thermostat Mit elektronischer Raumtempera turkontrolle Elektronische Raumtemperaturkont...

Страница 82: ...der mehr manuell einstellbare Stufen keine Raumtemperaturkontrolle Raumtemperaturkontrolle mit mechanischem Thermostat Mit elektronischer Raumtempera turkontrolle Elektronische Raumtemperaturkontrolle...

Страница 83: ...io ambiente y la salud Otras informaciones sobre el reciclado de este producto las obtendr desuayuntamiento recogidadebasuraoenelcomercio donde haya adquirido el producto Esta norma es v lida nicament...

Страница 84: ...RVICE empresarial interno SERVICIO ASISTENCIA T CNICA A CLIENTES ndice losp rrafosprecedidosporestes mbolo contieneninformaciones y prescripciones muy importantes particularmente por lo que respecta a...

Страница 85: ...e seguridad existe el riesgo de sufrir quemaduras a causa del contacto con componentes a temperatura elevada No cubrir Se ala al personal implicado que est prohibido cubrir el aparato para evitar que...

Страница 86: ...ste manual para consultas posteriores 4 Una vez quitado el embalaje verifiquen que el aparato est ntegro los elementos del embalaje no deben dejarse al alcance de los ni os ya que son potenciales fuen...

Страница 87: ...e tipo Y Para prevenir cualquier riesgo en caso de deterioro del cable de alimentaci n ste debe ser sustituido por el fabricante por su servicio de asistencia t cnica o por una persona cualificada 12...

Страница 88: ...elo No lo instale en el techo ni en la pared 25 No utilice el aparato cerca de cortinas ya que stas podr an ser aspiradas por las tomas de aire fig 3 26 Est prohibido arrojar o dejar alalcance de los...

Страница 89: ...Se recomienda no utilizar la estufa muy cerca de la ba era de la ducha o de la piscina 34 ATENCI N Algunas partes del presente aparato puedenalcanzartemperaturasmuyelevadasyprovocar quemaduras Es nec...

Страница 90: ...istas para su desplazamiento fig 2 42 No sumerge el aparato en agua o en otros l quidos Podr an producirse cortocircuitos o incendios 43 No haga funcionar el aparato en una rea cerrada como por ejempl...

Страница 91: ...ato se presente ntegro sin da os visibles que puedan haberse producido durante el transporte En caso de dudas no utilice el aparato y dir jase a los Centros de Asistencia T cnica autorizados 52 Descon...

Страница 92: ...o en el que se encuentre sea c modo 56 Este aparato est dise ado solo para uso dom stico o similar no para uso comercial o industrial 57 Un uso inapropiado del aparato con eventuales da os causados a...

Страница 93: ...IESESPRODUKTISTNURF RGUTISOLIERTER UMEODERF RDENGELE GENTLICHENGEBRAUCHGEEIGNET INSTRUCCIOES PARA LA INSTALACI N USOY MANTENIMIENTO ESTE PRODUCTO EST INDICADO NICAMENTE EN LUGARES ABRIGADOS O PARA UNA...

Страница 94: ...I N USOY MANTENIMIENTO ESTE PRODUCTO EST INDICADO NICAMENTE EN LUGARES ABRIGADOS O PARA UNA UTILIZACI N PUNTUAL IT EN FR DE ES 1 3 2 5 1 11 6 4 12 ESPA OL ES 12 Modelo Caldo Rock DT 1 Cuerpo del apara...

Страница 95: ...agado Funci n VENTILACI N gire la perilla a la posici n Funci n POTENCIA M NIMA gire la perilla a la posici n Funci n POTENCIA M XIMA gire la perilla a la posici n Perilla 8 Termostato Encienda el apa...

Страница 96: ...endido apagado del aparato Presione la tecla para encender el aparato la led 13a se ilumina Presione la tecla por segunda vez para apagar el aparato el led 13a se apaga El ventilador continuar funcion...

Страница 97: ...el valor es tablecido Con el aparato encendido presione ambas teclas simult neamente du rante 3 segundos para mostrar la temperatura en C o en F 16 Tecla de configuraci n del temporizador valor confi...

Страница 98: ...encia de da os en el aparato en el cable de alimentaci n y en la clavija Si no hay da os vuelva a conectar la clavija en la toma de corriente reencienda el aparato Si el aparato permanece apagado cont...

Страница 99: ...C y con un detergente delicado para limpiar sus partes externas Seque con un pa o seco Utilice una aspiradora para quitar el polvo de las rejillas de entrada salida aire fig 5 Aseg resedequeelaparatos...

Страница 100: ...n el caso de que no se desee utilizar el aparato por un periodo de tiempo prolongado o si se deben efectuar trabajos que podr an producir mucho polvo se aconseja almacenar el aparato como sigue Apague...

Страница 101: ...o m s niveles manuales sin control de temperatura interior Con control de temperatura interior mediante termostato mec nico Con control electr nico de temperatura interior Control electr nico de temp...

Страница 102: ...s niveles manuales sin control de temperatura interior Con control de temperatura interior mediante termostato mec nico Con control electr nico de temperatura interior Control electr nico de temperatu...

Страница 103: ......

Страница 104: ...263011B...

Отзывы: