


DE - 8
DEUTSCH
1 - WICHTIGSTE EIGENSCHAFTEN UND FUNKTIONSWEISEN
•
System zur Nachfilterung der Luft, wirksam zur Beseitigung von Asche, Haaren, Pollen, Rauch und
unangenehmen Gerüchen.
•
Der Vorfilter (2a) beseitigt die in der Luft vorhandenen Verunreinigungen (Haare, Papier und andere
Materialien) und verlängert die Lebensdauer des HEPA-Filters erheblich.
•
Der HEPA-Filter (2b) filtert
99,999
% der Partikel mit Durchmesser 0,3 Mikron aus. Er wurde eigens
dafür ausgelegt, Staub, Zigarettenrauch, Bakterien, Ruß, Pollen und radioaktive Partikel zu beseitigen.
•
Der hochwertige Aktivkohlefilter (3) beseitigt wirksam die in der Luft vorhandenen Gerüche, wie For
-
maldehyd, Benzol, Ammoniak und Wasserpartikel.
•
UV-System: Tötet Bakterien, Viren und Keime.
•
Ionisator: Das Gerät erzeugt kontinuierlich mehr als 2 Millionen Anionen, die zur Luftqualität im Raum
beitragen.
•
Funktion „Child Lock‟ (Kindersicherung)
•
Timerfunktion: von 1 bis 12h.
• Touch-Display.
•
Akustisches Signal bei Tastendruck.
•
Verbindung WLAN.
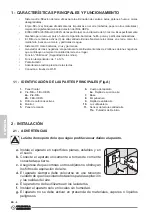
2 - INSTALLATION
2.1 -
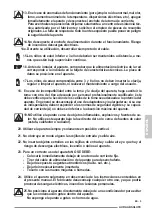
HINWEISE
Werden die nachfolgenden Punkte nicht beachtet, kann das Gerät Schaden
nehmen.
a.
Das Gerät auf ebenen und stabilen Oberflächen und am
Boden aufstellen.
b.
Das Gerät nur an geerdete Steckdosen anschließen.
c.
Sicherstellen, dass Gardinen oder andere Gegenstände
nicht die Luftansaugfilter verstopfen.
d.
Das Gerät muss immer so benutzt werden, dass die
Luftzufuhr und -abfuhr nicht behindert werden.
e.
Das Gerät darf nicht in einem zur Waschküche bestimmtem Raum installiert wer-
den.
f.
Das Gerät nur in trockenen Räumen aufstellen.
g.
Das Gerät darf in Anwesenheit von gefährlichen Stoffen, Dämpfen oder Flüssig
-
keiten nicht in Betrieb genommen werden.
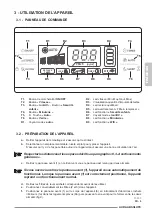
1.1 - BEZEICHNUNG DER WICHTIGSTEN BAUTEILE (Abb.A)
1.
Frontplatte
2.
Vor HEPA-Filter
2a.
Vorfilter
2b.
HEPA-Filter
3.
Aktivkohlefilter
4.
Display
5.
Bedienfeld
6.
Gerätekörper
6a.
Luftansauggitter
7.
Sockel
8.
Griff
9.
Luftauslassgitter
10.
UV-Lampe
11.
Luftqualität-Erfassungs-Sensor
11a.
Reset-Taste
Содержание AURA ABSOLUTE
Страница 2: ......
Страница 6: ...1 6a 10 6 8 9 7 7 4 5 8 2 2a 3 11 11a 2b min 20cm m in 20cm min 30cm A B B1...
Страница 7: ...1 6 6b 1a 6a 6a 1 6 2a 2b 3 11 D F G C E...
Страница 8: ...H 11a L 2a 2a x 3a 2b 2b 3 1 6 3a 6b 1a...
Страница 79: ......
Страница 80: ...263736A...


