background image

DHE-04 / DHE-08 / DHE-16 Quick Setup Guide 

DV-13 / DV-14 / DV-15 

R201405-V08 

- 9 - 

Part 2. DDNS 

1. 

Continue Part 1

: Select “

Other Setting

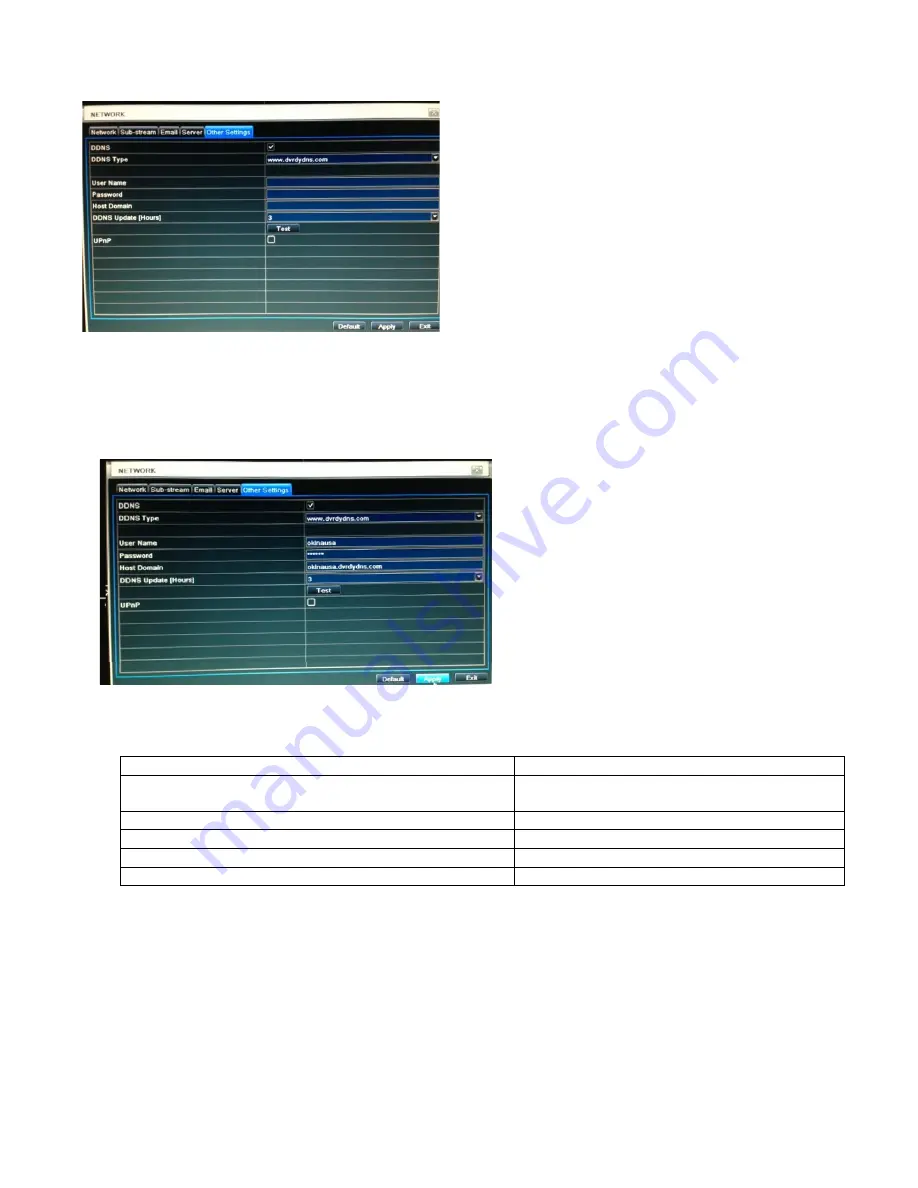
” from the Tab bar and turn on DDNS.


2.  Select DDNS Type and pick one website from the given field to register your Host Domain Name. 
 

3. 

Enter User Name, Password, and Host Domain info that you registered for DDNS and click Test 

After Test 

passes, then click 

Apply

 and 

Exit

.


4.  Finally, you will need to set port forwarding on your internet-facing router/gateway to direct port 80 traffic to 

the DVR. Also you will need to port forwarded your server port 6036 to stream video and audio as well. 
Locate the page in your router settings to set port forwarding (may also be labeled “firewall”). 

HTTP Port: Port for IE connection. (Default is 80) 

80 

Server Port: Port for video and audio streaming. 
(Default is 6036) 

6036 

Incoming Port Range (advance) 

80-80 (or alternative if port 80 is being used) 

Forward Port (advance) 

80, 6036 

IP 

Your DVR’s internal IP, typically 192.168.x.x 

Protocol (advanced) 

TCP & UDP 

 
TIP:
 Some consumer router/gateway devices may present the firewall settings as a list of services to forward. In this 
case, consult the manual for settings for creating a custom service and use the above values. For router/gateway 
devices provided by your ISP, please contact your ISP technical support.


TIP: AutoDDNS do not need to register online. This 
can just register on DVR.   
 
The DDNS URL will always be in the form of 
<hostname>.   
 
If you are unable to access the DVR from the 
internet using the DDNS URL, but the IP works, 
please double check that you have the DDNS URL 
correctly typed


Содержание DHE-04

Страница 1: ...ect to change without notice A One 1 DHE 04 DHE 08 DHE 16 DVR B One 1 Remote Controller C Two 2 AAA Battery for Remote Controller D One 1 USB Mouse E One 1 4 Screw on Terminal Connector DHE 04 One 1 8...

Страница 2: ...jump back to previous page 6 FF P T Z Fast forward on playback mode enter PTZ mode 7 REC FOCUS Manual record focus adjustment PTZ 8 SEARCH 9 Enter Validate action 10 Split Direction Key Switch split M...

Страница 3: ...speed dome or keyboard 3 Back Panel 8 CH Item Label Name Function 1 Audio in 4 CH Audio input 2 GND Grounding for Alarm in 3 ALARM OUT 1 ch relay output Connect to external alarm 4 ALARM IN Connect t...

Страница 4: ...onnect USB mouse or connect external USB devices 8 DC12V POWER INPUT 9 Video out Connect to monitor 10 Audio out Audio output connect to the sound box 1 Remote Controller This remote control uses AAA...

Страница 5: ...ff the power 13 Audio To enable audio output in live mode 14 Enter Button To confirm the choice or setup 15 Menu Button To enter into menu 16 To control playback Play Pause Stop Previous Section Next...

Страница 6: ...of DVR Language to set a proper language Date Format to set a proper display format of time Time Format to set 24 hour or 12 hour format to display Time Zone to set proper time zone GMT 8 Los Angeles...

Страница 7: ...on screen to confirm that manual recording is enabled Press Record Button again to stop recording OR Right click on main screen and select Record Note Definition of Holding Time on motion detect setti...

Страница 8: ...Cable is plugged in 5 After Apply the IP Address Netmask Gateway and DNS addresses should automatically be generated For STA TIP Write down HTTP Port Server Port and IP Address on a piece of paper for...

Страница 9: ...ed firewall HTTP Port Port for IE connection Default is 80 80 Server Port Port for video and audio streaming Default is 6036 6036 Incoming Port Range advance 80 80 or alternative if port 80 is being u...

Страница 10: ...r Website 1 www dyndns com 4 www dvrdydns com 2 www meibu com 5 www mintdns com 3 www no ip com 6 www autoddns com For technical specification please refer to the User Manual www okinausa com DV 13 DV...

Отзывы: