


Copyright © 2011 by OKINA USA
D-245
www.okinausa.com 9 R072011-V13
C)
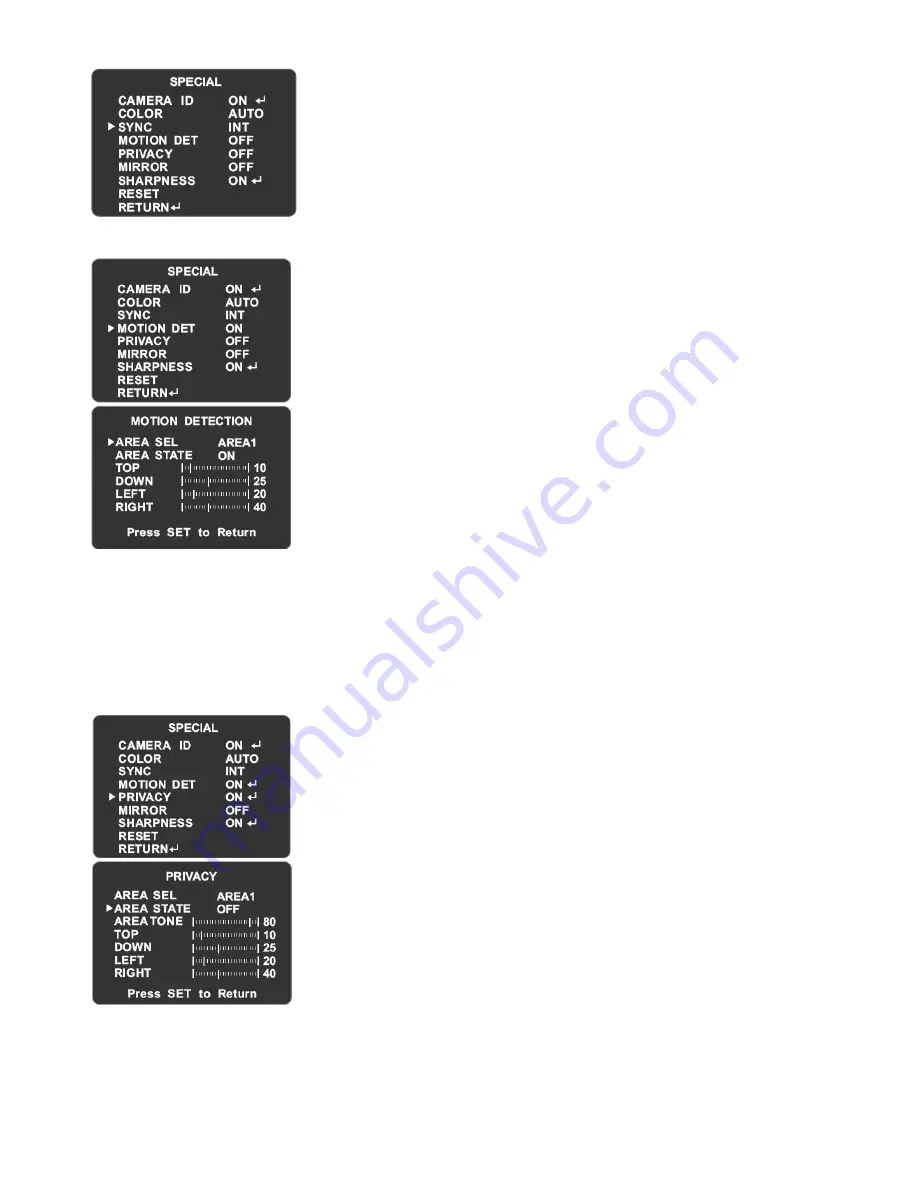
Sync
D)
Motion Detection
E)
Privacy
The camera is fixed to INT in SYNC mode that cannot be
modified by the user.
When there is a moving object, the camera will detect it and an
on-screen alert will pop up. The user can set up the detected
coverage area by selecting the 4 areas individually on the monitor.
1.
Position the arrow to MOTION DET in setup menu by
pressing UP/DOWN button.
2.
Select the mode you wish to operate by pressing
LEFT/RIGHT button
OFF: Motion Detection is off
ON: Motion Detection is on
When selecting ON, enter into MOTION DETECTION by
pressing Setup
1.
Position the arrow to AREA SEL by pressing
UP/DOWN button. The chosen area including
AREA1~AREA4 can be set up by LEFT/RIGHT button.
2.
Position the arrow to AREA STATE by pressing UP/DOWN button. The detection of the
chosen area can be turned on/off by LEFT/RIHGT button.
3.
Position the arrow to TOP/DOWN/LEFT/RIGHT by UP/DOWN button. The detected place and
coverage of the chosen area can be set up by pressing LEFT/RIHGT button.
4.
Return to last menu by pressing SETUP while finishing modification.
NOTE: Motion detection only shows alert on the monitor without additional alarm output.
This mode conceals the areas you do not wish to show on the
screen.
1.
Position the arrow to PRIVACY in setup menu by pressing
UP/DOWN button.
2.
Select the mode you wish to operate by pressing
LEFT/RIGHT button.
OFF: This will cancel the Privacy
ON: This will activate the Privacy
When selecting ON, enter into PRIVACY by pressing Setup.
1.
Position the arrow to AREA SEL by pressing
UP/DOWN button. The chosen area including
AREA1~AREA4 can be set up by LEFT/RIGHT button.
2.
Position the arrow to AREA STATE by pressing
UP/DOWN button. The privacy area can be
canceled/activated by pressing LEFT/RIGHT button.
3.
Position the arrow to TOP/DOWN/LEFT/RIGHT by pressing UP/DOWN button. The privacy
place and coverage can be set up by LEFT/RIGHT button.
4.
Return to last menu by pressing SETUP while finishing modification.


