Oki Pacemark PM4410 Скачать руководство пользователя страница 24

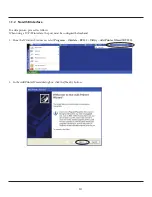
8.  If installation was completed successfully, the following dialog box will appear. To print a test page, click the [Print a test 

page] button. Click the [Finish] button to complete the installation.

Important:  When using a serial port, do not print the test page.


Confirm the printer and printer port settings when printing via a serial port.


For details, refer to “5.1 Notes for Printing via a Serial Interface” at the end of


the manual.

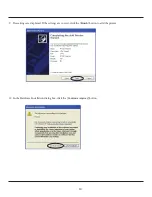
9.   From the Windows Start menu, select Settings – Printers to display the printer setting dialog box. Confirm that 

RT322 

Cutter

 or 

RT322 Tear Bar

 appears in the folder. If the appropriate printer appears there, installation was completed 

successfully.

24

Содержание Pacemark PM4410

Страница 1: ...Tear Bar Cutter Software Manual 59318001 my okidata com RT322 RT322...

Страница 2: ...64 Bit Edition 39 2 Features 43 2 1 RT322 Driver 43 2 2 44 2 3 Virtual Port Emulator 44 3 Windows 2000 XP Vista Printer Driver Settings 45 3 1 Setting the Printer 46 3 1 1 Print Mode 47 3 1 2 Paper T...

Страница 3: ...sing the Control Font 77 3 5 Barcode Fonts 79 3 5 1 Barcode Font List 79 3 5 2 Entering the Barcode Font 80 3 5 3 Using the Barcode Font 82 3 6 Selecting the Print Color 84 4 Windows 2000 SP3 or Later...

Страница 4: ...4 Bit Edition 1 1 Installing Windwos 2000 XP To install the driver proceed as follows Important When using a USB interface turn on the printer s power after performing steps 1 to 8 1 For Windows XP cl...

Страница 5: ...oceed 4 Type your user information After typing your user name and the name of your organization and selecting whether the installed program is to be available to all users of this computer or only to...

Страница 6: ...tall all of the program s features and then click the Next button For Windows versions prior to Windows 2000 SP3 only the driver functions will be installed 6 Click the Install button to begin the ins...

Страница 7: ...yway button 8 The wizard has completed installation of the program Click the Finish button to close the wizard 9 The remaining installation steps vary according to the type of interface Continue to ad...

Страница 8: ...1 Connect the printer and then turn on the printer s power switch The Plug and Play feature detects the connection of the printer hardware and automatically starts installing the driver software At th...

Страница 9: ...ccessfully the following dialog box will appear Click the Finish button to complete the installation 6 From the Windows Start menu select Printers and Faxes and confirm that RT322 Cutter or RT322 Tear...

Страница 10: ...oceed as follows When using a TCP IP interface the port must be configured beforehand 1 From the Windows Start menu select Programs Okidata RT322 Utility Add Printer Wizard RT322 2 In the Add Printer...

Страница 11: ...lect Local printer attached to this computer and uncheck Automatically detect and install my Plug and Play printer Click the Next button to proceed 4 In the Select a Printer Port dialog box select the...

Страница 12: ...fy the printer name that will be used after installation in Windows based programs Type the printer name if you wish to change it Additionally you may set the printer currently being installed as the...

Страница 13: ...t page or No to not print one and then click the Next button Important When using a serial interface do not print the test page Confirm the printer and printer port settings when printing via a serial...

Страница 14: ...9 The settings are displayed If the settings are correct click the Finish button to add the printer 10 In the Hardware Installation dialog box click the Continue Anyway button 14...

Страница 15: ...opied 11 From the Windows Start menu select Printers and Faxes and confirm that RT322Cutter or RT322 Tear Bar appears in the folder If the appropriate printer appears there installation was completed...

Страница 16: ...sories right click Command Prompt and then Run as administrator 2 At the command prompt perform the OKIPOS Driverset msi installer as follows 3 In the User Account Control dialog box click the Continu...

Страница 17: ...of your organization and selecting whether the installed program is to be available to all users of this computer or only to you click the Next button 6 Select the type of setup Select Complete to in...

Страница 18: ...button to begin the installation 8 In the software installation confirmation dialog box click Install this driver software anyway to continue with installation The confirmation dialog box will appear...

Страница 19: ...Click the Finish button to close the wizard 10 The remaining installation steps vary according to the type of interface Continue to add the printer according to the steps for the interface that you ar...

Страница 20: ...omatically installs the driver software If installation was completed successfully the following message will appear on the lower right of the Windows desktop 2 From the Windows Start menu select Sett...

Страница 21: ...ed beforehand 1 From the Windows Start menu select Programs Okidata RT322 Utility right click Add Printer Wizard RT322 and then select Run as administrator 2 In the User Account Control dialog box cli...

Страница 22: ...4 In the Choose a printer port dialog box select the port to use and then click the Next button 5 Select the printer to install and then click the Next button 22...

Страница 23: ...ased programs Type the printer name if you wish to change it Additionally you may set the printer currently being installed as the default printer Click the Next button to begin the installation 7 Mak...

Страница 24: ...int the test page Confirm the printer and printer port settings when printing via a serial port For details refer to 5 1 Notes for Printing via a Serial Interface at the end of the manual 9 From the W...

Страница 25: ...new folder in a location of your choosing on the computer ex RT322 on the desktop and then copy the files of Printer Driver Set The compressed data can be used after copying it 2 The remaining install...

Страница 26: ...nection of the printer hardware and automatically starts installing the driver software 2 In the following dialog box click Locate and install driver software recommended 3 In the User Account Control...

Страница 27: ...4 The following dialog box will appear The previously copied driver will be used therefore click I don t have the disc Show me other options 5 Click Browse my computer for driver software advanced 27...

Страница 28: ...llset folder ex RT322 Installset on the desktop in the previously created folder and then click the Next button 7 In the software installation confirmation dialog box click Install this driver softwar...

Страница 29: ...lect Settings Printers to display the printer setting dialog box Confirm that RT322 Cutter or RT322 Tear Bar appears in the folder If the appropriate printer appears there installation was completed s...

Страница 30: ...ce To add a printer proceed as follows When using a TCP IP interface the port must be configured beforehand 1 From the Windows Start menu select Settings Printers 2 In the printer setting dialog box c...

Страница 31: ...5 In the Install the printer driver dialog box click the Have Disk button 3 Click Add a local printer 4 In the Choose a printer port dialog box select the port to use and then click the Next button 31...

Страница 32: ...ox click the Browse button to display the Locate File dialog box In the previously created folder open the Installset folder ex RT322 Installset on the desktop select okirt322 inf and then click the O...

Страница 33: ...alog box select the printer to use and then click the Next button 9 Specify the printer name that will be used after installation in Windows based programs Type the printer name if you wish to change...

Страница 34: ...pleted successfully the following dialog box will appear To print a test page click the Print a test page button Click the Finish button to complete the installation Important When using a serial port...

Страница 35: ...tains are no longer necessary therefore delete them 13 From the Windows Start menu select Settings Printers to display the printer setting dialog box Confirm that RT322 Cutter or RT322 Tear Bar appear...

Страница 36: ...1 Turn off the power switch of the RT322 2 From the Windows Start menu select Programs Okidata RT322 Uninstall 3 When the following confirmation dialog box appears click the Yes button to continue 4 T...

Страница 37: ...r switch of the RT322 2 From the Windows Start menu select Programs Okidata RT322 right click Uninstall and then Run as administrator 3 In the User Account Control dialog box click the Continue or All...

Страница 38: ...og box appears select Do not close applications and then click the OK button Although A reboot will be required is indicated the computer will not restart 5 The uninstaller launches to remove all of t...

Страница 39: ...om the Windows Start menu select Settings Printers to open the printers folder Right click the RT322 printer icon and then select Run as administrator Delete 3 In the User Account Control dialog box c...

Страница 40: ...en select Run as administrator Server Properties 6 In the User Account Control dialog box click the Continue or Allow button 7 In the Print Server Properties dialog box click the Drivers tab Select th...

Страница 41: ...will appear Select Remove driver and driver package and then click the OK button 9 When the following confirmation dialog box appears click the Yes button to continue 10 The following dialog box will...

Страница 42: ...and then perform the uninstalling procedure again from step 5 11 If the driver s and driver package s were deleted the following dialog box will appear Click the OK button 12 If the RT322 printer no...

Страница 43: ...owing is an example of driver settings when using the buzzer optional Example of driver settings Peripheral Unit Type Buzzer Peripheral Unit 1 Document Bottom Peripheral Unit 2 No Use Buzzer 1 On Time...

Страница 44: ...re Important This function is supported by Windows 2000 SP3 or later XP Vista 32 bit edition Click here to go to the advanced okidata Configuration Utility page 2 3 Virtual Port Emulator By using this...

Страница 45: ...able for reverse printing wall mount mode Supports device fonts Suitable for printing barcode device fonts In addition this driver is able to set various functions for the RT322 Paper Type Page Cut Ty...

Страница 46: ...this driver Begin by opening the Properties dialog box as follows 1 From the Windows Start menu select Printers and Faxes to open the folder 2 In the folder right click the RT322 printer icon and the...

Страница 47: ...aster Sets Raster Mode Line Sets Line Mode Setting the print mode In the explanations that follow for the various functions the settings that can be made for Raster mode and Line mode are different an...

Страница 48: ...dding at the end of the page data Ticket Fixed length the printer outputs white space padding up to the end of the fixed length page Setting the paper type If you wish to carry out journal printing wi...

Страница 49: ...the end of each non final page of a document Available settings are as follows Setting Default Meaning No Cut Printer does not feed or cut paper Partial Cut Printer feeds paper to cut position and th...

Страница 50: ...hod for the final page of the document Available settings are as follows Setting Default Meaning No Cut Printer does not feed or cut paper Partial Cut Printer feeds paper to cut position and then cuts...

Страница 51: ...ent feed operation after printing Available settings are as follows Setting Default Meaning No Feed Printer does not feed paper after printing document Tear Bar Printer feeds paper to tear bar cut pos...

Страница 52: ...int quality Available settings are as follows Setting Default Meaning High Priority is given to print speed over print quality Middle Sets print quality and print speed to intermediate level Low Provi...

Страница 53: ...y Available settings are as follows Setting Default Meaning 3 to 1 Larger value with minus makes print density lighter Standard Prints with normal density 1 to 3 Larger value with plus makes print den...

Страница 54: ...tically Available settings are as follows Setting Default Meaning Disable Prints normally Enable Printing is inverted top to bottom Use when printer is mounted on wall or standing vertically Selecting...

Страница 55: ...the printer s nonvolatile memory For details about loading NV logos refer to 4 1 2 NVLogo Available settings are as follows Setting Default Meaning No Logo Printed No logo printed at the document top...

Страница 56: ...s refer to 4 1 2 NVLogo Available settings are as follows Setting Default Meaning No Logo Printed No logo printed at the Page top Print Logo 1 10 Prints the selected logo at the Page top Selecting the...

Страница 57: ...s refer to 4 1 2 NVLogo Available settings are as follows Setting Default Meaning No Logo Printed No logo printed at the page bottom Print Logo 1 10 Prints the selected logo at the page bottom Selecti...

Страница 58: ...memory For details about loading NV logos refer to 4 1 2 NVLogo Available settings are as follows Setting Default Meaning No Logo Printed No logo printed at the document bottom Print Logo 1 10 Prints...

Страница 59: ...ows Setting Default Meaning Buzzer Selects the buzzer as the peripheral unit Cash Drawer Selects the cash drawer as the peripheral unit Setting the peripheral unit type Important Buzzers are optional...

Страница 60: ...cted Available settings are as follows Setting Default Meaning No Use Does not use the peripheral unit Document Top Operates the selected peripheral unit at the document top Page Top Operates the sele...

Страница 61: ...cted Available settings are as follows Setting Default Meaning No Use Does not use the peripheral unit Document Top Operates the selected peripheral unit at the document top Page Top Operates the sele...

Страница 62: ...00 milliseconds Pulse width is 0 2 second 300 milliseconds Pulse width is 0 3 second 400 milliseconds Pulse width is 0 4 second 500 milliseconds Pulse width is 0 5 second 600 milliseconds Pulse width...

Страница 63: ...Setting cash drawer 1 The pulse width for cash drawer 2 is fixed at 200 milliseconds 63...

Страница 64: ...n refer to 2 1 RT322 Driver Available settings are as follows Setting Default Meaning 20 milliseconds Set to 0 02 second 40 milliseconds Set to 0 04 second 100 milliseconds Set to 0 1 second 200 milli...

Страница 65: ...n refer to 2 1 RT322 Driver Available settings are as follows Setting Default Meaning 20 milliseconds Set to 0 02 second 40 milliseconds Set to 0 04 second 100 milliseconds Set to 0 1 second 200 milli...

Страница 66: ...he buzzer to sound the buzzer stops when the FEED button is pressed For details of the settings and examples of operation refer to 2 1 RT322 Driver Available settings are as follows Setting Default Me...

Страница 67: ...refer to 2 1 RT322 Driver Available settings are as follows Setting Default Meaning 20 milliseconds Set to 0 02 second 40 milliseconds Set to 0 04 second 100 milliseconds Set to 0 1 second 200 millis...

Страница 68: ...refer to 2 1 RT 322 Driver Available settings are as follows Setting Default Meaning 20 milliseconds Set to 0 02 second 40 milliseconds Set to 0 04 second 100 milliseconds Set to 0 1 second 200 milli...

Страница 69: ...he buzzer to sound the buzzer stops when the FEED button is pressed For details of the settings and examples of operation refer to 2 1 RT322 Driver Available settings are as follows Setting Default Me...

Страница 70: ...aper are shown Paper Roll Width Setting Default Width Length 58 mm 50 8 mm x 200 mm 50 8 mm 200 mm 50 8 mm x Receipt 50 8 mm 3 000 mm 80 mm 72 mm x 200 mm 72 mm 200 mm 72 mm x Receipt 72 mm 3 000 mm A...

Страница 71: ...r Defined Paper Settings The paper size that will be used can be defined The procedure is as follows 1 From the File menu in the Printers and Faxes dialog box select Server Properties 2 Click the Form...

Страница 72: ...opriate Units and type the desired Width and Height settings Important Set all four margins left right top and bottom to 0 6 Click the Save Form button 7 Click the OK button to close the dialog box If...

Страница 73: ...12 24 48 Thermal printer fonts Printer 8 5 cpi 24 24 24 Printer 17 cpi Tall 12 48 48 Printer 8 5 cpi Tall 24 48 24 Printer 16 cpi 13 24 44 Printer 8 cpi 26 24 22 Printer 16 cpi Tall 13 48 44 Printer...

Страница 74: ...pixels Columns at 72 mm 576 dots Meaning Control 12 24 48 Control fonts ESC_FONT 1 24 576 UPC E 12 24 48 Barcode fonts UPC A 12 24 48 JAN EAN 8 12 24 48 JAN EAN 13 12 24 48 CODE39 12 24 48 ITF 12 24 4...

Страница 75: ...utput LF 7 Output CR F Auto cutter Full cut P Auto cutter Partial cut G Print NV Bit Image 1 in regular mode H Print NV Bit Image 2 in regular mode I Print NV Bit Image 3 in regular mode J Print NV Bi...

Страница 76: ...ngland k International character select Denmark I l International character select Sweden m International character select Italy n International character select Spain I o International character sele...

Страница 77: ...he following is an example of how to use the control font 1 Select the Control font from the font list Important When using device fonts with Microsoft Word refer to 5 Guidelines for Printing Document...

Страница 78: ...sh to execute refer to Section 3 4 1 For the characters that set the control font set the font height to the specified value 8 5 3 Print In this example the printer executes a linefeed and then prints...

Страница 79: ...code fonts and available types of characters Barcode Type Character Columns Available Character Set UPC E 12 columns Value 0 to 9 UPC A 12 columns Value 0 to 9 JAN EAN 8 8 columns Value 0 to 9 JAN EAN...

Страница 80: ...nd of the code e g For CODE39 Data to enter apABCDE67890z a p ABCDE6780 z Parameter for barcode end Enter z Barcode data Enter actual barcode data Parameter to set height Specify within range of o to...

Страница 81: ...inimum module width e 3 dots 8 4 dots 8 Minimum module width f 4 dots 10 6 dots 12 Minimum module width g 2 dots 4 2 dots 6 Minimum module width h 3 dots 6 3 dots 9 Minimum module width i 4 dots 8 4 d...

Страница 82: ...nd use barcode fonts 1 Select the device font with the barcode name from the font list In the following example select the barcode font of CODE39 Important When using device fonts with Microsoft Word...

Страница 83: ...2 Enter codes Also set the font height For CODE39 set the font height to 8 5 3 Print When printing a barcode is generated and printed out Print Sample 83...

Страница 84: ...o color printing however you must select color printing at the driver as follows 1 From the Windows Start menu select Printers and Faxes to open the folder 2 In the folder right click the Oki RT322 ic...

Страница 85: ...n of Black White For color printing Select as follows for color printing using two color thermal paper Media Select 2 color paper Color Select check button of Color For printing on special paper Selec...

Страница 86: ...ation Utility dialog box as follows Windows 2000 SP3 or Later XP From the Windows Start menu select Programs Okidata RT322 Utility RT322 Configuration Utility and follow steps 1 to 4 below 1 From the...

Страница 87: ...Windows Vista 32 Bit Edition From the Windows Start menu select Programs okidata RT322 Utility right click RT322 Configuration Utility and then select Run as administrator In the User Account Control...

Страница 88: ...k the RT322 Config tab 5 Click the Launch Configuration Utility button Follow steps 1 to 6 below 1 From the Windows Start menu select Settings Printers to open the printers folder 2 Right click the RT...

Страница 89: ...n Utility dialog box appears Menu Bar 1 File Select File F Rescan Ports for Printer S to rescan ports To rescan click the Yes button 2 Help Select Help H Version V to display the version of RT322 Conf...

Страница 90: ...connected to the current emulation and a Configure Port button Select the model name port name and emulation according to the environment used The printer setting function can be used with Star Line m...

Страница 91: ...Important Match the port configurations to the printer settings The printer settings can be confirmed using the self Printing For details refer to the Hardware Manual In the configuration utility the...

Страница 92: ...lues marked Values marked with are the factory defaults Important 1 Before clicking the button to load the settings confirm that the model name port name and emulation settings match the printer setti...

Страница 93: ...rom the drop down menus and then click the Write Settings button The displayed settings are written to the printer Important Click the Write Settings button to make your changes effective After changi...

Страница 94: ...For details about adding image data to the NVLogo list refer to 4 3 1 Image List To set the print data of NV logos use the printer driver For details refer to the information in from 3 1 9 Document To...

Страница 95: ...1 Click the Add button 2 Select the image that you want to register in the printer and then click the Use button 95...

Страница 96: ...nt all of the NV logo data written to the printer click the Print button This makes it possible for you to check all of the image data currently registered in the printer To delete all of the NV logo...

Страница 97: ...on to print out the 1 byte character table Print Head Test Click the Print button to execute black solid printing consisting of several lines and to test the printer head If the black solid printing p...

Страница 98: ...n to drive cash drawer 1 This allows you to confirm that cash drawer 1 works properly Cash Drawer 2 Test Click the Test button to drive cash drawer 2 This allows you to confirm that cash drawer 2 work...

Страница 99: ...In addition when using a TCP IP port with the configuration utility the TCP IP port will appear in the Port list by first clicking the Search LAN for Printers button Click the Search LAN for Printers...

Страница 100: ...from the Printer List on LAN and click the Property button to display the detailed information of the current Ethernet interface for the selected printer If the printers on the LAN cannot be found cl...

Страница 101: ...the environment that you are using When IP Address is Automatically Assigned by DHCP Server 1 Select the printer from the Printer List on LAN and then click the Change TCP IP Setting button 2 The uti...

Страница 102: ...ayed in the previous dialog box and then click the OK button The password can be changed on the web browser If the password was changed enter the new password 4 The setting dialog box will appear depe...

Страница 103: ...IP address a temporary IP address can be set Enter the IP address and then click the Do ARP and PING button 2 When the temporary IP address is issued the following dialog box will appear Then click t...

Страница 104: ...ayed in the previous dialog box and then click the OK button The password can be changed on the web browser If the password was changed enter the new password 5 The setting dialog box will appear depe...

Страница 105: ...4 2 Application Settings This is for setting each application You can set applications for each port 105...

Страница 106: ...that support only serial printers Adding a Virtual Port Click the Add Port button to display the following dialog box Set all of the items and then click the OK button Enter the output port name of th...

Страница 107: ...Select the timing to start up the emulator function When Automatic is selected this function starts at the same time as the system This is the most common setting When Manual is selected you must cli...

Страница 108: ...button 2 When the following confirmation dialog box appears click the Yes button to continue Check Health 1 Select the port to check from the Virtual Ports List and then click the Check Health button...

Страница 109: ...4 3 Common Data You can register graphic data that will be used as NV logos 109...

Страница 110: ...in the computer A test print will be made when adding graphic data therefore select the model name port name and emulation according to the environment used JPG PNG GIF and BMP are available as forma...

Страница 111: ...Adding Graphic Data 1 Click the Add button 2 Select the graphic data that you want to register and then click the Open button 111...

Страница 112: ...t results of the graphic data being adjusted Items in the options are different depending on the dithering selected Better printing results can be obtained by combining several settings to identify wh...

Страница 113: ...4 Click the OK button to add the graphic data to the Image List The graphic data is added to the Image List and can be used as an NV logo For details on using the data refer to 4 1 2 NVLogo 113...

Страница 114: ...elete button When the following confirmation dialog box appears click the Yes button to continue Editing Graphic Data Click the Edit button to open the Convert Image dialog box The graphic image data...

Страница 115: ...driver the printer settings must match the printer port settings The printer settings can be confirmed using the self printing For details refer to the Hardware Manual To configure the printer port pr...

Страница 116: ...le correct use of device fonts perform the following settings Windows 2000 XP 1 Open Microsoft Word s Tools menu and select Options 2 Click the Compatibility tab and in the Options area select the Use...

Страница 117: ...button Select Advanced and click 1 Layout Options 2 Select the Use printer metrics to lay out document check box Then click the OK button 3 Open Word s File menu and select Save to save the document...

Страница 118: ...line may result in skewed printing Do not include graphic data Windows fonts ruled lines etc on the same line with a device font as this too may cause skewed print results Remember that the Control d...

Отзывы: