background image

46

OKIFAX 4580 User’s Guide

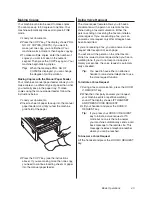
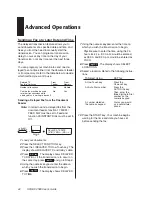
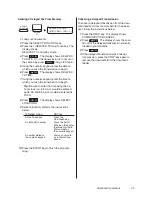
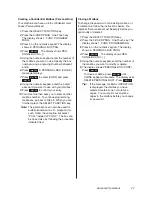
Sending a Confidential Fax or Sub-
address Transmission

Fax machines are often placed in public places
where everyone can look through the received
faxes. To send confidential documents, use the
confidential fax feature. The receiving fax machine
stores the message in a confidential mailbox (in
memory) and does not print it until a password is
entered.

Also, if the receiving fax machine is equipped with
a sub-address function, you can enter a sub-
address number, as a mailbox number enabling
sub-address communication.

Tip:

To send a confidential fax, you must
know in advance the mailbox the mes-
sage should be sent to. Ask the person
who will receive the fax to tell you their
mailbox number.

Fig08_01.eps

        MAIL BOX NO.
_

SELECT

FUNCTION

CONF.TX

3

+

Load your documents.

Press the SELECT FUNCTION key.

Press the 3/CONF. TX One-Touch key. The

display asks you to enter the number of a
confidential mailbox on the receiving fax
machine.

Using the numeric keypad, enter the number of

the confidential mailbox you are transmitting to.

Press the START key to confirm your entry.

The display shows SELECT LOCATION.

Select a location. Refer to the instructions

below.

To Select Using

Do This

A One-Touch key

Press the
One-Touch key.

An Auto Dial number

Press the
AUTO DIAL key.
Then enter the three
digit Auto Dial
number on the
numeric keypad.

A number dialed on

Dial as you would

on a the numeric keypad

normal telephone.

Press the START key. Your machine begins

sending the fax.

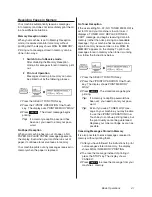
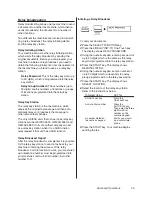
Receiving Confidential Faxes

If you need to receive a fax that should not be seen
by anyone else, have the person send the mes-
sage as a confidential fax from another Oki Data
Fax-compatible unit, or from a fax machine of a
different maker that is equipped with the sub-
address transmission function.

In order to do this, you must first set up a confiden-
tial mailbox, as explained below.  Then, give your
mailbox number to the person sending the mes-
sage.

An incoming confidential fax is stored in memory
until you enter your password.

Содержание OF4580

Страница 1: ...User s Guide ...

Страница 2: ...ontact Information Please address any comments on this publication to Mailing Address Oki Data Americas Training and Publications Department 2000 Bishops Gate Boulevard Mount Laurel NJ 08054 4620 e Mail Address pubs okidata com Web Site Please visit Oki Data s multilingual web site at http www okidata com Trademark Information OKI and OKI DATA are registered trademarks of Oki Electric Industry Com...

Страница 3: ...rs 33 Programming Groups 35 Basic Operations 36 Preparing Documents 36 Document Size 36 Multiple Page Documents 36 Loading Documents 37 Sending a Fax to a Single Location 38 Search Key Dialing 38 Real Time Dialing 38 Redialing 38 Confirming Results 38 Stopping a Transmission 38 Sending a Fax to Multiple Locations Broadcasting 39 Performing a Broadcast Operation 39 To make corrections 39 Faxing to ...

Страница 4: ... Parameter Settings 59 Dial Parameter Settings List 59 Changing Your Dial Parameter Settings 60 Service Function Settings 61 Service Function Settings List 61 User Functions 61 Reports 63 Understanding Reports 63 Active Memory Files Report 63 Activity Report 63 Confidential Reception Report 64 Broadcast Confirmation Report 64 Broadcast Entry Report 64 Message Confirmation Report 64 Configuration R...

Страница 5: ...ming voice and fax messages The ability to share the same telephone line with an answering machine A closed network feature for limiting who can send faxes to your machine Closed network can also limit both where faxes can be sent to and received from The ability to make up to 50 sorted copies of an original document using standard weight 20 lb paper 4 MB of built in memory The ability to scan dat...

Страница 6: ...dible warning device or automatic call detector may result in bell vibration sporadic ringing or false tripping of the call detector If such a problem occurs the user is requested to NOT contact the telephone company Adjustment of the electrical electronic compo nents in the machine requires an authorized service technician Do not attempt to make adjustments yourself Any alterations made by an ind...

Страница 7: ...er in the middle Never touch the green drum inside the image drum unit Please be careful when removing the toner cartridge Do not let it come in contact with clothing or porous materials The toner powder will cause permanent staining Small amounts of toner that come in contact with skin or clothing can be readily removed with soap and cold water if attended to immediately The use of hot water will...

Страница 8: ... Should Receive Document Tray Fig04_02 eps Paper Tray Copy Stacker Fig04_03 eps Facsimile Unit Fig04_01 eps Power Cord Fig04_04 eps Telephone Cord Fig04_05 eps Toner Cartridge Fig04_09 eps Document Stacker Fig04_06 eps Image Drum Unit Inside machine Fig04_07 eps ...

Страница 9: ... eps Components 1 1 Paper Tray Copy Stacker Up to 100 sheets of paper can be loaded onto this tray Up to 30 sheets of finished copies or received faxes can be stacked on top of this tray 2 Document Tray Holds original documents that are to be faxed or copied 3 Document Guides Adjust these guides to the page width of the documents that are to be copied or faxed 4 One Touch Keypad 5 Control Panel 6 ...

Страница 10: ... cartridge 2 Image Drum Unit The image drum unit contains the green photosensitive drum which receives images from the LED print head and transfers them to the printing paper 3 Toner Cartridge This black cylinder installed inside the image drum unit contains the black powder which is your machine s ink You need to install a new toner cartridge when the REPLACE TONER CART message appears on the dis...

Страница 11: ...r current selection See Setting the Answering Mode in the Installation section for more information about the answering modes avail able in your machine 1 LCD Display Panel Refer to this display for instructions and information while your machine is performing operations or while you are programming 2 YES key Transmit Resolution Use this key to change the resolution used for transmitting documents...

Страница 12: ...these numbers alphabetically You can also use the SEARCH key to search for unassigned One Touch keys and Auto Dial numbers 7 HOOK V REQUEST Key Press this key to open a telephone line for manual dialing You can hear the dialing through your machine s speaker If you have an external telephone connected to your machine you can also use this key to initiate or answer a request for voice communication...

Страница 13: ...er or installing a new toner cartridge press this key to cancel alarm conditions after the condition has been cor rected When programming pressing the STOP key takes you back step by step through the programming functions you have already selected 8 REDIAL Key Press this key to manually redial the last number dialed on your machine 9 AUTO DIAL Key Auto Dial numbers are abbreviated numbers for rapi...

Страница 14: ...s while programming infor mation into your machine Spaces are used to make programmed entries easier to read Spaces have no effect on dialing Use the PAUSE key to insert pauses into the dialing process 17 6 DELETE key One Touch key 6 Use this key to delete characters or numbers while programming information into your machine Pressing DELETE deletes the character the cursor is sitting under and all...

Страница 15: ...chine that this is a chain dial number 20 9 Hyphen key One Touch key 9 While programming use this key to input a hyphen During transmission a hyphen performs private to public or domestic to overseas line switching of your fax machine 21 10 UNIQUE Key One Touch key 10 When programming the Sender ID Location ID etc use this key to enter unique characters Umlaut characters ä ß ñ ö ü Norwegian charac...

Страница 16: ...from pulse to tone dialing during your current call You can also use this key while programming to create numbers with mixed pulse then tone operation 24 GROUP Key Once you have programmed some One Touch keys or Auto Dial numbers use this key to create groups to allow you to send the same fax to multiple locations After you have loaded a document use this key to select the group you want to send y...

Страница 17: ...l document to a mail box a memory storage area in the receiving fax machine 4 RELAY INIT TX Key Use this key to set up a relayed fax transmission During a relayed fax transmission your machine initiates the trans mission by sending a document to a second fax machine which then broadcasts the message to a number of other fax machines 5 POLLING Key When a document is loaded on the document table use...

Страница 18: ...ine experiences a problem during communications it emits five long beeps Press the STOP key to turn the error tone off then print a Message Confirmation Report to check the source of the problem to do this press the COPY key twice with no documents loaded Warbling Sounds Voice Request Tone During a fax session either you or the person at the remote fax machine may initiate a voice request When the...

Страница 19: ...ll your new machine follow the instructions from Unpacking to Setting the Fax Identification You must complete these steps for your machine to operate properly If you have purchased an option package for your machine refer to the documentation you received with that option Where to Install Your Machine Install your machine in a dust free location away from direct sunlight Allow several inches on e...

Страница 20: ...er Slip the paper tray copy stacker tabs into the rear most slots in the top of the unit You will feel them lock into place Fig05_01 eps Install the Document Tray Insert the document tray into the long horizontal slot on the top of the unit You will feel it lock into place Fig05_02 eps ...

Страница 21: ...hat is sandwiched in the manual paper feeder and gently pull out and detach Fig05_06 eps 5 Place the image drum unit back into your machine Ensure that the tabs on both sides of the image drum are inserted correctly as shown below Then press down firmly on both ends of the image drum until it snaps into place Fig05_07 eps Warning Never expose the image drum unit to light for more than 5 minutes Ne...

Страница 22: ...white plastic tape from the bottom of the toner cartridge Fig05_09 eps 8 With the ridged side facing up and the gray lever on your right insert the toner cartridge into the image drum unit Slide the left end of the cartridge in first then lower the right end into place Fig05_10 eps Warning Be careful not to insert the toner cartridge backwards into the image drum unit 9 Once the toner cartridge is...

Страница 23: ...e Tip To connect both an answering machine and a telephone first connect your answering machine to your machine then plug your external telephone s cord into the telephone jack on your answer ing machine Tip You need to have the TAD mode feature turned on for an answering machine to work with your machine See Setting the Answering Mode in this section Connect Power Warning Before connecting power ...

Страница 24: ...per If you intend to use a different paper size change the PAPER SIZE user function setting to match your new paper size See the Programming chapter for instructions 1 Adjust the paper guides to the width of your paper Fig05_16 eps Tip Adjust the paper guide on the right side to the mark of the width of your paper After completing paper setting Item 3 the paper guide on the left side should be ali...

Страница 25: ...the SELECT FUNCTION key 2 Press the 9 USER PROG One Touch key 3 On the numeric keypad press 3 The display shows 3 CLOCK ADJUSTMENT 4 Press YES The display shows the cur rently set date and time 5 Using the numeric keypad enter the new date and time 6 Press YES to confirm your entry 7 Press the SELECT FUNCTION key to finish ...

Страница 26: ...answer your machine switches back to fax mode to allow the calling party to manually send a fax Telephone Answering Device Mode TAD Use this mode if you have connected an answering machine to your machine Like Telephone Fax mode the Telephone Answering Device mode detects whether an incoming call is a fax or voice call If the call is a fax call your machine receives the fax Your answering machine ...

Страница 27: ... 2 Press the AUTO REC key again Your machine switches to the next setting 3 Continue pressing the AUTO REC key until the selection you want appears on the display After a short pause your machine returns to standby mode displaying the new answering mode setting Tip If a password has been set in the Memory Reception mode you need to enter the password in order to disable the Memory Reception mode ...

Страница 28: ...re is the number that appears on the call back message Fig05_18c eps 1 Press the SELECT FUNCTION key 2 Press the 9 USER PROG One Touch key 3 On the numeric keypad press 4 The display shows 4 SYSTEM DATA PRG 4 Press YES The display shows NO TSI CSI ID SENDER ID 5 After the display clears enter the full telephone number of your machine using the numeric keypad Tip Use the 8 key to enter a character ...

Страница 29: ...s 14 USER LANGUAGE ENG YES NO SELECT FUNCTION YES USER PROG 1 1 GHI 4 9 HYPHEN 1 Press the SELECT FUNCTION key 2 Press the 9 USER PROG One Touch key The display shows 1 FUNC PROGRAMMING 3 Press YES The display shows FUNCTION NO 4 Using the numeric keypad enter 14 This display shows USER LANGUAGE 5 Press NO repeatedly to switch to the other installed language 6 To accept the language change press Y...

Страница 30: ... If you continue to have difficulty with fax communication after following these steps contact your dealer Fig05_18c eps 1 Press the SELECT FUNCTION key 2 Press the 9 USER PROG One Touch key 3 On the numeric keypad press 2 The display shows 2 DIAL PARAMETER 4 Press YES until the display shows PBX LINE OFF 5 Press NO The display changes to PBX LINE ON 6 Press YES until the display shows DIAL PREFIX...

Страница 31: ...e Enter spaces 5 SPACE One Touch key Enter hyphens 9 HYPHEN key Enter plus 8 key for chain dialing Enter pauses Pause key wait for long distance or outside lines Add a switch from key pulse to tone dialing for part of the call Move the cursor YES and NO to make corrections Delete 6 DEL key 6 Press the START key 7 Enter the Location ID This is a descriptive title up to 15 characters long Refer to t...

Страница 32: ...e up to 40 digits long When it is necessary to dial a number which is longer than 40 digits use the chain dial feature To create a chain dial number program the first 31 digits of the number into a One Touch key or Auto Dial number Then press the 8 One Touch key to make this a chain dial number Next program the rest of the number into another One Touch key or Auto Dial number or you can leave the ...

Страница 33: ...hens 9 HYPHEN key Enter plus 8 key for chain dialing Enter pauses Pause key wait for long distance or outside lines Add a switch from key pulse to tone dialing for part of the call Move the cursor YES and NO to make corrections Delete 6 DEL One Touch key 7 Press the START key 8 Enter the Location ID This is a descriptive title up to 15 characters long Refer to the instruc tions below To Do This Us...

Страница 34: ...t the speed and YES to select it 10 The display shows G3 ECHO Protection OFF Press NO to change the setting and YES to select it 11 The display shows AUTO DIAL NO 12 To continue programming Auto Dial numbers go back to Step 4 If you are finished program ming press the SELECT FUNCTION key ...

Страница 35: ...tion Press AUTO DIAL Enter the 3 digit Auto Dial number Press START to add it to the group Delete a previously added Press the One Touch location One Touch key Press START to delete it from the group Delete an Auto Dial Press the location AUTO DIAL key Enter the 3 digit Auto Dial number Press START to delete it from the group Search for a location Press the by name to add or delete SEARCH key cont...

Страница 36: ...d the copy instead You can also use a photocopier to enlarge or reduce documents before sending Document Size Width All documents must have a minimum width of 5 8 inches 148 mm Documents cannot be wider than 8 5 inches 216 mm Length All documents must have a minimum length of 5 inches 128 mm Documents cannot be longer than 14 inches 356 mm Multiple Page Documents Your machine can scan paper with a...

Страница 37: ...aper you are using Fig07_01 eps 2 Neatly stack your documents then insert them face down into the document feeder Readjust the document guides for a snug fit Fig07_02 eps 3 Your machine grips the documents and pulls the bottom page into the machine 4 If necessary use YES to set the resolution of your document Document Type Resolution to Use Normal office documents STD Standard Documents with small...

Страница 38: ...y to look through an alphabetical list of all of the Location IDs programmed into your machine 1 When selecting locations press the SEARCH key The display shows ENTER 1 ST CHAR 2 Repeatedly press the SEARCH key to look through the entire list of locations in alphabeti cal order or locate the letter you want on the numeric keypad and press that key repeatedly to look through Location IDs beginning ...

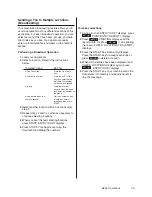
Страница 39: ...ber dialed on the Dial the number as you numeric keypad would on a normal telephone then press START 3 Select another location within 3 seconds after step 2 4 Repeat steps 2 and 3 as often as necessary to continue selecting locations 5 When you are finished selecting locations press START ENTRY IS OK displays 6 Press START Your begins scanning the document and dialing the numbers To make correctio...

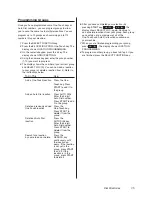
Страница 40: ...each group print a Telephone Directory To do this 1 Press SELECT FUNCTION 2 Press the 6 REPORT PRINT One Touch key 3 Press NO repeatedly until PHONE DIREC TORY appears 4 Press YES Receiving Faxes Manually As long as your machine is not set to the manual receive TEL mode your machine automatically receives faxes If your machine is set to the manual receive TEL mode follow the instructions below 1 W...

Страница 41: ...laced No Toner Reception If the user setting No 22 NO TONER MEM RX is set to ON and your machine is low on toner it displays a TONER LOW REPLACE TONER CART message and begins receiving data into memory rather than risk printing an unreadable message If your machine has received a mes sage in memory because toner is low MSG IN MEMORY appears on the display To print out a message stored in memory wh...

Страница 42: ...8 YES 08 CLOSED NETWORK OFF YES NO 9 HYPHEN 1 Press the SELECT FUNCTION key 2 Press the 9 USER PROG One Touch key The display shows 1 FUNC PROGRAMMING 3 Press YES The display shows FUNCTION NO 4 Using the numeric keypad enter 08 The display shows 08 CLOSED NETWORK and the current setting of this function 5 Press NO until the setting you want appears in the display 6 Press YES to confirm the new se...

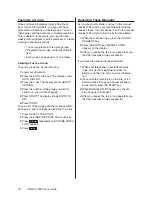
Страница 43: ... the manual paper feeder Using Voice Request The voice request feature allows you to have a conversation with a person at a remote fax ma chine during a fax communication Either the person sending or receiving the fax can initiate a voice request If you are sending a fax you can answer a voice request only after all pages have been transmitted If you are receiving a fax you can answer a voice requ...

Страница 44: ..._01 eps DELAYED TX DATE 07 01 YES NO SELECT FUNCTION DELAYD TX 1 1 Load your documents 2 Press the SELECT FUNCTION key 3 Press the 1 DELAYED TX One Touch key The display shows DELAYED TX and today s date 4 Press NO The display shows DELAYED TX DATE or if the transmission is to occur on the same day press YES and go to Step 6 5 Using the numeric keypad enter the date on which you wish the transmiss...

Страница 45: ...m would be entered as 20 00 8 Press YES The display shows SELECT LOCATIONS 9 Select a location Refer to the instructions below To Select Using Do This A One Touch key Press the One Touch key An Auto Dial number Press the AUTO DIAL key then enter the three digit Auto Dial number on the numeric keypad A number dialed on Dial as you would the numeric keypad on a normal tele phone 10 Press the START k...

Страница 46: ...dential mailbox on the receiving fax machine 4 Using the numeric keypad enter the number of the confidential mailbox you are transmitting to 5 Press the START key to confirm your entry The display shows SELECT LOCATION 6 Select a location Refer to the instructions below To Select Using Do This A One Touch key Press the One Touch key An Auto Dial number Press the AUTO DIAL key Then enter the three ...

Страница 47: ...T FUNCTION key Note The personal box can also be used for bulletin transmissions To program it for such follow the same flow but select POLL instead of CONF The box can be closed also by following the procedure indicated next Closing a Mailbox To change the password of an existing mailbox or to delete one follow the instructions below Re member that a mailbox must be empty before you can modify or...

Страница 48: ...n ished programming press the SELECT FUNC TION key Printing Confidential Messages Each time your machine receives a confidential message it automatically prints a confidential received transmission report that tells you which mailbox number received the message To print a received confidential fax message 1 Press the SELECT FUNCTION key 2 Press the 2 PRINT OPERATION One Touch key The display asks ...

Страница 49: ...AX 5980 Units of another company can act as a relay key station when it is a SUB function relay request if that unit has a SUB function Relay Broadcast Report After the relay broadcast is completed it is possible for the relay key station to send a fax back to your machine confirming the success of the relay broadcast For this function to work your machine s own telephone number must be programmed...

Страница 50: ...etin Polling a text message is stored in memory until you delete it You can therefore conduct polling transmission as many times as you want Also when using a box number the remote fax must also be equipped with a box func tion Set the box number to 0 for polling without a box number Dialing Another Fax Machine to Re quest Documents Polling Reception Calling a remote fax machine to receive documen...

Страница 51: ...display shows TX PREP ACTIVATED you have to wait two or three seconds until this message clears When the first transmission is complete the next fax will automatically be sent Enter the fax number before loading the next document Make copies What You Can Do While Receiving a Fax Load another document and prepare it for transmission You can continue to load documents as long as memory is available ...

Страница 52: ...o the User Function Settings List to determine which settings you may need to change then refer to Changing Your User Function Settings to make the change User Function Settings List 01 MCF SINGLE LOC This function auto matically prints a Message Confirmation Report after each single location transmission or polling transmission Available settings are on and off 02 MCF MULTI LOC This function auto...

Страница 53: ...the STD and NORMAL settings If you are constantly sending faxes which require some other combination of trans mission modes use this function setting to change the default transmission modes to any other combination of settings While you are programming the new default combinations appear on the LEDs above the Transmit Resolu tion YES or Type of Original NO 10 T F TIMER PROG When set to the tele p...

Страница 54: ...used 19 ECM FUNCTION The error correction mode function helps your machine to improve commu nication in areas where telephone line condi tions are poor Available settings are on and off 20 REMOTE DIAGNOSIS The remote diag nostics feature allows a service person to remotely dial and service your machine Avail able settings are on and off 21 PC FAX SWITCH This function is only used when the MFP Opti...

Страница 55: ...rts reading document when receiving the CFR signal of the remote machines after call origination 26 RESTRICT ACCESS Select whether or not you want restricted access Turning on this function renders your restricted ID registration active Available settings are on and off Important You cannot generate a report listing the Restrict Access IDs Be sure to record all Restrict Access IDs If you forget a ...

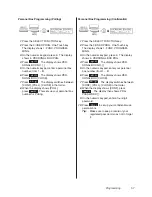
Страница 56: ...er modes TEL TEL FAX or TAD override Distinctive Ring You must have a genuine OKI optional handset connected to your unit This feature may not work properly if you have a telephone other than a genuine OKI handset an option connected to your machine Fig09_01a eps 1 Press the SELECT FUNCTION key 2 Press the 9 USER PROG One Touch key The display shows 1 FUNC PROGRAMMING 3 Press YES The display shows...

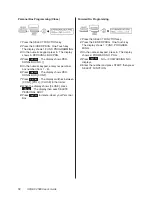
Страница 57: ...ber for Polling Personal Box Programming Confidential Fig09_02a eps 1 Press the SELECT FUNCTION key 2 Press the 9 USER PROG One Touch key The display shows 1 FUNC PROGRAM MING 3 On the numeric keypad press 5 The display shows 5 PERSONAL BOX PRG 4 Press YES The display shows PER SONAL BOX NO 5 On the numeric keypad enter your personal box number from 1 8 6 Press YES The display shows PER SONAL BOX ...

Страница 58: ... 6 Press YES The display shows PER SONAL BOX CONF 7 Press NO The display switches between CONF POLL CLOSE in that order 8 When the display shows CLOSE press YES The display then asks DELETE PERSONAL BOX 9 Press YES to delete close your Personal Box Forward No Programming Fig09_02 eps 1 Press the SELECT FUNCTION key 2 Press the 9 USER PROG One Touch key The display shows 1 FUNC PROGRAM MING 3 On th...

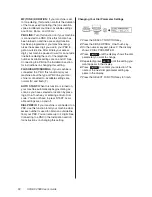
Страница 59: ...t your dealer for assistance Dial Parameter Settings List REDIAL TRIES This function controls how many times your machine automatically redials a number which is busy or which does not answer Available settings are from 0 to 10 tries REDIAL INTERVAL Controls how long your machine waits between each automatic redial attempt Available settings are from 1 to 6 minutes DIAL TONE DETECT This function a...

Страница 60: ...e is connected to Available settings are normal N and flash F AUTO START When this function is turned on your machine automatically begins dialing as soon as you have selected a location by press ing a One Touch key or entering an Auto Dial code You do not have to press START Avail able settings are on and off DIAL PREFIX If your machine is connected to a PBX use this function to tell your machine...

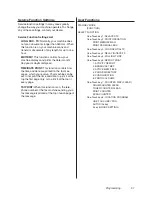
Страница 61: ... set to not print the time and date to print it at the top the first page only or to print it at the top of every page TSI PRINT When this function is on the tele phone number of the fax machine sending you a fax message is printed at the top of each page of the message User Functions STANDBY MODE FUNCTION SELECT FUNCTION One Touch key 1 DELAYED TX One Touch key 2 PRINT OPERATION PRINT MEMORY MSG ...

Страница 62: ...SED 19 ECM FUNCTION 20 REMOTE DIAGNOSIS 21 PC FAX SWITCH 22 NO TONER MEM RX 23 MEM FULL SAVE 24 CONTINUOUS TONE 25 INSTANT DIALING 26 RESTRICT ACCESS 27 WIDTH REDUCTION 28 TONER SAVE 29 CNG COUNT 30 600DPI FAX TX 2 DIAL PARAMETER REDIAL TRIES REDIAL INTERVAL DIAL TONE DETECT BUSY TONE DETECT MF TONE DP PULSE PULSE DIAL RATE PULSE MAKE RATIO PULSE DIAL TYPE MF TONE DURATION PBX LINE FLASH NORMAL AU...

Страница 63: ...nd polling transmission not using a Box Polling transmissions are indicated in the mode column along with scanned number of pages empty for Feeder Polling Transmis sion Polling Reception lists the date and time of reception the sender and the transmission mode TRANSMISSION prints out information on Delayed Fax and Redialing Wait transmissions However Polling reception information is listed in the ...

Страница 64: ...ur machine gives you the option of printing this report to confirm your entries Information in this report includes The Location ID of the One Touch keys and Auto Dial codes you have selected Telephone numbers you have manually entered using the numeric keypad Message Confirmation Report This report provides information about your last single location fax transmission or polling transmis sion Info...

Страница 65: ...r other communications In this case your machine automatically prints a power off report to alert you Protocol Dump In the event of obstructions to transmission the following report prints This report can be helpful in analyzing the cause of the obstruction Send this report to the dealer or service center if so re quested Printing Reports Printing a Message Confirmation Report After transmission p...

Страница 66: ...nting unit Contact your service person R_JAM A paper jam occurred in your machine while it was receiving a fax and your fax machine was unable to receive the entire message in memory S_JAM A document jam occurred in the sending fax machine STOP The STOP key was pressed ending the communication session Communication Codes Communication codes indicate the communication mode was used for a communicat...

Страница 67: ...itioned straight in your feeder press the STOP key to try to feed the document the rest of the way through the feeder If this fails follow the instructions below 1 Grasp the control panel Pull up and toward you until it releases Swing the control panel up and out of the way Fig11_01 eps 2 Pull out the jammed document Fig11_02 eps 3 Push the control panel back down until it locks Fig11_03 eps ...

Страница 68: ...ay CAUTION If you open the top cover you will see a label that reads CAUTION HOT This portion is extremely hot and must not be touched under any circumstances 1 Lift the top cover and swing it out of the way Fig11_04 eps 2 Grasp the control panel Pull upward and toward you until it releases Swing the control panel up and out of the way Fig11_05 eps 3 Lift the image drum unit out and set it aside K...

Страница 69: ...image drum unit to light for more than 5 minutes Never expose the image drum unit to direct sunlight Always hold the image drum unit by the ends Never touch the surface of the green drum inside the image drum unit 6 Close the top cover Fig11_09 eps 7 Close the control panel Press down until it snaps into place Fig11_10 eps 8 Pull the paper out of the paper tray If any of the paper is damaged remov...

Страница 70: ...mes low even before your machine displays REPLACE TONER CART gently wipe the lens surface of the LED array see Step 7 If the print density does not improve replace the toner cartridge When your machine s display shows CHANGE DRUM replace the image drum unit Warning Be careful when handling the toner cartridge Do not let toner spill on your clothing or other porous materi als See the Safety section...

Страница 71: ...o place Warning Be careful not to insert the toner cartridge backwards into the image drum unit Fig11_17 eps 6 Once the toner cartridge is in place push the gray lever all the way forward to secure it and release the toner Fig11_18 eps 7 Using the cleaning wipe provided in the pack age with your new toner cartridge gently wipe back and forth across the full length of your fax machine s LED array F...

Страница 72: ...ng up to 8 000 pages at 3 pages per job and about 4 500 pages at 1 page per job Warning Never expose the image drum unit to light for more than 5 minutes Never expose the image drum unit to direct sunlight Always hold the image drum unit by the ends Never touch the surface of the green drum inside the image drum unit CAUTION If you open the top cover you will see a label that reads CAUTION HOT Thi...

Страница 73: ...ted correctly as shown below Then press down firmly on both ends of the image drum until it snaps into place Fig11_25 eps 6 Install a new toner cartridge Follow Steps 3 7 in Replacing the Toner Cartridge in this section 7 Wait until the time date and answering mode appear on the display Then press the SELECT FUNCTION key 8 Press the 7 COUNTER DISPLAY One Touch key The display will show DRUM COUNT ...

Страница 74: ...installed unless it has never been used Reading Your Print Counters Your machine s print counters count the number of pages your machine has printed or scanned in its lifetime If you are experiencing a problem a service person may ask you to check these counters Tip If your machine s image drum unit has reached the end of its life you will also use this function to reset the drum counter Refer to ...

Страница 75: ...shows a communication error This alarm indicates any of a number of problems You may be trying to communicate with an incompatible fax machine the standard unit can only communi cate with ITU T Group 3 fax machines The remote machine may not be able to perform the function that you want such as polling or confidential messages The remote machine may also be out of paper or experiencing a paper jam...

Страница 76: ...send Check the display to make sure that you have set your machine s clock to the correct time See Setting the Clock in the Installa tion section Your machine disconnected before you could answer a voice request You must answer a voice request while the warbling tone is sounding When you hear the warbling tone press the HOOK V REQUEST key after picking up your handset Your machine will not poll a ...

Страница 77: ...JAM FAX CHECK PAPER OR PATH Paper may be jammed inside the printing mechanism under the image drum Check the paper path and remove any jammed paper see Clearing a Printing Paper Jam ADF Error jam DOCUMENT JAM FAX CONFIRM AND STOP A document to be faxed or scanned has jammed in the scanner Follow Clearing a Document Jam Paper feed Error 07 25 2000 14 14 FAX RELOAD DOCUMENT A document to be faxed or...

Страница 78: ...pears when you turn on your machine the registration information of One touch function etc may be deleted Confirm the contents you have registered Other Error Messages No image drum TONER SENSOR FAX CHECK DRUM CART Cover open COVER OPEN Communications error COMMUN ERROR FAX For a Communication Error print a copy of the Activity Report Look at the report and find the error code for the transmission...

Страница 79: ... RX 600 dpi interpolation Halftone Transmission 64 shades of gray Document Size A4 A5 letter or legal size Recording Paper Plain paper A4 letter or legal size Effective reading width 215 mm for TX letter Weight Approx 17 6 lbs 8 kg excluding paper Display 2 rows of 20 characters LCD panel Dimensions Approx 12 4 W x 15 1 D x 7 5 H 316 x 383 x 190 mm Excluding paper tray and document tray Power 120V...

Страница 80: ...IBED ABOVE NO WARRANTIES WHETHER EXPRESS OR IMPLIED INCLUDING BUT NOT LIMITED TO ANY IMPLIED WARRAN TIES OF MERCHANTABILITY OR FITNESS FOR A PARTICULAR PURPOSE SHALL EXTEND BEYOND THE RESPECTIVE WARRANTY PE RIOD DESCRIBED ABOVE Some states do not allow limitations on how long an implied warranty lasts so the above limitation may not apply to you OKI DATA SHALL NOT BE RESPONSIBLE OR LIABLE FOR ANY ...

Страница 81: ...ma chine Error message interpretation solutions Parts and supplies identification Consumer relations Note Customer Support Representatives are not trained to provide assistance with the use of commercial software pack ages Please consult your software user s manual for times and availability of their support Overnight Exchange U S Canada Note Available in the United States and Canada If you choose...

Страница 82: ...mber you may still have your unit serviced by an authorized Oki Data service center or service depot under the terms of the warranty 3 Fax or mail us the sales receipt for your ma chine showing date and location of purchase and model and serial number of the unit 4 We will ship a replacement product up to midnight Eastern Time You should receive it the next business day or Saturday if requested on...

Страница 83: ... Fax 525 263 8785 Brazil Oki Data do Brasil Ltda Mariano Escobedo 2220 80 andar Chácara Sto Antonio São Paulo SP Brazil 04717 004 Phone 5511 3444 3500 Fax 5511 3444 3501 Support Center 0800 11 55 77 e mail okidata okidata com br If you are having a problem with your OKI product please contact any of the Authorized Service Centers shown for your Country Region on our Web site www okidata com Sales ...

Страница 84: ...er Negligible Solubility in solvents Not available Coefficient of water oil Distribution Not available Appearance and odor Black granules no odor Odor Threshold Not available Fire and Explosion Hazard Data Flammability Not flammable under conditions of use Extinguishing Media In case of fire use extinguishing media water spray CO2 foam dry chemicals When in a machine treat as an electrical fire Fl...

Страница 85: ...r with a wet cold water cloth 5 Place waste material in a closed container Waste Disposal Prevent release of material into natural waters and sewers Follow appropriate federal state and local regulations Precautions for Handling or Storage Protect from the sun Store in a cool room under 104o F 40o C Special Shipping Information Non hazard ous Handle container carefully to avoid shock Do not drop K...

Страница 86: ...llen into the machine When relocating your machine always discon nect the telephone line before disconnecting the power cord then reconnect the power cord first This unit is not intended to be used in parallel with any other telephone devices If anything happens that indicates that the machine is not working properly or has been damaged unplug it immediately and follow the instructions in Service ...

Страница 87: ... modular jack that is also compliant See installation instructions for details 4 The REN is used to determine the number of devices that may be connected to a tele phone line Excessive RENs on a telephone line may result in the devices not ringing in response to an incoming call In most but not all areas the sum of RENs connected to a line as determined by the total RENs contact the local telephon...

Страница 88: ...tions may cause harmful interference to radio communica tions However there is no guarantee that interfer ence will not occur in a particular installation If this equipment does cause harmful interference to radio or television reception which can be determined by turning the equipment off and on the user is encouraged to try to correct the interference by one or more of the following measures Reo...

Страница 89: ...t that the sum of the RENs of all the devices does not ex ceed five IC Radio Interference Statements 120 Volt Models This OKI apparatus complies with Class B limits for radio interference as specified in the Industry Canada Radio Interference Regulations 230 240 Volt Models This OKI apparatus complies with the Class A limits for radio interference as specified in the Industry Canada Radio Interfer...

Страница 90: ... 51 E Emergency First Aid 7 F Features 5 Forward No Programming 58 G Getting Started 19 Group Faxing to 40 I Installation 19 Hints 6 Introduction 5 L Loading Documents 37 M Making Copies 43 Memory Password Programming 59 Message Confirmation Report 64 Multiple Locations Faxing to Broadcasting 39 O Operation and Maintenance 6 P Personal Box Programming 57 58 57 Polling 50 Power Failures and Memory ...

Страница 91: ...ervice Function Settings 61 Settings List 61 Setting Language 29 Answering Mode 26 Clock 25 Fax Identification 28 Your Fax Machine Up 20 Your Fax Machine s Distinctive Ring 56 Shipping the Fax Machine 74 Signal Tones 18 Specifications 79 T Telephone Directory 65 The One Touch Keypad 17 Toner Cartridge and Image Drum Unit Safety 7 U User Functions Settings 52 Listing of 61 Using Voice Request 43 ...

Отзывы: