background image

30

 – MPS610c/MPS711c 

User’s 

Guide

Shutdown Menu 

This item should always be selected before switching the printer 

off, to ensure that no data is lost. 

EPSON FX Font 
List

Execute

Scroll down to this parameter and select 
execute to print out an Epson FX emulation 
font list.

Usage Report

Execute

Scroll down to this parameter and select 
execute to print out a list of color and mono 
pages printed.

Error Log

Execute

Scroll down to this parameter and select 
execute to print out the error log.

Color Profile 
List

Execute

Scroll down to this parameter and select 
execute to print out a list of color profiles.

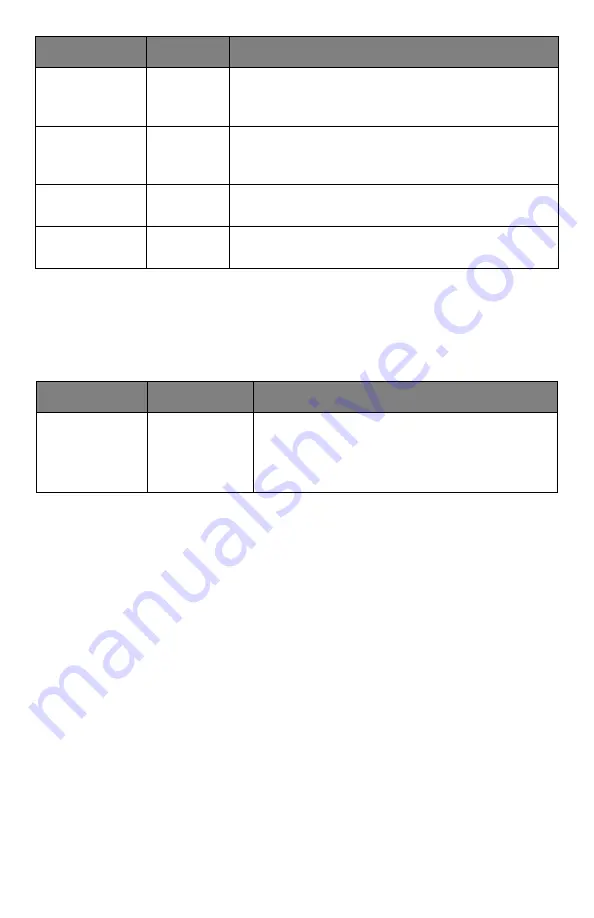
ITEM

SETTING

EXPLANATION

Shutdown 
Start

Execute

Performs controlled shutdown of the 
printer.
Only power the printer off when the display 
indicates that shutdown is complete.

ITEM

ACTION

EXPLANATION

Содержание MPS711c

Страница 1: ...User s Guide MPS610c MPS711c 59101301 my okidata com...

Страница 2: ...orsement by the manufacturer While all reasonable efforts have been made to make this document as accurate and helpful as possible we make no warranty of any kind expressed or implied as to the accura...

Страница 3: ...ve the person to an open area for fresh air Seek medical attention If it gets into the eyes flush with large amounts of water for at least 15 minutes keeping eyelids open Seek medical attention Spilla...

Страница 4: ...t Settings 14 Multi Purpose Tray 15 Face Down Stacker 15 Face Up Stacker 15 Duplex Unit 16 Loading Paper 17 Tray 1 and Optional Trays 2 and 3 17 Multi Purpose Tray 21 Menu Functions 23 Operator Panel...

Страница 5: ...r Sensor Error Codes 71 Clearing Paper Jams 72 Replacing Consumables and Maintenance Items 83 Order Information 83 Toner Cartridge Replacement 84 Image Drum Replacement 90 Replacing the Transfer Belt...

Страница 6: ...text which may help you to use and understand the product CAUTION A caution appears in this manual like this A caution provides additional information which if ignored may result in equipment malfunc...

Страница 7: ...re this valuable resource among users on your office network Photo Enhance mode to improve printouts of photographic images Windows PCL driver only Template Manager utility for Windows enables the des...

Страница 8: ...ntrols and LCD panel 3 Paper tray Standard paper tray Holds up to 300 sheets of 80 g m paper 4 Multi purpose tray Used for feeding heavier paper stocks envelopes and other special media Also for manua...

Страница 9: ...xits the printer through the rear of the printer and is stacked here face up This is mainly used for heavy print media When used in conjunction with the multi purpose feed tray the paper path through...

Страница 10: ...nel 3 Paper tray Standard paper tray Holds up to 530 sheets of 80g m paper 4 Multi purpose tray Used for feeding heavier paper stocks envelopes and other special media Also for manual feeding of singl...

Страница 11: ...the printer through the rear of the printer and is stacked here face up This is mainly used for heavy print media When used in conjunction with the multi purpose feed tray the paper path through the p...

Страница 12: ...ke Up button on the control panel Switching off 1 Press the Enter button on the control panel to enter the menu 2 Press the Menu down button and scroll to the Shutdown menu 3 Press the Enter button 4...

Страница 13: ...t the ink must not offset when exposed to the high fuser temperatures used in the printing process Envelopes Labels Recommended type is Avery White Label types 7162 7664 7666 A4 or 5161 Letter CAUTION...

Страница 14: ...13 inches Legal 13 5 8 5 x 13 5 inches Legal 14 8 5 x 14 inches Executive 7 25 x 10 5 inches A5 148 x 210 mm B5 182 x 257 mm A4 210 x 297 mm A61 1 MPS711c A6 printing from the MP Tray only 105 x 148 m...

Страница 15: ...cies Up to 50 sheets of transparencies or 10 envelopes can be loaded at one time subject to a maximum stacking depth of about 3 8 inch 10 mm Face Down Stacker ______________ MPS610c The face down stac...

Страница 16: ...____________________ This option provides automatic two sided printing on the same range of paper sizes as tray 2 i e all cassette sizes except A6 using paper stocks from MPS610c 17 32 lb US Bond 64...

Страница 17: ...paper to be loaded at the edges 1 and in the middle 2 to ensure that all sheets are properly separated then tap the edges of the stack on a flat surface to make it flush again 3 Note For illustrative...

Страница 18: ...18 MPS610c MPS711c User s Guide 3 Load paper load letterhead paper face down with the top edge towards the front of the printer as shown a b b c...

Страница 19: ...ng except as described below for the 2nd tray NOTES If you have two trays and you are printing from the 1st upper tray you can pull out the 2nd lower tray during printing to reload it However if you a...

Страница 20: ...up rear stacker a is open and the paper support b is extended Paper is stacked in reverse order The tray capacity is approximately 100 sheets of 20 lb US Bond 75 g m2 paper CAUTION Do not open or clos...

Страница 21: ...paper supports b 3 Press gently down on the paper platform c to ensure it is latched down 4 Load the paper and adjust the paper guides d to the size of paper being used For single sided printing on le...

Страница 22: ...d face up with top edge to the left and short edge into the printer Do not select duplex printing on envelopes Do not exceed the paper capacity of about 100 sheets or 10 envelopes Maximum stacking dep...

Страница 23: ...23 MPS610c MPS711c User s Guide Menu Functions This section lists the menus accessed via the controls on the printer s operator panel and displayed in the LCD window...

Страница 24: ...ll Buttons Enters the Menu mode In Menu mode forwards or reverses the menu item displayed Press for 2 secs or longer to jump from top to bottom 4 On Line Button Switches between ONLINE and OFFLINE Exi...

Страница 25: ...ing selected 8 Cancel Button Deletes the data being printed or received when pressed for two seconds or longer Deletes the data when pressed for two seconds or longer with WRONG PAPER SIZE RUN OUT OF...

Страница 26: ...he menu you wish to view is displayed Then proceed as follows 1 Press Enter to enter the menu 2 Use the up and down MENU buttons on the control panel to scroll through the menus When the item you want...

Страница 27: ...buttons scroll to the required letter digit b Press the Enter button to input and move to the next letter digit c Repeat steps a and b until all letters digits are entered Enter your 4 to 9 digit pass...

Страница 28: ...er Select item to display the percentage of a consumable remaining Network Printer Name Short Printer Name IPv4 Address Gateway Address MAC Address Network FW version Web Remote version IPv6 Address L...

Страница 29: ...o this parameter and select execute to print out Network information Demo Page DEMO1 Execute Scroll down to this parameter and select execute to print out a demonstration page File List Execute Scroll...

Страница 30: ...own to this parameter and select execute to print out a list of color and mono pages printed Error Log Execute Scroll down to this parameter and select execute to print out the error log Color Profile...

Страница 31: ...to 20 sec The search can be cancelled by holding down the Cancel button Not Found will be displayed where a file which could be printed is not available The following message will appear if a printab...

Страница 32: ...printable file is available Stored Job Print Delete When Print is selected Set Collating Amount is displayed and the number of pages to print can be specified Specify the number of pages to print and...

Страница 33: ...Enter button Unit of Measurement Default inches Selects UOM inches or millimeter Select by scroll and Enter button Tray1 Config Default Configure Paper Size Media Type Media Weight Select by scroll an...

Страница 34: ...in Letterhead Film Labels Bond Recycled Card Stock Rough Glossy USERTYPE 1 5 USERTYPE 1 to 5 are displayed only if registered in the host PC Paper weight 189 250 g m2 Media Weight Light Medium Light M...

Страница 35: ...l and Enter button Manual Timeout Default 60 Select from Off 30 seconds 60 seconds Select by scroll and Enter button Wait Timeout Default 40 Select from Off 5 10 20 30 40 50 60 90 120 150 180 210 240...

Страница 36: ...temperature humidity conditions and difference in print density frequency Change the setting when print quality is uneven BG Setting 3 2 1 0 1 2 3 Default 0 To correct variations in print results caus...

Страница 37: ...ion Operates with IPv4 for IPv4 not valid with IPv6 Operates with both IPv4 and IPv6 for IPv4 v6 Operates with IPv6 for IPv6 not valid with IPv4 There is only IPv4 and IPv4 v6 as normal value From thi...

Страница 38: ...ion is not IPv6 IPv4 Address xxx xxx xxx xxx Sets the IPv4 Address Display Conditions TCP IP should be enabled IP Version is not IPv6 Subnet Mask xxx xxx xxx xxx Sets the Subnet Mask Display Condition...

Страница 39: ...NetWare should be enabled Network Scale Normal Small When Normal is selected the network can work effectively even when it is connected to a HUB that has a spanning tree feature However printer start...

Страница 40: ...led for Local Print except for Demo Page Duplex On Off Specifies Duplex print option if a Duplex unit is installed and enabled Binding Long Edge Short Edge Specifies Binding in duplex printing Display...

Страница 41: ...ono Print Speed Auto Color Speed Normal Speed Sets the monochrome print speed Prints at the most appropriate speed for page process if Auto is set Prints always at the color print speed if Color is se...

Страница 42: ...cifies paper width of Custom paper as a default value Sets a paper size at right angles to the paper run direction Y Dimension 127 mm 297 mm 1321 mm Specifies paper length of Custom paper as a default...

Страница 43: ...equal to the number of fonts installed in FONT SOURCE Font Pitch 0 44 CPI 10 00 CPI 99 99 CPI Width of the PCL default font in characters per inch CPI Default font is fixed pitch scalable font The va...

Страница 44: ...n A4 paper is selected in the menu that sets the print width of A4 paper in portrait orientation Usually such A4 paper print width is set slightly narrower than 8 inches about 7 93 inches This setting...

Страница 45: ...ceived in PCL LF Line Feed LF CR Line Feed and Carriage Return Print Margin Normal 1 5 inch 1 6 inch Sets a non printable area of paper The width of the area along the right and left sides of paper le...

Страница 46: ...destination command ESC l H in PCL5e emulation Displayed only if Tray 2 is installed Tray 3 1 20 59 Sets the to specify Tray 3 for the paper feed destination command ESC l H in PCL5e emulation Display...

Страница 47: ...CR code is received LF Function LF LF CR Sets action when LF code is received Line Length 80 136 column Specifies the number of characters per line Form Length 11 11 7 12 inch Specifies the length of...

Страница 48: ...Sets whether to eject a blank sheet Available only when simplex is set CR Function CR CR LF Sets action when CR code is received Line Length 80 136 Column Specifies the number of characters per line...

Страница 49: ...Enable Disable 100 output against the CMY100 TRC compensation Ordinarily the TRC compensation function holds control for the appropriate print density thus 100 output is not always possible Selecting...

Страница 50: ...cute Initializes Resident FLASH When the Enter button is pressed the following confirmation message appears Are You Sure Yes No If No is selected the previous menu display resumes If Yes is selected t...

Страница 51: ...g confirmation message appears Are You Sure Yes No If No is selected you will return to the previous menu If Yes is selected the following confirmation message appears Execute Now Yes No If No is sele...

Страница 52: ...the previous menu The request is put into the memory and the SD Card initialization and partition size change will be executed at next power cycle Yes shutdown SD Card initialization and partition si...

Страница 53: ...ower cycle Yes shutdown The partition is formatted at power Off On cycle System Setup Near Life Status Enable Disable Set LCD panel control at the time of near life warning for drum fuser and belt Ena...

Страница 54: ...the next digit Daylight Saving On Off Enable disable daylight saving setting Time Setting 01 01 2000 00 00 01 01 2009 00 00 31 12 2091 23 59 Set current date and time Display format follows the settin...

Страница 55: ...en the Enter button is pressed the following confirmation message appears Are You Sure Yes No No the preceding menus are restored Yes the current menu settings are saved and this menu is exited Restor...

Страница 56: ...t in TRC compensation This adjustment must be executed when the printer is idling It can become invalid if executed in any other state Adjust Registration Execute When this menu is selected the printe...

Страница 57: ...3 2 1 0 1 2 3 Adjusts HIGHLIGHT light area of the TRC Darker Lighter Mid Tone 3 2 1 0 1 2 3 Adjusts MID TONE area of the TRC Darker Lighter Dark 3 2 1 0 1 2 3 Adjusts DARK area of the TRC Darker Light...

Страница 58: ...Busy Ack while Busy ACK IN BUSY BUSY LOW The end of ACK pulse ACK WHILE BUSY BUSY LOW The center of ACK pulse I prime 3 sec 50 sec Disable 3 microseconds Enabled with the 3 s nInit signal 50 microseco...

Страница 59: ...able Disable ENABLES DISABLES the USB port Speed 480 12 Mbps Selects the interface speed After setting change the menu the printer restarts on exit Soft Reset Enable Disable Enables or disables the SO...

Страница 60: ...f Yes is selected the printer automatically reboots and the encoding function is turned on Display Conditions SD Card is installed SD Card encoding func tion invalidity and Storage Setup Enable Initia...

Страница 61: ...stored on the SD card cannot be restored After execution the following confirmation messages will appear Are You Sure Yes No No display returns to the previous menu Yes the printer automatically reboo...

Страница 62: ...tting this parameter to No ignores the existence of the SD Card When No is set access to a SD Card results in FAIL because the SD Card is regarded as not attached After setting change and exit from th...

Страница 63: ...63 MPS610c MPS711c User s Guide Enable initialization No Yes Prevents a setting change accompanying initialization of Block Device SD Card FLASH ITEM SETTINGS EXPLANATION...

Страница 64: ...B Host Power Off On Set power supply for USB HOST of the whole power save mode When Off suppress power supply When On do normal power supply ITEM SETTINGS EXPLANATION Language initialize Execute Initi...

Страница 65: ...pecifies if the Group counter is displayed in the Usage Report Print Enable Displayed Disable Not displayed Conditions for display Enable must be selected in Functions Print Statistics Usage Report Su...

Страница 66: ...nter Execute Resets the frequency of consumable exchange maintenance counter is not reset Are You Sure Yes No When No is selected it returns to original menu indication When Yes is selected the counte...

Страница 67: ...n less paper and makes large documents even easier to handle The duplex unit slides straight into the rear of the printer and requires no tools to install Additional RAM Memory __________ Oki P N 7006...

Страница 68: ...can be used to store overlays and macros fonts and secure or proof documents waiting to be printed Installation takes a few minutes and requires a medium size cross head philips type screwdriver Addit...

Страница 69: ...and this section explains how to clear them quickly and simply Jams can occur due to paper misfeeding from a paper tray or at any point on the paper path When a jam occurs the printer immediately stop...

Страница 70: ...s Guide Major Printer Components and Paper Path 1 Duplex unit if fitted 6 Operator panel 2 Face up stacker 7 Front cover 3 Paper exit 8 Paper tray 4 Fuser unit 9 Additional paper tray if fitted 5 Top...

Страница 71: ...fitted CODE LOCATION CODE LOCATION 370 Duplex unit 382 Paper exit 371 Duplex unit 383 Duplex unit 372 Duplex unit 390 MP Tray 373 Duplex unit 391 Paper Tray 380 Paper feed 392 2nd Paper tray 381 Pape...

Страница 72: ...ily do not use excessive force It can be removed from the rear later 2 Press the cover release and open the printer s top cover fully Note For illustrative purposes the MPS711c printer has been shown...

Страница 73: ...dges a and image drums b It is essential that they go back in the same order It will be necessary to remove the four image drums to gain access to the paper path 4 Holding it by its top center lift th...

Страница 74: ...the remaining image drum units CAUTION The green image drum surface at the base of the Image Drum is very delicate and light sensitive Do not touch it and do not expose it to normal room light for mor...

Страница 75: ...f the belt unit To remove a sheet with its leading edge at the front of the belt a carefully lift the sheet from the belt and pull it forwards into the internal drum cavity and withdraw the sheet CAUT...

Страница 76: ...fuser c separate the trailing edge of the sheet from the belt push the fuser pressure release lever d towards the front and down to release the fuser s grip on the sheet and withdraw the sheet throug...

Страница 77: ...a To remove a sheet in the fuser push the two retaining levers e towards the rear of the printer to release the fuser Withdraw the fuser unit using the handle f Press release lever g and pull the trap...

Страница 78: ...78 MPS610c MPS711c User s Guide b Replace fuser unit into the machine and move locking levers e toward the rear of the machine e...

Страница 79: ...est the fuser replace the four image drums into the drum cavity making sure to locate them in the correct order Holding the complete assembly by its top center lower it into place in the printer locat...

Страница 80: ...pen the rear exit tray h and check for a sheet of paper in the rear path area i Pull out any sheets found in this area If the sheet is low down in this area and difficult to remove it is probably stil...

Страница 81: ...x unit cover and pull out any sheets found in this area Close the duplex unit cover 13 Pull down the MP Tray using the depressions Lift the front cover release lever and lower the front cover 14 Check...

Страница 82: ...uides are properly positioned against the edges of the paper stack When satisfied replace the tray 16 Finally close the top cover and press down firmly so that the cover latches closed When the jam ha...

Страница 83: ...ate your warranty Based on continuous print ITEM LIFE MPS610C ORDER NO MPS711C ORDER NO Toner black 10 000 Letter 5 52123704 52123804 Toner cyan 10 000 Letter 5 52123703 52123803 Toner magenta 10 000...

Страница 84: ...ny kind They will make stains permanent Note For illustrative purposes the MPS711c printer has been shown If you have a MPS610c printer the principle is the same with any exceptions noted Note When th...

Страница 85: ...ver release and open the printer s top cover fully 2 Note the positions of the four cartridges WARNING If the printer has been powered on the fuser may be hot This area is clearly labelled Do not touc...

Страница 86: ...r b Lift the right hand end of the cartridge and then draw the cartridge to the right to release the left hand end as shown and withdraw the toner cartridge out of the printer 3 Put the cartridge down...

Страница 87: ...from end to end several times to loosen and distribute the toner evenly inside the cartridge 7 Remove the wrapping material and peel off the adhesive tape from the underside of the cartridge 8 Holding...

Страница 88: ...ainst the spring on the drum unit then lower the right end of the cartridge down onto the image drum unit 10 Pressing gently down on the cartridge to ensure that it is firmly seated push the colored l...

Страница 89: ...89 MPS610c MPS711c User s Guide 11 Gently wipe the LED head surface with a clean lint free cloth 12 Finally close the top cover and press down firmly at both sides so that the cover latches closed...

Страница 90: ...ontains four image drums cyan magenta yellow and black 1 Press the cover release and open the printer s top cover fully CAUTION Static sensitive devices handle with care WARNING If the printer has bee...

Страница 91: ...91 MPS610c MPS711c User s Guide 2 Note the positions of the four toner cartridges a and image drums b It is essential that they go back in the same order a b...

Страница 92: ...to avoid damaging the green drum surface CAUTION The green image drum surface at the base of the ID unit is very delicate and light sensitive Do not touch it and do not expose it to normal room light...

Страница 93: ...hown 2 and withdraw the toner cartridge out of the image drum cartridge Place the cartridge on a piece of paper to avoid marking your furniture 7 Take the new image drum cartridge out of its packaging...

Страница 94: ...n Push the left end in first and then lower the right end in It is not necessary to fit a new toner cartridge at this time unless the remaining toner level is very low 9 Push the colored release lever...

Страница 95: ...end into their slots in the sides of the printer cavity 11 Finally close the top cover and press down firmly at both sides so that the cover latches closed Note If you need to return or transport your...

Страница 96: ...nd allow the fuser to cool for about 10 minutes before opening the cover 1 Press the cover release and open the printer s top cover fully 2 Note the positions of the four toner cartridges a and image...

Страница 97: ...e drum surface at the base of each cartridge is very delicate and light sensitive Do not touch it and do not expose it to normal room light for more than 5 minutes If the drum unit needs to be out of...

Страница 98: ...of the belt and the lifting bar b at the front end 5 Turn the two fasteners 90 to the left This will release the belt from the printer chassis 6 Pull the lifting bar b upwards so that the belt tilts u...

Страница 99: ...w belt unit into place with the lifting bar at the front and the drive gear towards the rear of the printer Locate the drive gear into the gear inside the printer by the rear left corner of the unit a...

Страница 100: ...belt unit in place 9 Replace the four image drums complete with their toner cartridges into the printer in the same sequence as they came out cyan nearest the rear magenta yellow and black nearest th...

Страница 101: ...fy the fuser handle a on the top of the fuser unit WARNING If the printer has recently been powered on some fuser components will be very hot Handle the fuser with extreme care holding it only by its...

Страница 102: ...n a flat surface which will not be damaged by heat 5 Remove the new fuser from its packaging and remove the transit material 6 Holding the new fuser by its handle make sure that it is the correct way...

Страница 103: ...PS711c User s Guide 8 Push the two retaining levers b towards the rear of the printer to lock the fuser in place 9 Finally close the top cover and press down firmly at both sides so that the cover lat...

Страница 104: ..._________ Clean the LED heads when printing does not come out clearly has white lines or when text is blurred There is no need to switch off the printer to clean the lens 1 Press the cover release and...

Страница 105: ...he LED head surface with a clean lint free cloth 4 Close the top cover and press down firmly at both sides so that the cover latches closed CAUTION Do not use methyl alcohol or other solvents on the L...

Страница 106: ...ties tab in the printer driver Color Swatch Utility Print a color swatch and use the indicated RGB values to set up the color s of your choice in your graphics design software application PDF Print Di...

Страница 107: ...m the internet accessed through the Menu Installer on the CD For more information click Tell me more on the Internet Options screen in the CD installer PrintSuperVision View the real time status of pr...

Страница 108: ...t the printer uses in Postscript mode Installing the Utilities ____________ Utilities on the CD Load the utilities from the Menu Installer located on the CD supplied with your printer Download Utiliti...

Страница 109: ...220 to 240 V ac 50 60 Hz 2 Power consumption Operating 1200 W max 600 W average 77 F 25 C Stand by 100 W average 77 F 25 C Power saving 15 W max Sleep approx 1 W 77 F 25 C Operating environment Operat...

Отзывы: