Oki ML521 Скачать руководство пользователя страница 6

Page 6 of 20

P/N 58356302

General Information (continued)
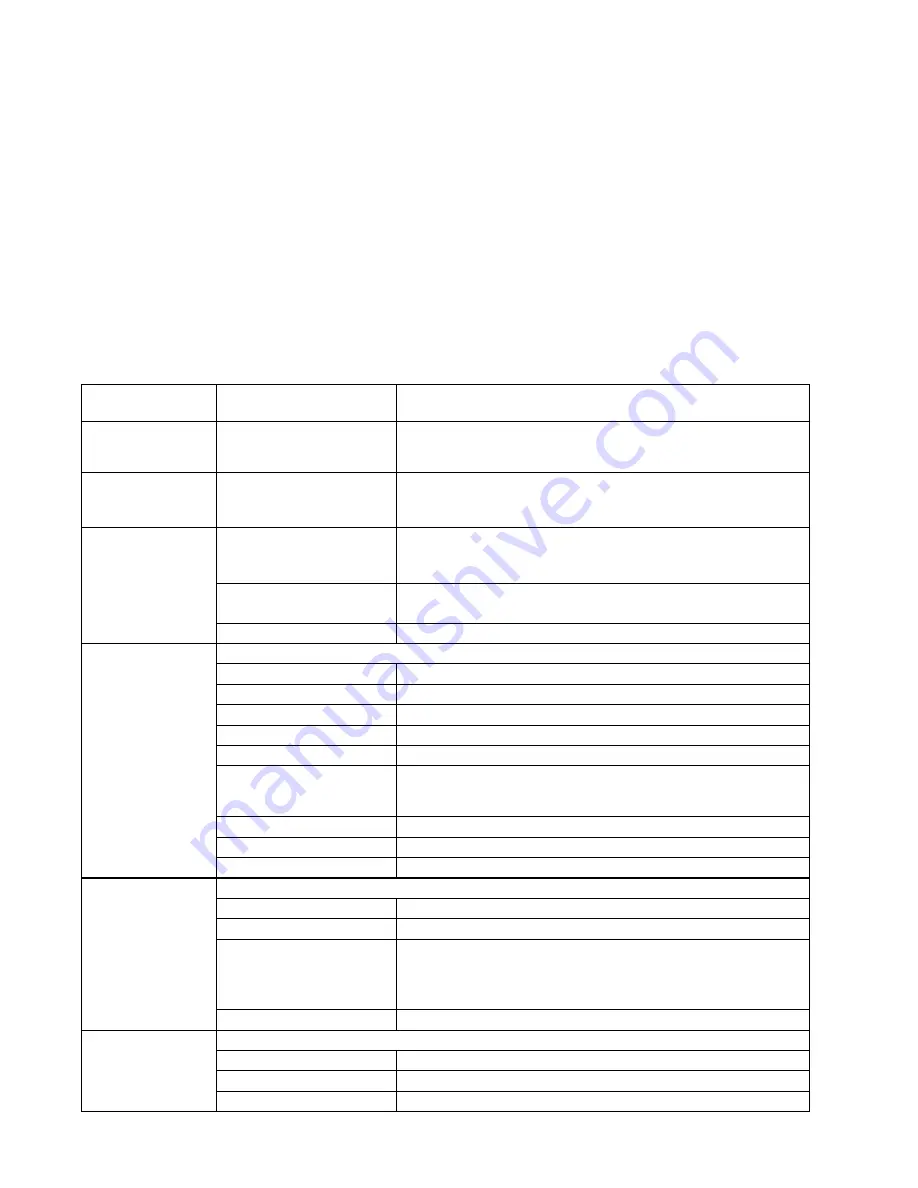
Menu Settings Table

Microline 300 Series Printers ONLY

The settings listed below are the 

changes


or


additions

 to those listed in the User’s Guide.

For a complete explanation of the menu and each menu item, refer to the User’s Guide, “Using Your Printer, Menu Mode,
Explanations of Menu Items.”
The User’s Guide is provided as an Adobe Acrobat file on the CD provided with your printer.
The table below shows the items that may appear in the menu. Settings which are engaged at the factory (defaults) are set
in bold italic. Some groups or entries will only appear when a specific emulation is engaged, as noted.

Menu_Settings_Table.doc

Group

Item

Settings

(

Defaults are set in


bold italic

)

Symbol Sets
(ML390/391 Series
printers only)

Code Page

USA

Canada French, Multilingual, Portugal, Norway, BRASCII,

Abicomp, Multilingual 858, ISO 8858-15

Top Feed

Form Tear-off

Form Tear-off only appears when an optional Roll Paper Stand is
installed.

OFF

, 500 ms, 1 sec, 2 sec

Set-Up

CSF Bin Select

CSF Bin Select only appears when an optional Dual Bin Cut Sheet Feeder
is installed.

Bin 1

, Bin 2

CSF Type

CSF Type only appears when an optional Cut Sheet Feeder is installed.

Wide

, Narrow

ESC SI Pitch

17.1 CPI

, 20 CPI

Serial I/F

Serial I/F only appears when an optional Serial Interface board is installed.

Parity

None

, Odd, Even

Serial Data 7/8 Bits

8 Bits

, 7 Bits

Protocol

Ready|Busy

, X-ON/X-OFF

Diagnostic Test

No

, Yes

BusyLine

SSD -

, SSD +, DTR, R TS

Baud Rate

9600

, 4800, 2400, 1200, 600, 300, 38400, or 19200 BPS

38400 BPS is displayed only when an optional serial interface board with
38400 firmware is installed.

DSR Signal

Valid

, Invalid

DTR Signal

Ready on Power Up

, Ready on Select

Busy Time

200 ms

, 1 sec

CSF Bin 1

CSF Bin 1 only appears when an optional Cut Sheet Feeder is installed.

Line Spacing

6 LPI

, 8 LPI

Bottom Margin

Valid

, Invalid

Page Width

13.6"

, 8"

The setting for Page Width affects both Bin 1 and Bin 2.
On a wide-carriage printer (321, 391), when Page Width is set to 8", the
printer prints 8" wide lines, not the full width of the printer.

Page Length

11"

, 11 2/3", 12", 14", 17", 3.5", 4", 5.5", 6", 7", 8", 8.5"

CSF Bin 2

CSF Bin 2 only appears when an optional Dual Bin Cut Sheet Feeder is installed.

Line Spacing

6 LPI

, 8 LPI

Bottom Margin

Valid

, Invalid

Page Length

11"

, 11 2/3", 12", 14", 17", 3.5", 4", 5.5", 6", 7", 8", 8.5"

Содержание ML521

Страница 1: ...ew 1 General Information 2 What You Should Receive 2 What You Will Do 3 What You Need to Know 4 Product Changes 4 Locations of Items 5 CSF Cut Sheet Feeder 5 Menu Settings Table 6 Physical Setup 7 Cus...

Страница 2: ...line documentation network information for network printers and printer drivers This version CD includes common model User Manual Documentation If you have a ML320T you can use the ML320T n User docu...

Страница 3: ...USB Installation Before you use your USB port you will Step 1 Connect to the USB Port Step 2 Install a USB port driver only in Windows 98 or Windows Me Step 3 Install the printer driver s 4 Network I...

Страница 4: ...ork card The steps you use to install your printer vary according to your type of printer stand alone or network operating system Product Changes The product has changed since the publication of the d...

Страница 5: ...bin and a dual bin The Menu Groups you will see when working with the menu depend on which version of the option you install with your printer The difference between a printer with a USB port and a p...

Страница 6: ...when an optional Dual Bin Cut Sheet Feeder is installed Bin 1 Bin 2 CSF Type CSF Type only appears when an optional Cut Sheet Feeder is installed Wide Narrow ESC SI Pitch 17 1 CPI 20 CPI Serial I F S...

Страница 7: ...okidata com Top of Form TOF If you turn the platen knob when the printer is turned on you will cause the Top of Form to mis align Always turn the printer off before turning the platen knob The factory...

Страница 8: ...carton in case you ever need to ship or transport the unit 2 Remove the shipping restraints and tape 32T 17b eps 32T 16b eps 32T 07A eps arrows eps and arrows eps 3 Install the ribbon 32t 19dn eps 4...

Страница 9: ...r see the instructions provided with the pull push tractors To load rear feed continuous forms paper 1 Grasp the tabs and lift off the paper separator 32T 23A eps and arrows eps 2 Load the paper on th...

Страница 10: ...aper width selection in the printer menu is set to 8 5 inches Otherwise printing on the platen may damage the printer Refer to the Printer User s Guide Using Your Printer Menu Mode Explanations of Men...

Страница 11: ...ou will use to install your printer Install_Page_refs_Table doc Non USB USB 98 Me NT 2000 XP NT 98 ME 2000 XP ML320T 1T p 12 p 12 p 12 p 13 p 13 N A p 14 p 14 p 16 p 17 ML320Tn 1Tn p 12 p 12 p 12 p 13...

Страница 12: ...e Reference Manual and my okidata com To learn more about a selection move your cursor over it 9 Select Printer Software 10 At the next prompt you select the components drivers and documents you wish...

Страница 13: ...rivers Printer Model Operating System Language Items in brackets will vary according to your system requirements 16 Click Open 17 The next screen confirms your selection 18 Click Okay 19 You should se...

Страница 14: ...river for your device Click Next 9 Select CD ROM and specify the location 10 Click Next to begin the search Verify that the CD ROM is inserted 11 Windows finds the driver OKI USB Driver and is ready t...

Страница 15: ...line documents are provided on the CD ROM To access these items insert the CD ROM into your computer s CD drive Click Start Run browse to your CD ROM drive and open install exe 27 Move through the pr...

Страница 16: ...to your CD ROM drive then Drivers Printer Model Operating System Language Items in brackets will vary according to your system requirements 11 ClickOK 12 The files are copied 13 Select Install one of...

Страница 17: ...hardware Step 2 Install the Printer Driver s 6 Insert the CD ROM provided with your printer 7 The printer is detected The Found New Hardware Wizard appears 8 Select Install from a list or specific loc...

Страница 18: ...ur computer s CD drive Click Start Run browse to your CD ROM drive and open install exe 15 Move through the prompts until the main Menu Install screen appears Several selections are available Printer...

Страница 19: ...fy it operates 2 Local Printer Installation Install your printer as a local printer 3 Network Installation Install your printer as a network printer 4 Product Registration The network configuration is...

Страница 20: ...today Registering Your Printer You can register your printer by visiting our website athttp www okidata com Click on Product Registration using the OKI Menu Installer 1 Insert the CD ROM provided wit...

Отзывы: