


- 92 -
3. Basic Operations
•
•
Entering with the Numeric Keypad
Entering with the Touch Panel
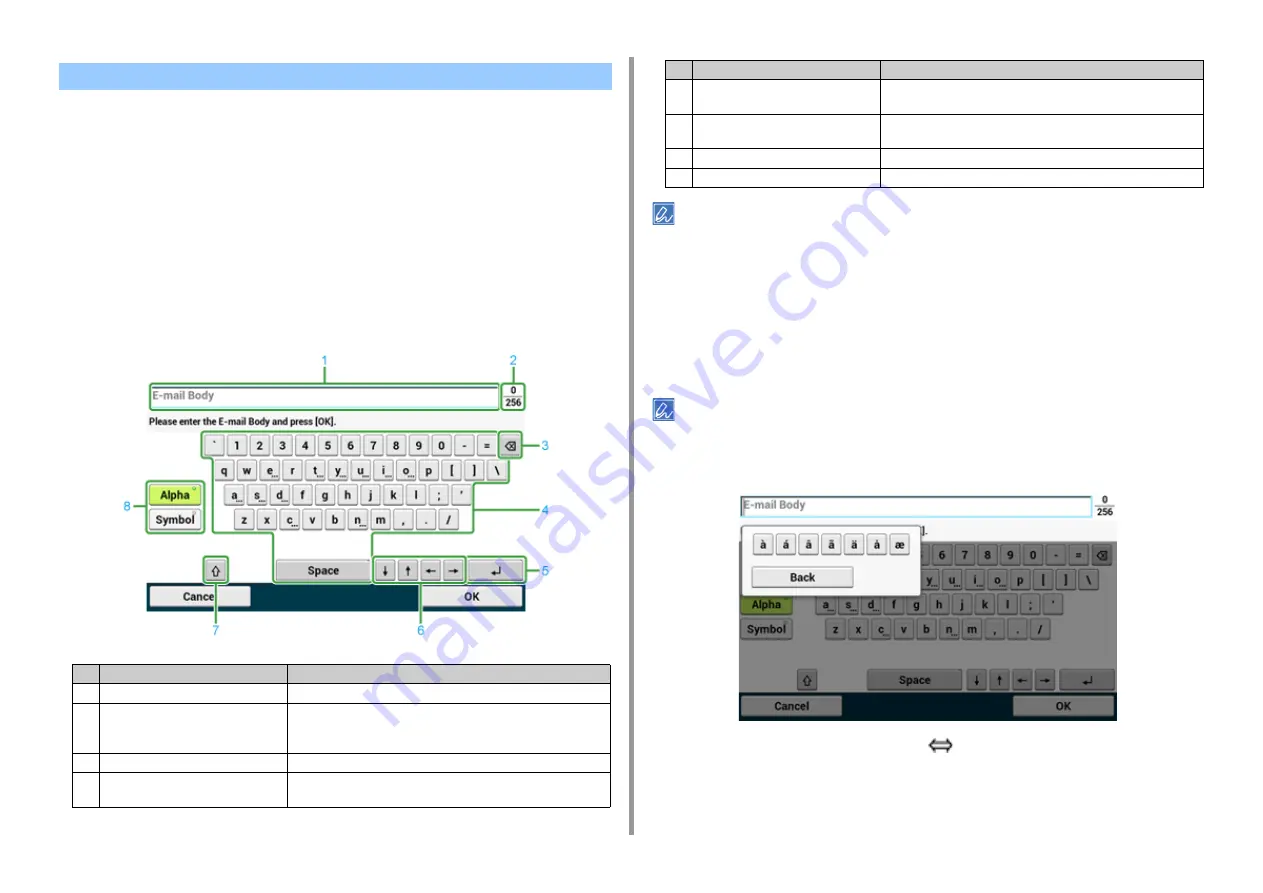
When you need to enter characters while you are setting an item, the following entry screen
is displayed.
You can enter uppercase and lowercase alphabets, numbers, and symbols.
• About the entry screen
The number of buttons in the entry screen differs depending on the input.
The QWERTY keyboard set by default can be switched to the AZERTY keyboard. To switch to the AZERTY keyboard,
select [Manage Unit] > [Keyboard Layout] > [AZERTY] on the touch panel.
• Entering Characters
1
Press the touch panel.
2
When the entry is complete, press [OK] or [Next].
To enter a diacritical mark, press and hold a character button with [...] shown. When a diacritical mark appears, press
the character you want to enter.
The screen below shows an image when holding down the "a" button.
• Switching the Entry Mode (Numbers
Alphabetic Characters)
1
Press [Alpha] or [Symbol].
Entering Characters
Item
Description
1
Text entry field
Displays the entered characters.
2
The number of entered characters/the
maximum number of characters that
can be entered
Indicates the maximum number of characters that can be entered
and the number of entered characters.
3
Back Space button
Deletes a character just before the cursor.
4
Character panel
Enters characters.
The character type switches depending on the entry mode.
5
Return button
Puts a line break. This button appears when entering body text of an
E-mail.
6
Left button/right button/up button/down
button
Moves the cursor left, right, up, or down.
7
Capital Lock
Switches between the uppercase and lowercase characters.
8
Entry mode button
Switches the entry mode (types of characters) for entering text.
Item
Description
Содержание MC573dn
Страница 1: ...MC573 ES5473 MFP User s Manual...
Страница 12: ...12 1 Before starting ENVIRONMENTAL INFORMATION...
Страница 17: ...17 2 Setting Up Side view when the additional tray unit is installed...
Страница 22: ...22 2 Setting Up 13 Hold the handle B to close the scanner unit...
Страница 35: ...35 2 Setting Up 1 Plug the power cord into the power connector 2 Plug the power cord into the outlet...
Страница 41: ...41 2 Setting Up 7 Replace the paper cassette into the machine Push the paper cassette until it stops...
Страница 80: ...80 2 Setting Up 10 Click Complete 11 Click Next If the following dialog is displayed click Yes...
Страница 108: ...4 Copy Copying Cancelling Copying Specifying the Number of Copies Descriptions of Screens for Copy...
Страница 132: ...132 6 Print 5 Change the settings in each tab to suit your needs 6 Click OK 7 Click Print on the Print screen...
Страница 145: ...7 Fax Basic Operations of Fax Functions Setting for Receptions Descriptions of Screens for Fax...
Страница 148: ...148 7 Fax A fax that is being sent is displayed on the top of the list 5 Press Yes on a confirmation screen...
Страница 227: ...46472402EE Rev5...


