background image


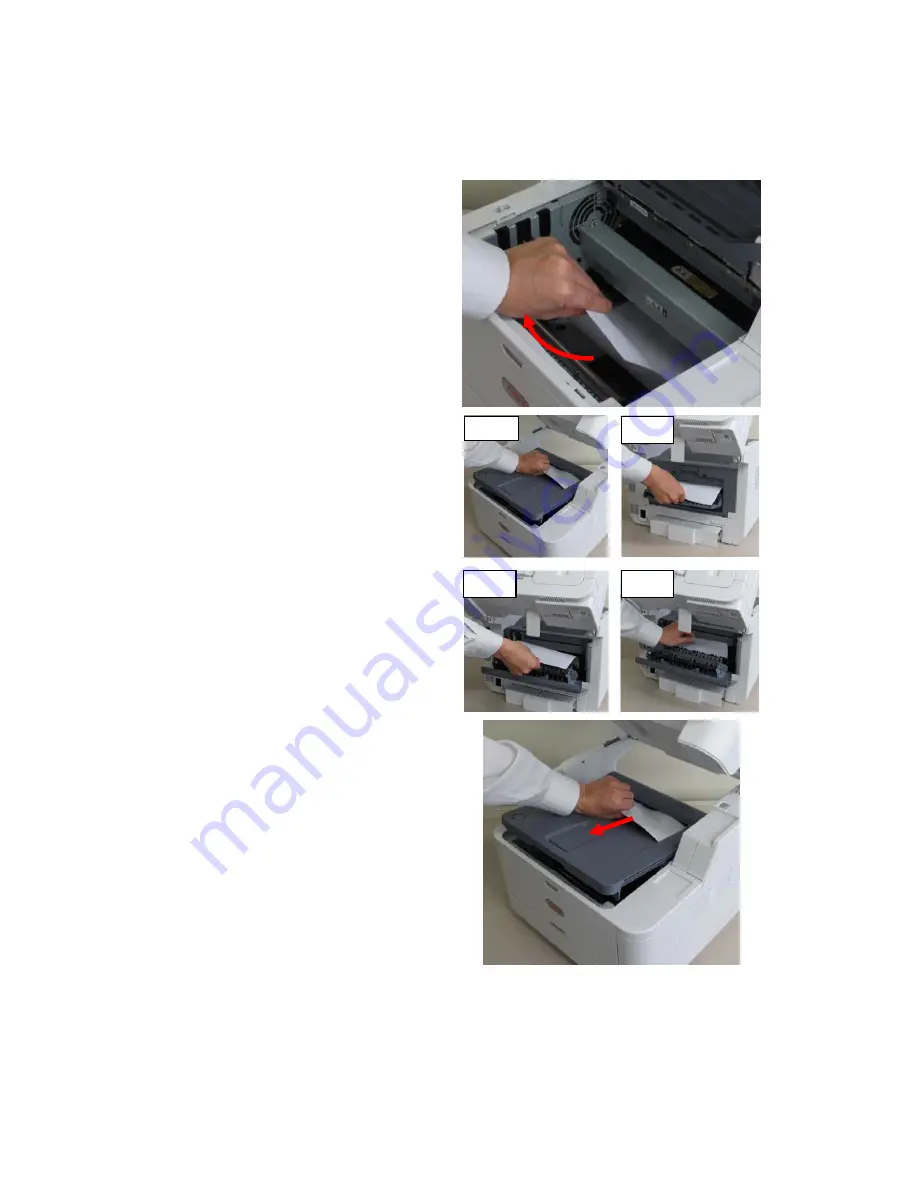
Paper discharge unit (Paper jammed)


If the bottom end of paper is visible in 

the printer, hold and pull out the paper 

carefully.


If the bottom end of paper is not visible 

but the leading edge is visible at the 

paper discharge unit, hold the top end of 

paper and pull out the paper carefully.  
If you cannot remove the paper by 

following Steps (A)1 and (A)2, pull out 

the paper by following Steps (B) 1 and 

(B)2. 
If you have failed to remove jammed 

paper, follow the steps below. 


Reinstall the image drum cartridge and 

toner cartridge assembly into the printer, 

(Step 9 in the previous section) and 

close the top cover. 
Turn the printer Power switch ON. 
When the motor starts to rotate, hold the 

top end of paper and gently pull out the 

paper. 

NOTE: 


If paper jams when you load it, 

check to see that no paper has 

been left in the paper feed path. 

Remember that you can clear the 

alarm display only after you have 

opened the top cover first and then 

closed it again. 


(A) 2 

(A) 1 

(B) 1 

(B) 2 

MB 461 - 471 - 491

Page 7

Clearing Paper Jams

Содержание MB461MFP

Страница 1: ...Clearing Paper Jams MB461 MB471 MB491 Rev 1 1 April 19 2012...

Страница 2: ...unit ALWAYS Turn the Unit Off and let it sit for several minutes as the fuser stays hot for several minutes after the machine is powered off Be very careful when working around the fuser Remove the pa...

Страница 3: ...he top cover 4 Carefully lift out the image drum and toner cartridge as an assembly Be careful not to touch or scratch the green drum surface 5 Remove the Duplex unit by raising the colored handles on...

Страница 4: ...is no paper remaining inside the machine 7 Replace the duplex unit When replacing the Duplex unit into the printer insert the 2 legs on the front sides of Duplex unit into holders of the printer 8 Sec...

Страница 5: ...as an assembly NOTE Make sure that the drum grounding pegs on each side of the drum slide into the slots on each side of the printer frame 10 Close the top cover Close the scanner unit 11 Power the un...

Страница 6: ...hold the paper top end and carefully pull out the paper 3 If neither the top or bottom end of paper is visible move the jammed paper in the arrow direction as shown Hold the top end of paper with both...

Страница 7: ...If you have failed to remove jammed paper follow the steps below 7 Reinstall the image drum cartridge and toner cartridge assembly into the printer Step 9 in the previous section and close the top co...

Страница 8: ...e that there are no pieces of paper left in the unit 3 Reinstall the paper tray into the machine 4 Remove any documents from the scanner s document tray and lift the scanner unit 5 Press the top cover...

Страница 9: ...Open the ADF cover and gently pull the document up and out When you can see the document Inside the ADF 1 Remove any documents from the document tray Open the ADF cover Hold the jammed document by th...

Страница 10: ...t the paper guide and then pull out the document Close the paper guide 3 If the edge of the document cannot be seen in the ADF lift the document tray and then pull out the document Close the document...

Отзывы: