background image

MB260

- 34 -

8 - PC Featu

res

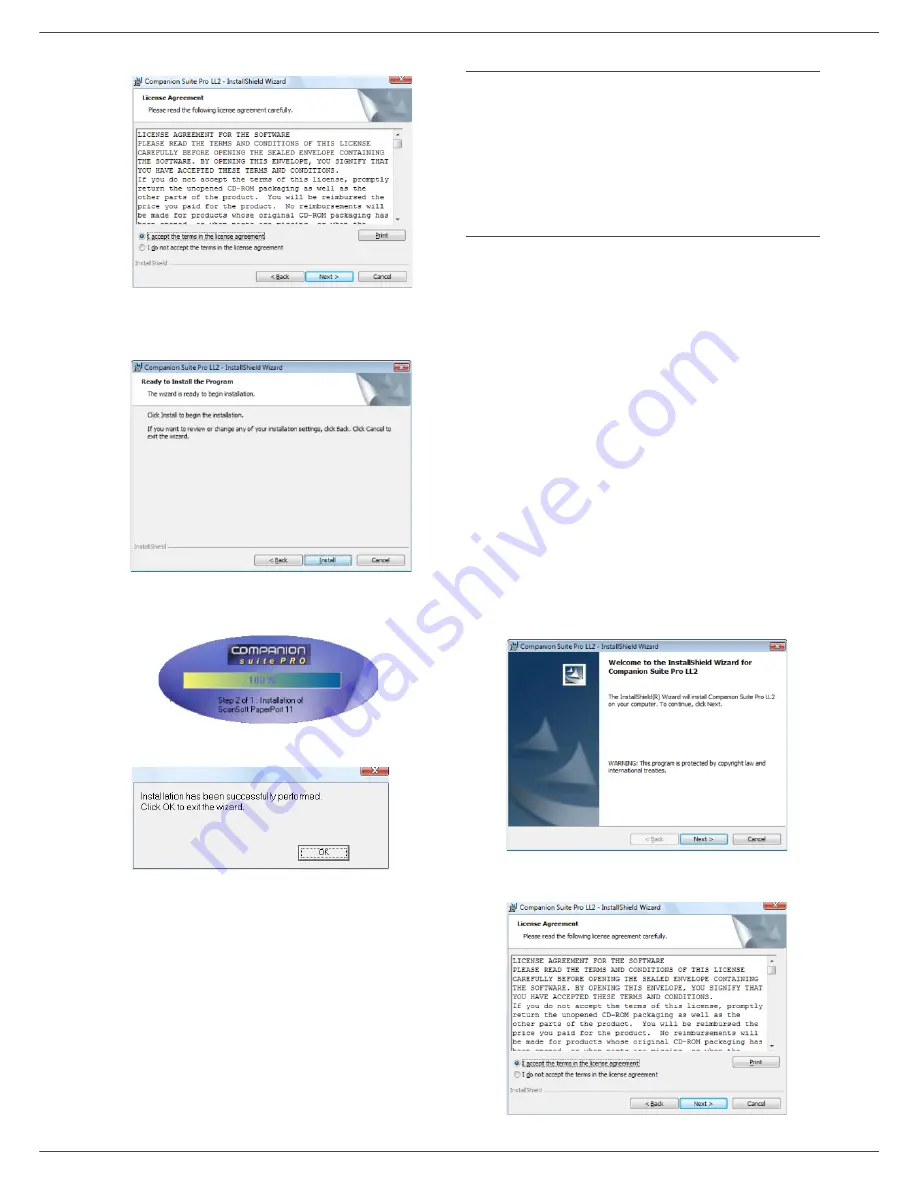
license agreement.

8

Click on the 

N

EXT

 button.

9

The final installation is ready to be executed. Click 
on the 

I

NSTALL

 button.


The following screen appears to indicate the 
progression of the installation.

10

Click on 

OK

 to finish the installation.

Your Companion Suite Pro kit is successfully installed on 
your PC.

You can now connect your multifunction machine, refer to 
paragraph 

Connections

, page 36.

You can start the multifunction machine's management 
software from the menu 

S

TART

 > A

LL

 P

ROGRAMS


> OKIDATA > C

OMPANION

 S

UITE

 P

RO

 LL2 

> C

OMPANION

 D

IRECTOR

 or by clicking on the icon 

C

OMPANION

 - D

IRECTOR

 located on your desktop.

Installing drivers only

This section describes the following installation 
procedures:

installation of drivers using the Companion Suite Pro 
software,

manual installation of drivers.

Installing the drivers using the Companion Suite 
Pro software

Turn your PC on. Open an account session with the 
administration rights.

1

Open the CD-ROM drive, insert the installation CD-
ROM and close the drive.

2

An installation procedure is automatically run (Auto 
run). If it does not, double-click on setup.exe at the 
CD-ROM's root.

3

A screen titled 

C

OMPANION

 S

UITE

 P

RO

 LL2


appears. This screen allows you to install and 
uninstall the software, access the product's user 
guides or browse the CD-ROM contents.

4

Place your cursor on 

I

NSTALL


PRODUCTS

 and 

confirm with left-click of the mouse.

5

The Products Installation screen appears.


Place your cursor on 

C

USTOMIZED

 and confirm by 

left-click with the mouse.

6

Place your cursor on 

C

OMPANION

 S

UITE

 P

RO

 LL2


and confirm with left-click of the mouse.

7

The welcome screen appears. Click on the 

N

EXT


button to launch the installation of the Companion 
Suite Pro kit on your PC.

8

To continue, you need to accept the proposed 
license agreement.

Содержание MB 260

Страница 1: ......

Страница 2: ...ave documents through your PC If you have a WLAN adaptor optional you can communicate with a personal computer wirelessly WLAN is an optional working only with a specific adaptor that you can obtain from your retailer You will find further information on our website http www okiprintingsolutions com Thanks to its navigator and its multitask access it is powerful user friendly and easy to use The M...

Страница 3: ...olution setup 19 Zoom setup 19 Analysis origin setup 20 Contrast setup 20 Brightness setup 20 Paper type setup 20 Paper tray selection 20 Flat bed analysis margins setup 20 Left and right printing margins setup 20 Top and bottom printing margins setup 21 Format paper setup 21 Parameters Setup 22 Language 22 Technical Parameters 22 Printing the functions guide 22 Print the list of setups 22 Lock th...

Страница 4: ...inting in duplex mode with the multifunction machine 40 Software Uninstallation 41 Uninstall the software from your PC 41 Uninstall the drivers from your PC 41 Uninstall the drivers using the Companion Suite Pro software 41 Uninstall the drivers manually 41 Maintenance 43 Service 43 General information 43 Toner cartridge replacement 43 Issues with smart cards 44 Cleaning 44 Scanner reading system ...

Страница 5: ... trademarks of Microsoft Corporation Other product names and brand names are registered trademarks or trademarks of their proprietors Laser Safety Information CAUTION Use of controls adjustments or performance of procedures other than those specified in this guide may result in hazardous light exposure This equipment complies with international safety standards and is classified as a Class 1 Laser...

Страница 6: ... cause serious eye damage Safety precautions and interlock mechanisms have been designed to prevent any possible laser beam exposure to the operator For North America CDRH Regulations This equipment complies with the FDA performance standards for laser products except for deviations pursuant to Laser Notice No 50 dated 24 June 2007 and contains 1 class 3B laser diode 10 72 milliwatt 770 795 nanome...

Страница 7: ...warning labels at the positions shown below For your safety you must never touch these surfaces when you remove a paper jam or when you replace the Toner cartridge Symbols for the main power switch In accordance with IEC 60417 this machine uses the following symbols for the main power switch means POWER ON means POWER OFF ...

Страница 8: ...nt or relocate the receiving antenna 2 Increase the separation between the equipment and receiver 3 Connect the equipment into an outlet on a circuit different from that to which the receiver is connected 4 Consult the dealer or an experienced radio TV technician for help Declaration of Conformity This device complies with Part 15 of the FCC Rules Operation is subject to the following two conditio...

Страница 9: ...MB260 5 1 Preface Environmental Information Software use license Environmental Information ...

Страница 10: ...of them This license will automatically be canceled in case you do not respect the terms of this license If the license is rendered invalid you agree to destroy all copies of the program and the associate documentation Warranty The Software is provided as is with no warranties what so ever whether expressed or implied including without limitation any warranties of merchantability or fitness for a ...

Страница 11: ...e Systems Incorporated PaperPort11SE is a registered trademark of ScanSoft Microsoft Windows 2000 Microsoft Windows Server 2003 Microsoft Windows XP Microsoft Windows Vista and any other Microsoft product referred to here are registered trademarks of Microsoft Corporation registered and or used in the United States and or in other countries All the other brands or products referred to as examples ...

Страница 12: ...on below describes the precautions to be taken when using the machine Never turn the machine off and never open the lids while printing Never use gas or flammable liquids or objects generating magnetic field close to the machine When you unplug the power cord always hold the connector without pulling the cord A damaged cord presents a potential fire hazard or an electric shock hazard Never touch t...

Страница 13: ...hing into the product You suspect that your product needs service or repair Your product s cover has been damaged Do not incinerate spilled toner or used toner Toner dust might ignite when exposed to an open flame Disposal can take place at our authorised dealer or at appropriate collection sites Dispose of the used toner cartridge or bottle in accordance with the local regulation CAUTION Protect ...

Страница 14: ...aper jams Adding paper in the pile must be avoided because it may cause double feeding When withdrawing the cassette from the main unit always support it with both hands to avoid dropping it If you use paper already printed by your machine or another printer the printing quality may not be optimal Handling of paper Curling must be corrected before printing Curls must not exceed 10 mm Care must be ...

Страница 15: ...g these notes could result in moderate or minor injury or damage to the machine or to property Be sure to read these notes Refer to the security notices presented in the Safety booklet Important Indicates points to pay attention to when using the machine and explanations of likely causes of paper misfeeds damage to originals or loss of data Be sure to read these explanations Note Indicates supplem...

Страница 16: ...m cover 3 Power supply cord connection 4 On Off switch 5 Slave USB connection for PC 6 Master USB connection USB key 7 Manual paper feed setup guides 8 Manual input tray 9 Paper tray 10 Cartridge access cover 11 Fold down stopper for paper delivery 12 Paper output 13 Smart card insertion point ...

Страница 17: ...d select 51 FUNCTIONS LIST Confirm with OK To print the functions list with the shortcut method 1 Press 2 Enter 51 with the numerical keypad to directly print the functions list 1 Screen 2 Digital keypad 3 Key document analysis to the PC or a media USB key 4 Key local copy 5 Key stops the current PC print job 6 Key Validation 7 Key OK confirms the displayed selection 8 Key menu access and navigati...

Страница 18: ...pecting the security notices stated at the beginning of this booklet 3 Remove all stickers from the machine 4 Remove the plastic protection film from the screen Feed cassette paper insertion Your device accepts a number of formats and types of papers refer to the paragraph Specifications page 47 1 Remove the paper feed cassette completely 2 Push the lower panel down until it clicks Important Befor...

Страница 19: ... Cartridge installation 1 Stand in front of the machine 2 Push the left and right sides of the cover and pull it towards you at the same time 3 Unpack the new cartridge Gently roll the cartridge 5 or 6 times to distribute the toner evenly inside the cartridge Thoroughly rolling the cartridge will assure the maximum copies per cartridge Hold it by its handle 4 Insert the cartridge in its slot by pu...

Страница 20: ...n be fed at a time 1 Spread the manual feed guides to the maximum 2 Insert a sheet or an envelope in the manual input tray 3 Adjust the paper guides against the right and left edges of the sheet or the envelope 4 Print making sure that the chosen paper format corresponds to the selected format on the printer refer to Copy page 18 Use of envelopes Feeding can be done only through the manual feed Re...

Страница 21: ...t envelope by pressing the folding line of four edges properly after releasing air inside Set envelope in a proper position after aligning in case it is bent or warped Paper conditioning is not allowed And it should be used under normal office environment ...

Страница 22: ...to 4 or 1 page to 9 Confirm with the OK button 6 Adjust the desired zoom level from 25 TO 400 with the buttons or confirm with the OK button only available in 1 Page to 1 copy mode 7 Adjust the desired origin values with the digital keyboard buttons or then confirm with the OK button 8 Choose the resolution depending on the printing quality that you want AUTO TEXT QUALITY TEXT or PHOTO with the bu...

Страница 23: ... setup The RESOLUTION parameter allows you to setup the photocopy resolution 841 ADVANCED FCT COPY RESOLUTION 1 Press enter 841 using the keypad 2 Choose the resolution with the buttons or according to the following table 3 Confirm your choice by pressing the OK button 4 Quit this menu by pressing the button Zoom setup The ZOOM parameter allows you to reduce or enlarge an area of a document by cho...

Страница 24: ... button 4 Quit this menu by pressing the button Paper tray selection The Automatic selection can have two meanings depending on the paper format defined on the paper trays The following table describes the different cases 852 ADVANCED FCT SCAN PRINT TRAY PAPER 1 Press enter 852 using the keypad 2 Select the default paper tray to use AUTOMATIC or MANUAL with the buttons and 3 Confirm by pressing th...

Страница 25: ... you to define the default paper format of the manual tray and the main tray You can also setup the default scanning width 857 ADVANCED FCT SCAN PRINT PAPER FORMAT 1 Press enter 857 using the keypad 2 Select the paper tray for which you want to define a default paper format with the buttons and 3 Confirm by pressing the OK button 4 Choose the paper format with the buttons or according to the follo...

Страница 26: ...setups starts Lock the machine This function prevents non authorized people from accessing the machine An access code will be required every time someone wants to use the device After each use the device will lock automatically Before that you have to enter a lock code 811 ADVANCED FCT LOCK LOCKING CODE 1 Press enter 811 using the keypad Parameter Signification 8 Eco energy Choosing the printer st...

Страница 27: ...unters for your machine at any time According to your needs you can read the counters for scanned pages printed pages Scanned pages counter To view the number of pages scanned on your machine 823 ADVANCED FCT COUNTERS SCANNED PAGE 1 Press enter 823 using the keypad 2 The number of scanned pages appears on the screen 3 Quit this menu by pressing the button Printed pages counter To view the number o...

Страница 28: ...mber on the numeric keypad 1 to 100 8 Confirm with OK 9 Choose the number of copies you want by entering a number from 1 to 9 on the numeric keypad 10 Confirm with OK The number of copies of the grid requested is printed Print the solution to a grid 522 PRINT SUDOKU PRT SOLUTION 1 Press enter 5 using the keypad Confirm with OK 2 Select SUDOKU using the or button 3 Confirm with OK 4 Select PRT SOLU...

Страница 29: ...ne into a radio network WLAN 1 Configure the network to your PC 2 Set up the parameters for your machine so that it can function in a network 3 Having set up the parameters for your device install the Companion Suite Pro software onto your PC with the necessary printer drivers Once the machine is incorporated into a WLAN network you can from your PC print documents on the multifunction machine fro...

Страница 30: ...EL appears enter a figure between 1 and 13 1 to 11 for the US and confirm with OK 7 Select your encryption method OFF WEP or WPA and confirm with OK If you choose WEP enter the WEP key that you are using on your network If you choose WPA enter the WPA or WPA2 key that you are using on your network Note You can be sure of perfect communication if you use an approved adaptor in conjunction with your...

Страница 31: ...using the keys or and confirm with OK 2 Select WLAN using the keys or and confirm with OK 3 Select PARAMETERS using the keys or and confirm with OK 4 Select GATEWAY using the keys or and confirm with OK 5 The number of your gateway will appear in the format 000 000 000 000 Enter the new gateway for your machine in the format displayed and confirm with OK 6 Exit this menu by pressing the key 2825 S...

Страница 32: ...r to the paragraph Software installation page 33 An example of how an AD HOC network may be set up An example of how to configure an Ad hoc network without security protection using the following parameters network name house radio type ad hoc channel 1 PC s IP address 169 254 0 1 PC s subnetwork mask 255 255 0 0 PC s gateway 0 0 0 0 IP address of the multifunction machine 169 254 0 2 subnetwork m...

Страница 33: ...twork house once this has been detected 5 Now set up the WLAN network connection of your PC To do this you must configure the element Protocol Internet TCP IP for the WLAN connection that has been created If this element is set up in such a way as to obtain an IP address automatically you must change it to manual mode to set up the TCP IP address 169 254 0 1 in our example the subnet mask 255 255 ...

Страница 34: ...respecting the insertion way MEDIA ANALYSIS appears on the screen 2 Select PRINT DOC with the or buttons and confirm with OK 3 Select FILE with the or buttons and confirm with OK 4 You have three possibilities to print your files ALL to print all the files located in the USB memory key Select ALL with the or buttons and confirm with OK The printing is started automatically SERIES to print a series...

Страница 35: ...y key Select with the or buttons the file to delete and confirm with OK A star appears on the left side of the file Repeat this step for each file you want to delete Press the button You come back to the previous menu 5 Quit this menu by pressing the button Analyse the USB memory key content After a period of inactivity your machine will return to the main menu To view the USB memory key again ple...

Страница 36: ...the picture will be saved in TIFF format COLOUR the picture will be saved in JPEG format You can choose the image resolution that will be digitized to the USB memory key the default resolution is AUTO Press the button several times and select the resolution you require Scanning in BLACK WHITE icon text resolution icon photo resolution no icon auto resolution Scanning in COLOUR icon text resolution...

Страница 37: ...of the Companion Suite Pro software installation of the drivers only Installing the full software package Turn your PC on Open an account session with the administration rights 1 Open the CD ROM drive insert the installation CD ROM and close the drive 2 An installation procedure is automatically run Auto run If it does not double click on setup exe at the CD ROM s root 3 A screen titled COMPANION ...

Страница 38: ...allation of drivers Installing the drivers using the Companion Suite Pro software Turn your PC on Open an account session with the administration rights 1 Open the CD ROM drive insert the installation CD ROM and close the drive 2 An installation procedure is automatically run Auto run If it does not double click on setup exe at the CD ROM s root 3 A screen titled COMPANION SUITE PRO LL2 appears Th...

Страница 39: ...e installation The Companion Suite Pro software is now installed on your PC You can now connect your multifunction machine refer to paragraph Connections page 36 Installing the drivers manually You can install the printer and scan drivers manually without running any setup software 1 Locate your USB cable connectors and connect as shown below on the picture 2 Power on your multifunction machine Th...

Страница 40: ... your multifunction machine The PC detects the device and the drivers are automatically installed 3 Once the installation is finished a message indicates that the drivers are installed correctly You can now use the multifunction machine to print or scan your documents Important It is recommended to install the Companion Suite Pro software first and then to connect the USB cable to your machine see...

Страница 41: ... presentation Run the application by clicking on the COMPANION DIRECTOR icon located on your desktop or from the menu START ALLPROGRAMS OKIDATA COMPANION SUITE PRO LL2 COMPANION DIRECTOR Utilities and applications activation The Companion Suite Pro graphical interface allows you to run the following utilities and software get HELP from the current documentation run the PAPERPORT software Doc Manag...

Страница 42: ...rop down menu 3 Select the desired scan RESOLUTION in the drop down menu 4 Click OK to confirm the new parameters Removing a device 1 Select the device from the list and click the minus sign or REMOVE button 2 To confirm the removal of the device click YES To cancel the removal click NO The device is no longer displayed in the list Display the consumable status The following information will be av...

Страница 43: ...cument from PaperPort 1 Click on FILE SCAN 2 Select the desired scanner 3 Customise the advanced properties of the digitisation by clicking on the ADJUST THE QUALITY OF THE SCANNED PICTURE link 4 Adjust the desired parameters and click on the OK button 5 Click on the SCAN button you can follow the ongoing digitisation on a screen Printing You have the possibility to print your documents via the US...

Страница 44: ...e printing 9 Even pages are printed on the other side of the sheets Once all pages are printed remove the explanation sheet CAUTION In manual duplex the print quality and paper transport are not guaranteed If some trouble occurred to the paper during the print of the first side such as wrinkle dog ear or staple do not use the paper for manual duplex When you load paper please true up the end of pa...

Страница 45: ...see paragraph Uninstall the drivers using the Companion Suite Pro software If you have installed the drivers manually see paragraph Uninstall the drivers manually Uninstall the drivers using the Companion Suite Pro software Run the programs removal from the menu START ALL PROGRAMS OKIDATA COMPANION SUITE PRO LL2 UNINSTALL 1 A confirmation screen appears Click on the YES button to continue the COMP...

Страница 46: ...DWARE DEVICE MANAGER or START CONTROL PANEL HARDWARE AND SOUND DEVICE MANAGER depending on the operating system 2 In the OTHER DEVICES sub menu select the OKI MB260 item and click on the right button of the mouse 3 Select UNINSTALL on the menu and left click with the mouse 4 Click on the OK button to confirm the removal 5 In the IMAGING DEVICES sub menu select the OKI MB260 item and right click wi...

Страница 47: ...he toner cartridge at any time before it reaches its end of cycle To replace the toner cartridge proceed as shown below 1 Insert the smart card provided with the new toner cartridge as shown on the picture below The following message appears 2 Press OK The following message appears 3 Stand in front of the device 4 Push on the left and right sides of the cover and pull it towards you 5 Raise and re...

Страница 48: ...ent Printer issues Error messages When the printer encounters any of the problems described below the corresponding message is shown on the machine display PLEASE WAIT NEW TONER REMOVE CARD PLEASE WAIT REMOVE CARD ALREADY USED PLEASE WAIT UNKNOWN CARD REMOVE CARD ACTION CANCELLED REMOVE CARD Message Action CHECK TONER Check the presence of a toner cartridge in the machine TONER NEAR END Indicates ...

Страница 49: ...on the connection to the PC the problem encountered during printing PC printing via USB connection PAPER JAM EXTERNAL TRAY CAUTION The fusion unit can reach a very high temperature during the operation To prevent any harm do not touch this area For details refer to Positions of Safety labels on the machine page 3 PAPER JAM REMOVE TONER Issue encountered Print request handling Paper empty Once the ...

Страница 50: ...r jam Paper format problem Toner empty The printing of the active document is cancelled Documents waiting to be printed however will be printed or Printing resumes from the first non printed page Pause requested from the spooler The machine switches to idle mode after a timeout 30 seconds by default The printing of the active document is cancelled Documents waiting to be printed however will be pr...

Страница 51: ...ending on used operating systems computer specifications software applications connection modes USB or WLAN paper formats as well as file types and sizes Preheating time 21 sec First page out time 13 sec Type Autonomous Black and White Copy speed 20 ppm maximum Resolution 600 dpi Multiple copies 99 pages maximum Zoom range 25 to 400 Type Colour scanner Colour depth 36 bits Resolution 600 dpi optic...

Страница 52: ...MB260 48 9 Maintenance Consumable specifications Reference paper Specifications are subject to changes for improvement without notice Scanner Inapa tecno SPEED A4 Printer Ricoh T6200 A4 ...

Страница 53: ...5 Website www okiprintingsolutions de info oki de 0 14 Minute aus dem dt Festnetz der T Com Stand 11 2008 Oki Systems Iberica S A C Teide 3 San Sebastian de los Reyes 28700 Madrid Tel 91 3431620 Fax 91 3431624 Atención al cliente 902 36 00 36 Website www oki es Oki Systems Finland Oy Kutomotie 18 B 5 Krs 00380 Helsinki Tel 358 0 9 5404 420 Fax 358 0 9 5404 4223 Website www oki fi Oki Systèmes Fran...

Страница 54: ...ki ua Website www oki ua OkiSistemveYazıcıÇözümleriTic Ltd Ști Harman Sokak No 4 Kat 6 34394 Levent Istanbul Tel 90 212 279 2393 Fax 90 212 279 2366 http www oki com tr www okiprintingsolutions com tr CPI S A Greece 1 Rafailidou str 177 78 Tavros Athens Tel 30 210 48 05 800 Fax 30 210 48 05 801 e mail sales cpi gr Website www cpi gr ...

Страница 55: ...07099701 iss 2 ...

Отзывы: